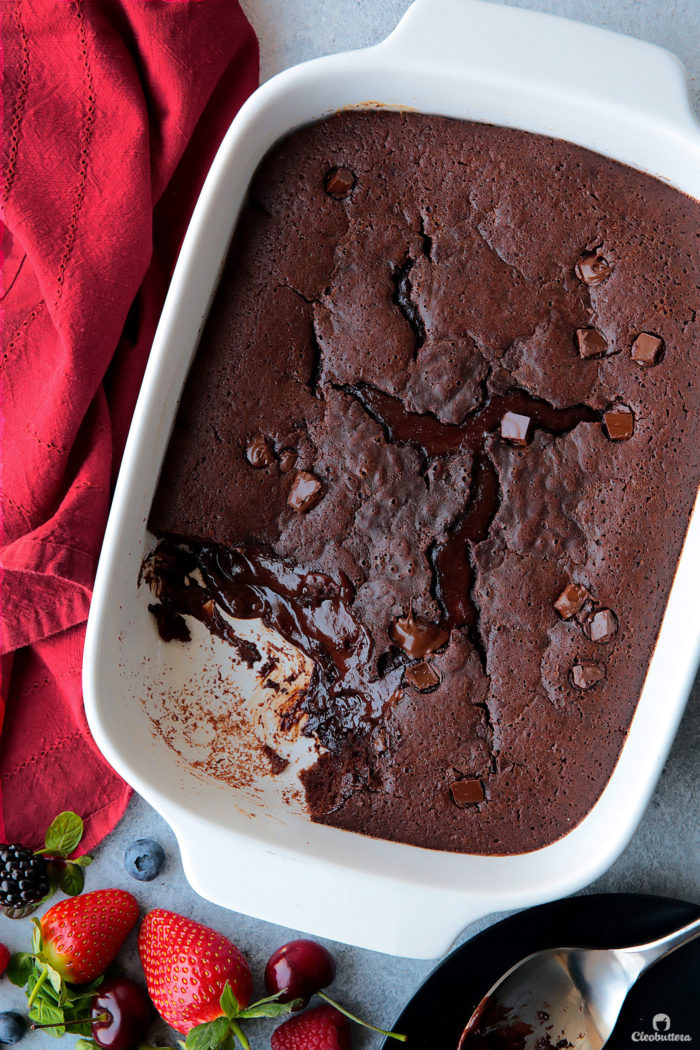
Hot Fudge Pudding Cake
A blown up version of my most popular recipe post of ALL time, the Molten Chocolate Mug Cake! This one feeds a crowd, is just as easy and every bit as delicious, with its fluffy, cake-y outside and molten, saucy inside.
If I’ve learned one thing from my 4 years of blogging, is that you guys LOVE a quick and easy chocolate fix.
This is not a random observation; but a sold fact backed by numbers and statistics.
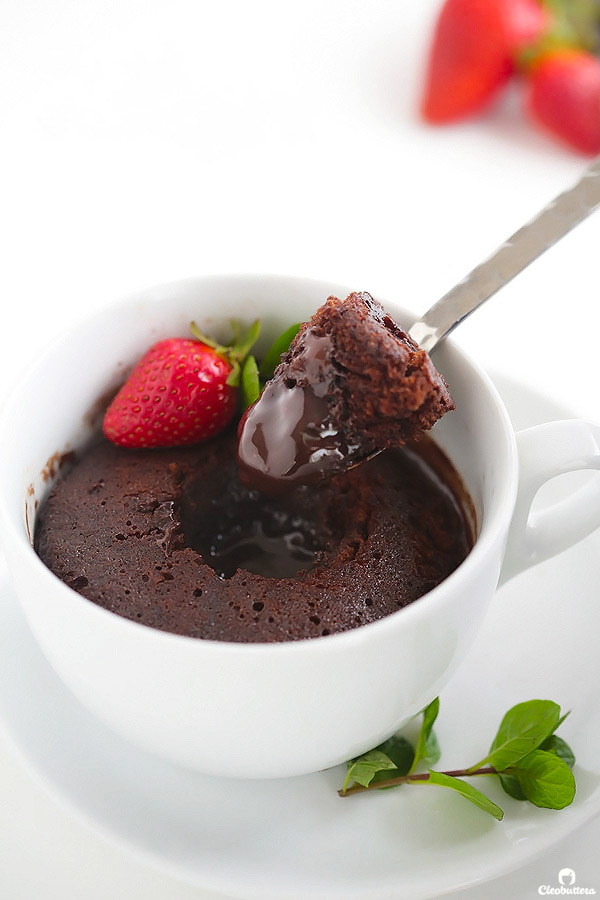
I wish I was kidding, but my analytics have been telling me over and over again that out of the hundreds of recipes I’ve shared with you, my far and beyond most popular post is a dead simple Chocolate Mug Cake baked in…wait for it: A microwave!!! Go figure!
Yes…this is the one ??
So I spend weeks and months testing and developing showstoppers like this Epic 12 Layer Chocolate Cake, and perfecting serious classics like those Cinnamon Rolls, and you leave all that and fall in love with a “microwave” cake that takes 5 minutes to make???!!!!
Seriously?! Please excuse me while I go mourn over my fried brain and reevaluate my recipes choices.
In all honesty though…I can’t blame you. Who can resist a stellar molten cake that comes together in less time it takes to make a grilled cheese sandwich?! It sure is one decadent chocolate emergency rescuer and a trusty go-to for when unexpected company shows up.
There was only one problem with the mug recipe though. It made only ONE. And judging by how you can’t get enough of the chocolate-y goodness…it seems that you wanted more!
I got asked so many times, how the cake can be adjusted to serve more people, because you weren’t thrilled by the idea of sharing your mug lol! I’ve also heard of fights breaking over that last bite. So in an attempt to bring peace back within family and friends, I have set out to come up with a solution that pleases everyone!
I have reworked the famous mug cake recipe in order to serve a crowd, without having to microwave individual mugs separately.
It’s still just as easy, just as quick to prepare and more importantly, just as delicious. With that signature soft, cake-y outside, pudding-like, molten-y inside marbled with melted chocolate, this blown up version is basically the mug cake you know and love, in giant form.
In fact, I almost named it Giant Mug Cake, but to avoid confusion since it certainly doesn’t look like a mug, I opted for a more familiar cake name: Hot Fudge Pudding Cake.
Because even though this cake is prepared using a slightly different method and is less sweet, it shares similar taste and textural characteristics of a good ol’ Hot Fudge Pudding Cake, and so Hot Fudge Pudding Cake it is!
What is Hot Fudge Pudding Cake?
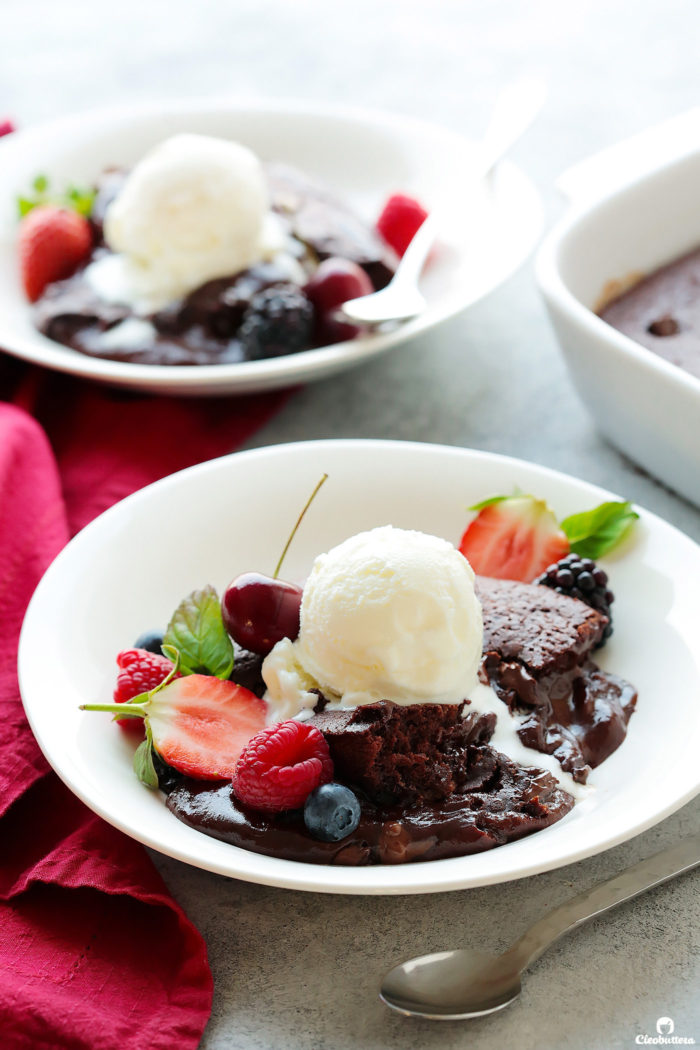
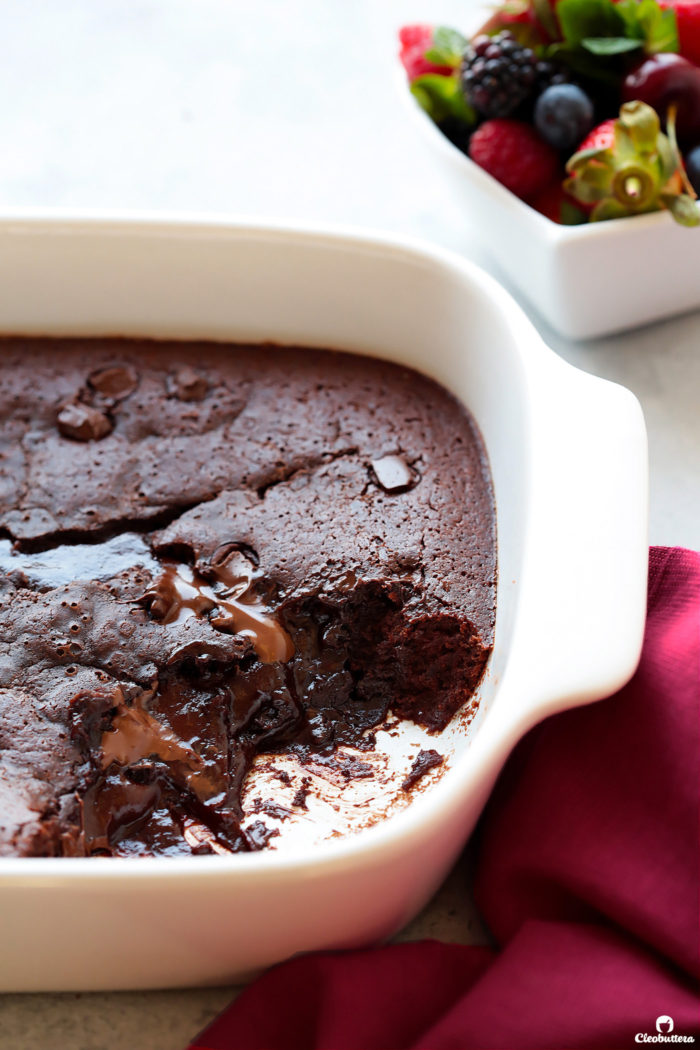
Hot Fudge Pudding Cake (aka chocolate cobbler) is a two-layered, self-saucing cake with a cake-y, fluffy outside and a pudding-style chocolate-y inside, reminiscent of hot fudge sauce. Served warm, and with a scoop of ice cream, it’s pure heaven.
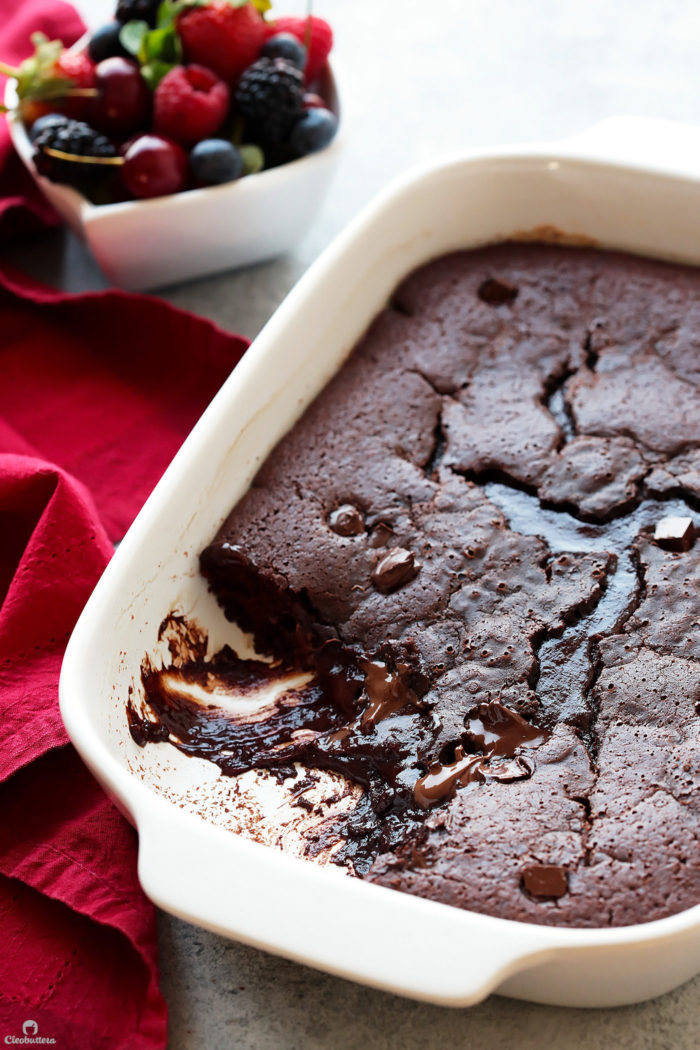
It comes together by spreading a fairly standard chocolate cake batter into a pan, topping it with a layer of sugar-cocoa mixture, then pouring water over the top. It looks like a child’s experiment gone wrong at this point, but then as the batter bakes, the cake rises to the top, magically switches places with the sugar-cocoa/water puddle, and develops an irresistible bottom of thick chocolate sauce.
So what’s the difference between standard Hot Fudge Pudding Cakes and this one?
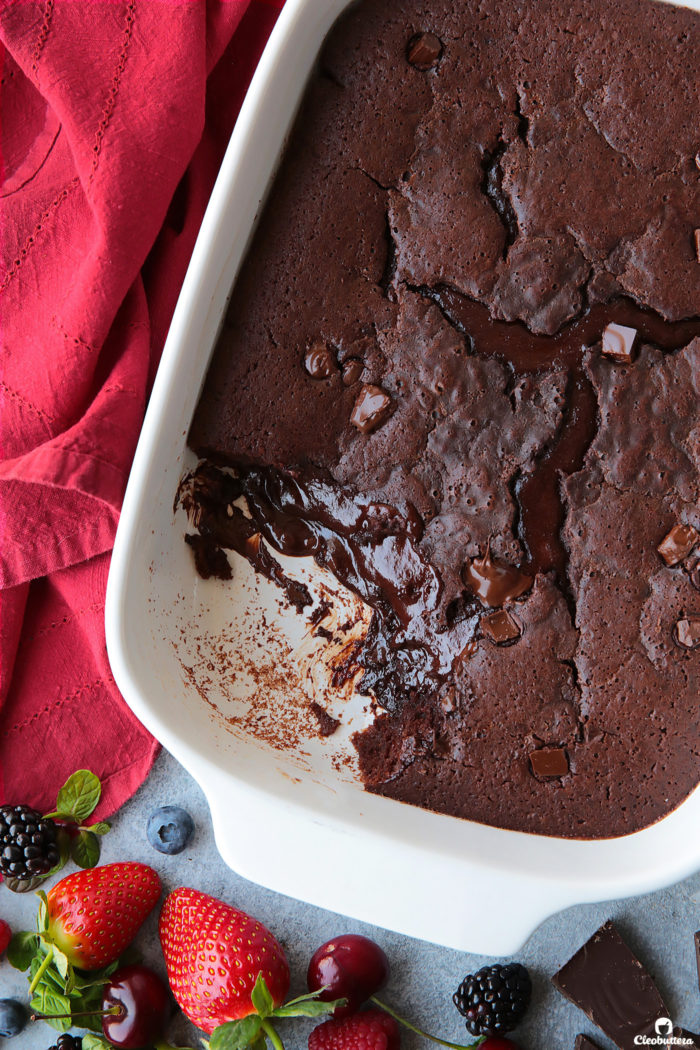
This cake is based on the ever-so-popular molten mug cake, which ditches the cocoa/sugar topping that is typically sprinkled over the cake, thus uses half as much sugar. Instead, the batter is topped with optional shards of semisweet chocolate for another dimension of chocolate flavor and extra gooiness. In my humble opinion, I find that this results in a less cloyingly cake with a more balanced sweetness profile and varying textures, while not compromising on that iconic saucy bottom.
Let’s make Hot Fudge Pudding Cake, the Molten Mug Cake way!
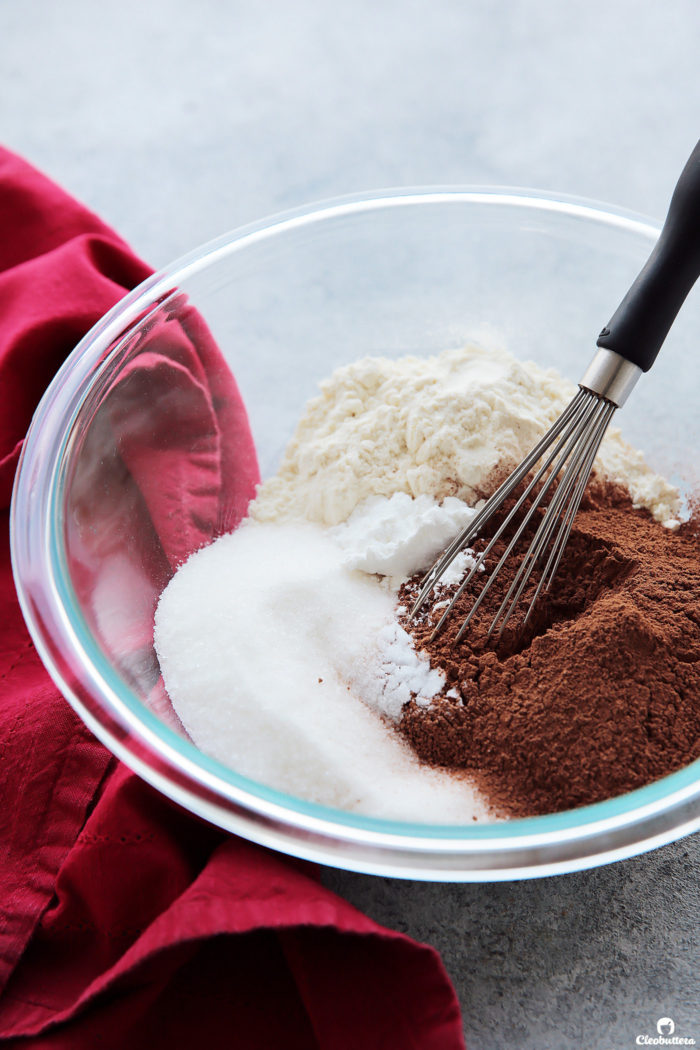
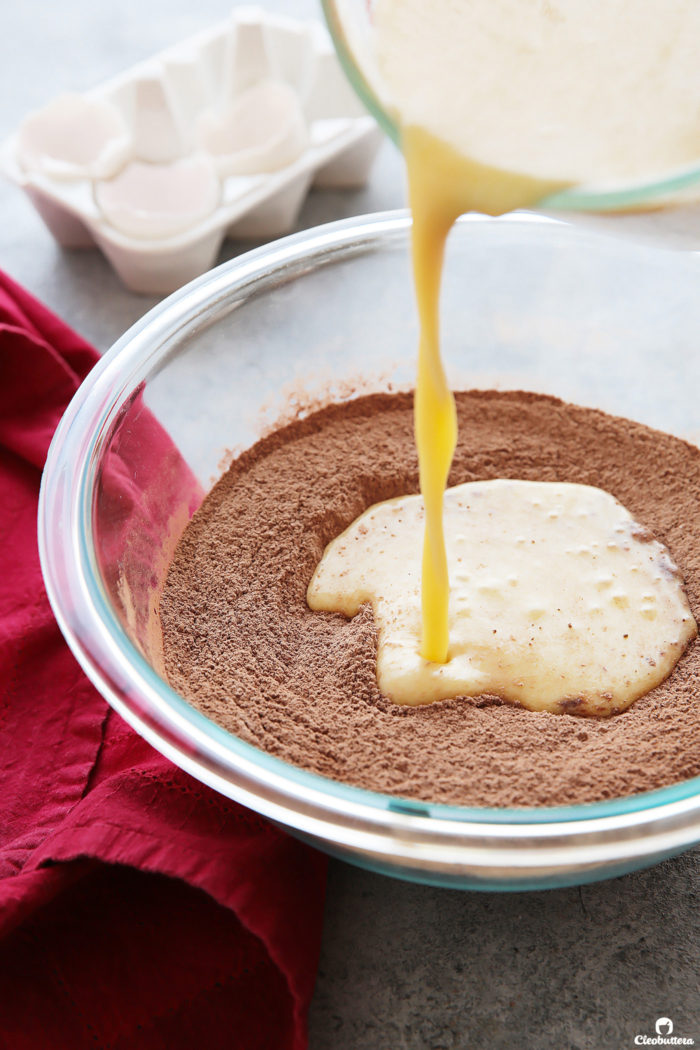
As promised, this cake comes together as easily as its mug cousin. All you need to do is whisk together your dry ingredients: flour, sugar, unsweetened cocoa powder, baking powder and salt, to combine.
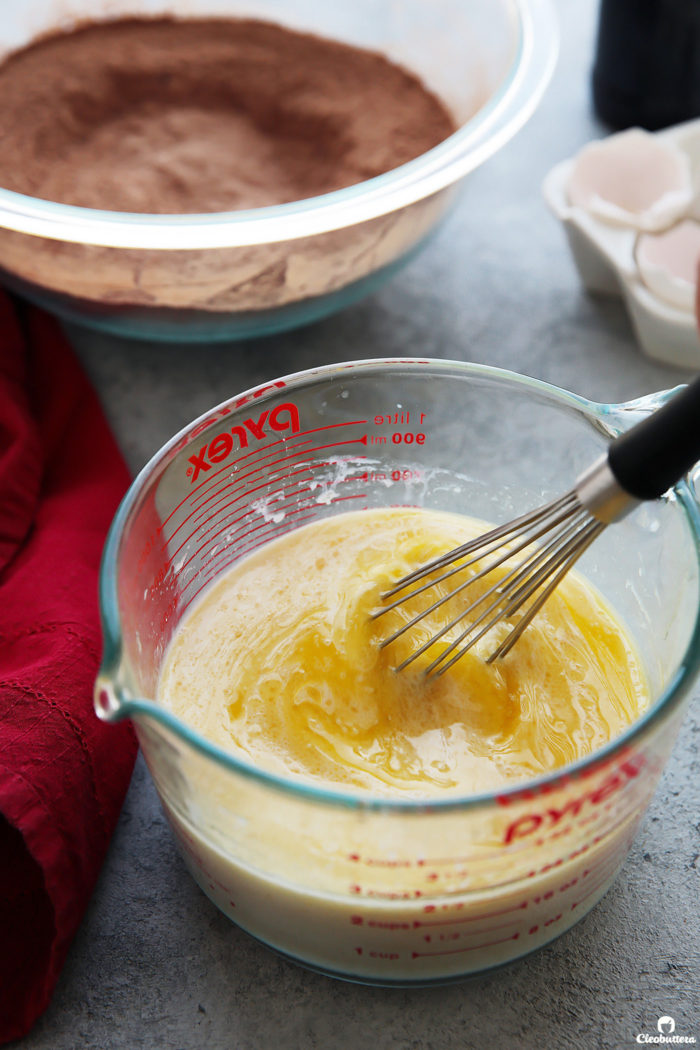
In another bowl or liquid measuring cup, whisk together the melted butter, milk, eggs and vanilla until well combined.
Pour the liquid ingredient over the dry…
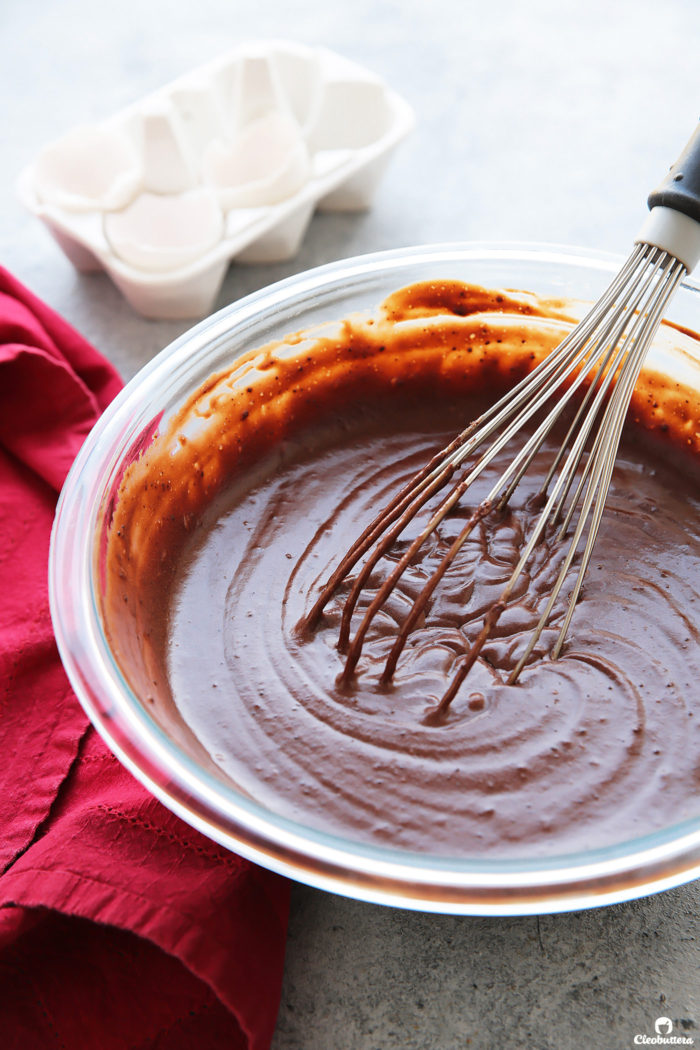
And whisk until a smooth batter forms. I you know want to lick the batter, don’t you? Go ahead! No shame.
Now here’s where stuff will start looking wonky and you’ll start doubting why you ever listened to me…but if you’ve tried the mug cake or even watched the video, you know I ain’t steering you wrong.
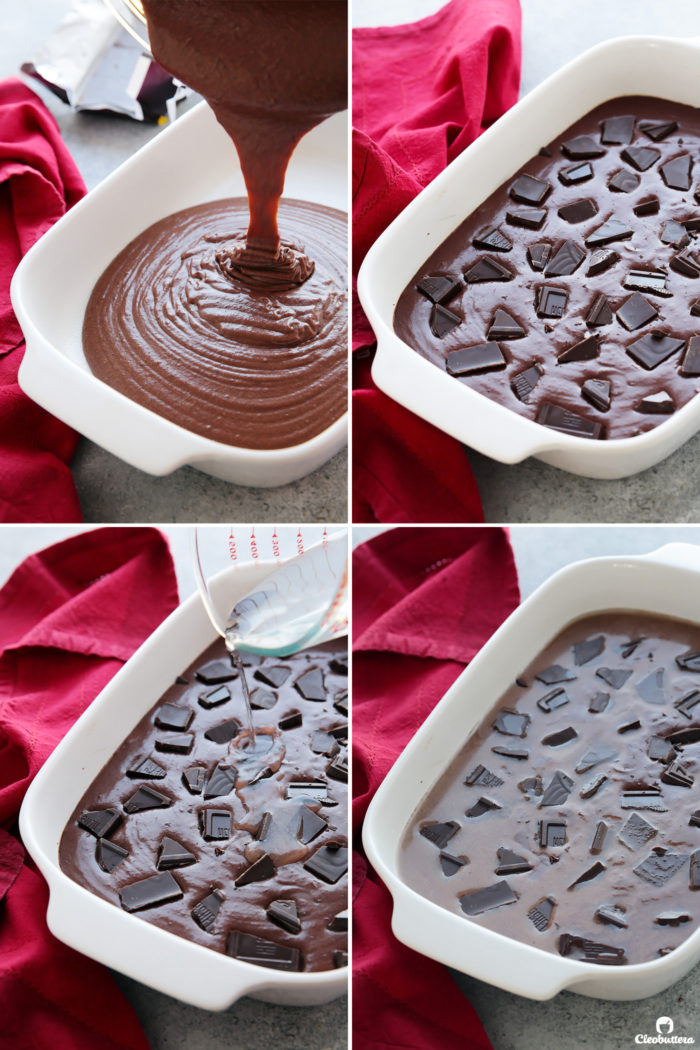
Pour the batter into the pan, top with broken up pieces of chocolate (I love semisweet, but use whatever you like…dark, milk, chocolate chips or even omit them if you have none on hand), then take a leap of faith, and pour that water all over the surface. Yep! I’m fully aware that it currently look like a muddy puddle.
So cast away your doubts, place the pan in the oven (oh..did I not mention that we’re not using a microwave this time? Oops!), wait 17 to 23 minutes, then release a sigh of relief that the mess actually baked into a cake.
Yes…it looks like an earthquake hit it and it certainly won’t win any beauty awards….
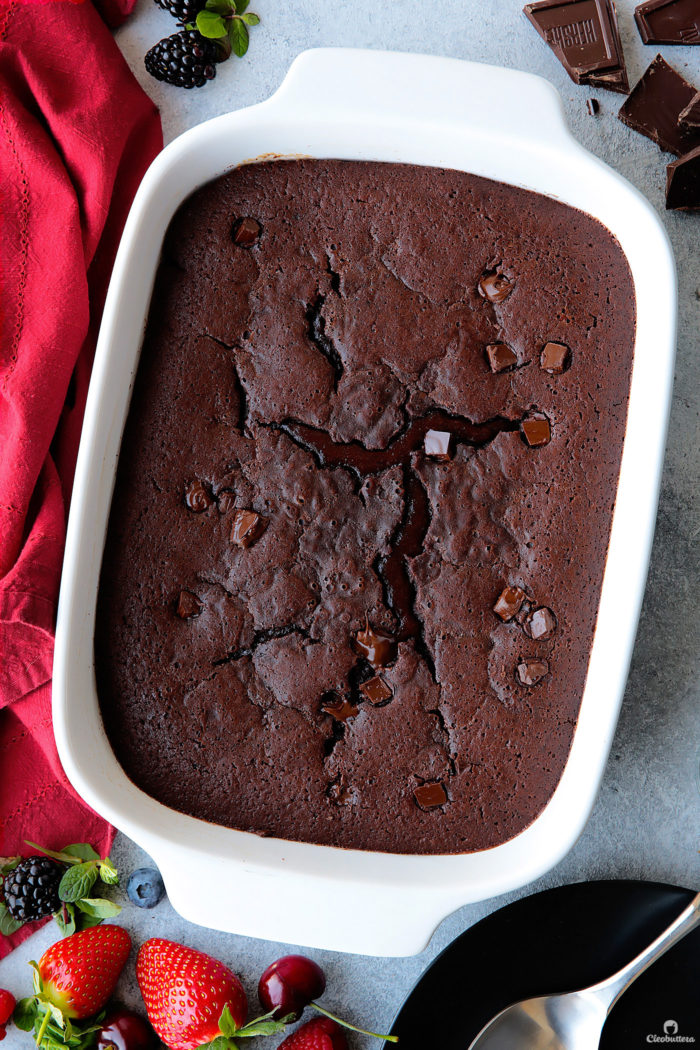
But with a generous scoop of vanilla ice cream and a few adornments from nature’s jewels (berries), it just might.
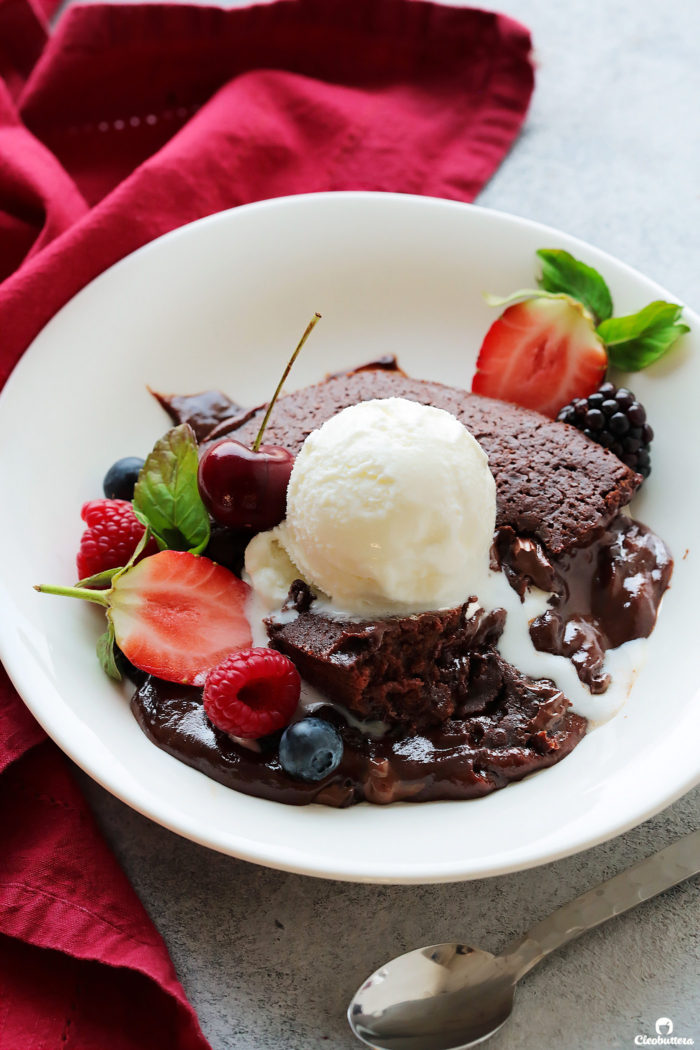
Besides…who cares what it looks like, when it tastes like one of the best chocolate desserts ever!
Tips for success:
- Do NOT overbake. Baking duration is what makes or breaks this cake. It is the deciding factor that determines whether you’ll end up with a spongy cake (still delicious) or a molten, gooey one. The suggested baking time in the recipe, is an estimate according to my own experience with my oven. Given the fact that ovens vary greatly, it is important to pay attention to visual cues, instead of a strict timing. The best way to know when the cake is done, is when the first 2-inches surrounding the edges, feel springy to the touch, but the center is still jiggly. Baking until the center is cooked through, will result in a cake with no sauce at the bottom.
- Pay attention to the size and material of the dish. Keep in mind that ceramic dishes will cause the cake to bake faster than glass dishes, so check on the cake accordingly. It is recommended to stick to the suggested pan sizes mentioned in the recipe, but if you don’t have them on hand, use the closest size you can find. Just keep in mind though, that larger dishes will bake the cake faster than smaller ones.
- Use your favorite chocolate variety (or not). Your cake will taste as good as the chocolate you put in it, so choose a chocolate that you enjoy eating. If you’re not a fan of dark chocolate, for example, use semisweet or milk chocolate or a mixture of both. You can also use chocolate chips or even peanut butter or white chocolate chips. You can even leave out the chocolate altogether for a less rich cake or add Nutella instead. The chocolate adds another layer of chocolate, but it is not wants creates the pudding-like sauce. So if you do choose to leave out the chocolate, you should still end up with a saucy bottom.
FAQs:
Can I bake this cake in the microwave?
Although I haven’t tested it out to be able to give a confident answer, I honestly think it should work just fine. I mean if the single serving works, I don’t see why the larger one won’t. Just keep a close eye on it as it bakes, since it will probably require less time to bake than in the oven, yet surely more time than the mug. If I do try it out in the microwave, I’ll update the recipe with exact timings and instructions.
How far in advance can I prepare this cake?
This cake is best served warm, within maybe an hour or so of getting it out of the oven. However, individual cooled portions can be rewarmed in the microwave for a few seconds. Be sure not to overheat it though, as that will dry out the sauce and turn it into cake.
Can I double the recipe?
Absolutely! A 13X9-inch dish will be the perfect pan size for a doubled batch. Note that baking time may vary; will probably take longer to bake than the single recipe.
Hot Fudge Pudding Cake

A blown up version of my most popular recipe post of ALL time, the Molten Chocolate Mug Cake! This one feeds a crowd, is just as easy and every bit as delicious, with its fluffy, cake-y outside and molten, saucy inside.
Ingredients
For the cake:
- 1 cup (120 grams) all purpose flour
- 1 cup (200 grams) granulated sugar
- 1/2 cup (44 grams) unsweetened cocoa powder (sift if lumpy)
- 2 teaspoons baking powder
- 1/4 teaspoon salt
- 3/4 cup (172 grams) unsalted butter, melted
- 3/4 cup (177ml) whole milk, slightly warmed*
- 3 large eggs
- 1 teaspoon vanilla extract (or 2 teaspoons if using imitation vanilla flavoring)
- 4 oz (114 grams) lightly broken up semisweet chocolate*
- 1/4 cup (60ml) water
To serve: (optional)
- Vanilla ice cream
- Berries of your choice
Instructions
- Adjust oven rack to medium position and preheat oven to 200C/ 392F. Lightly spray an 8-inch square (or 7 X 10-inch as pictured) glass or ceramic baking dish* with nonstick cooking spray.
- In a large bowl, whisk together the flour, sugar, cocoa powder, baking powder and salt to combine. Set aside.
- In another medium bowl or 2-quart liquid measuring cup, whisk together the melted butter, milk, eggs and vanilla until well combined.
- Pour the milk mixture over the dry ingredients, and whisk well until the batter is evenly moistened and smooth; a few lumps are ok.
- Pour the batter into the prepared pan and spread evenly to the sides and corners. Arrange the chocolate pieces in a single layer all over the surface of the batter; no need to push them down.
- Evenly drizzle the water all over the surface of the chocolate studded batter.
- Bake for 15 to 23 minutes, or until the first 2-inches of the cake is set around the edges and is springy to the touch, but the center is still slightly wobbly. Be careful not to overbake, to ensure a saucy, molten-y interior. If in doubt, it's better to err on the side of under baking. Note that a ceramic dish will bake faster than a glass dish.
- Allow the cake to cool down for about 10 minutes, then serve warm with vanilla ice cream and berries if desired. Cover leftovers tightly with plastic wrap and store at cool room temperature. Individual portions can be reheated for a few seconds in the microwave.
Recipe Notes
- I like Hershey's unsweetened cocoa powder here, for its milk chocolate flavor, that perfectly balances out the bitterness of semisweet chocolate pieces, but you can use your favorite brand. I have not tested this cake with dutch processed cocoa.
- Warming the milk in the microwave for about 40 seconds, avoids the risk of solidifying the melted butter once it hits the milk.
- I prefer semisweet chocolate here, but you can use dark, milk, or a mix of both, if you prefer. In the pictures, I use Hershey's semisweet baking chocolate bar, which I had brought along from a recent trip to Dubai and I love it. Chocolate chips may be used instead of bar chocolate.
- For a less rich cake, feel free to omit the chocolate bar altogether. You'll still get a saucy cake, if you're careful not to overbake it. Chocolate pieces adds another layer of chocolate flavor which I love, but it's not essential for achieving the pudding-like consistency of the cake.
- I almost always bake this cake in an 8-inch square pyrex dish, but changed to a 7 X 10-inch ceramic dish this time around, because I found it more photogenic. I've noticed the glass dish bakes the cake in longer time than the ceramic one. The glass bakes in about 20 to 23 minutes, while ceramic baked in 15 to 17 minutes. So keep the material of your dish in mind when checking for doneness.
Recipe adapted from Molten Chocolate Mug Cake.
Measurements Note: All recipes of this site have been developed using weight measurements. Although US volume measurements have been included for your convenience, it is highly encouraged that you weigh your ingredients using a kitchen scale to get the best possible results. Due to the sensitive nature of baking, kitchen scales are proven to yield more accurate and consistent results than measuring cups. Enjoy!
Powered by ![]()
This post may contain affiliate links.
All images and content are owned by Cleobuttera® and are copyright protected. Please do not use my images without prior permission. If you would like to republish a recipe, please rewrite it in your own words and link back to the recipe page on my site. Original recipes and creations of this site are intended for personal and home use. Commercial replication or media consumption are only allowed with a written consent and agreement with Cleobuttera owners. Otherwise it is considered a violation of intellectual property. Thank you for respecting and appreciating the amount of time and effort that goes into creating free, unique recipes that make people happy.


I’m not sure yet.
But nothing can beat your fabulous Molten Chocolate Mug Cake!
Hahahaaaa! Rest assured…this cake is just the mug cake X4. Seriously, it’s just a quadrupled version of the mug…so it tastes exactly the same, maybe only slightly better since we’re getting more amount ?
I don’t think I ever got a chance to say how much I like this sites new look! And I have made your mug cake a few times so I can see why it’s popular. The best part of this recipe is no need for inverting it or frosting it. One can just scoop out a portion while it’s still warm!!
Thank you Iram! I’m thrilled about the new site design too. It was a long overdue makeover and I’m really happy you like it. I totally agree with you; there’s nothing like a simple. homey cakes that requires minimal effort and taste like you spent all day making it. I hope you love this one as much as you like the mug!
Hi!! Can I substitute the milk with maybe half and half /cream?? Can’t wait to try it!
Hi Mar! I’m honestly not sure how the outcome will turn out as I haven’t tried them myself in this particular recipe. However, I believe that half & half should work well; heavy cream would probably be too much here, as it has a very high fat content compared to whole milk. Best of luck!
One of the easiest and most delicious cakes I have ever made, super bravo ??
What an amazing feedback Sally! I’m really happy you enjoyed it, and found it easy to make ?
This was soooooo good I tried other versions that didn’t taste chocolatey or or agent fudgey enough but this was perfect!!
That’s so wonderful to hear Shay! I’m really glad you found in this one that perfect balance of fudginess and chocolate-y flavor that you were looking for.
Made this on the weekend with my four year old, that’s how easy it is! It was soooooo good! Thank you thank you, we’ll definitely be making this cake a lot!
Yay! Absolutely love hearing that Lina! Thank you so much for your wonderful feedback.
my comment is for all those people who will have a slightest doubt of not expecting a good enough outcome.
let me tell you one thing, this girl’s mug cake pinterest pic brought me here and that pic might be one i have seen the most over there so yeah i tried that recipe, it turned out to be the BEST mug cake you will ever make.
and then this recipe came, i had blind trust in cleobuttera for this recipe so without thinking twice, i gathered all my ingredients and made it..
here are some thoughts about this cake
1.you don’t t even need a beater, just a whisk will be enough,
2.only TWO FREAKING BOWLS are needed to make this recipe.
3.yes, pouring water in the last step might stop you for some reason. (when i did that, my 4 years old nephew surprisingly shouted “who pour the water on batter.. why are you ruining my cake”. i laughed and thought my trust on cleobuttera is more than what common sense says)..
4.the quantity of every single thing is perfected for sure, just the right amount of everything. and that’s something you will rarely find in other recipes.
5.the ONLY thing that can make or break is the timing you give for baking. i made it first time and slightly overbaked this.. but then, my oven, it’s temperature were solely responsible for that. it will definitely take you a try or two to perfect the timing.
cleobuttera, I’m so lucky to have you on my list for such recipes. seriously, i can feel the time, energy, pain, frustration and practice you must have put in this recipe to make it perfect and indeed it is a perfect recipe!!!!
Oh Anie…I really don’t know what to say to such amazing comment. WOW! Thank you so much for your trust, kind words, appreciation and encouragement. This means EVERYTHING to me! I also can’t thank you enough for those wonderful tips…I’m sure they’ll be of great help to other readers who interested in trying this recipe. Warmest regards and much love, Tasbih.
Hi Tasbih! Thank you so much for this amazing recipe!
I’m a student, and the oven in the flat I rent is old and never bakes stuff thoroughly, so I was looking forward to coming back home to try this. When I did, I only had an opportunity to bake today, before leaving… I only tried a piece and left everything else for my parents and siblings (although I took a couple of pieces with me!) and it’s sooo good. I over baked it though, because I wasn’t sure about my oven, so it’s not sausy, but it’s amazing nonetheless. Thank you so so so so much, I’m definitely making this again!!!!!
Really happy to hear that you still loved this Lana! I’m sure you love it even more once you perfect the baking time. Enjoy ?
Can I use stevia instead of sugar?
I’ve made this cake more than I can count. That’s how perfect it is!
Just tried this and it came out beautifully. I never loved spaghetti squash until finding this recipe…I’m now hooked and will be adding this into my meal plan a lot more. Thank you so much!
I so enjoy your site and your recipes. Would you please consider adding a print option so we can enjoy your recipes a little more easily. Thank you.
Excellent recipe and easy to make at the last minute. My family loved it. Thank you!
Yay! So glad to hear that ?
What will happen if I use a “regular” baking pan vs a glass or ceramic one ?
All types of pans should work well here. Just keep in mind that some pans heat up faster than others, so baking time will vary. Just keep a close eye on it and use visual cues, instead of the suggested baking time to judge for doneness. Enjoy ?
I just discovered this post because Foodie Crush tweeted it. I am so inspired and can hardly wait to try so many of your recipes!
Welcome abroad Hannah! I hope you love everything you try from here ?
cannot cook to save my life!
But this cake was a treat..
I used my oven for the very first time 🙂 to make this slice of heaven ..
I didn’t have any pans so had to make do with this glass bowl.. it’s really a nice version of the mug cake which is the only thing I really make ..
I stuck to the exact recipe as much as I could .. I think 15 mins of bake would be enough if you want it moisty .. I don’t like drier cakes and this anyway is more of a pudding .. but a real fun cake to make .. it sure this won’t be my last attempt 🙂
Really glad you liked it Reshma!
Attachment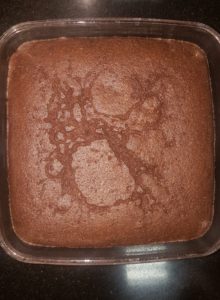
Thank you, Tasbih! This was absolutely delicious and quite easy to whip up. Not gonna lie, my heart sank a little when I poured all that water over the batter (my cake batters rarely look that perfect) but oh, my! It was was rich, gooey, fudgy, chocolate-y heaven! Wish I had the vanilla ice cream or fresh berries to break up the richness of the chocolate, but I think it was for the best or I’d have gone back for a second helping (I did it anyway, sorry, not sorry)!
First I wanna tell you how delicious that chocolate cake is. I’ve been looking for an easy chocolate cake for a while and I believe I found the one !! ♥️
I would like to ask you for more easy recipes like this one please more often.
Your recipes are mouth watering but for a kitchen beginner like me they sound like a kitchen disaster lol