The Perfect Ghorayeba
Perfected recipe for Egyptian, bakery-style Ghorayeba cookies! Delicate, fine-textured, smooth and melts-in-the-mouth delicious.

Why is it that the simplest things are always the hardest to get right?
Ghorayeba is a 3-ingredient, plain, seemingly simple drop cookie with no bells and whistles, and a straightforward flavor. How hard can it be?
Uhmmm…VERY!
Just like basbousa and red velvet cupcakes, these stubborn cookies drained the life out me, trying to get them the way they’re supposed to be.
I went through dozens and dozens of failed attempts, that I was this close to giving up on it and calling it quits.
But I’m glad I hung on for those last few trials, because they are what led to the The Perfect Ghorayeba.
What is Ghorayeba?
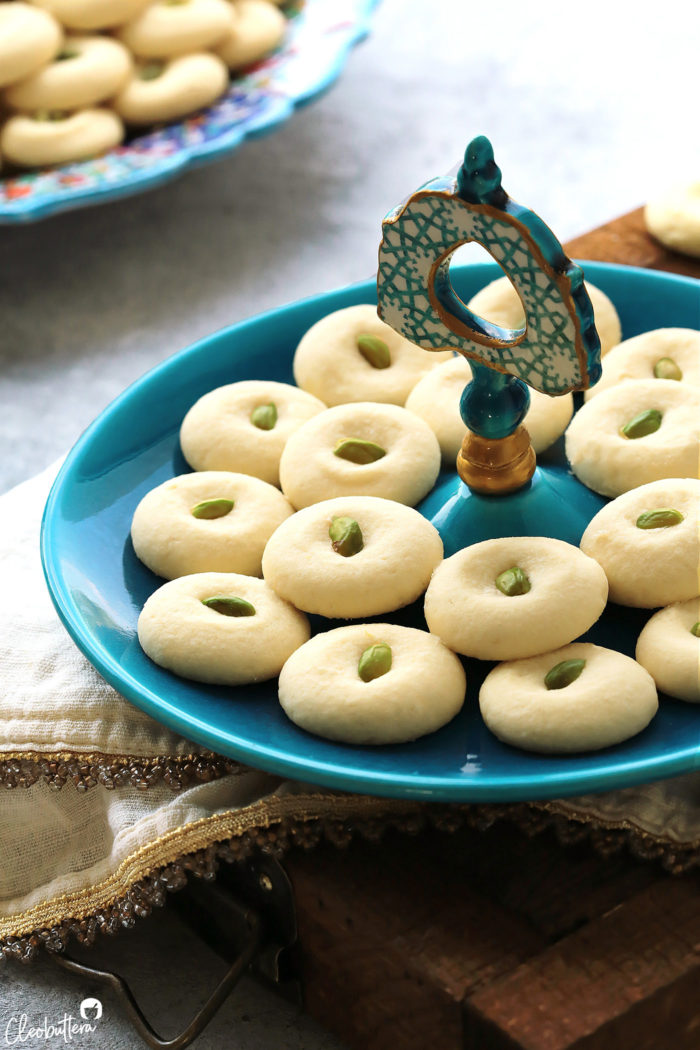
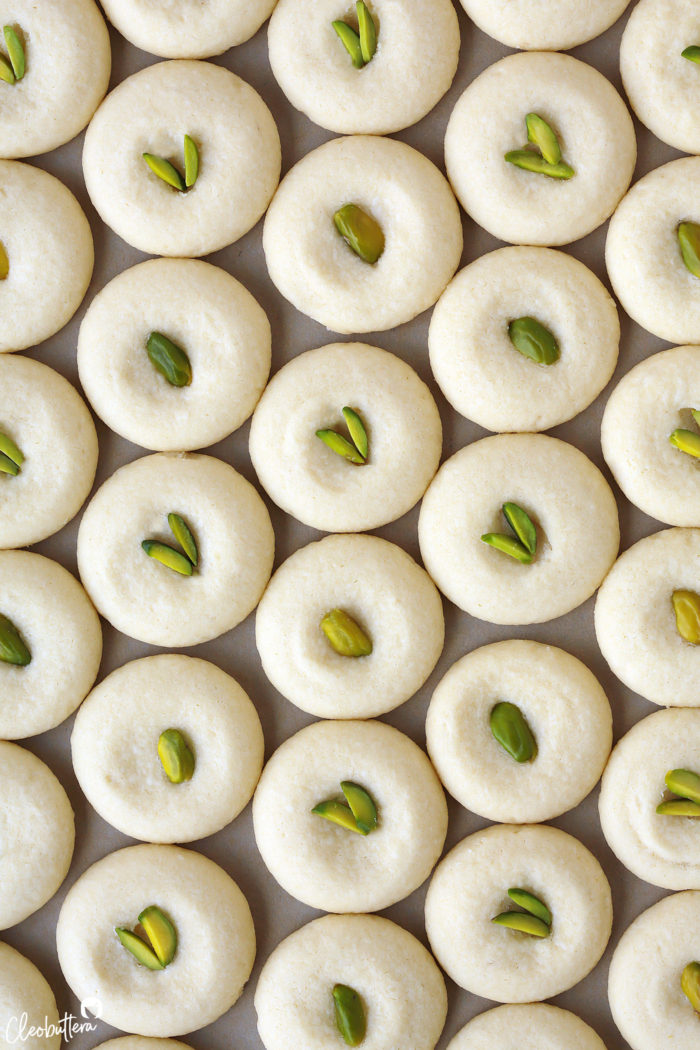
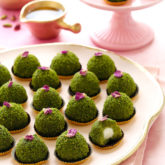
Ghorayeba can be described as the shortbread of the Middle East without the crunch. Barely sweet, with a pleasant ghee flavor, ever-so-slight bite and a delicate texture that melts away in the mouth.
The classic Egyptian type is flavored with nothing but the ghee its made with, while other parts of the Arab world like Syria and Lebanon, often flavor theirs with orange blossom and rose water, where its also slightly crunchier and pronounced ‘Graybeh’. Today, we’re focusing on the Egyptian variation.
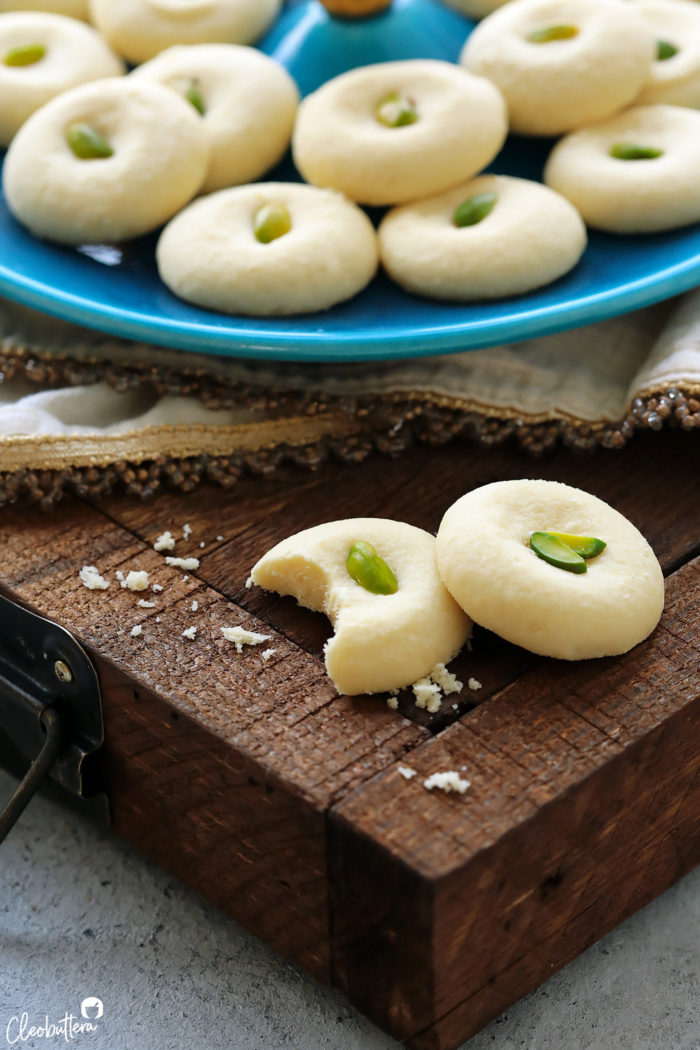
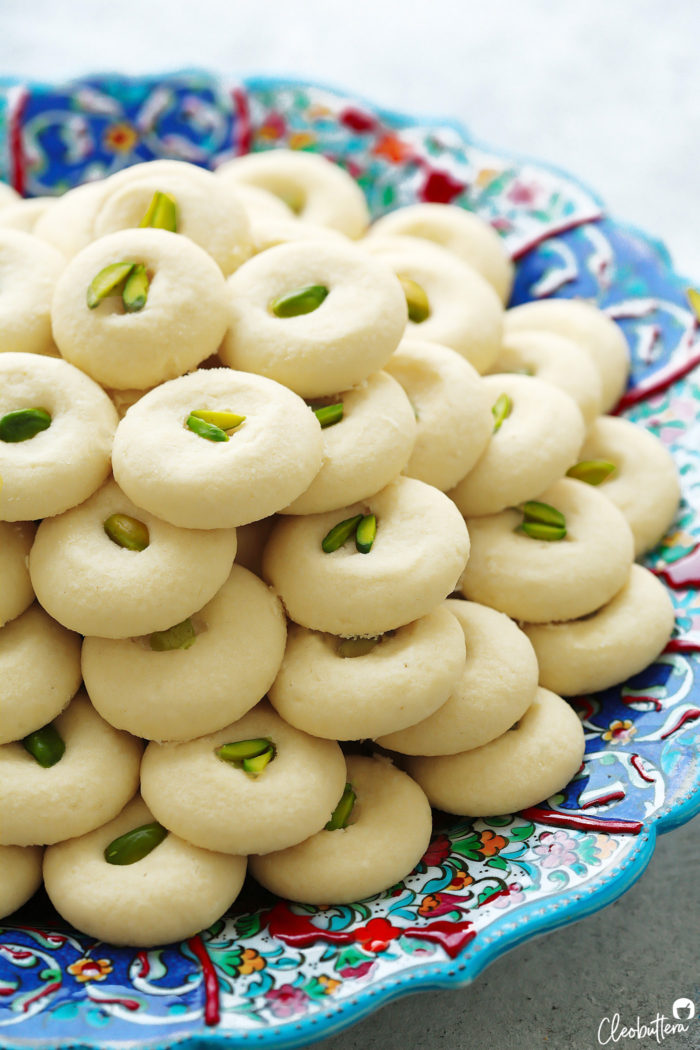
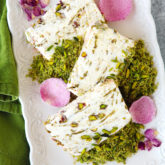
Ghorayeba is most known for it’s distinctive fine crumb, smooth finish with a fuzzy outer layer and angelic off-white color. It has a cloud-like mouthfeel that disintegrates to the bite and a rich lightness like no cookie I know of.
The texture is everything when it comes to ghorayeba and I don’t think enough adjectives will ever do it justice. It’s just one of those things you need try to be able to know what it’s like.
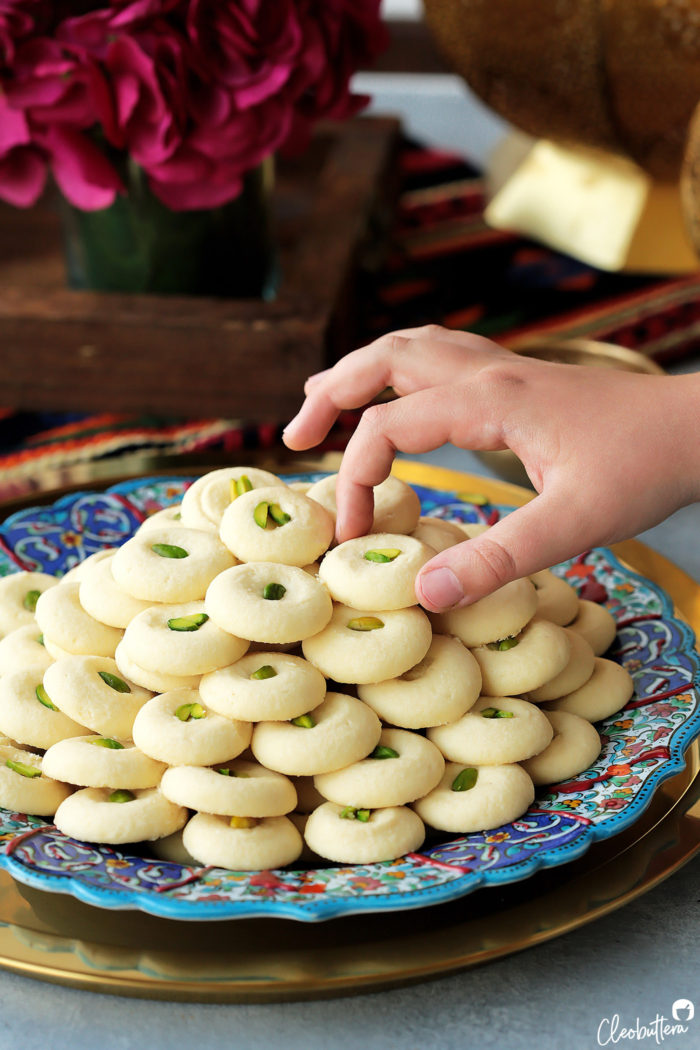
Ghorayeba is a celebration cookie around these parts. In Egypt, where I’m from, they are especially baked for Eid, as well as Easter and Christmas. And just like kahk, no feast is complete without it.
There’s nothing I associate the end of Ramadan and arrival of Eid more, than when I see boxes of kahk and ghorayeba entering homes. They’re what people gift one another during that time of the year and an always welcomed tradition that is as old as time.
I get excited over well-made kahk just like every other Egyptian, but I’m personally Team Ghorayeba all the way. It’s that unique texture that wins me over every single time. It is just a thing of minimal beauty and hands down my favorite Eid cookie.
I have zero self-control over ghorayeba. Give me a box-full & 15 minutes, and you’ll see a miracle of disappearance happen.
And it seems I’m not alone on this. You guys are just as crazy about it and I know it! So many of you have been asking if I had a good recipe since I started the blog & the answer had always been a sad ‘no’.
And this just had to change.
But it was easier said than done.
My mission was to find a ghorayeba recipe that is:
- Sturdy, yet delicate.
- Melts-in-the-mouth.
- Fine textured.
- With a minimal bite; zero crunch.
- Rich in flavor, light in texture.
- Smooth finish without any cracks.
- Off-white in color.
- Just sweet enough.
- With a distinctive ghee flavor.
It was a long list and I wasn’t about to compromise.
I have tried so many recipes, that I’ve lost count. From cookbooks, websites, blogs, YouTube, you name the recipe, I’ve most likely tried it.
And what I got was: Hard, tough, crunchy, and cracked. But at least the flavor and color were there. Thank God!
I was pulling my hair out experimenting with different ingredient ratios, ovens temperatures, baking durations, to get that signature texture…but nope, it wasn’t happening. I even called for help on Instagram and many of you have been so kind with sharing your tips with me. Thank you guys!
And then it suddenly occurred to me to seek the advise of a pastry chef at my local bakery. I wasn’t sure if he was gonna pour out all his secrets…but my oh my there’s still good in this world.
Chef Beshoy not only shared his recipe with me, but walked me through every step, bared through the countless ghorayeba photos and videos I texted him, helped me troubleshoot and even taste tested the ones I baked for approval. I cannot be more grateful to this good-hearted human being. Because of his help, you and I now have all the secrets needed to make perfect ghorayeba at home just like the best bakeries in Egypt.
What’s so special about this recipe?
For starters, its coming out of the mouth a professional pastry chef, not a baking enthusiast like myself. I’m simply here to pass down what I’ve learned from him.
Technique-wise, this recipe is nothing like any of the recipes I’ve tried before. The ratios are almost the same…most of them are, but the mixing method is what makes all the difference.
Whereas most other recipes, call for kneading the ingredients just until a dough forms, some even cautioning about over-mixing and stress on handling the dough oh-so-gingerly, this one specifically asks you to beat the heck out of it. Trust me…this is the secret!
But won’t overmixing develop gluten?
Not here! In fact, we’re doing the complete opposite. Gluten starts to develop once liquid is added to flour, and there’s no liquid here. No milk, no water, nothing. Just flour, sugar and ghee. By beating the flour extensively with the ghee, you’re coating the flour particles with fat, and that actually inhibits gluten formation, giving us a more tender cookie. Smart, right?
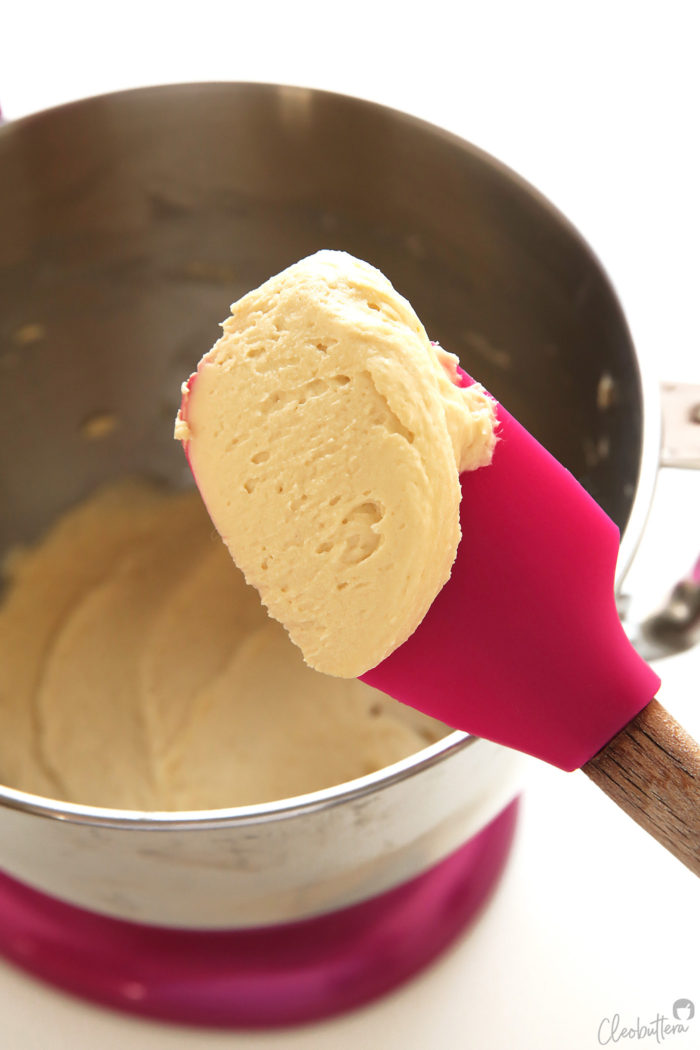
You’ll want to beat the dough so much until it loosens up to a smooth, thick cake batter consistency. It will look exactly like hummus dip.
How will we roll the “dough” into balls if it’s so soft and batter-like?
We don’t. We pipe it like macarons.
Another departure from the regular recipes I’ve tried, Chef Beshoy pipes the ghorayeba instead of rolling it. Since the dough is so soft and sticky, I actually find piping so much easier than rolling into balls. I know some of you aren’t very comfortable with piping, so I found that cooling the dough for a couple of hours before rolling it into balls works too. I also feel that chilling the dough into a log then slicing it, as in slice-and-bake-style cookies, might also work, although I haven’t tried it. I know chef Beshoy wouldn’t approve, but I just want to help you find a way to make them, even if it means bending some rules.
What do we need to make Ghorayeba?
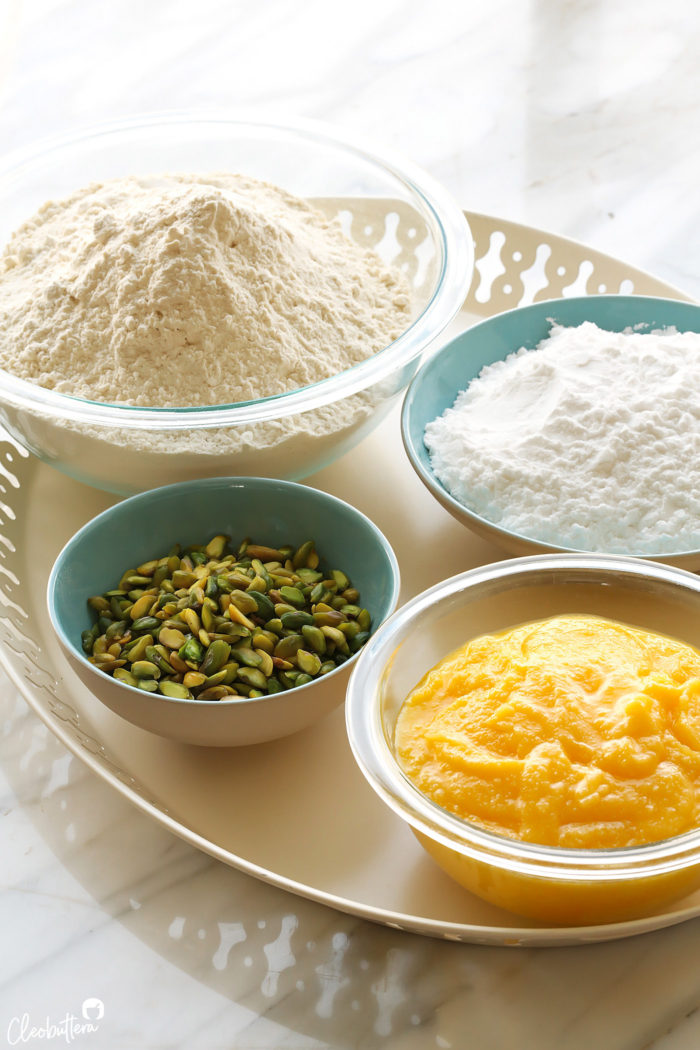
As promised…only 3 ingredients!
Flour, powdered sugar and ghee.
Oh and some pistachios or any other nut you prefer, but you can totally leave them out if you’re not into nuts. My kids pick them out and eat the Ghorayeba plain.
Since very few ingredients make up this recipe, know that your ghorayeba will only taste as good as the ingredients you put in it, especially the ghee. So choose a ghee brand that you love and can tolerate its smell and taste. Some ghee types have an overpowering odor and a strong taste and I’m not a fan of those. So I like to go with something that tastes as close to butter as possible, but hey! you be you. Go with whatever you like, except butter…unfortunately. And as much as I hate to say it…straight up butter does not work here.
Why can’t I use butter?
Because butter is around 80% fat, 20% moisture, while ghee is near 100% fat. Remember, moisture develops gluten and we don’t want it here. So the moisture (milk and water) from the butter, will result in a tough, crunchy cookie.
What do I do if I don’t have ghee?
You can use clarified butter, where the milk solids have been removed instead. Just be sure to use it in its solid state though.
How to make the Perfect Ghorayeba?
Whisk together the flour and powdered sugar to combine. Then add in the ghee. I’ve tried both room temp and cold ghee (as many recipes recommend) and didn’t notice any difference in the results. So use whatever you prefer, as long as it’s not melted.
Then beat the mixture on low speed to combine. Dough will start out looking stiff the way cookie dough should be, and you’ll be tempted to stop here, but don’t. Keep mixing for another 5 minutes on medium low.
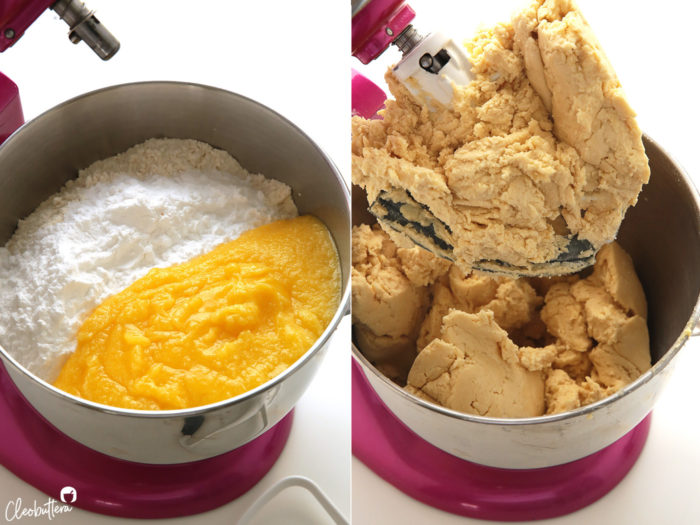
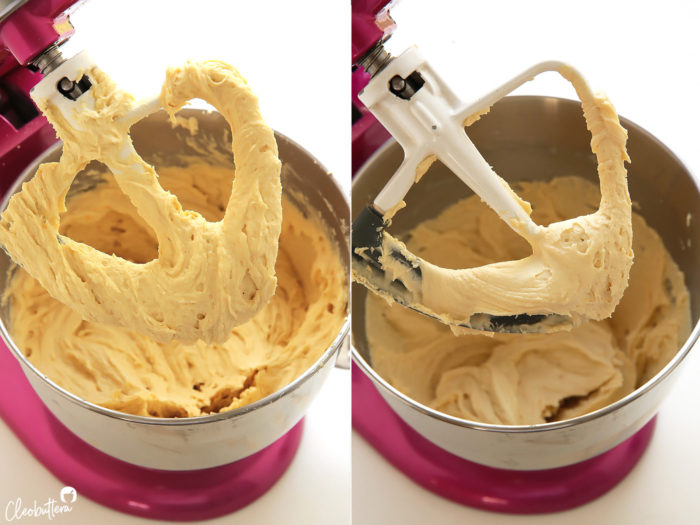
Then raise the speed to medium-high and beat for another 5 minutes. Dough will soften up significantly, but won’t be as smooth as we want it. So turn down the mixer to medium-low again and continue beating for another 5 minutes. That’s a total of 15 minutes! Your dough should now be very smooth, with no lumps and will look exactly like hummus. It will also be alarmingly sticky.
Now you have 2 options to getting the sticky dough from bowl to baking sheet.
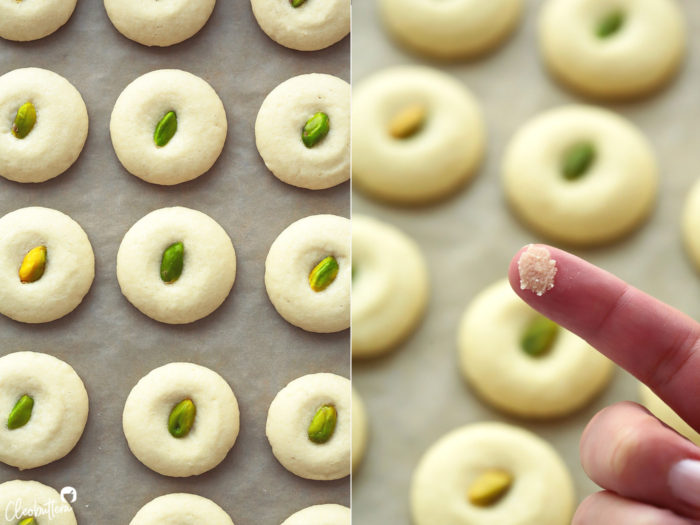
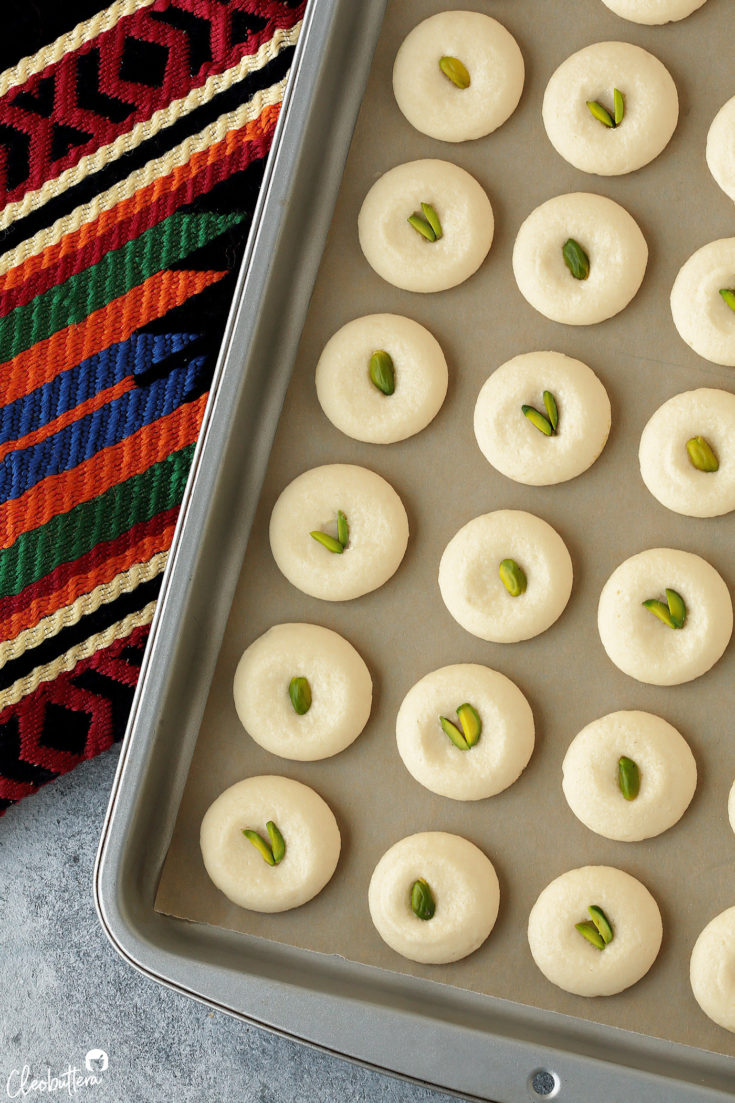
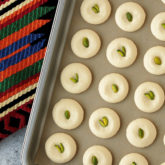
- Piping method: (which I strongly recommend) due to the dough’s stickiness. Pipe 3.5-4cm rounds just like macaron.
- Roll and flatten method: (so nerve-wracking to be honest) but at least you have the choice . If you’ll go this route, then you’ll need to chill the dough long enough for it to firm enough to handle. Then roll into balls and flatten with the palm of your hand.
- Slice-and-bake method: (not pictured, not tested) but I think it will work well, albeit the won’t be ideal. Shape dough into a thin log over parchment paper or plastic wrap. Wrap it tightly, chill until firm, then slice into 1 cm thick round and bake!
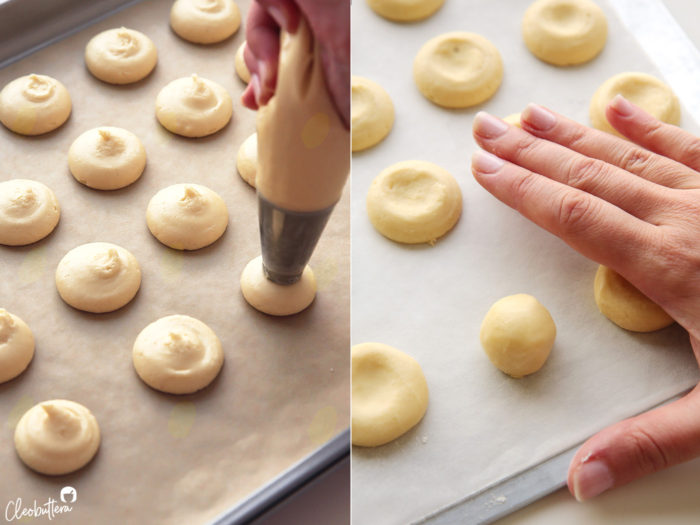
If you have any peaks popping out due to piping, simply chill the dough for about 5 minutes, so its no longer sticky but not firm, then tap them down with a floured finger.
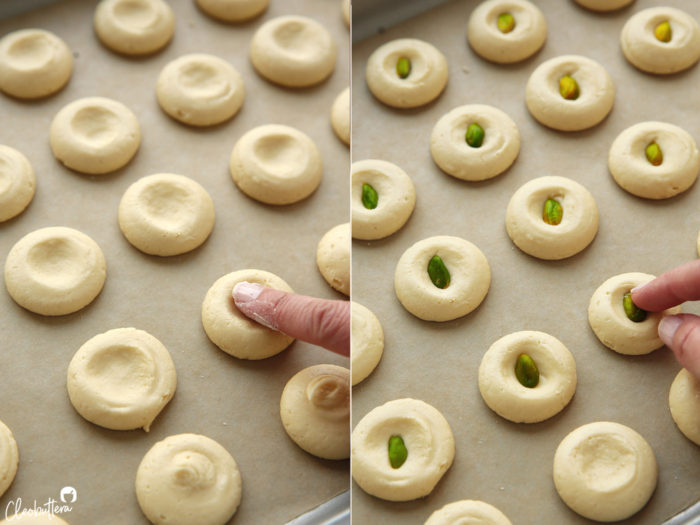
Follow that with pressing a nut in the middle of each round.
You’ll want to bake the cookies low and slow to maintain that pale color, while baking it all the way through. I found that a 120C oven for 17 minutes work perfectly in my oven, but that might not be the case for you. So I recommend baking a test batch before proceeding.
You just want to bake them until the cookies look set. The color should still remain off-white and the bottoms should not take on any color. They will feel set to the touch, firm but not hard at all and will leave dough residue on your finger if you touch them. Don’t worry, this will go out away once the cookies have cooled. They will continue to bake as they cool, so be sure to allow them to come to complete room temp before sampling.
And that is it!
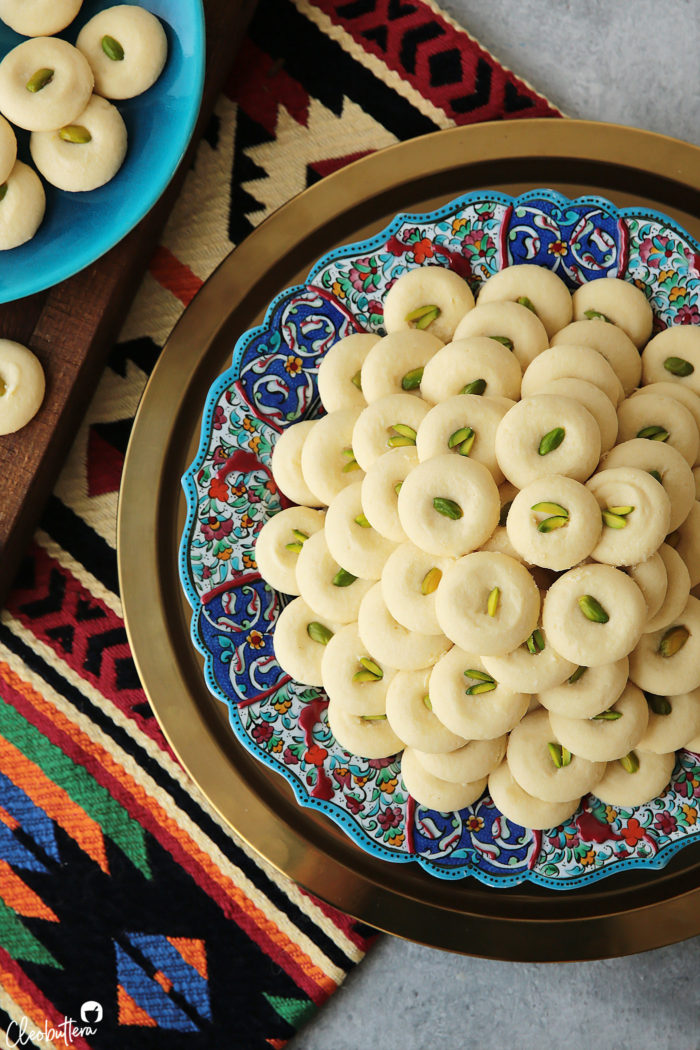
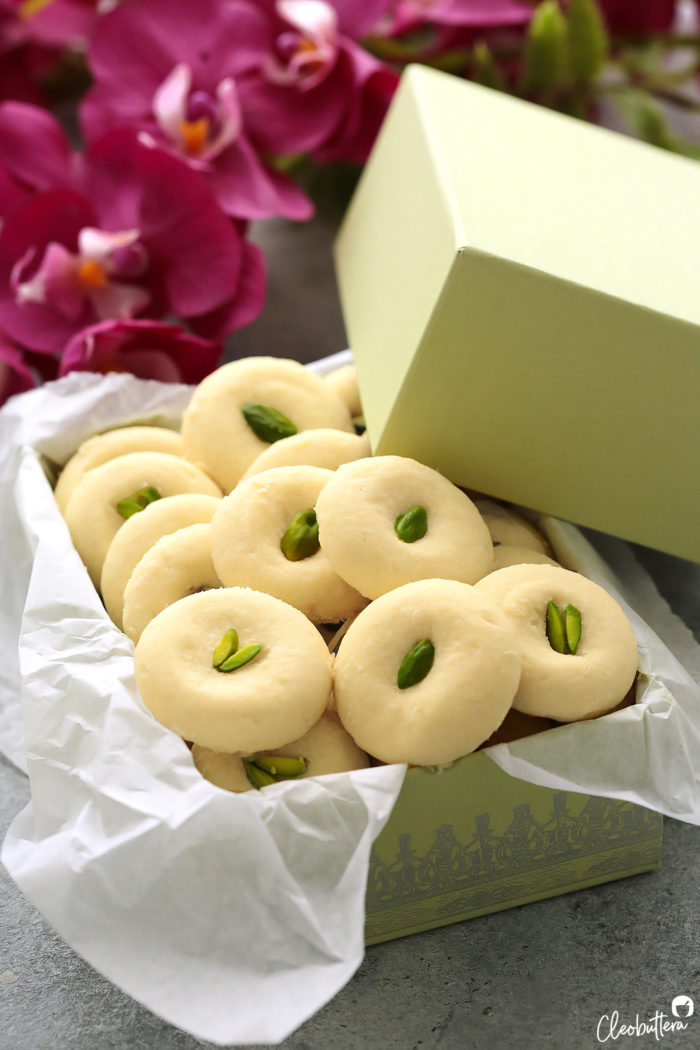
You’ve just made bakery quality Ghorayeba you can be proud of.
Now pile them up in a pretty box (totally reused Ladurée’s signature box and yes it’s upside down ?)
Then give them away to your loved ones as quickly as possible…because you won’t be able to stop and your waistline will not forgive you for it.
FAQs:
What can I use instead of ghee?
Clarified butter in its solid state. Store-bought or homemade will both work. Be sure to check out a YouTube tutorial to learn how to make it.
What if I don’t have a standmixer?
An electric handmixer will work just fine, but expect an arm’s workout ??
How long to do these cookies keep and how to store them?
Ghorayeba is one of those things that get better over time. I like them more after the second day they’re baked. I find that the texture improves as they sit and they get smoother and softer. They will keep well for 2 to 3 weeks at room temperature. Store in a regular container or box (not airtight).
How can I prepare these cookies in advance?
Shaped dough rounds can be kept in the refrigerator for 3 to 4 days, and in the freezer for 1 month. Bake straight from the fridge, increasing baking time by one minute. For frozen, bake straight from frozen increasing baking time by 2 to 3 minutes.
Can I double the recipe?
If you have a standard home-size stand mixer of about 5 quarts or less, then it’s not recommended. It will not be able to sufficiently beat the dough into the required level of smoothness. It’s better to prepare the dough in batches instead.
Can I halve the recipe?
Absolutely! It’s what I did when I was testing the recipe and it worked so well. You may also quarter it.
My ghorayeba came out hard. What did I do wrong?
Either 1) The flour and/or powdered sugar were over-measured (a common culprit of measuring cups), and for that I highly advise using a scale for all baking recipes, and particularly this one. 2) The dough was not mixed long enough. 3) The cookies were over-baked.
My Ghorayeba cracked. What did I do wrong?
Same as above 1) The flour and/or powdered sugar were over-measured (a common culprit of measuring cups), and for that I highly advise using a scale for all baking recipes, and particularly this one. 2) The dough was not mixed long enough. 3) The cookies were over-baked. 4) The oven temperature was too high.
My Ghorayeba dough was cracking as I was piping it. What did I do wrong?
This means that it hasn’t mixed long enough. You can fix this by returning the dough to the mixer and beating for longer, until it becomes so smooth.
Need a closer look?
Check out my video tutorial on my Instagram highlights labeled ‘Ghorayeba.’
The Perfect Ghorayeba
Perfected recipe for Egyptian, bakery-style Ghorayeba cookies! Delicate, fine-textured, smooth and melts in the mouth delicious.
Ingredients
For the Dough:
- 4 cups (500g) all purpose flour
- 1 1/3 to 1 1/2 cups (150g to 175g) powdered sugar, sifted*(see note below)
- 1 1/3 cup plus 1 tablespoon (300g) ghee, room temperature or cold
For Garnish: (optional)
- Pistachios (whole, halves or slices), or any nut of your choice
Instructions
- Adjust oven rack to middle position and preheat oven to 120C/248F. Line 2 baking sheets with parchment paper or silicon mats
- In the bowl of a stand mixer fitted the paddle attachment (or in a large bowl and an electric hand mixer), add the flour and powdered sugar, and whisk together to combine.
- Add in the ghee and mix on low speed until a crumbly dough starts to form. Continue beating for 5 minutes. I actually set a timer for this. The dough will start out very crumbly then stiff, but will soften up as the mixing progresses.
- Raise the speed to medium-high and mix for another 5 minutes. Then turn back the speed to low and continue beating for another 5 minutes. The dough needs to mix for a total of 15 minutes, or until very smooth with absolutely no lumps, and transforms to the consistency of thick cake batter and resembles smooth hummus dip. It will be sticky, and not dough-like, so don't be tempted to add more flour.
- Transfer the dough to a piping bag fitted with a large round tip (I use Ateco 808). Holding the piping bag at a 90-degree angle over the prepared baking sheets, pipe 3.5-4 cm rounds of dough, spacing them 2cm apart. If the rounds are cracking as you're piping, it means that the dough needs to be beaten for longer (For alternate shaping methods, refer to recipe notes 4 and 5). Refrigerate the baking sheet until the dough rounds are no longer sticky to the touch, but is still soft; 5 to 10 minutes.
- Using a lightly floured finger, gently tap on the peaks to flatten. Press a pistachio half (or whole if you like) in the middle of dough round.
- Bake for 17 minutes, just until the cookies look set. The color should still remain off-white and the bottoms should not take on any color. They will feel set to the touch, but not hard and will leave dough residue on your finger if you touch them. Don't worry, this will go out away once the cookies have cooled. It is really important not to over-bake these cookies, or they'll end up really tough and hard. (Since each oven runs differently and it's difficult to judge when they're done, it is recommended that you bake a test batch of 8 or so first, to figure out the perfect baking duration for your oven. Mine are perfect after exactly 17 minutes, but that might not be the case for everyone).
- Allow the cookies to cool on the baking sheets. If you need the baking sheet for another batch, just slide the parchment paper with the cookies off on to a counter to continue to cool completely. Ghorayeba will continue to bake as they cool, so be sure to allow them to come to complete room temp before sampling.
- Leave the cookies out for at least two hours or even overnight before storing or boxing, so the thin layer of film around them can set and disappear.
- Store ghorayeba in a regular container or box (not airtight) for 2 to 3 weeks at room temperature. Texture improves after the second day they're baked. The surface becomes smoother and the cookies get softer overall.
Recipe Notes
- The amount of sugar is according to preference. Chef Beshoy's recipe calls for 150g of sugar, but I personally prefer the extra sweetness of 175g. You can use either or, or something in between; no more, no less. Note that the less the sugar, the finer the texture will be.
- Ghee may be substituted with clarified butter at its solid state. Regular butter will not work here.
- My preferred brand of ghee is Best Sheraton.
- Be sure to use good quality, store-bought powdered sugar; the finer the better. Home-made powdered sugar will not work here.
- It is highly advised to use the piping method to portion out your dough, as rolling could be messy due to the stickiness of the dough. If you're not comfortable with piping, you can shape the dough by hand. First, you'll need to refrigerate the dough for about 2 hours or until firm but not rock solid, as it's too sticky to handle while at room temperature. Then taking 2 teaspoon-sized pieces of dough, use your hand to roll into balls. Place the ball on the baking sheet, then use the palm of you're hand to flatten. Press with a pistachio.
- As another shaping alternative, you may want to consider the slice-and-bake method. I have not tried it but I think it will work well, albeit the shape won't be ideal. Shape dough into a thin log over parchment paper or plastic wrap. Wrap it tightly, chill until firm, then slice into 1 cm thick rounds and bake!
- Doubling the dough amount is not recommend unless you have a bakery size stand-mixer. Most home-mixers, which are around 5-quarts, will not be able to sufficiently beat the dough into the required level of smoothness. You may halve or quarter the recipe though.
Recipe adapted from Chef Beshoy.
Measurements Note: All recipes of this site have been developed using weight measurements. Although US volume measurements have been included for your convenience, it is highly encouraged that you weigh your ingredients using a kitchen scale to get the best possible results. Due to the sensitive nature of baking, kitchen scales are proven to yield more accurate and consistent results than measuring cups. Enjoy!
Powered by ![]()
This post may contain affiliate links.
All images and content are owned by Cleobuttera® and are copyright protected. Please do not use my images without prior permission. If you would like to republish a recipe, please rewrite it in your own words and link back to the recipe page on my site. Original recipes and creations of this site are intended for personal and home use. Commercial replication or media consumption are only allowed with a written consent and agreement with Cleobuttera owners. Otherwise it is considered a violation of intellectual property. Thank you for respecting and appreciating the amount of time and effort that goes into creating free, unique recipes that make people happy.


Amazing as always !! You are the best .. cant wait to try it 😀 i was wondering how can i manage with the ingredients if i want to make the recipe in a small quantity .. i mean we are a small family and i want to reduce it like to the half ? Hope it will work out .. thank you honey ❤️
There’s a popular Pakistani cookie called Naan Khatai that is made almost the same way. The only difference is that we add some cardamom powder for flavoring and baking powder. And then just for looks some people decorate the top with egg yolk and nuts (typically an almond). I also refer to it as a type of Pakistani shortbread. I’ve always made it with granulated sugar though. Can’t wait to try out the powdered sugar version!
Isn’t it amazing how each culture has a variation of the same thing?! Love that you use cardamom in the Pakistani version. I may try it on this recipe one of those days. Thank you so much for sharing and I hope you love this one just as much.
Thank you so much Nada!
Absolutely! You can even quarter it too. It’s what I used to do when I was testing the recipe and it worked just perfectly. Enjoy ?
This looks lovely and irresistibly delicious ?
Can you please recommend me a good Ghee brand that I can use?
I wouldn’t want to mess it up!
Thank you ?
Thank you so much Nihal! I love Best Sheraton brand. It doesn’t have an overpowering ghee flavor which I prefer.
Hope you love this recipe ?
Can’t wait to try this! Can I pipe it with a fluted tip, like butter cookies?
I hope you love these Farhana! I haven’t tried using a fluted tip, so I can’t tell for certainty if it will work. My deep down guts tell me that it should work just fine though ? Please let us know how it works out if you do give it a try.
Hi I really want to make a lot of your recipes, but it requires a stand mixer and I unfortunately don’t have one and can’t buy one any time soon either 🙁 Is it possible to use a hand mixer? Or it won’t work well?
Hello Sajidah! A standmixer is easier to use, but definitely not the only way out. I always include in my recipe instructions an alternate method if you don’t have a stand mixer, including this one (please refer to step 2).
You can surely use an electric hand mixer here, but expect an arm’s workout ??? That means more cookies for you right? ?
Should I use raw pistachios? Where could I get them in Egypt?
Hello Ala’a ? Yes its preferable to use raw pistachios because they’ll toasted as they bake. I get them from Abu Auf. They just look greener than usual because I blanched them in boiling water and then pushed away the peel with my finger; you definitely do not need to do that. As for the sliced ones…they can be found at Al Rifai.
Attachment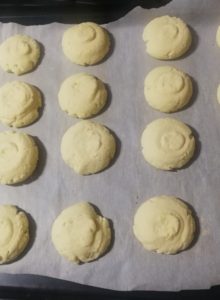
I literally got up and made this as soon as i saw your post on Instagram! You are just so inspiring and your posts are so detailed and eloquent. They look great but I may have made them a little bigger than I should as it gave me a smaller yield than stated. I can’t wait to try them! Thanks for all your wonderful recipes.
Love your enthusiasm Nour! They really look great. Hope you love every bit of them.
I have a problem with the Ghorayeba it’s amazing but it sticks on my hand whenever I touch it even after being a cool temperature I can’t even transfer it to a serving plate will that go off after leaving them overnight or no and what i can do to avoid this next time ?
Attachment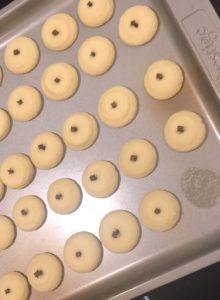
this is a part of my patch
They look so perfect Assil! I’m really happy to hear that you loved it. The stickiness is normal for the first several hours they’re baked, but will subside as the cookies are left to air-dry. I leave mine over the counter overnight and that does the trick. If they’re still sticky even after that time, then that means that they might be slightly underbaked.
With the temperature and time given the cookies are completely raw. I increased the temp to 160C and extended the time by good 10 minutes, then they came out great.
Hi Noor! I’m happy to hear that your adjustments worked out so well. Do you think your oven might be running lower than normal? 160C for 30 minutes in my oven would turn them into rocks. If possible, I recommend using an oven thermometer to check if your oven is as high as its supposed to be. Meanwhile, keep doing what you’re doing if it works for you. Again, every oven is different and we just need to adapt to it. Best of luck dear ?
Thank you for generously sharing these scrumptious recipes.
If I halve the recipe, should I also halve the time of beating to 7.5 minutes?
It’s my pleasure Nirvana!
Great question! I’ve made half and quarter of this recipe, and found that it still requires the same amount of mixing. Timing may vary according to your mixer’s speed and power. You just want to make sure that the dough is very smooth and looks like creamy hummus dip. Enjoy ?
Attachment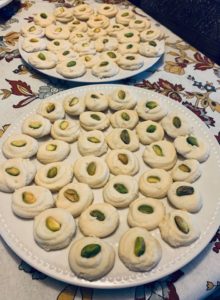
This might be my favorite Ramadan recipe yet! I’m partial to Scottish shortbread, and this is very similar in flavor but without the crunch. Mine don’t look anywhere near as pretty as yours – I didn’t have a piping bag or tip so I just used a Ziplock bag with the end cut off which didn’t give me a lot of precision when piping. Other than that, I think they turned out perfect – exactly the texture and color you described. My husband hasn’t tried them yet as he’s fasting, but he said they look just like the ones his mom made by hand in Alexandria. I also wanted to take a minute to commend you on your writing. I’m an academic, so I love all your details and descriptions and how scientifically you approach everything. I always read your recipes start to finish several times, even if I don’t make them, because they educate me so much about baking. Thanks for doing what you do, and Ramadan Mubarak!
Oh Amy! Your comments always make my day. I’m honored to hear these kind of words from someone who’s an expert in the field. That means the world to me; especially that English is my second language and I often doubt my writing skills.
I really couldn’t be happier to hear that you loved this recipe! I hope your husband gives them his Egyptian seal of approval. They look amazing already and I’m actually impressed with how they turned out with a humble zipperlock bag. Kudos to your piping skills ?
Assalamualaikum!
Thank you for the beautiful recipe!
I had two questions, what does powdered sugar mean? is it confectioners sugar or castor sugar or powdering sugar at home.
also can we use a icecream scoop to make the cookies intead of a pastry bag
Attachment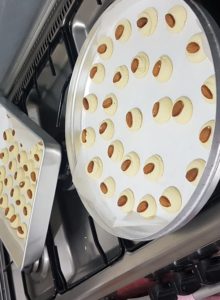
Perfect as always, first batch was gone in no time ?? here is a picture of the second one
They look so perfect Aya! I’m so glad you guys loved them so much ?
Attachment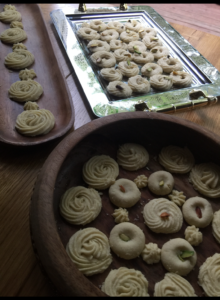
Tasbih,
Thank you for such an amazing recipe. I love the way your blog utilises ingredients I already have at home. When the Ghorayeba recipe landed in my mailbox, I was instantly motivated to find my three ingredients and start baking. I love how easy this recipe is. Although I think I might have gone a little carried away with the pipping tip …
Hahahaaa! I’m so happy you did because these lot incredible! A dear reader was just asking if she can use a fluted tip and you just now answered her and anyone who’s wondering the same thing ?
Attachment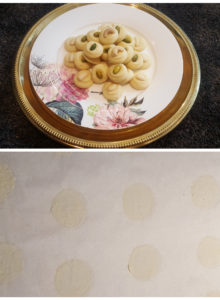
Greetings from Pakistan! I grew up eating tameeya, fatayer, kosheri juha and these cookies in Jeddah. Imagine my joy on discovering your blog ? Your milky bread is my favourite bread!!
I scaled down your recipe to 1/4th and honestly, it was a mistake! These came out delicious & the cookies were gone in 2 servings ? Next time, I will make a big batch. I have two questions please:
1. Are these supposed to be white or offwhite?
2. The parchment paper has a thin layer of cookies (after I let the cookies rest overnight and gently picked them up). Did I do anything wrong?
Many thanks and looking forward to more recipes. Eid Mubarak ?
Attachment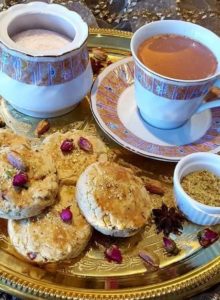
I forgot to mention we have similar shortbread cookies aka Nan Khatai but with slighlty different ingredients and technique. I find it amazing how different countries have similarities in terms of food and culture ?
They look so pretty Brinacyl! I’m so happy you loved them so much ?
1. The color of the Ghorayeba depends on the color of the ghee you’re using. Some types of ghee are white in color, and those will yield white cookies. Yellow ghee, on the other hand, will produce off-white cookies.
2. I experience the same thing too, so I guess its normal ? This can become more apparent in humid areas,
An embarrassingly belated Eid Mubarak to you too!
Hello again
sorry to bother u
if u don’t want to post a picture of your face
Pleeeeeease pleeeeeeas can we meet at midnight in Tahrir Square on Sunday night. Hopefully it’s a dark night and if it is nobody will be able to see us. x?????
Look forward to seeing you there!
Hahahaaaaa Maryanna! I actually sometimes post pics of my face on Instagram stories. Follow along and we’ll surely virtually bump into each other ?
Hello Tasbih,
I’m so happy to have found your blog?I have been looking around and I love it. The middle eastern dishes add a unique twist….keep up the amazingness??
I’m so happy you found your way here! Welcome aboard and enjoy ?
Maryanna,
If you want to comment on a blog post please talk about food and don’t press people to share pictures of their face.
Thankyou.
Great thanks
Hi Tasbih. This recipe looked great and I had to try it. I used half the recipe and used my electric hand mixer
After about 15-16 minutes of beating, it looked beautifully smooth – but unfortunately, when I tried to pipe it, it was too loose. The batter/dough spread on the baking sheet, almost like a macaron. So the cookies were very flat, unlike what I see in your pictures. And I couldn’t get a clean break when piping each cookie. I’m no piping expert but I’m pretty sure my batter was not the right consistency
Did I actually whisk/beat it too much, too long? I went at it for about 15-16 minutes, but it’s hard to judge the speed of a hand mixer. Also, I wonder if my room temperature is too warm – the weather here has been pretty hot, about 30°C.
I’m sure they will taste great (they’re cooling as I write this) but the shape isn’t right. Let me know if you have any advice. Thanks!
I hope they still tasted amazing Heshan! If you’ve weighed everything accurately, then it could be the heat that caused the loose consistency. Was your ghee melted by any chance?
They did taste amazing! I think the texture too was very close to what you’re describing – maybe I had over-baked it by a couple of minutes. But still the texture was extremely fine and pretty melt-in-the-mouth. I’m still figuring out the temperature of my new oven
As for the batter, I used room temperature ghee. I did weigh everything with my digital scale so I think the ambient temperature would be to blame. Cheers!
Tabish,
Is it possible to use home-made Ghee for this recipe? Thank You!
Sure! Just be sure that it doesn’t have any traces of the white milk solids. Enjoy ?
Greetings from Canada, Tasbih – I’ve baked several of your recipes which have become family favourites, but it’s not until I made these cookies that I felt I needed to comment. Simply amazing! The most incredible texture and delicious flavour of ghee (which I had to make myself since I was suspicious of the store bought versions). These will become my go to recipe for shortbread. Thank you for all your testing and tinkering to make the most perfect recipes.
Oh wow Jenny! Your comment has really made my day. I’m beyond happy that you loved these so much. Thank you for taking the time to get back to me with your feedback ?
I’ve just madre this recipe, I loved them, they were really deliciosu without doubt a! Thanks
Maigualida , from Venezuela
So happy you loved this recipe so much Maigualida ?
Hi, I’d love to try this recipe because ghorayeba cookies ste some of my favorite. My problem is I’ve always found ghee to be pungent and over powering. Do you have any brands you recommend? I don’t live in Egypt, so maybe a brand I could find in the States.
Hi Jain! I agree with you that so many ghee brands tend to have a very overpowering taste. I’m definitely not a fan of these. Unfortunately I’m not familiar with the brands available in the US, but if you can make it to a Middle Eastern store, try looking for an Egyptian brand. Generally, Egyptian-style ghee is milder than Asian kinds. There’s also the option of making homemade clarified butter. It’s pretty simple to make; you can find so many tutorials on YouTube. Several readers have tried clarified butter and reported back great results. Enjoy ?
Thank you so much for the detailed recipe. I remember these as a child – and have been searching for a recipe that was very specific as it’s not a cookie we make in my Italian home… Can not wait to try – even your comments with the specific ghee butter you use – sooo helpful!!!
It’s my pleasure Heather! Hope you love them as much as we do. Enjoy?
I have to say that these are exquisit, the flavor is soft yet intense, amazingly perfect! I had little troubles with the ghee, since I’m from México is not easy to find and quite expensive, so I used clarified butter instead, it was a bit of a mess because the first time I think it burned and it kind of exploded ?? I got little burns, but I was not going to give up, I searched and found another tutorial and yay!!! I had my clarified butter!!!! It was kind of a challenge and a bit of a struggle but I did it! The outcome deliciuos! One more time Thank you!
Oh wow! So happy the cookies were worth the trouble you went through to make the clarified butter. I’m really happy you loved them so much. Thank you for your wonderful feedback Claudia ?
Easy to read and understand!! Thanks
Thank you so much for the recipe
I have made your recipe beautiful and very delicious and this recipe that I have been looking for for a long time. I made it with homemade butter. It was a little harder than the recipe, so I made it manually and to taste I added Persian rose water. It tastes great but it was a little dry I cooked it at 160 degrees. Is this the cause of the drought?
Hi Tasbih. Made your Cheese Knafeh and also Cream Knafeh and both came out great, so am gonan try this too. am new to baking, what kind of piping tool should I use?
These turned out perfectly! I used a hand mixer and ghee from Monoprix, my French supermarket. I tried to eat one when it came out of the oven and it fell apart, but two hours later (it helps to read the instructions a second time), they’re absolutely the ghorayeba of my childhood. Thank you!!
Hi!! Absolutely delicious! However, a bit too sweet for my taste even using the minimum amount of sugar. Would it be possible to add less sugar and more flour?? Thank you and congratulationsssssss!!
I’m really happy that you loved them Susana! You can absolutely reduce the amount of sugar to your liking, but I don’t recommend increasing the amount of flour as that would make them tough.
Hello, I have been looking for a recipe for an Armenian Kourabia cookie like my grandmother used to make. They were exactly as you’ve described here in sweetness and texture. I cannot wait to try your recipe and thank you for sharing it.
These cookies resemble so much to Indian cookies Naan kataee. I’m going to try and make your version of cookies.
And I’d love to try the Indian version ?
Truly appreciate your effort in explaining every detail of the recipe,
My best ever dessert!
My concern is how using stevia powdered sugar may affect the texture of grybeh before and after baking. If in a negative way, could you please advise how to substitute the sugar, or weather if we can avoid it at all!
The other concern is, does adding rose water or any flavors considered as liquids which will turn into gluten when mixed with flour as you mentioned.
And last, what kind of non-airtight containers you mean, does it have to be like yours in the picture, or a plastic one with a parchment paper inside will do the work.
Sorry for taking so long listing my worries, since it is Truly a concern getting your grybeh
perfectly done?❤️
Thanks in advance
Hi Mariam! Thank you for your kind words.
I honestly have never tried making them with a sugar substitute so I can’t tell for certainty how they’d turn out. I’m guessing that since the amount of sugar is very low, stevia might just work well, albeit tasting a bit different. I recommend experimenting with a 1/4 of the recipe and see how it goes before committing to such a large amount.
If the amount of flavoring is very small such as 1tsp then it shouldn’t really affect the texture; any more and it might just make them slightly tougher. Just be sure to add it last thing after finishing whipping the dough and not from the start.
Best of luck!
Hello !!
Is it ok to mix in a food processor?
Hi Yasmin! I haven’t tried this recipe using a food processor, but you can try. If it gives you the same dough consistency as a mixer, then it should be fine. The most important thing to look for, is that smooth hummus-like consistency. Best of luck ?
I have to commence you on your skills and preparation process, i did as instructed they turned out perfect like it would at my local bakery in egypt, given that i’m in the UK this recipe was a God send. Your very talented msA. My sister is the one who recommended this page to me. Going forward it’ll be my go to page. They turned out looking wonky but who cares as long as they taste awesome ?
I also did your kahk and my Husband wants a second batch
Woooohoooooo! Giving you a taste of home is all I could hope for this recipe to deliver. So happy you loved it ?
Attachment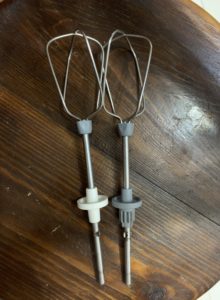
Hi Tasbih, I am not sure if you’ll see this but I was looking forward to baking this recipe buuuuuut. My problem is my standmixer does not come with a paddle attachment only a beater one (like the one in the photo) would that work ? If not could i beat it by hand using a whisk ?
Hopefully you see this before my family decides to buy ghorayeba ?
Thanks a mil.
Hi Malak! Absolutely. That would work just fine as long as beat it enough to get it to that smooth hummus-like consistency. Enjoy ?
Hi tasbih, should I use cake flour or all purpose flour?
Hi Sara! I use all purpose, but cake flour would work too as long as it’s not self-raising.
Hello Tasbih,
I don’t have a mixer, can I use a wisk instead and beat it by hand?
Hi N! Hmmmm…let me ask you this. Are you ready for an arm’s workout??? This batter needs to be mixed for 15 minutes with an electric mixer and it’s a pretty heavy dough. If you can beat it enough by hand to get it to that smooth hummus-like consistency, then by all means go ahead. Best of luck dear ?
Tried your kahk with agameyya recipe and it was awesome! Still waiting till Eid to actually try them, but I’m pumped.
Can’t say the same for this ghorayba recipe though, darling. I understand weighing should bring out more accurate results, but it really shouldn’t be this complicated… not more than the agameya kahk!!
This turned out to be a horrifying mess! The results were flat-can’t -even-call- them-cookie… things. Not my favorite recipe. I need to start from scratch, but I need something less complicated because I’m tight on time. I recommended your kahk to my non-Arab SIL, but I’m sorry I couldn’t recommend this.
Please keep coming with more awesome things to try!
Still a fan
Hi Hanaa! Im so glad your kahk turned out so good! I wish I could say the same for this one. I’m really sad to hear that it didn’t work out for you and thank you for sticking by. So many factors could have contributed to the failure of your trail and if you still like to give it another try, I’m here for you if you’d like me to help you troubleshoot. As you can see in the comments, so many others have tried it with so much success and I’d really love for you to experience the same results they’ve had. Did you by any chance watch the tutorial on my Instagram highlights? Maybe this would help you know what could’ve possibly went wrong. In any case, I really wish you the best in finding the ghorayeba recipe that works well you. Have a wonderful eid ?
Absolute perfection! Thank you so much! I don’t have a kitchen machine but managed with a single electric whisk. It was tough and there was dough flying everywhere but I stuck it out for 15 min and it was totally worth it! It’s gonna be a very happy quarantine eid!
Attachment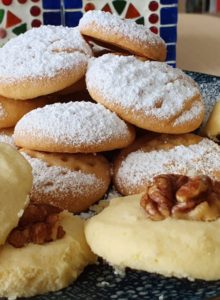
So delicious!! Made both your Kahk as well as these amazing cookies and they turned out so nicely! When a non-Egyptian can pull off these cookies for her Egyptian fiance I guess it’s safe to say that the recipes are perfect :). Can’t wait to try your basbousa!
YUM! They look so perfect Laura! You’re so sweet for giving your fiancé a little taste of home. Hope you love the basbousa just as much ?
Woooohooooo! Really happy you were able to pull it off with a hand mixer. Sorry you had to go through the arm workout. And the mess ? Happy it was worth it and made your quarantined Eid a little extra sweet.
Hi! Eid mubarak!!! I hope you and your family are staying safe.
I followed your recipe and turn out good initially. However when picking them up or eating them it cracks very easily. They are super fragile.
What have I done wrong?
xx
Thank you Dalia! I hope you had a wonderful Eid yourself ?
It sounds like they needed an extra few minutes in the oven.
This is in reference to the ghorayeba. xx
Hi, thank you so much for your recipe! I can’t wait to try it. I have bought a food scale since you said that over packing the cups causes issues, so waiting for the scale to arrive before I start.
I did have a question on the the blue serving dish with the lovely handle in the center. Where did you get it, I would love to buy one! if its from Egypt, please tell me where, I go to Egypt every year.
I’ve never had ghorayeba before, but made these and they were actually perfect. They dissolve into almost nothingness when eaten, they’re so soft! I clarified my own butter and ended up needing to add a smidge of vegetable oil because it wasn’t coming together into that hummus like consistency, but it was worth the troubleshooting!
Hi! Thanks so much for the recipe. Ever since I came back from a trip to Jordan I’ve been craving them. Tried a few recipes but never quite caught it. Still have to sample since they haven’t cooled down completely, but I think this might be the recipe! My question is, can I freeze these? We are in partial lockdown and I’m the only person eating sweets in our household… Thanks in advance for your answer!
افضل غريبة عملتها بحياتي لكن ترك آثار للغريبة في اليد بعد النضج كيفية التغلب عليها
I measured everything with a digital scale and as soon as I put the cookies they all went drippy and literally combined together.. so now I’ve a whole sheet of cookie the size of the oven tray!! I wonder why. Btw they’re still in oven at the moment and I’m almost heart broken. ??
Oh no! I’m really sorry to hear that Zahra. Was your ghee melted by any chance? Also note that if your kitchen is too warm and with the long beating time, the dough can get overheated and get too soft. I haven’t experienced this myself, but it’s a viable possibility. In that case, I’d recommend placing the dough in the fridge to firm back up to a pipeable consistency before proceeding.
I’m from the US, but I lived in Egypt for 7 years! I ADORED ghoreyyeba! I could never understand what gave them that amazing texture. Just a beautiful mystery. I guess the secret is elbow grease. Thank goodness I have a stand mixer. I can’t wait to give them a try.
I hope you love this one just as much Emily ?
Attachment
Hi Tasbih, I love your recipes and the techniques. I come from Hong Kong, live in Rome and have an Egyptian colleagues, who brings me Egyptian desserts that are so good and not available from anywhere else. I have been looking for a cookie recipe that is not only delicious but also holds beautiful form. Yours is the only one that can achieve that. I only added some chocolate to the dough, and below is a specimen.
yummy and looks very delicious i’ll try to make it.
The recipe looks simple and the result awesome. Can I put this batter into a cookie press?
Attachment
Relevant information and best selection of words really thanks for share it.
I had never heard of these before. But I was looking for something as a dessert for our neighbours who are university students from Egypt. I followed your recipe exactly and the results were astounding. They said they were exactly like the ones they got in Egypt and were better than anything they had tasted in Canada. One of the boys also said they were much better than what his Mom could make. High praise indeed!
Attachment
Relevant information and best selection of words really thanks for share it.Here we introduce the top coupons. also we provides Our Trending Stuff with 50% discount then you use Revounts.
My grandmother used to make these every year around the holidays and so far this is the closest I’ve come to her recipe. Color and taste were perfect however, after cooking the cookies seem to be quite doughy (lots of residue on fingers when picking them up). Any chance they weren’t cooked long enough?
Myer has the availability of artificial materials has changed the meaning of “fashionable” of Myer’s reputation. We are offering a 20% discount on MYER Coupon Code Australia from categories of clothing to beauty products.
Thanks a lot for the thorough recipe. I bear in mind these as a child– and have actually been looking for a dish that was really details as it’s not a cookie we make in my Italian house … Can not wait to attempt– also your comments with the certain ghee butter you use– sooo handy!!!
Pingback: The Perfect Sugar Cookie, Ghraybeh! – Afaaf's Cookies