The Ultimate Cinnamon Rolls
An amazing recipe for squishy soft cinnamon rolls with a super fluffy and tender texture and a gooey filling that caramelizes in the bottom. A halo of perfectly sweet cream cheese frosting ties everything together. A brilliant Asian technique called Tangzhong, ensures moist, airy rolls that stay soft for days.

Very few things in life bring me a sense of accomplishment and relief than when I conquer a recipe that’s been giving me a hard time.
Accomplishment is understandable…but relief? Yes relief!
Things like not getting the texture right, nailing the flavor, or perfecting the height is what keeps me up all night. And when I do eventually drift off to sleep…it’s what I dream of. Anyone else’s dreams are centered around food?
Welcome to the obsessive compulsive baking life. Sometimes I feel like I need help ?
Red velvet cake has been haunting my dreams for years, yellow cake is taking over my brain cells, and until very recently, cinnamon rolls were all I could think of.
But that has finally changed when the best cinnamon rolls I’ve ever tasted emerged from my oven.
The first bite was not only followed by a HUGE sigh of relief, but with the dorkiest happy dance known to man, and an embarrassing amount of ooohs and aaaahs.
Oh my God, cinnamon rolls…you’ve taken me too long to perfect, but you are so worth the wait.
So why did it take me so long to find the ultimate cinnamon rolls?
My wishlist was long and I wanted it ALL! Getting most of it, just won’t do. They had to have it all…no compromises.
My idea of the perfect cinnamon rolls needed to be:
- Squishy soft, and stay that way even after they cool.
- Airy and fluffy in texture.
- Generous with a gooey filling.
- Forward with the cinnamon flavor.
- Slathered with a cream cheese frosting that compliments rather than steals the show.
- Not overly sweet.
- Not too rich.
- Big and beautiful.
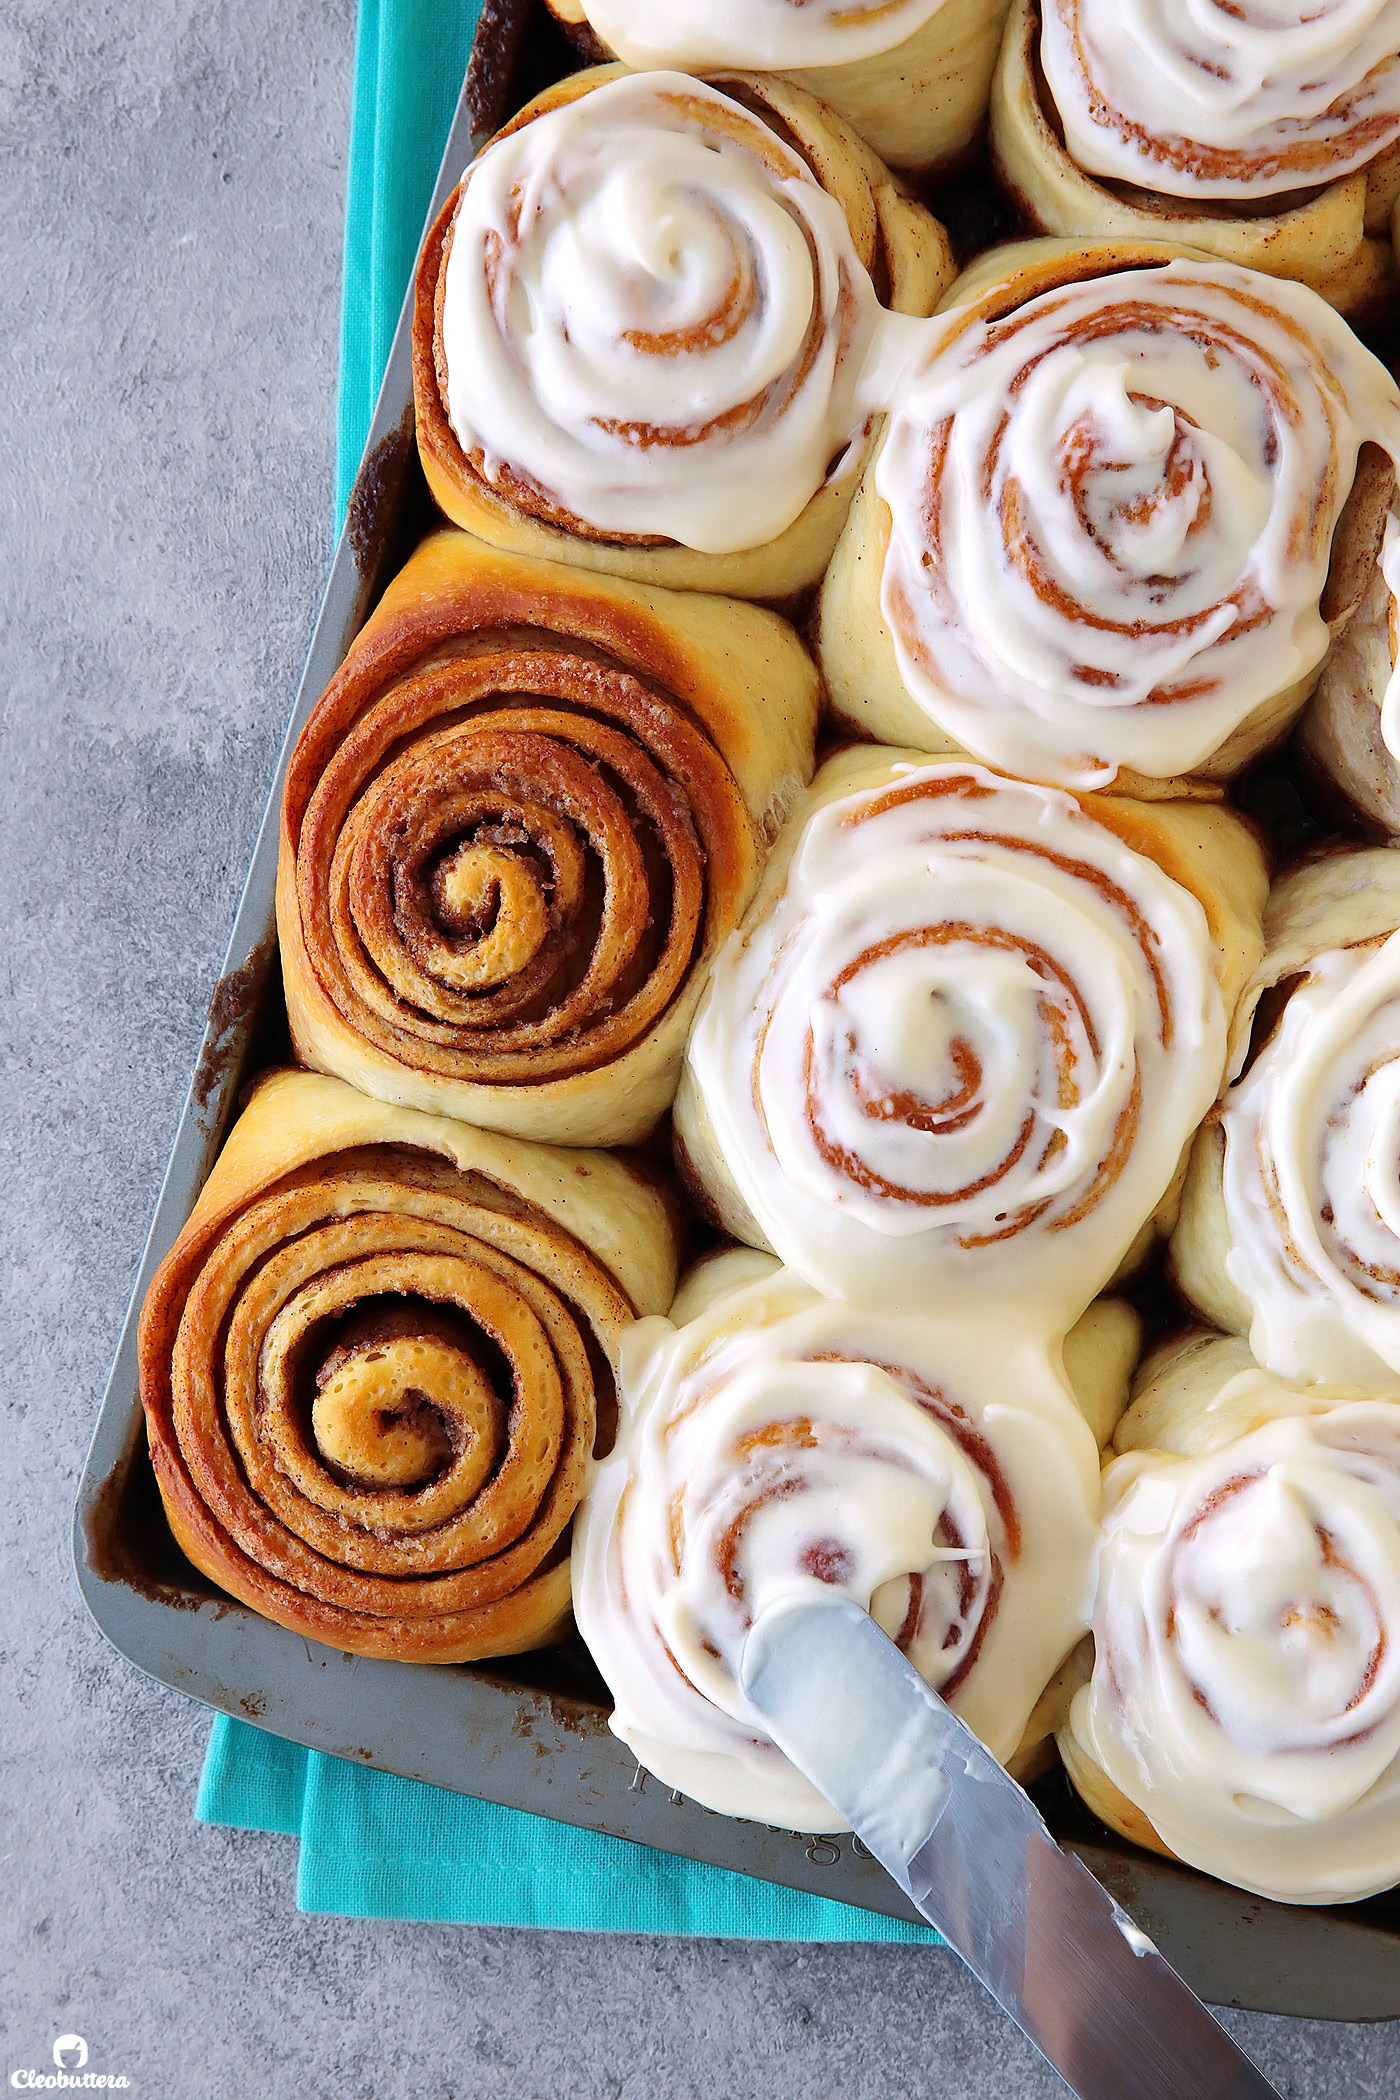
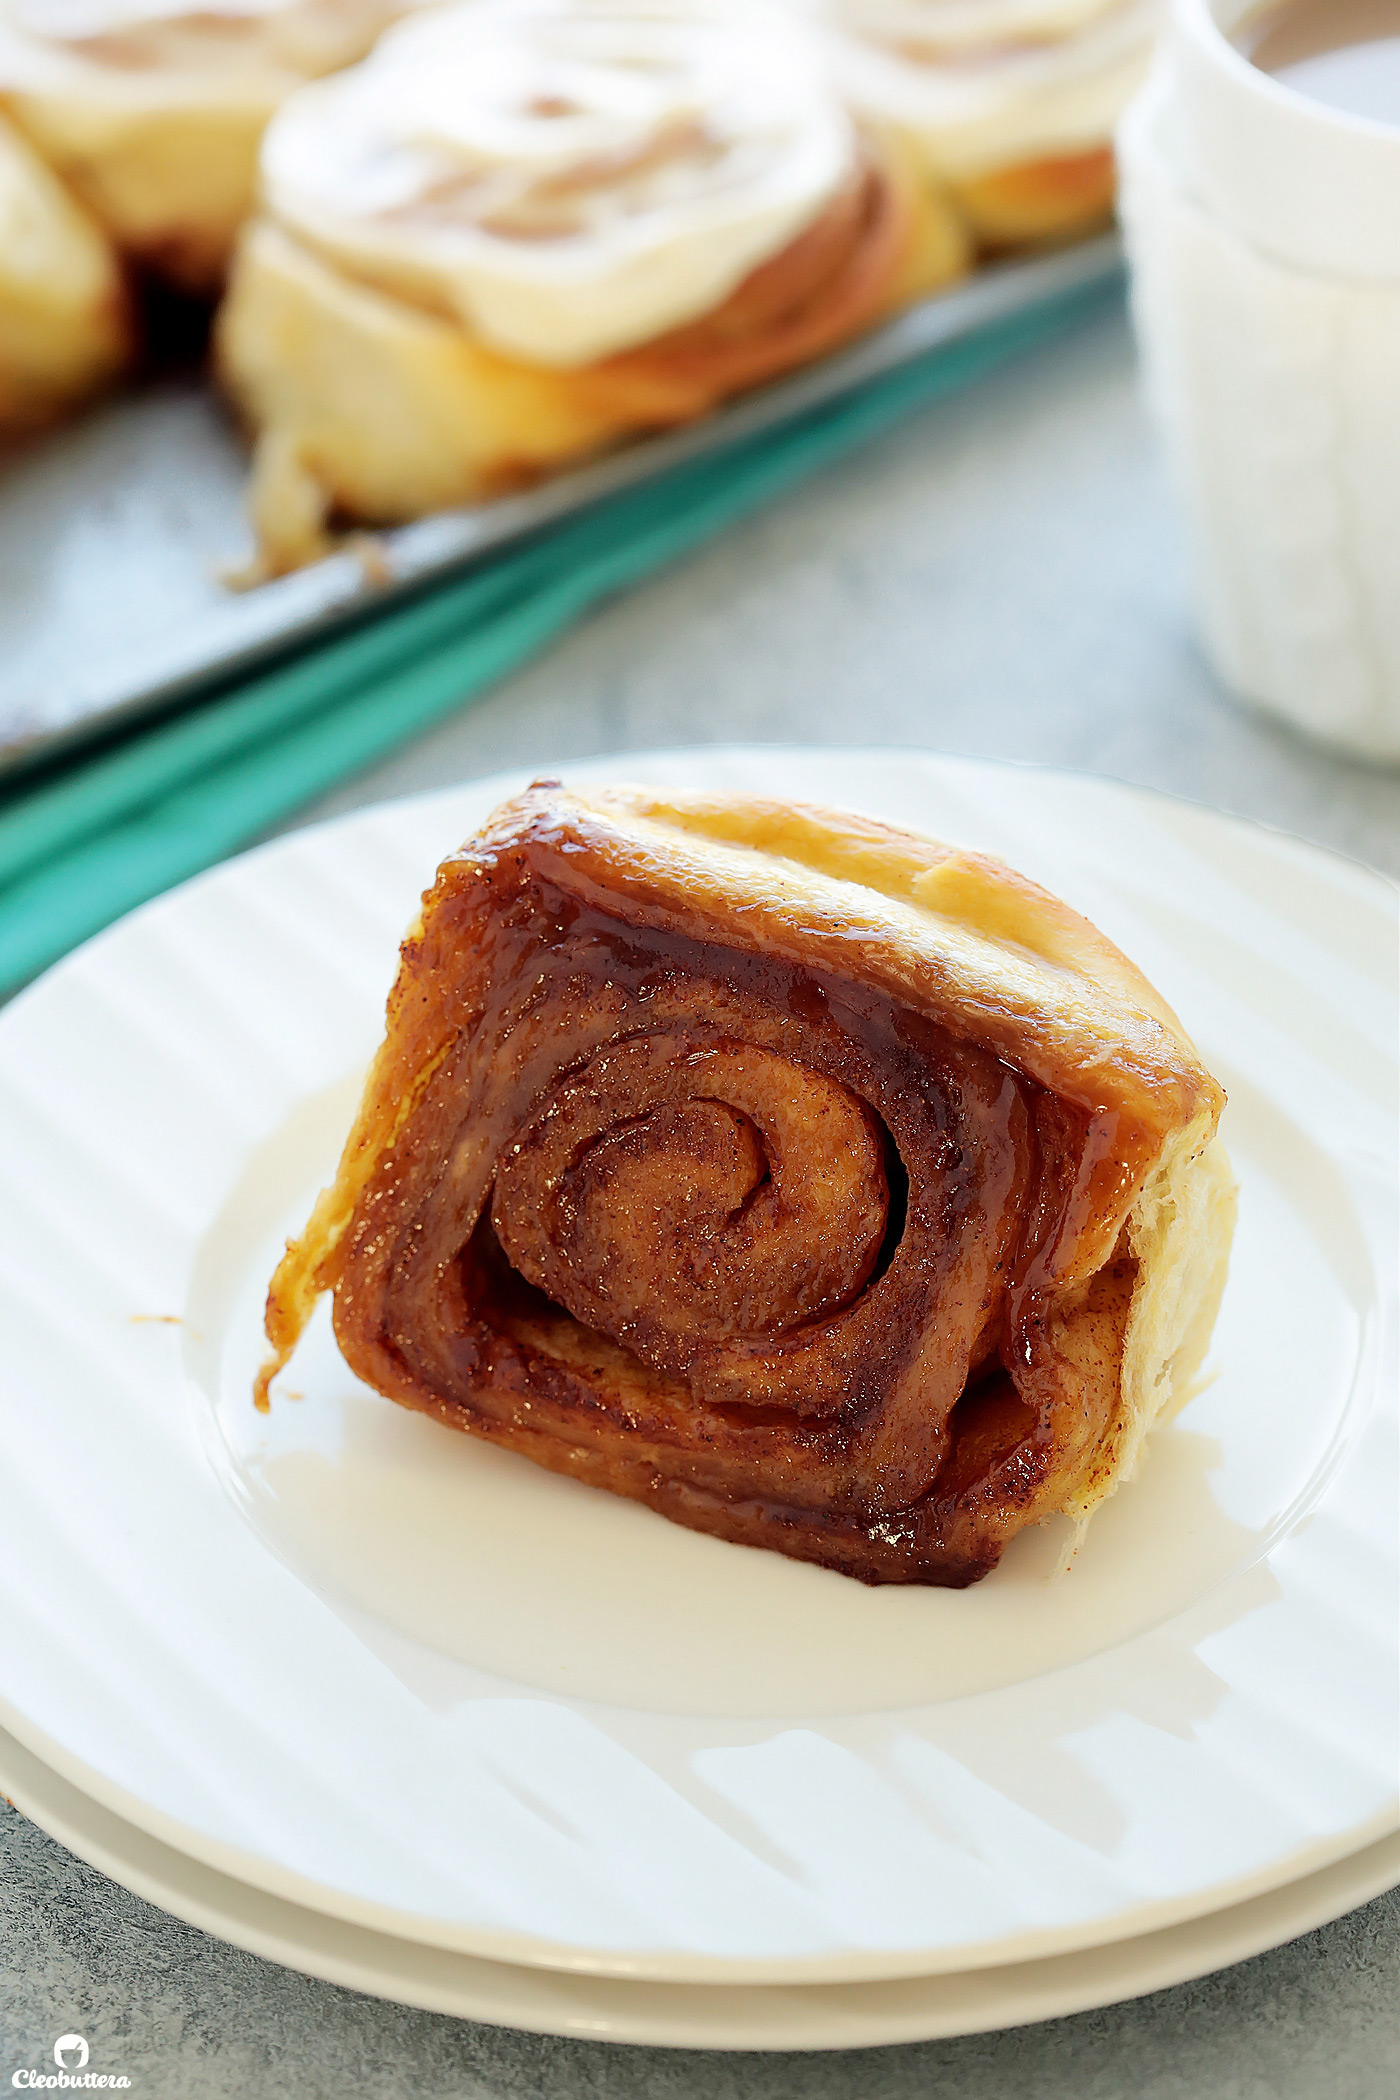
- Bonus: Have a caramelized bottom, that leaves a mess behind.
Is that too much to ask?
Apparently yes, but I cannot be more happy to say at last that these cinnamon rolls, check every attribute on the list.
Even that bonus caramelized bottom.
And that I can now sleep comfortably knowing that I have a killer homemade cinnamon rolls recipe with gold standards under my belt.
Something I can pass on to my kids, grace special brunches with, and welcome guests to. Because is there anything more inviting than the smell of cinnamon rolls wafting from the oven?
There are so many great cinnamon roll recipes out there, in fact, I’m not sure if a bad one actually exists.
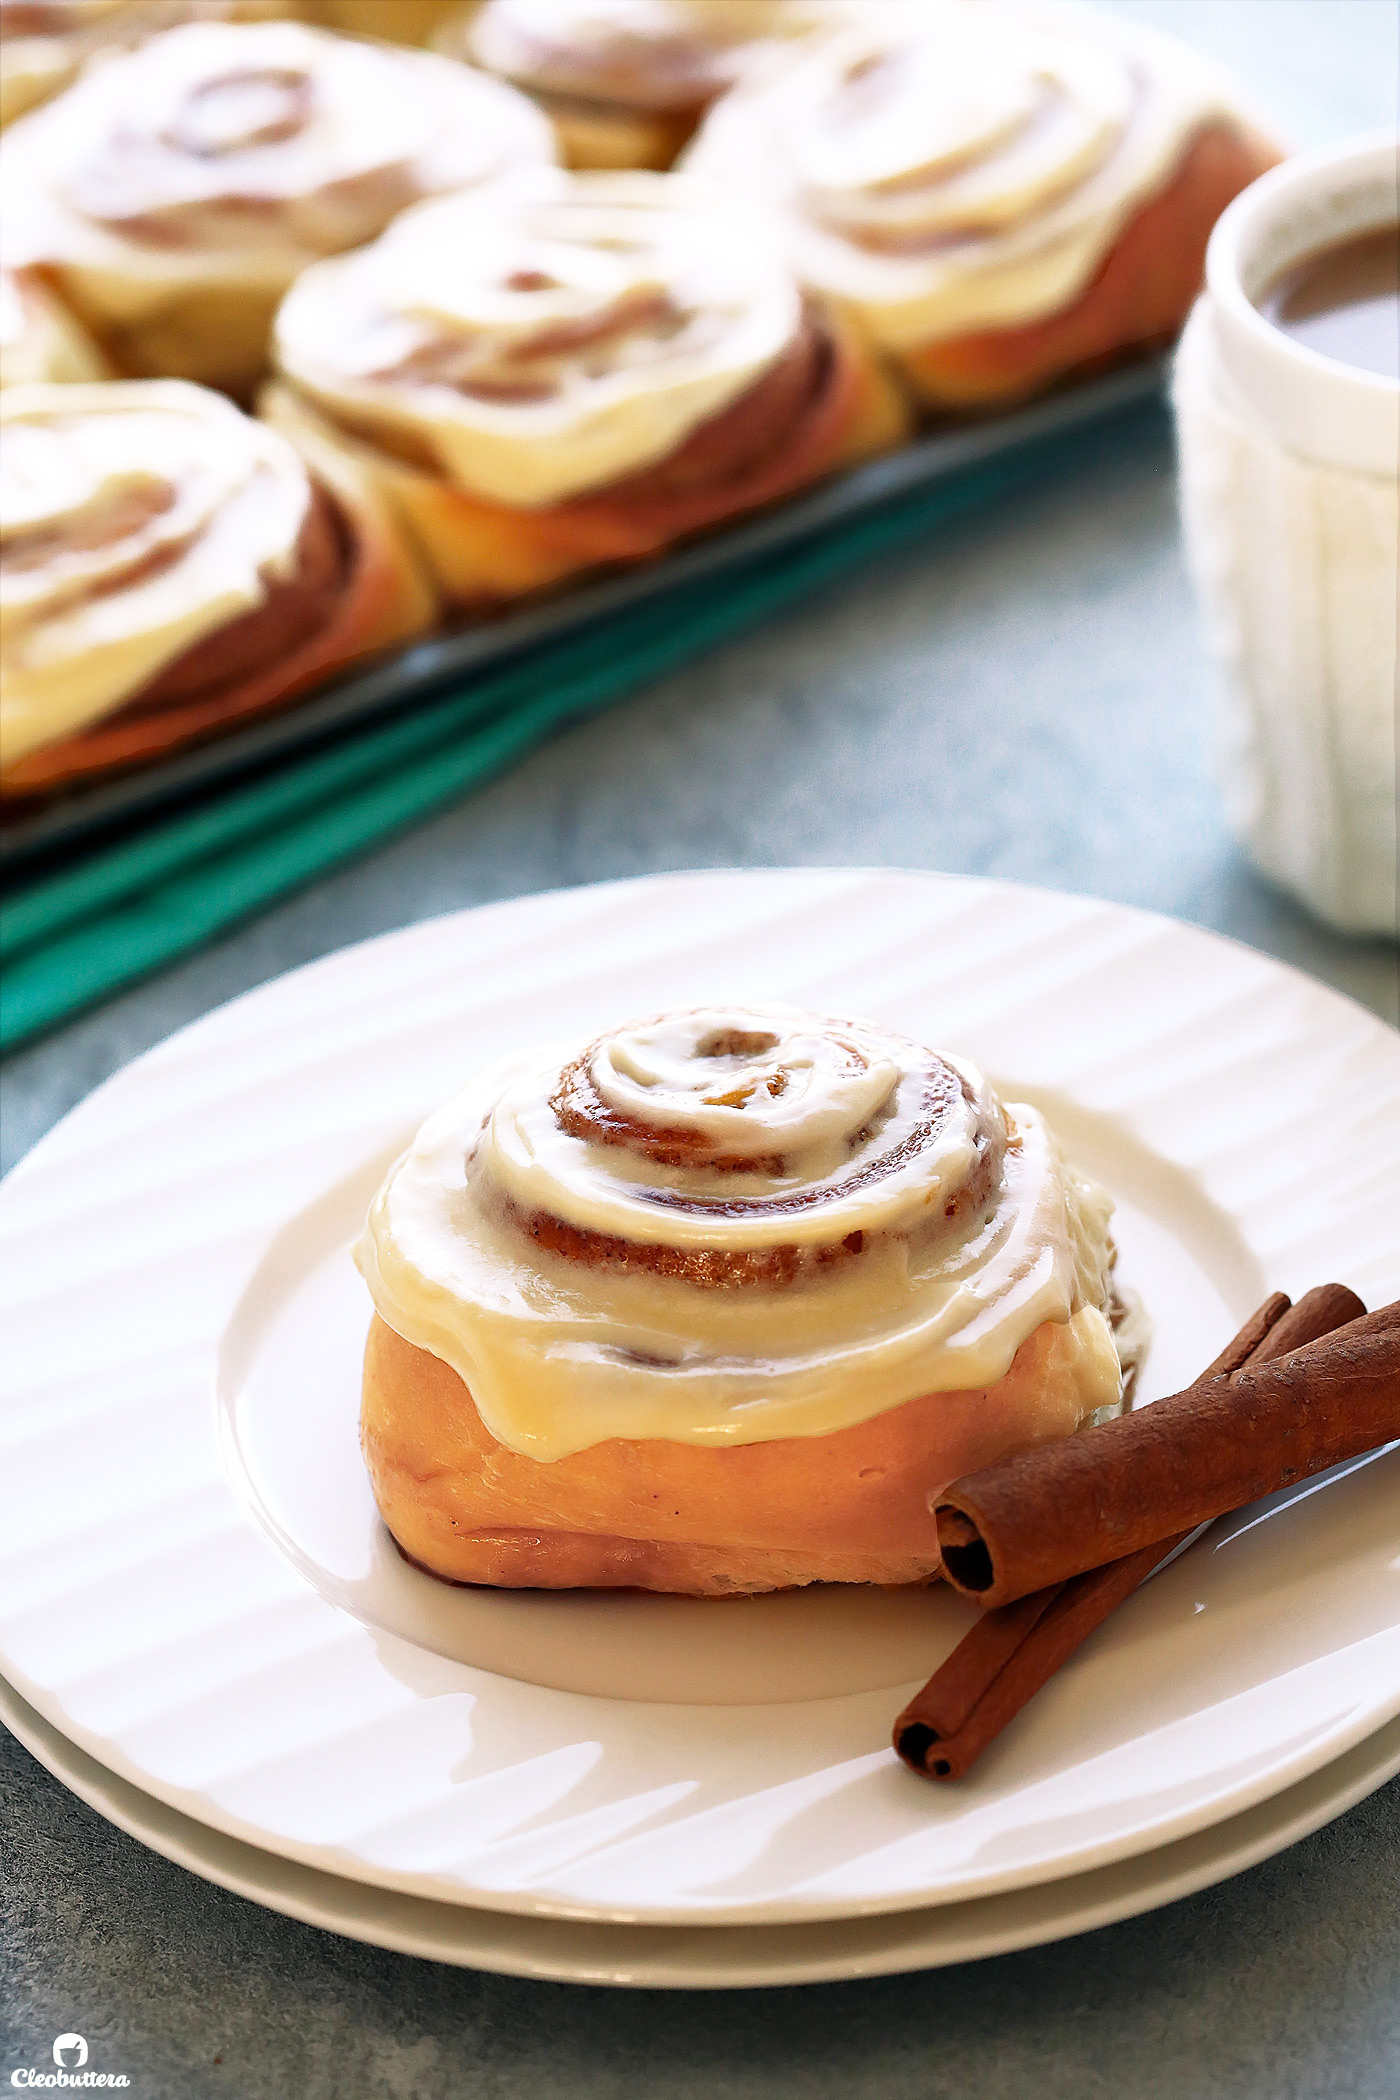
What makes this one my absolute favorite is it’s impossibly plush and fluffy texture that stays soft for days. Literally.
As in you can eat them 2 days later…and they’ll still be oven-fresh soft.
They have a featherlight airiness that makes them melt-in-the-mouth, without being too rich.
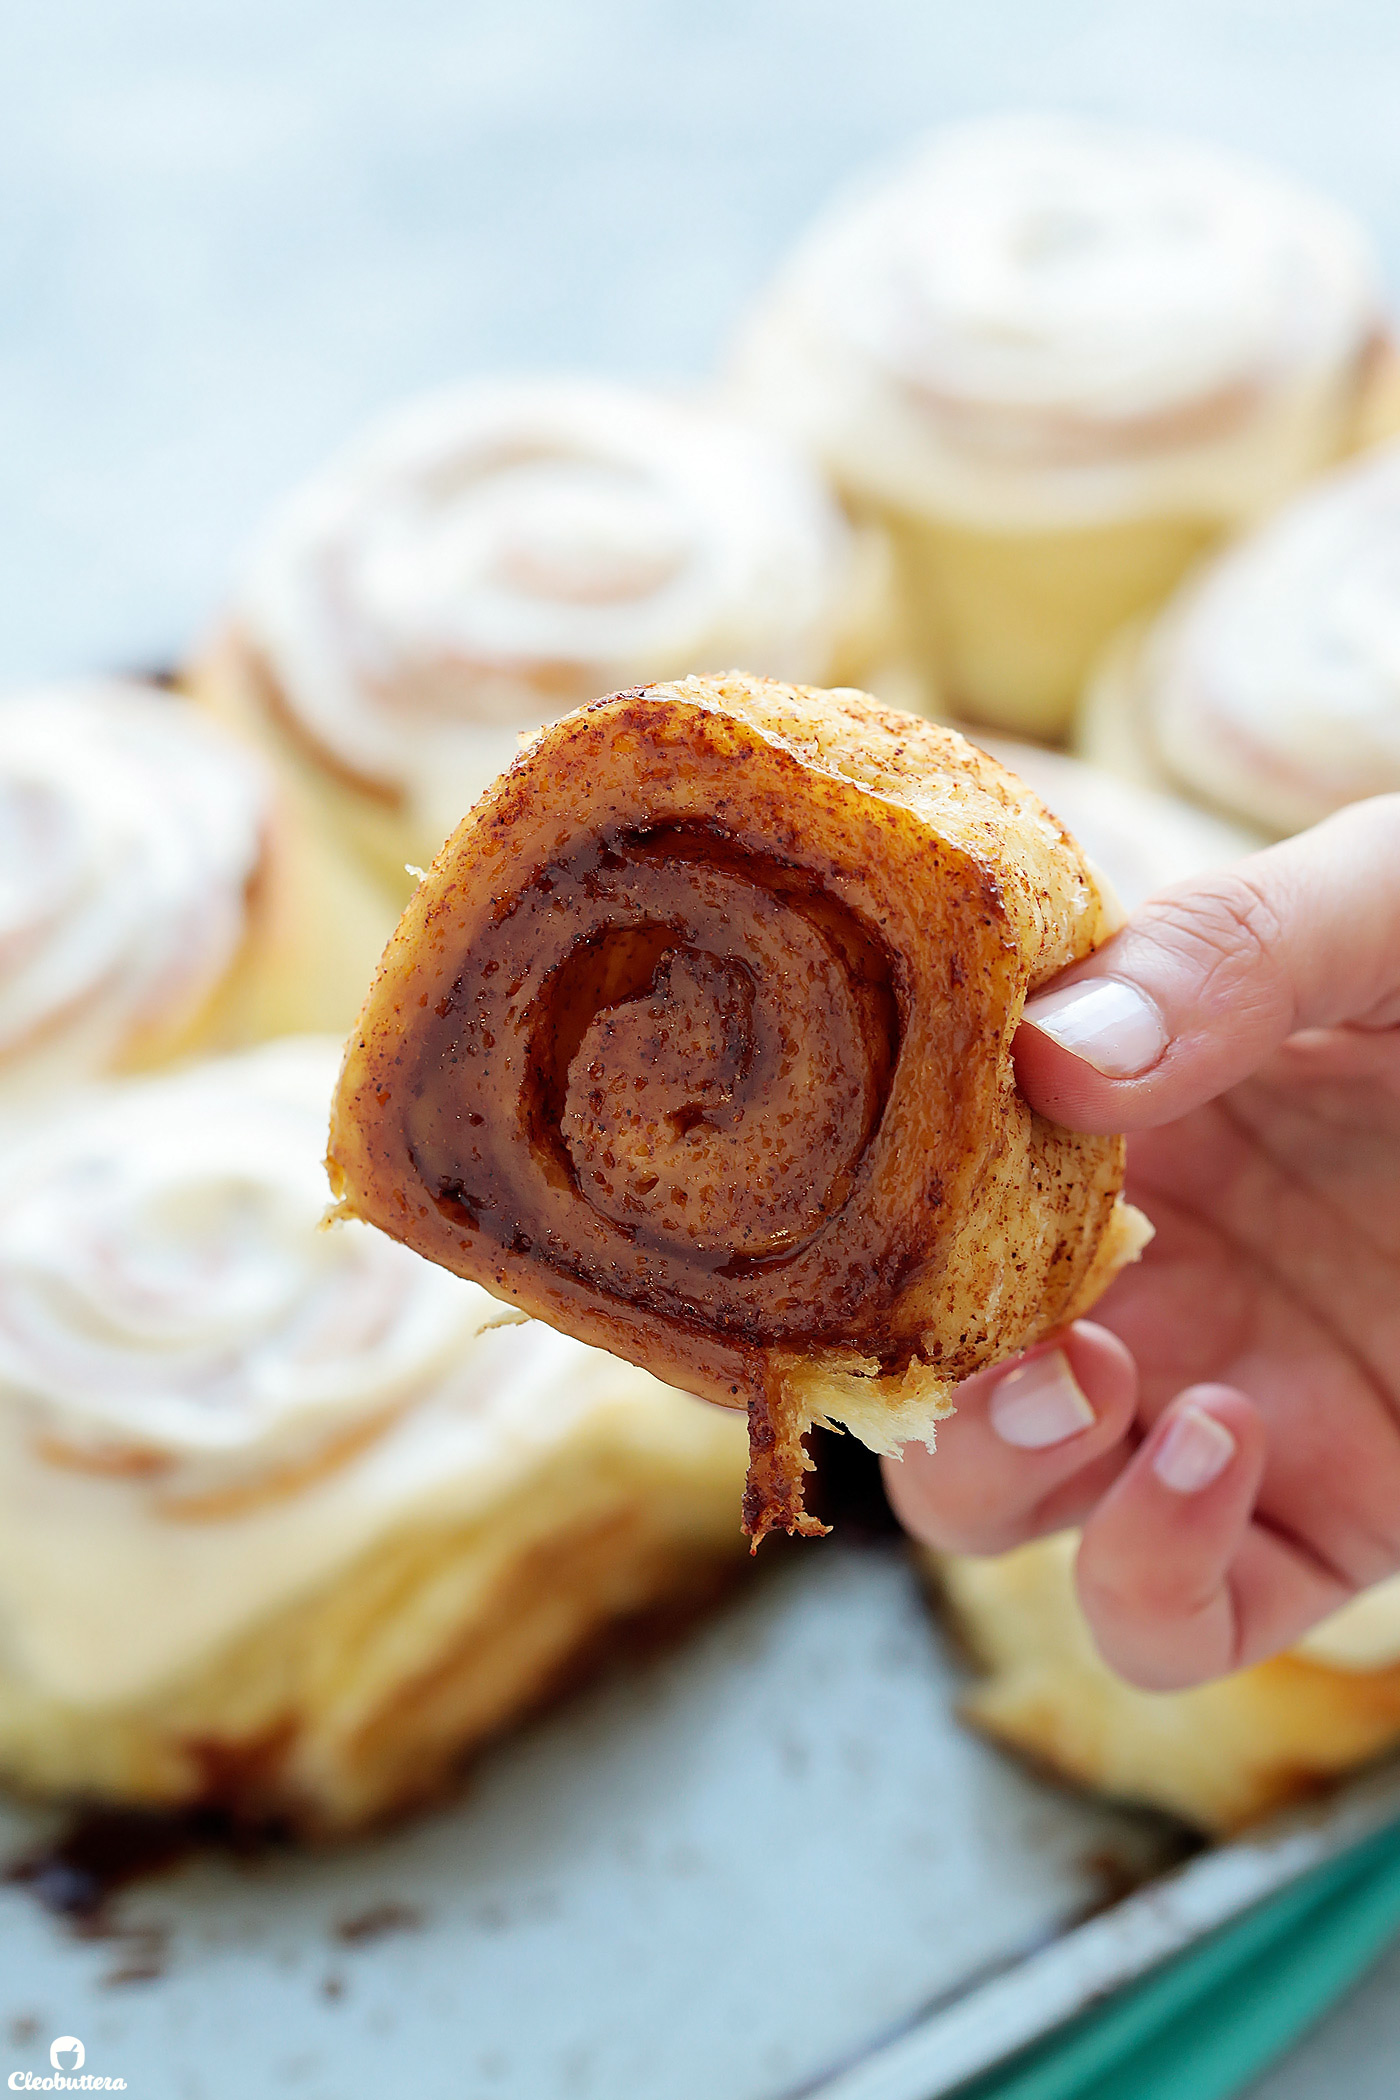
I mean would you look at that open crumb of this fluff ball..

Their cotton-like, pillowy texture just sets them apart, and makes you want to go for more.
I realize that that’s more of a problem than a hallmark, but really…they feel lighter on the stomach (not calories… I wish!) than most cinnamon rolls, say a brioche-based dough for instance, which makes it easy to go for seconds. But that could be just me ?
The texture of the dough owes its exceptional softness to a popular Asian bread making method called Tangzhong.
In fact, the dough is based on a Tangzhong bread recipe, that I posted years ago under the title Ultra Fluffy Milk Bread Rolls. It is by far, one of the most popular recipes on the blog and for a good reason. Readers cannot get over that extreme fluffiness of the bread and could not stop raving about it in the comments.
So much so that I’ve been asked many times, if the dough’s recipe can be adapted for cinnamon rolls. Having now tried it myself, I can now confidently answer with a BIG, FAT:
YES!
The first time I tested the aforementioned dough for cinnamon rolls, it had a great texture, but the overall taste was overly sweet, and it only made a batch of 8. Now in my humble opinion, if you’re gonna go through all that amount of work, then you might as well get more out of it…12 sounded like a more reasonable amount.
So as I set out to improvise, I discovered that King Arthur Flour had already done all the work. They omitted all the sugar from the dough, and extended the amount of ingredients to yield a batch of 24 smaller rolls.
So I tried their recipe for Soft Cinnamon Rolls, but since ‘BIG & Beautiful’ was a must on my list of cinnamon roll goals, I decided to go for 12 bigger ones instead. Bigger means more fluffy innards and gooey centers and I wasn’t about to give up on that. I also used a different filling and frosting, but more on that later.
The textural results were impressive but I wasn’t a fan of the lack of sugar in the dough. Even with the added sugary filling and frosting, the dough tasted too bread-like and salty. So after playing with different amounts of sugar, I landed on just the right amount that yields perfectly sweet buns.
So back to that magical dough and the secret to its fluffiness.
What exactly is Tangzhong?
Tangzhong is an Asian bread-making technique that produces soft, light-textured, and tender breads and rolls. I promise it is much simpler than it sounds! It only involves cooking 5-10% of the flour in the recipe, with some of the recipe’s liquid, into a thick, pudding-like paste. This paste is then added to the remaining recipe ingredients and kneaded into the dough.
The paste traps water, which makes it possible to add much more liquid than what the flour can normally hold. The extra liquid keeps the crumb moist and tender without turning soggy. It also converts to steam during baking, which makes the bread fluffy and light.
A perfect dough is the heart and soul of cinnamon rolls, but that doesn’t make the remaining components any less important. And here’s where I departured from King Arthur Flour’s recipe.
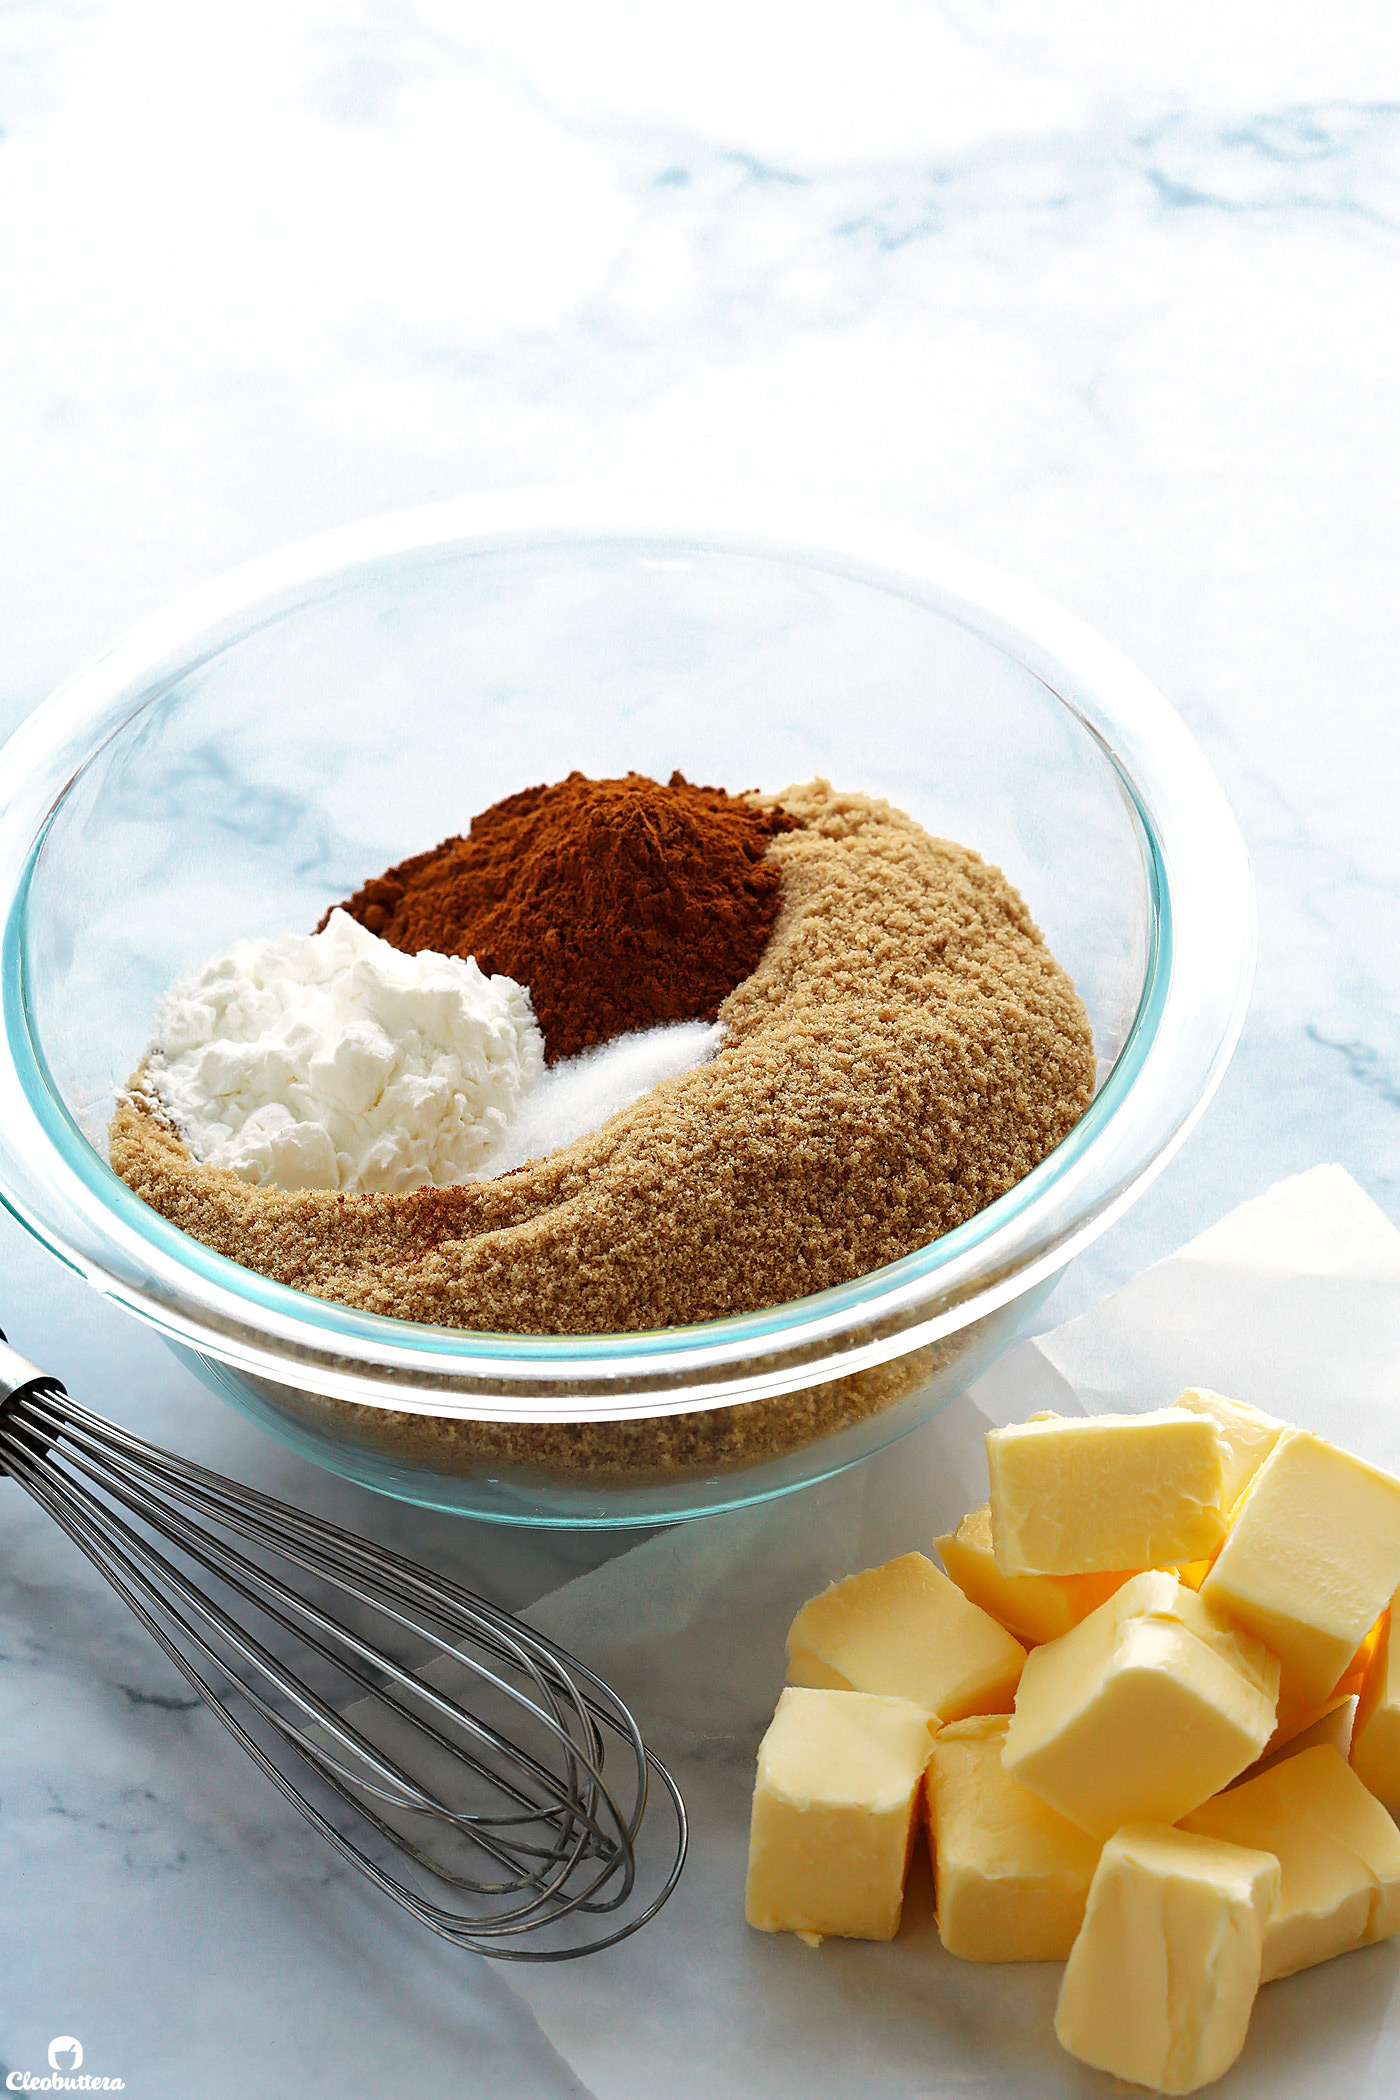
For a gooey filling that caramelized in the bottom and smeared your lips with deliciousness:
- Butter (a lot of it) proved to be a must. Not only does it create a gooier filler, but it also hydrates the dough, making it even more soft and tender.
- All brown sugar made for a filling that is gooier than a combination of brown and white, and adheres better to the dough.
- A generous amount of cinnamon for perfectly spiced rolls.
- A little bit of salt, balanced out the sweetness.
- I also took a hint from Lauren’s Latest and Oh Sweet Basil who both use cornstrach in the filling. I was weirded by it too…but it works as an emulsifier and really helps thicken the consistency of the filling, making it even gooier. Don’t worry…you’re not gonna taste it.
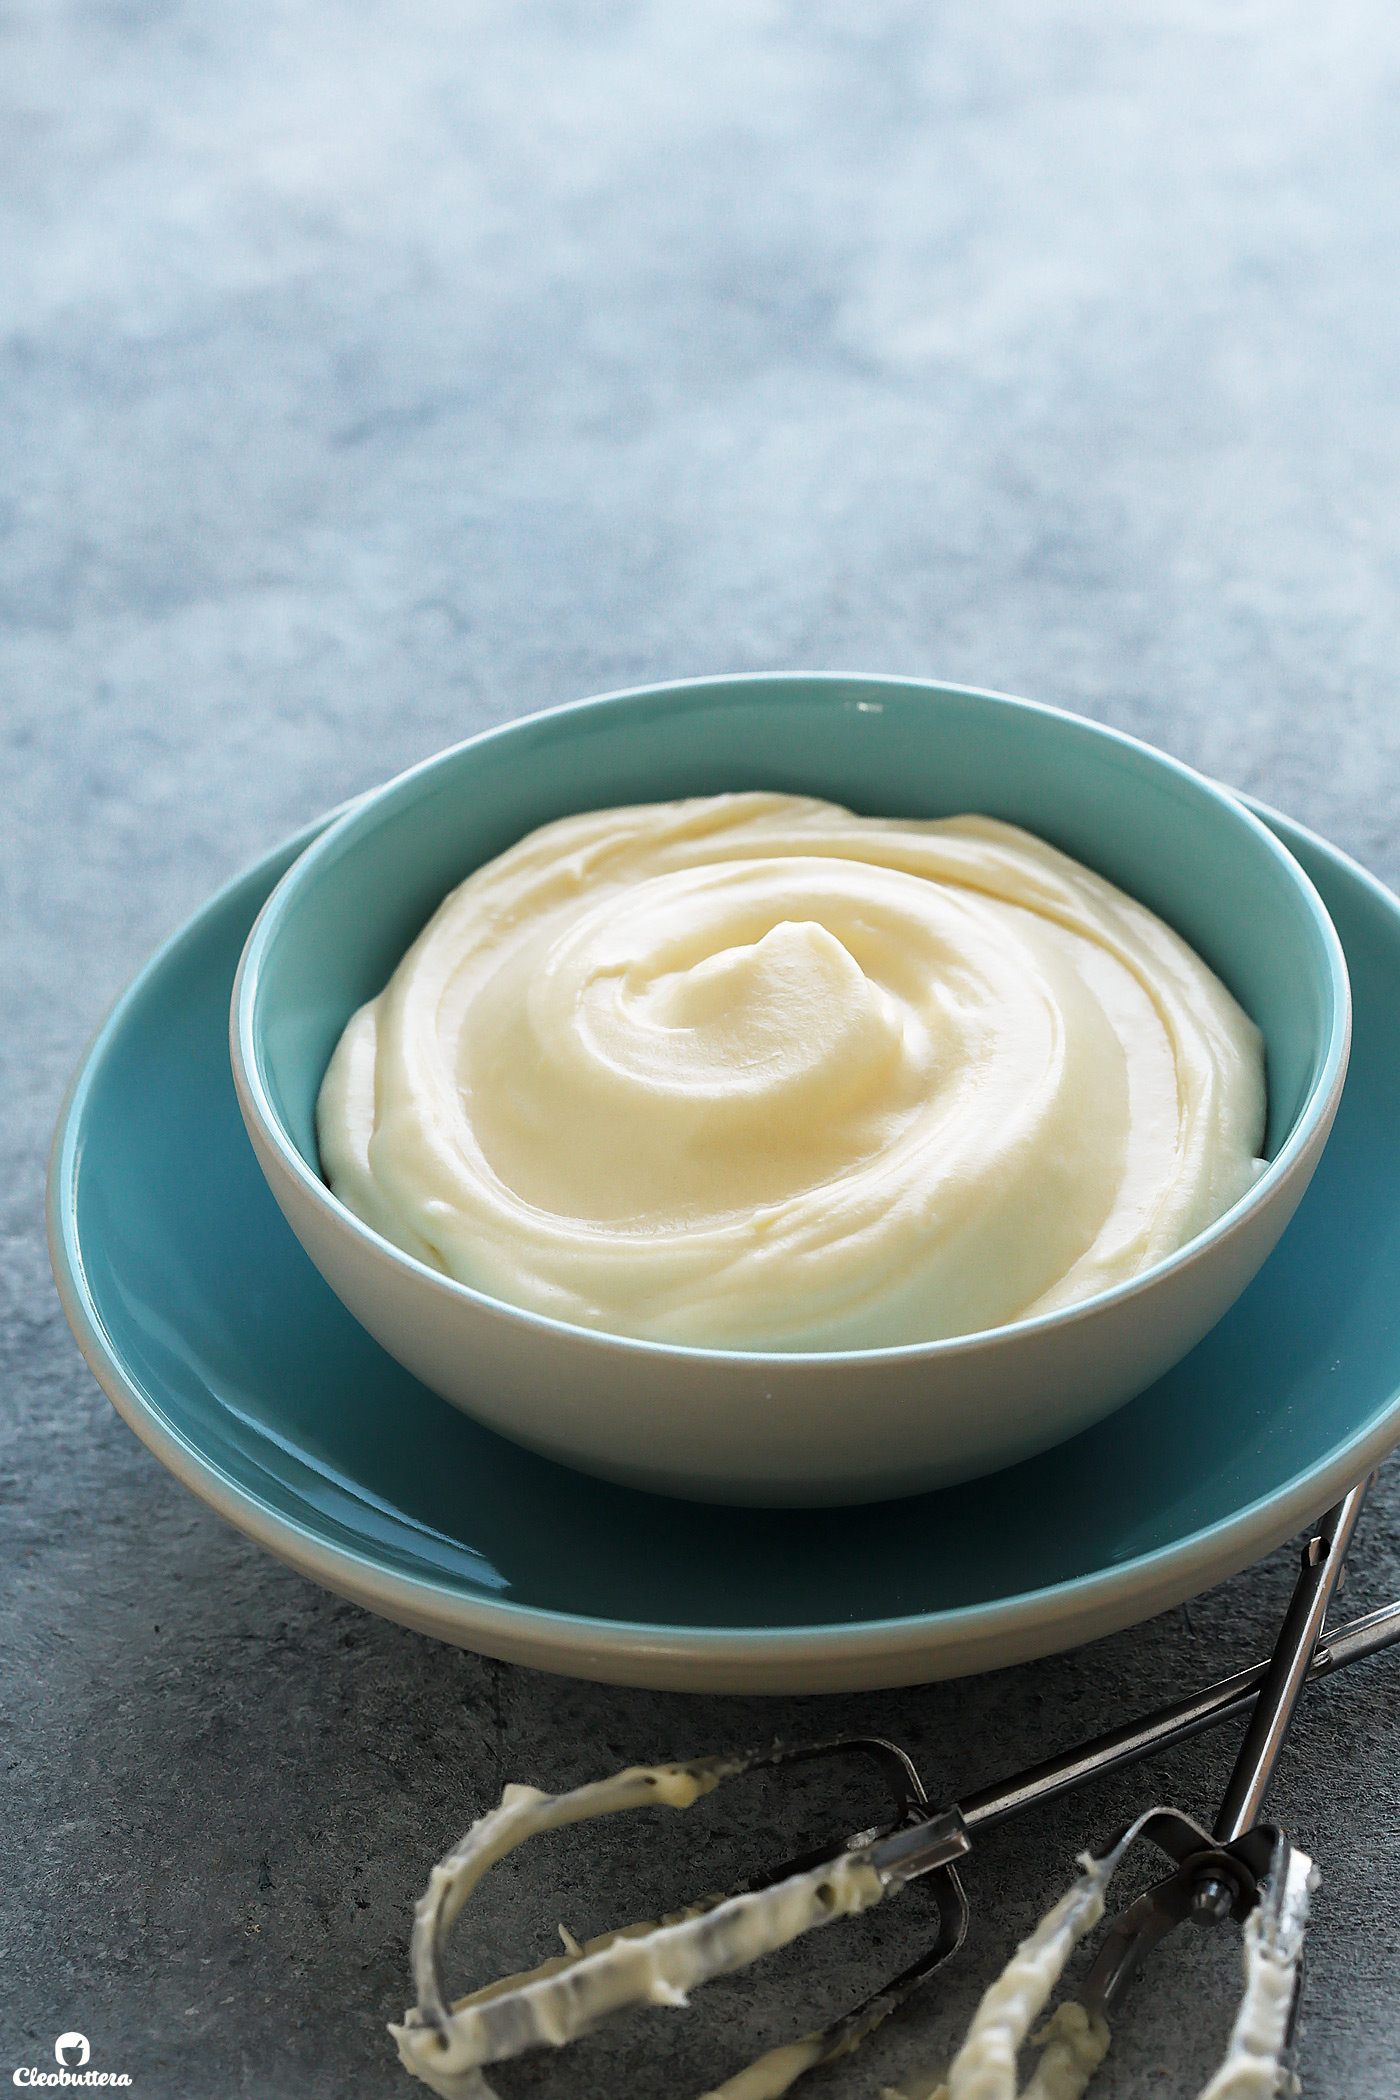
As for the last component, the crowning jewel of the rolls; the cream cheese frosting, here’s what I discovered.
The perfect cream cheese frosting for cinnamon rolls:
- Equal parts of cream cheese to butter made for a perfect ratio of creaminess to tanginess, without overwhelming the flavor of the the rolls themselves.
- Less powdered sugar than most recipes, keeps the sweetness at bay.
- A pinch of salt oversets the sweetness.
- A squeeze of lemon juice adds another dimension of tanginess without tasting like lemon.
- Vanilla adds a subtle floral flavor.
- A splash of milk softens the frosting, to make it easier to spread and melt into the cervices of the rolls.
Now that I’ve talked your ears off…
Let’s make some rolls!
Eventhough I tweaked a couple of steps from the original Milk Bread Rolls recipe, the basic idea is still the same. So it might be a good idea to hop over to the post and watch the VIDEO!
But worry not my friends, an additional avalanche of step-by-step photos in true Cleobuttera fashion, still awaits you below.
Let’s start with the Tangzhong paste!
Here we have some of the flour, water and milk cooked until a thick paste form. It only takes a couple of minutes on the stove, and the results are well worth the extra step.

To the Tangzhong, we’ll add melted butter…
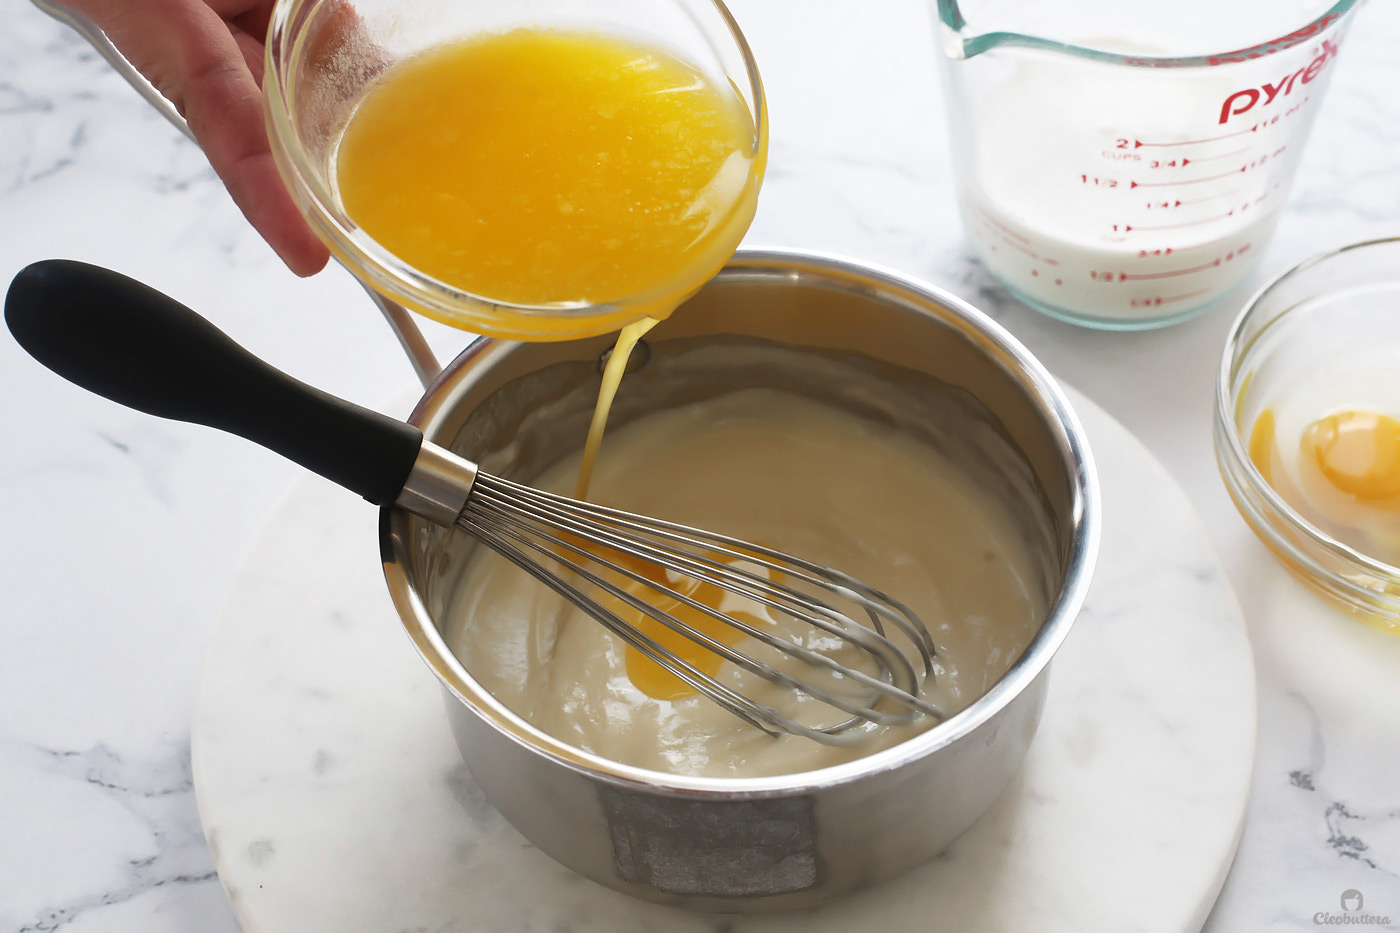
Milk straight from the fridge or cool room temp, to cool it off…
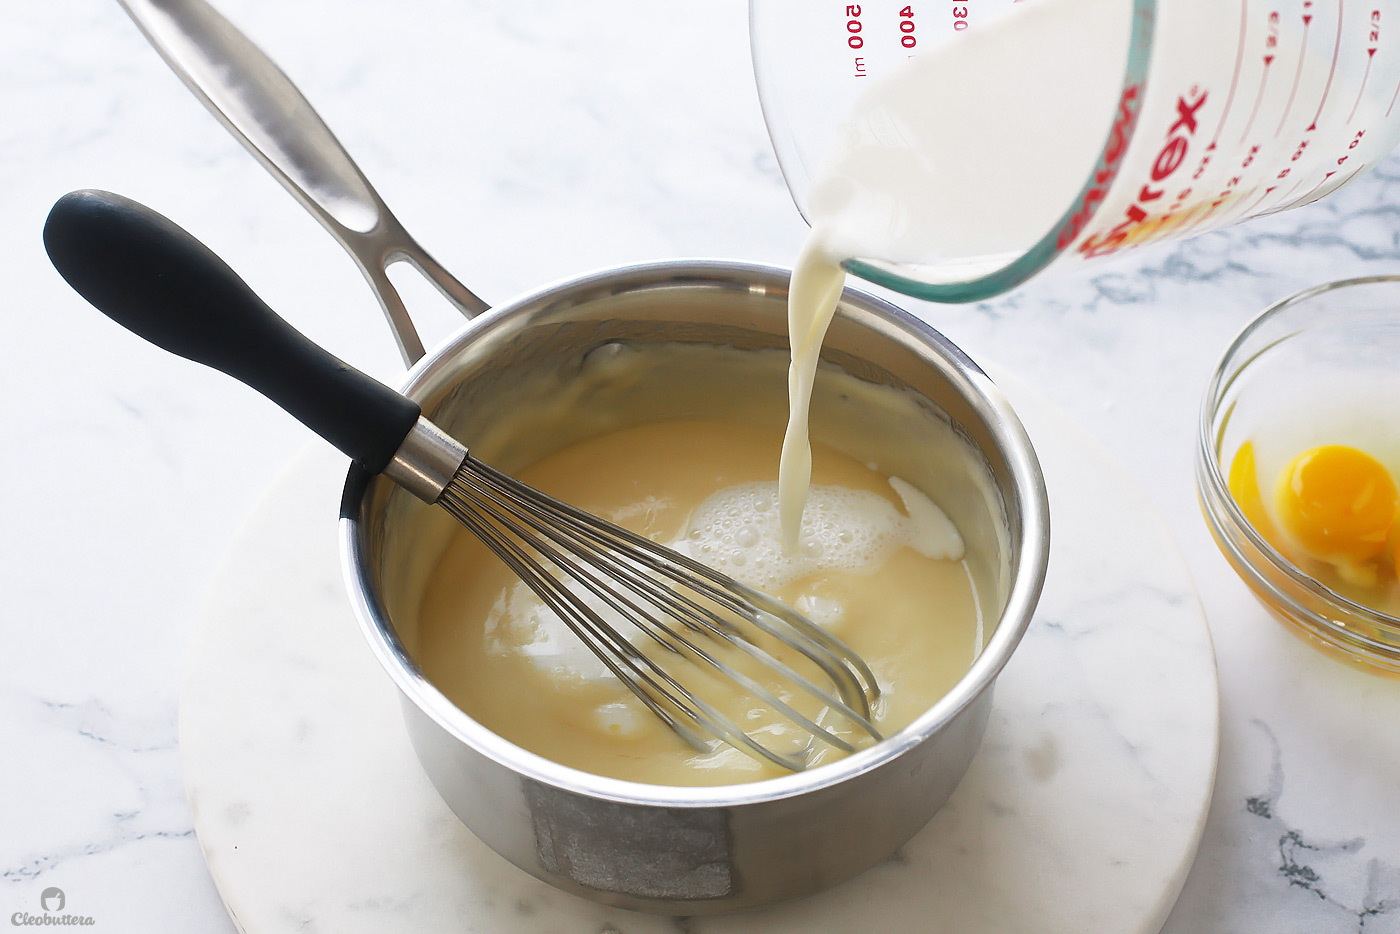
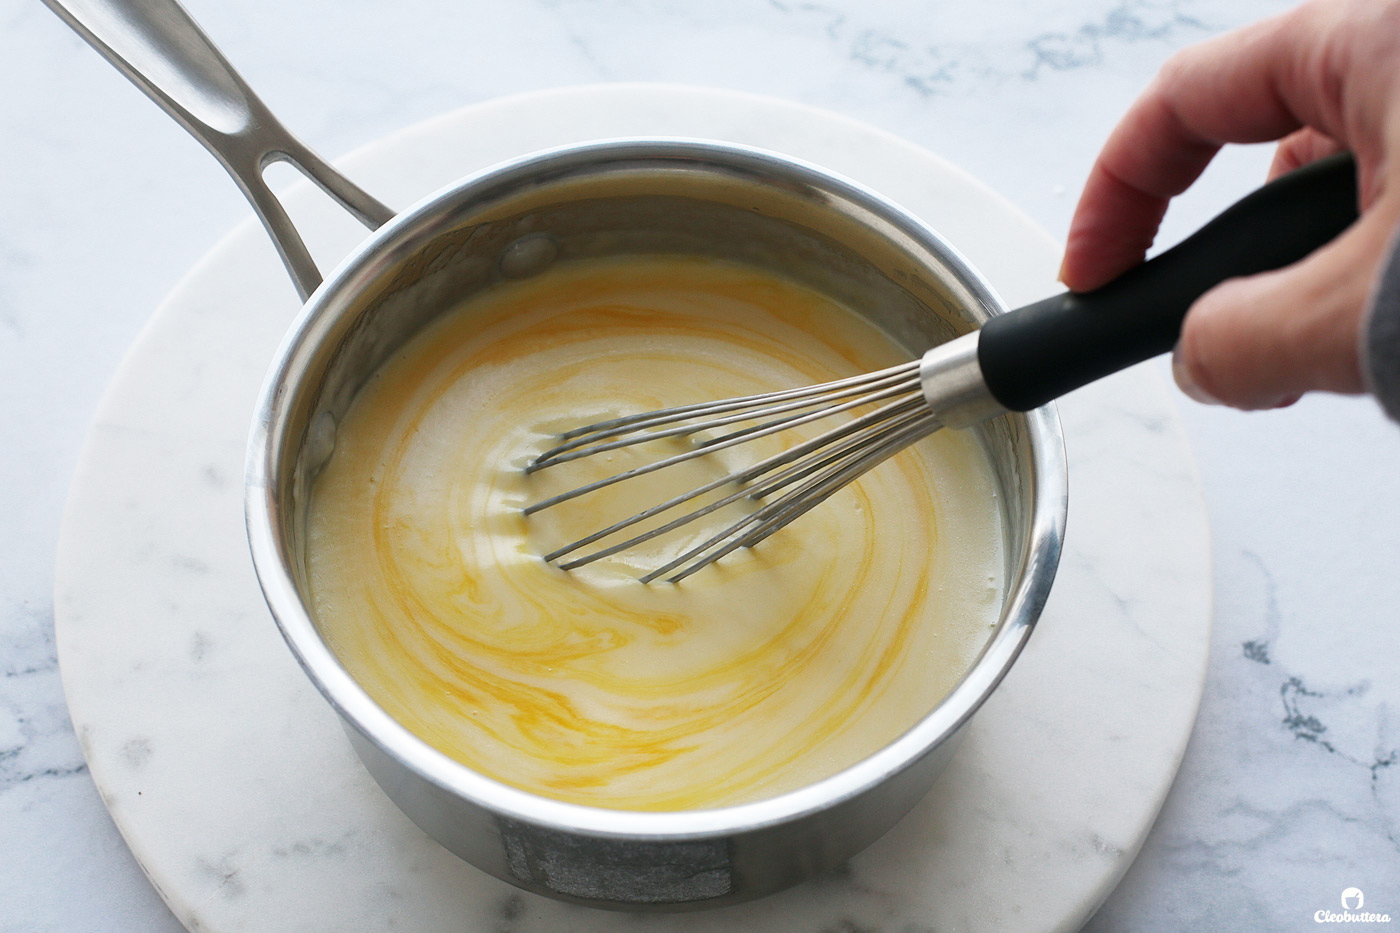
And we’ll then whisk in the eggs last, to avoid scrambling it. The mixture should now be nice and warm and safe to pour over yeast.
For our dry ingredients, we have:
Flour, dry milk powder and instant yeast. Be sure to use INSTANT!
Dry milk powder adds flavor and increases the dough’s tenderness.
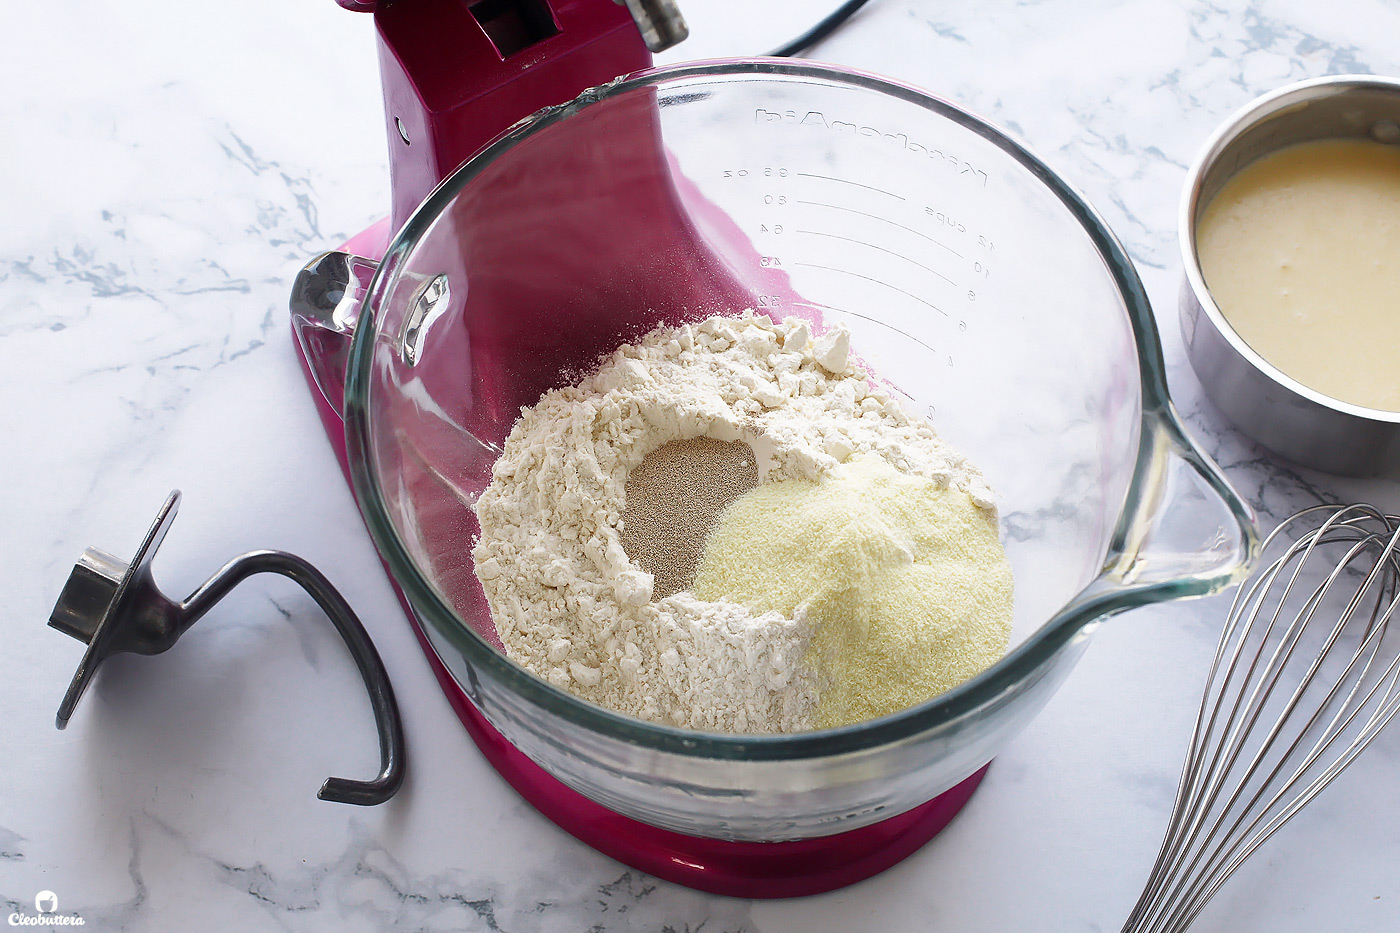
Then we’ll pour in our tangzhong/milk mixture.

And knead just enough until the flour is moistened and a shaggy dough comes together; 1 to 2 minutes.
We’ll then cover the dough, and let it rest for 20 minutes.
This will give the flour a chance to absorb the liquid, making it easier and faster to knead later.
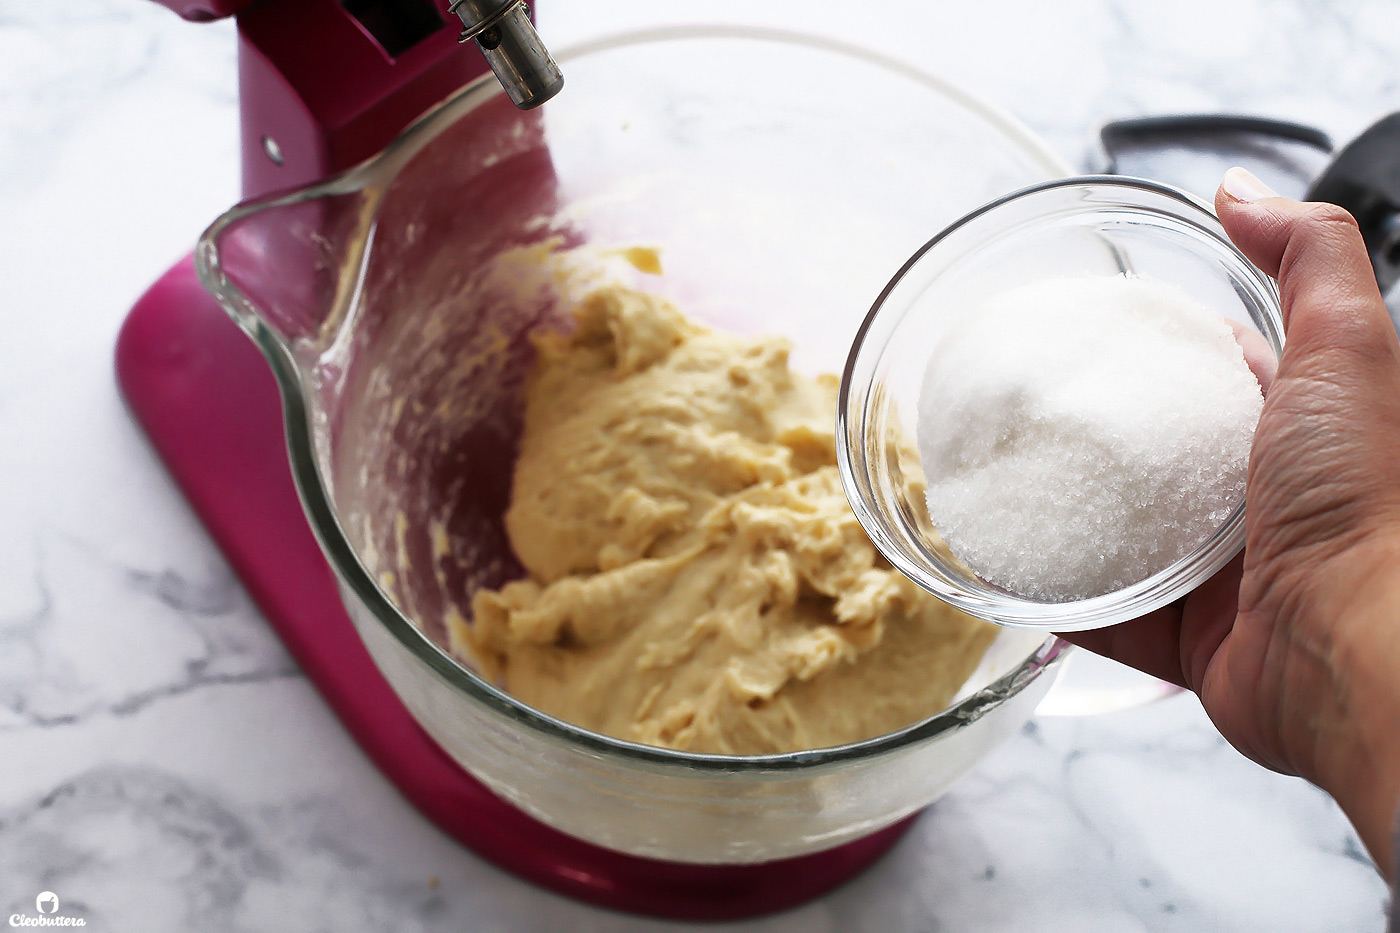
After the 20 minute rest, add the sugar and salt.
The reason why we hold off the sugar and salt for later, is because they’re both hygroscopic, which means they attract water and would have pushed moisture away from the flour, delaying the formation of gluten. So we add them well after the water has been absorbed by the flour to give the dough a chance to build enough structure.
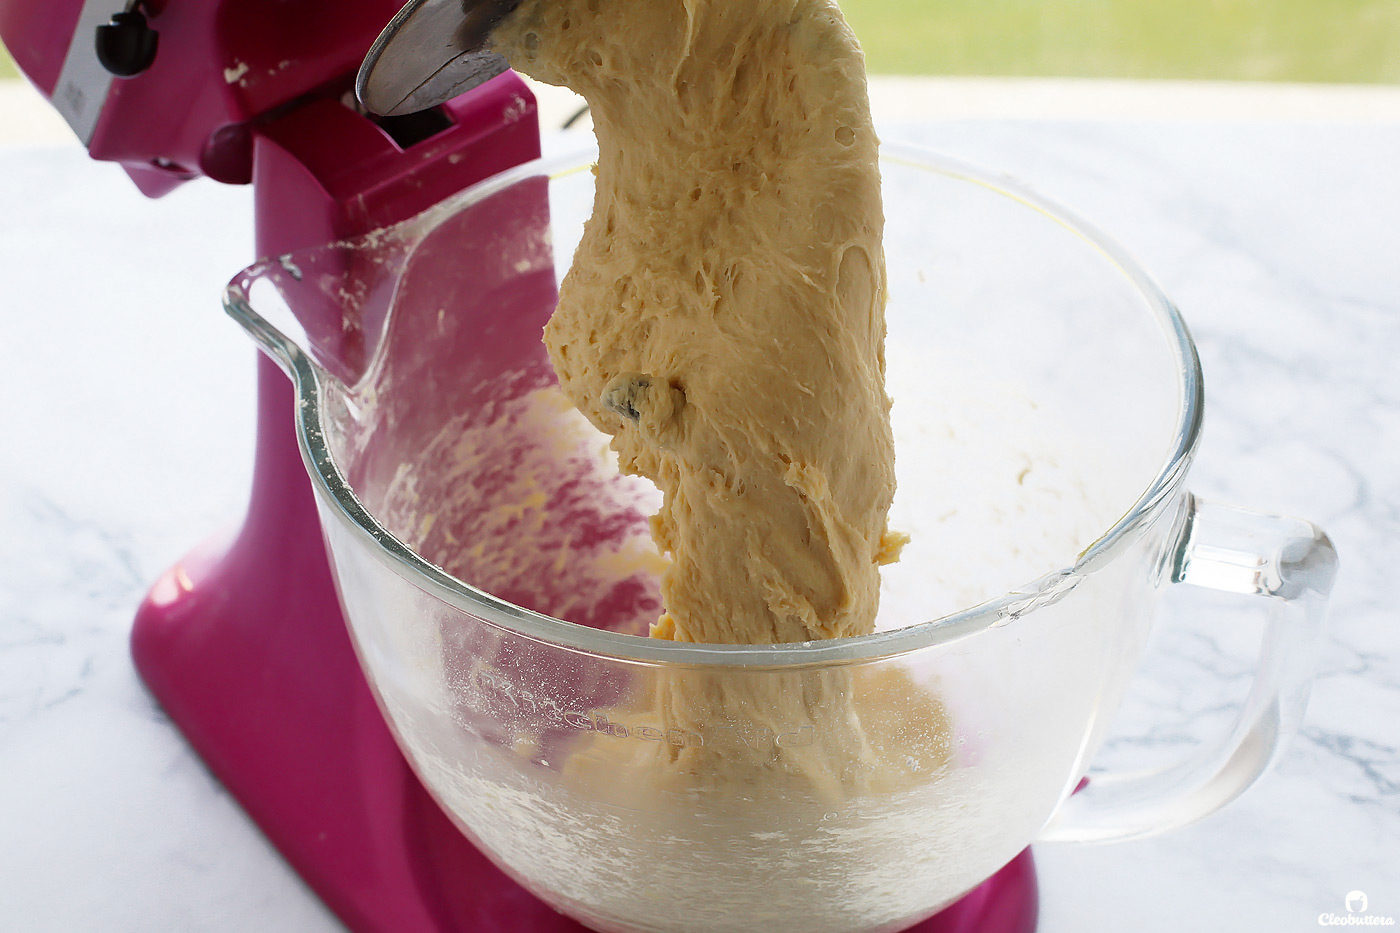
We’ll then mix the dough until a smooth, elastic and slightly sticky dough forms; about 10 minutes. The dough will be very sticky when mixing begins, but resist the urge to add more flour (especially if you’ve used weight measurements); the dough will absorb the excess moisture and come together nicely as the mixing progresses.
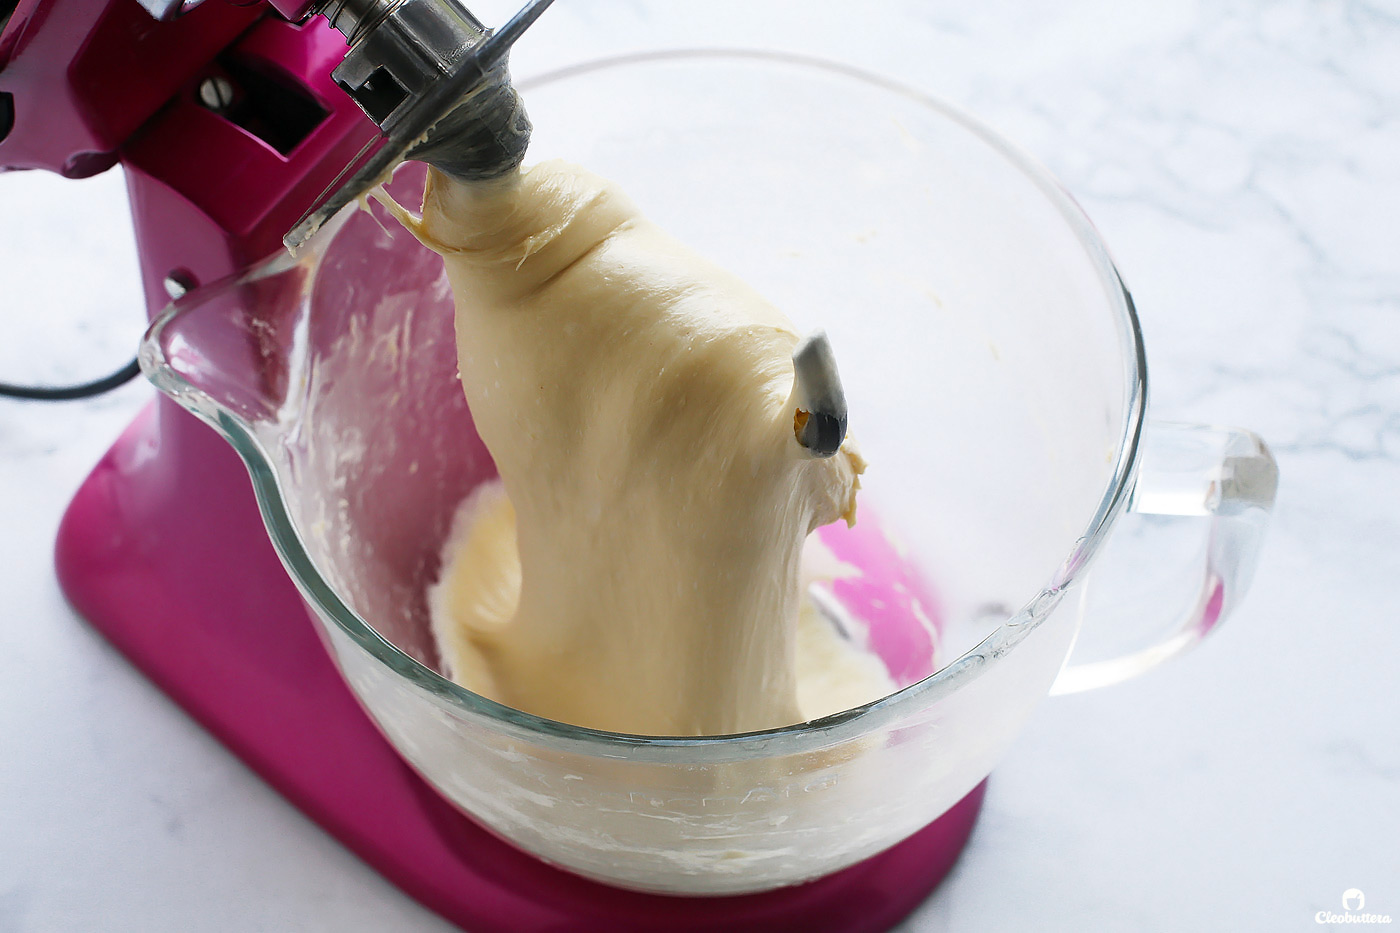
After the 10 minutes of kneading, the dough should feel slightly sticky but not messy and should easily come together in a taut ball when handled with lightly oiled hands.
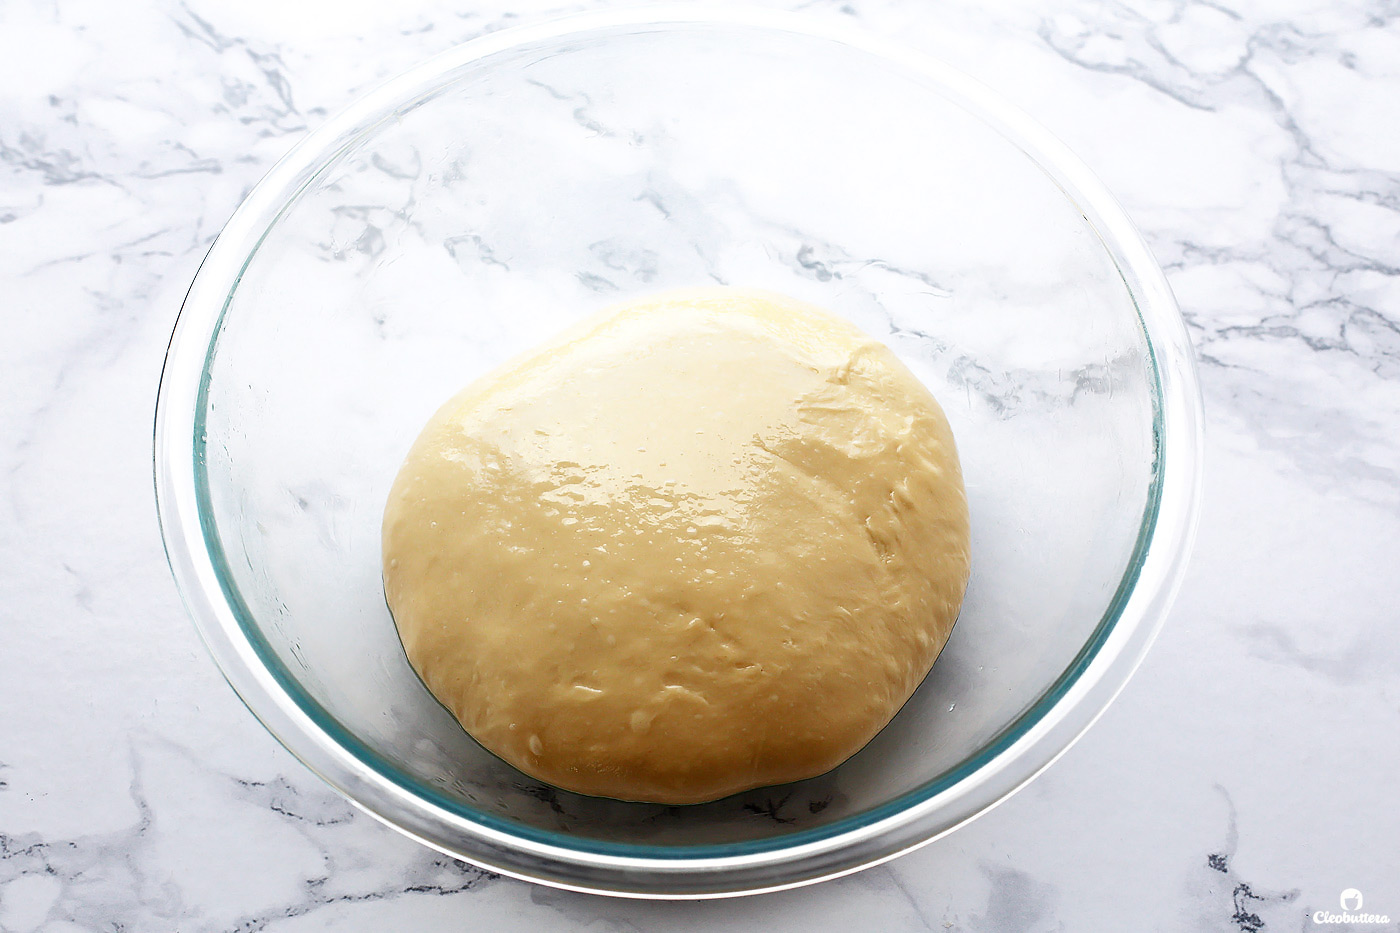
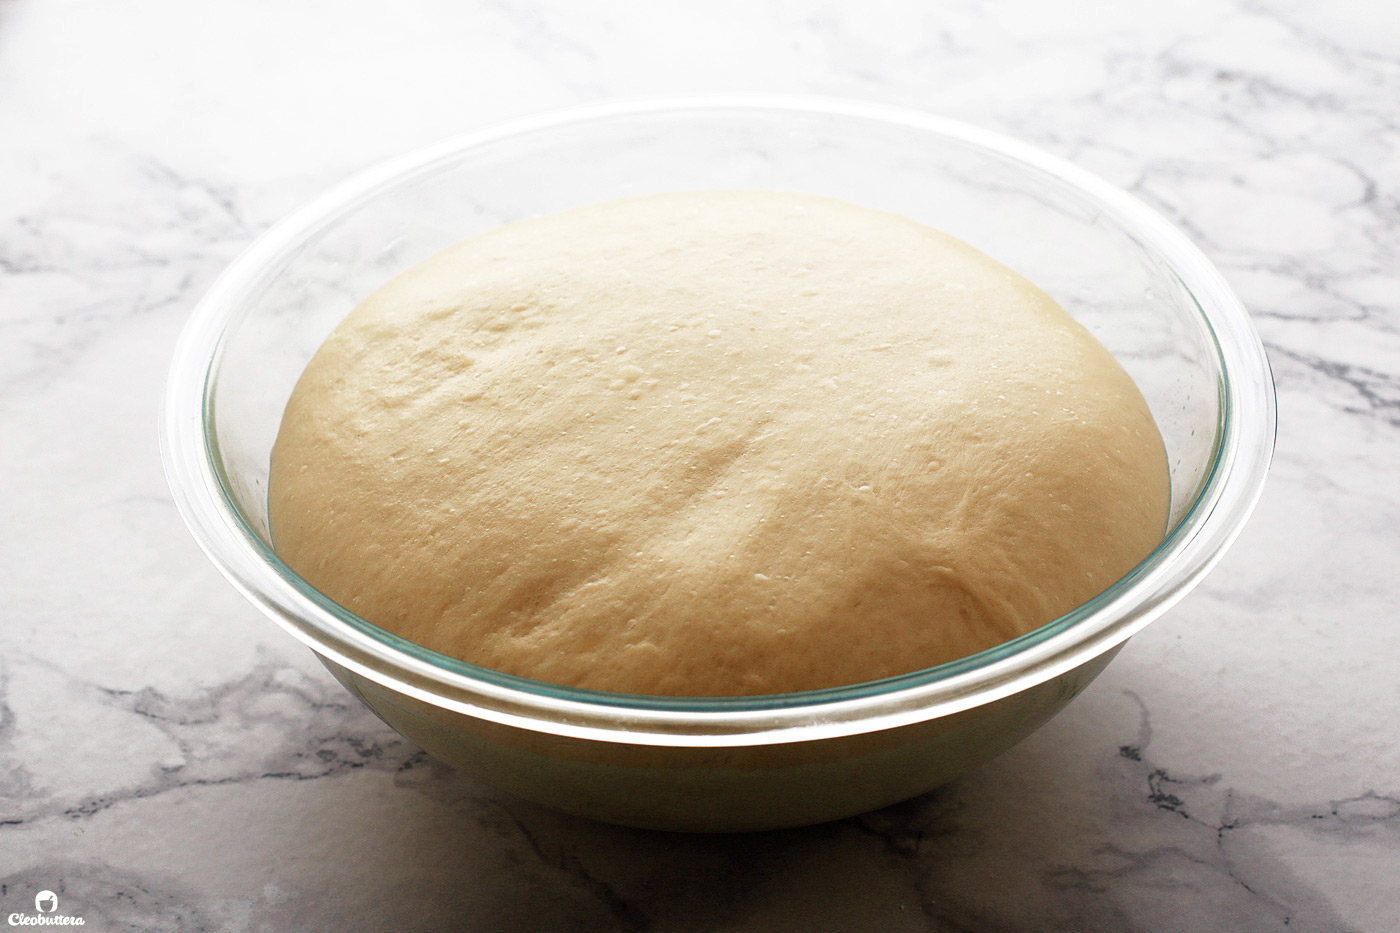
We’ll then cover it and leave it to rise in a warm place until doubled in size; about an hour. Or you can let it rise in the fridge overnight.
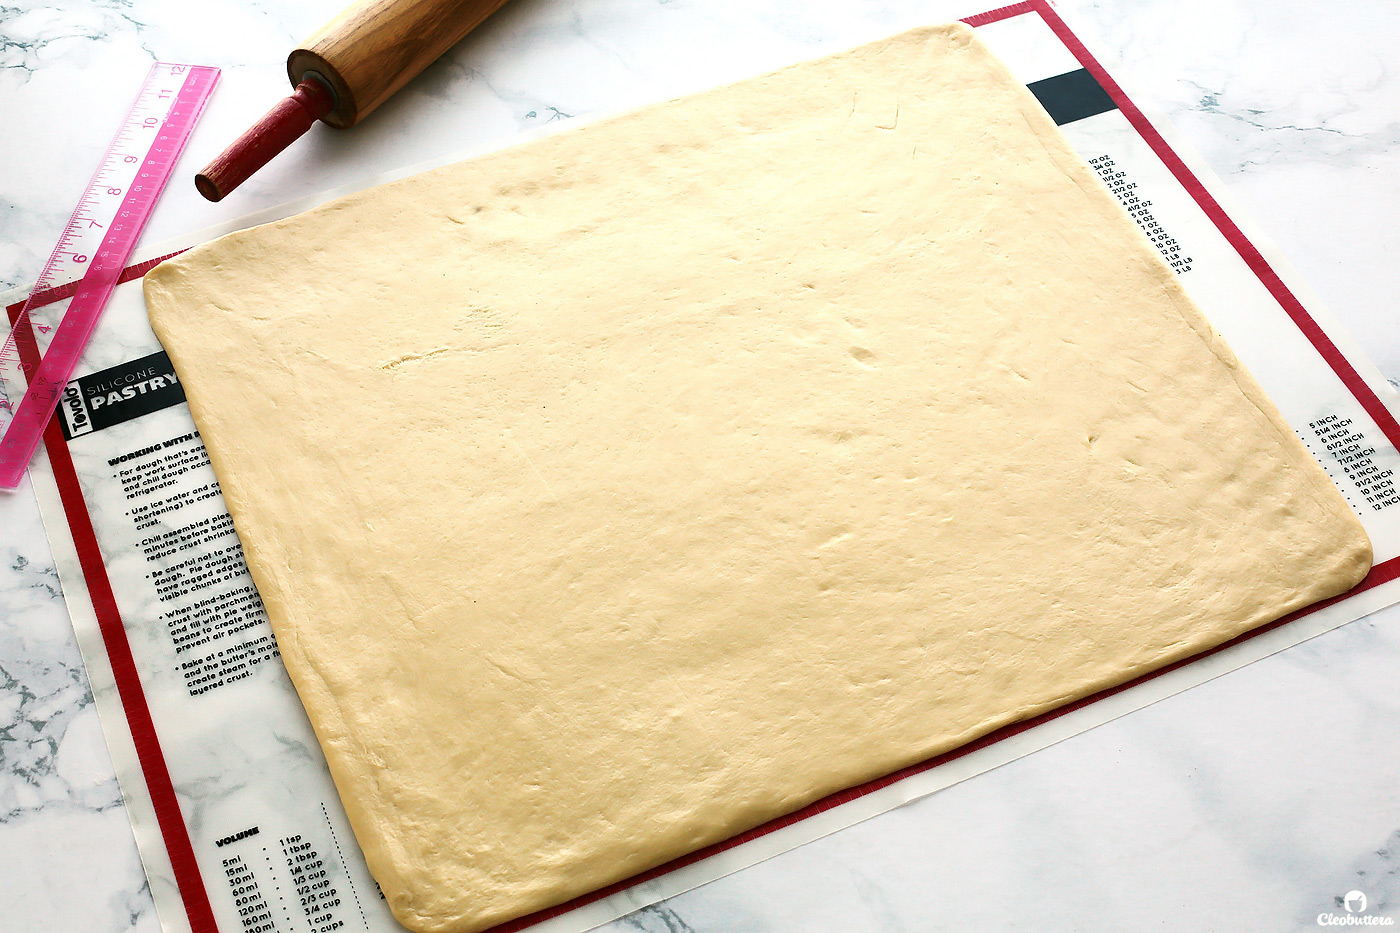
Pat, stretch and roll out the dough to form 16X18-inch rectangle with long edge nearest you.
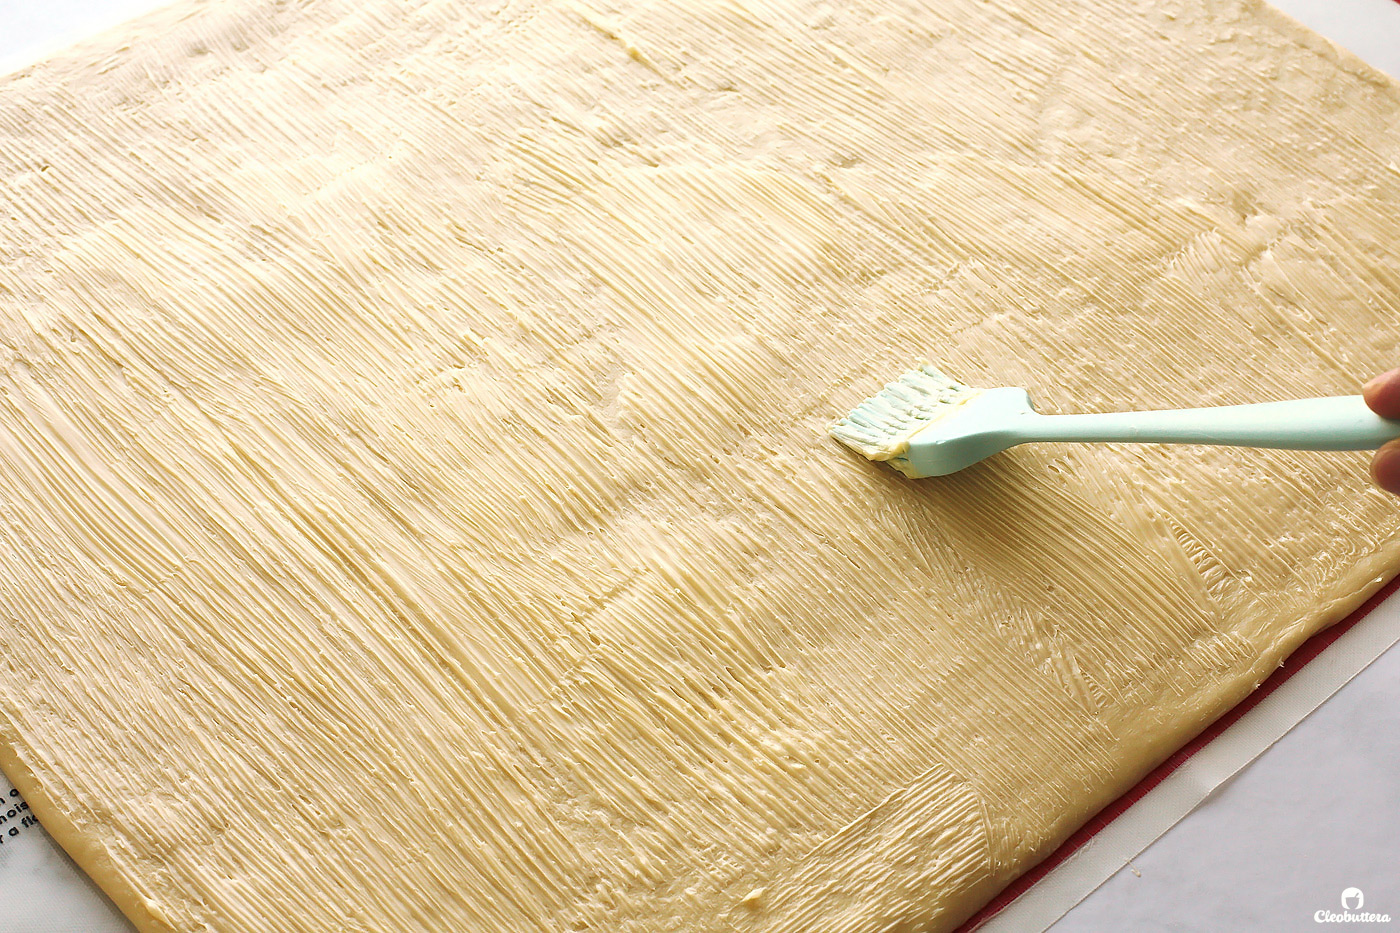
Then spread partially melted butter all over the surface.
Partially melted butter is much easier to spread than room temperature butter (which can tear the dough), without the mess of melted butter.
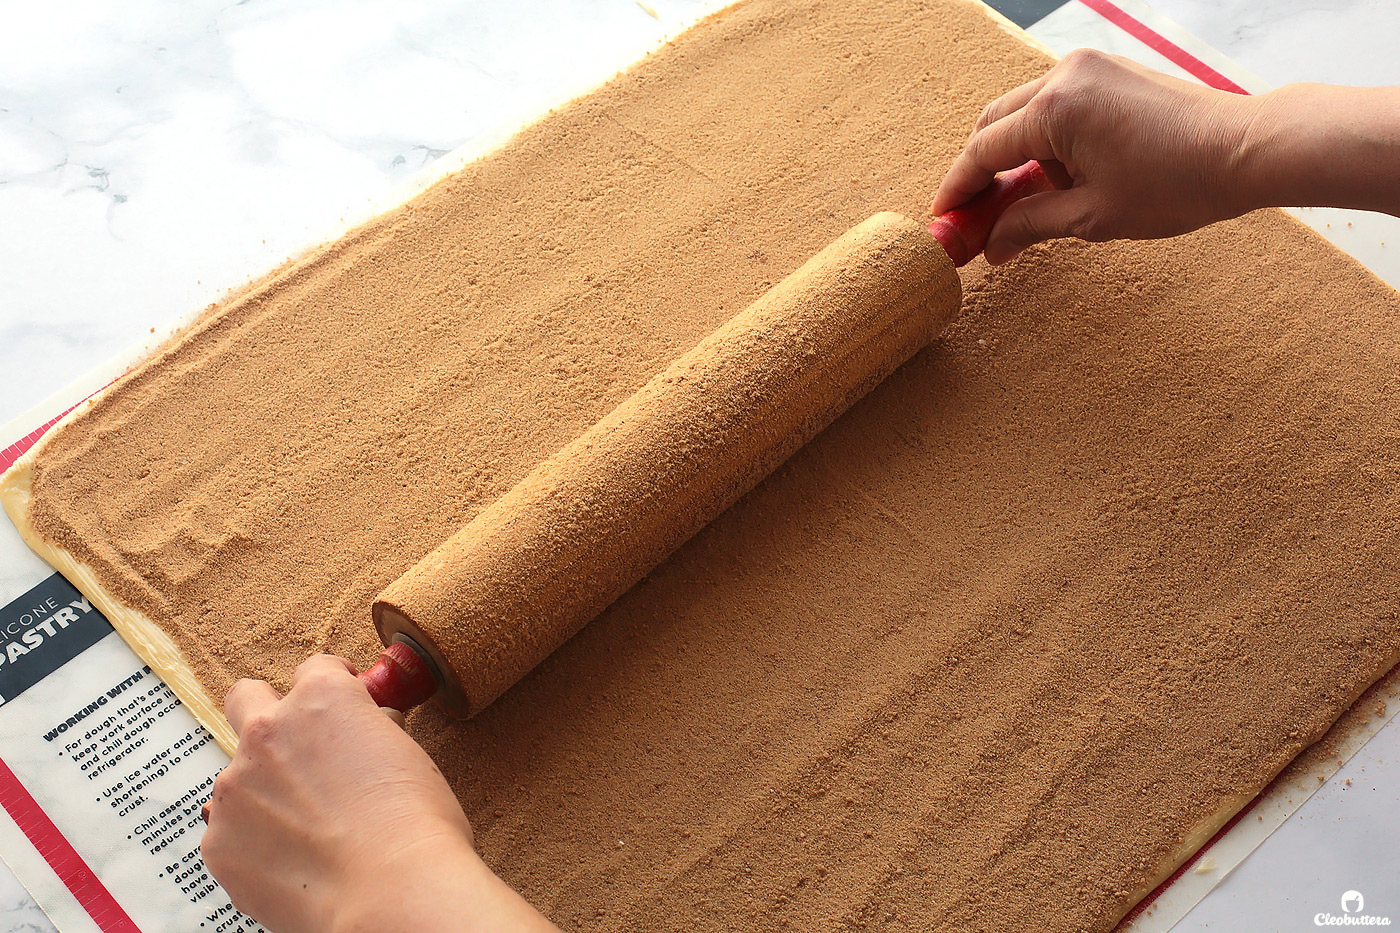
Then sprinkle on the filling mixture and press to adhere. I like using a rolling pin to press it on there.
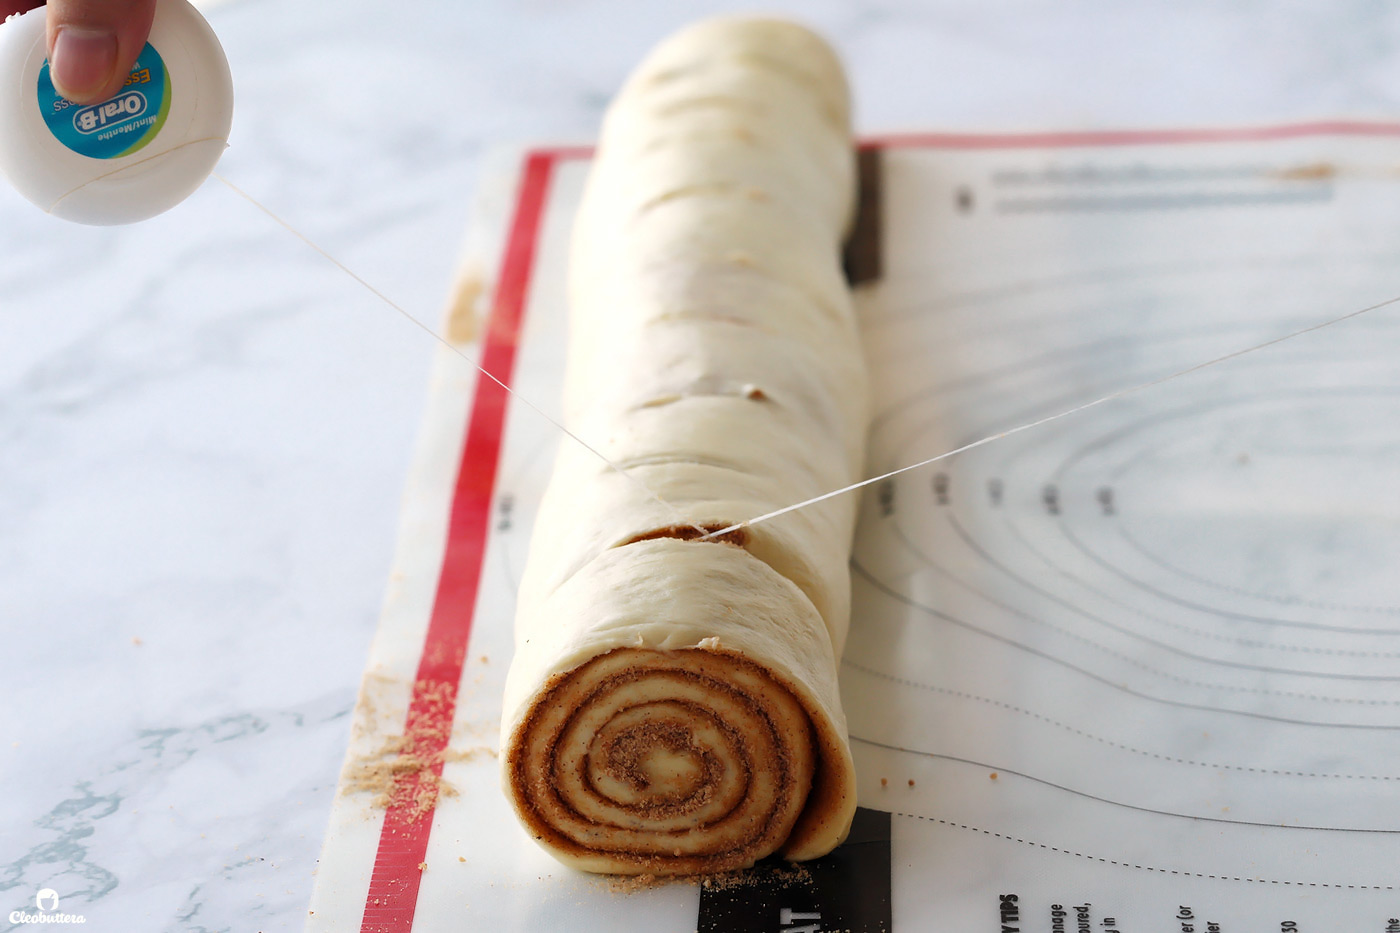
Starting with long edge nearest you, roll the dough into a cylinder. Pinch the seam to seal the dough shut and roll cylinder seam side down.

Mark gently with a knife to create 12 equal portions. For the cleanest cut, slice by holding a strand of dental floss underneath the cylinder, and cross ends of the floss over each other and pull. Slice cylinder into 12 portions (about 2 inches each).
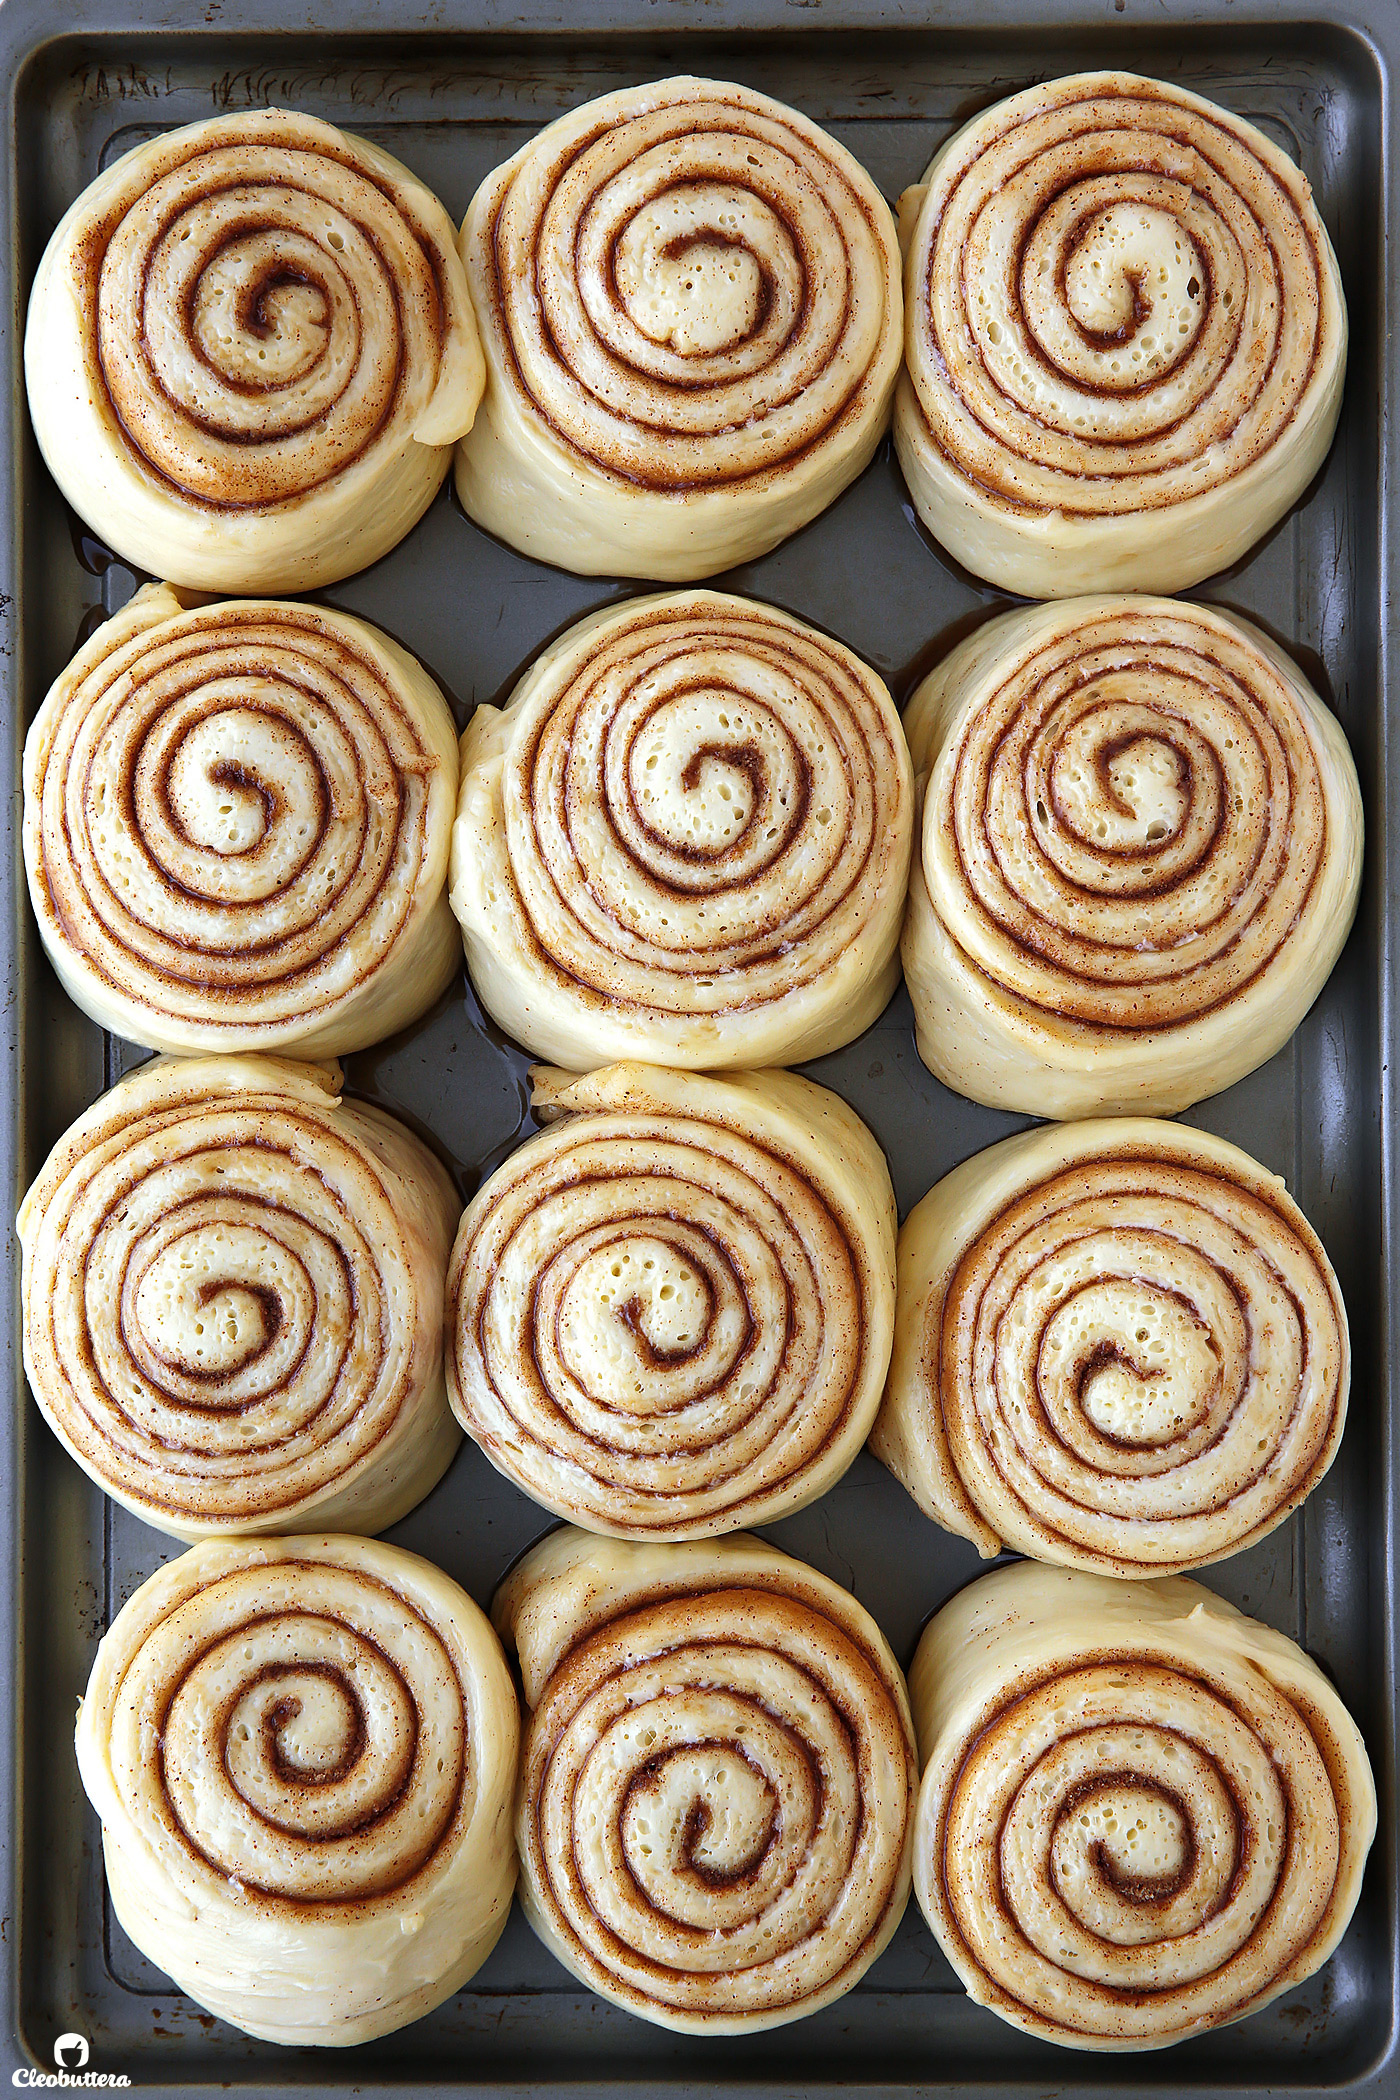
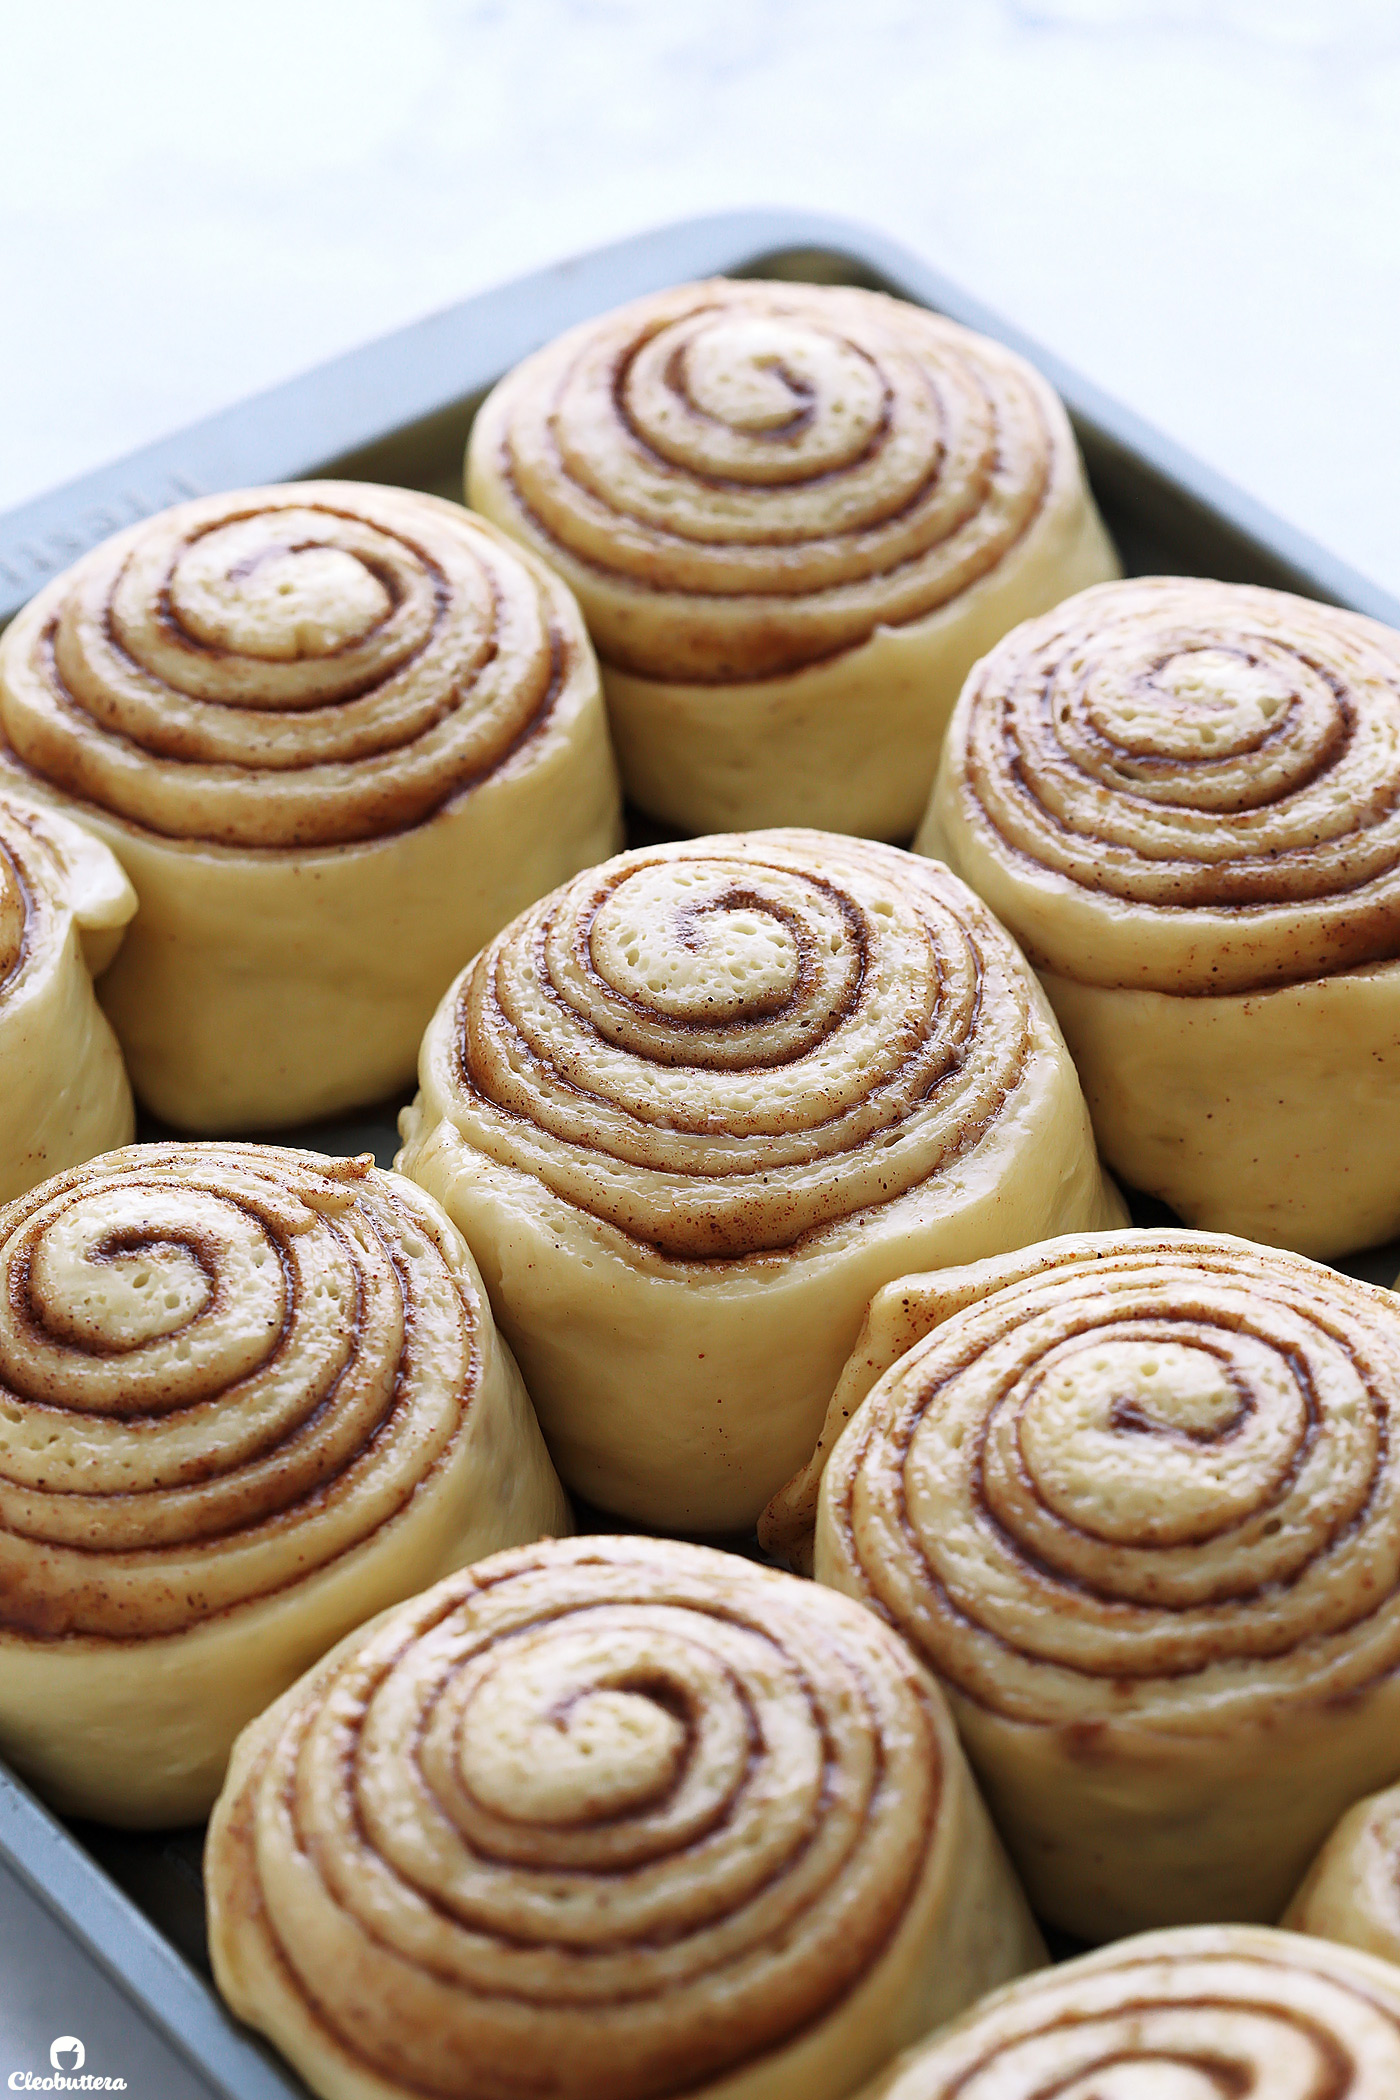
Transfer to a 15X13-inch rimmed baking sheet (pictured below) or 13X9-inch baking pan, that’s been greased with cooking spray.
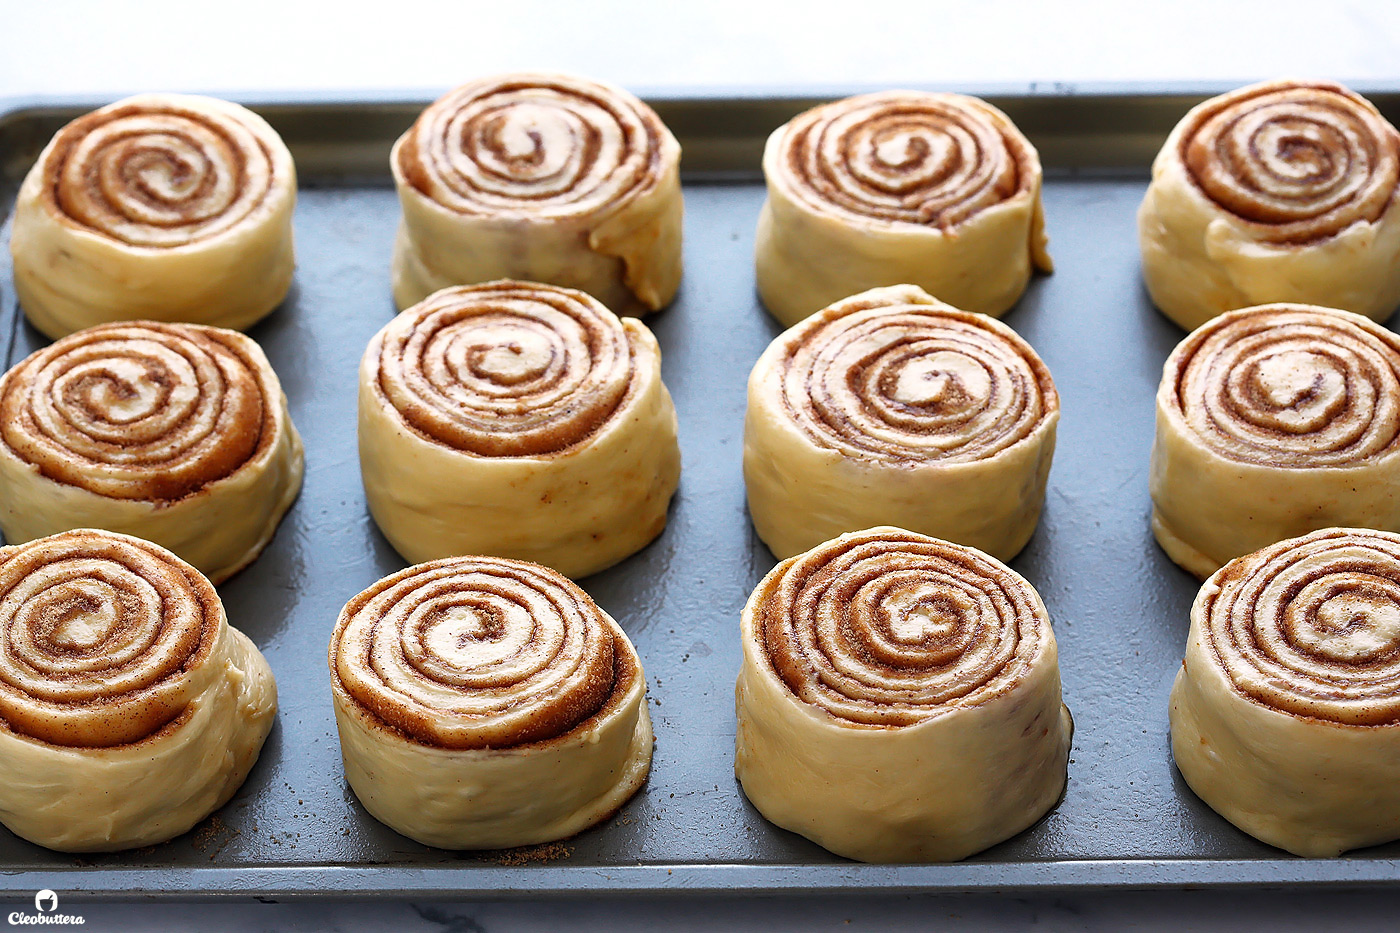
Cover the pan loosely with plastic wrap and allow the rolls to rise until puffy and the rolls are touching one another; 40 to 50 minutes.
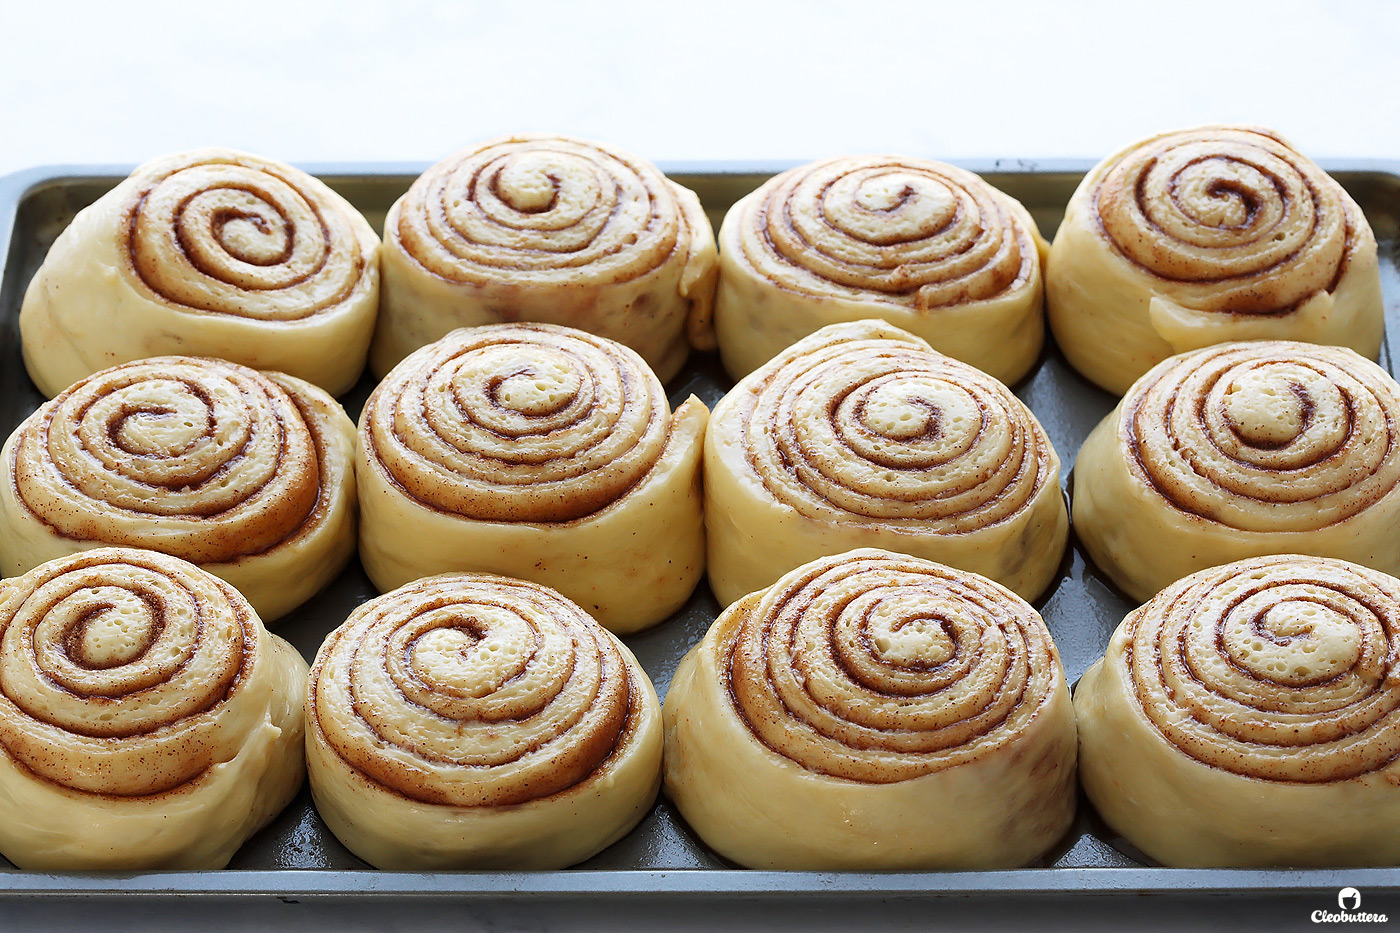
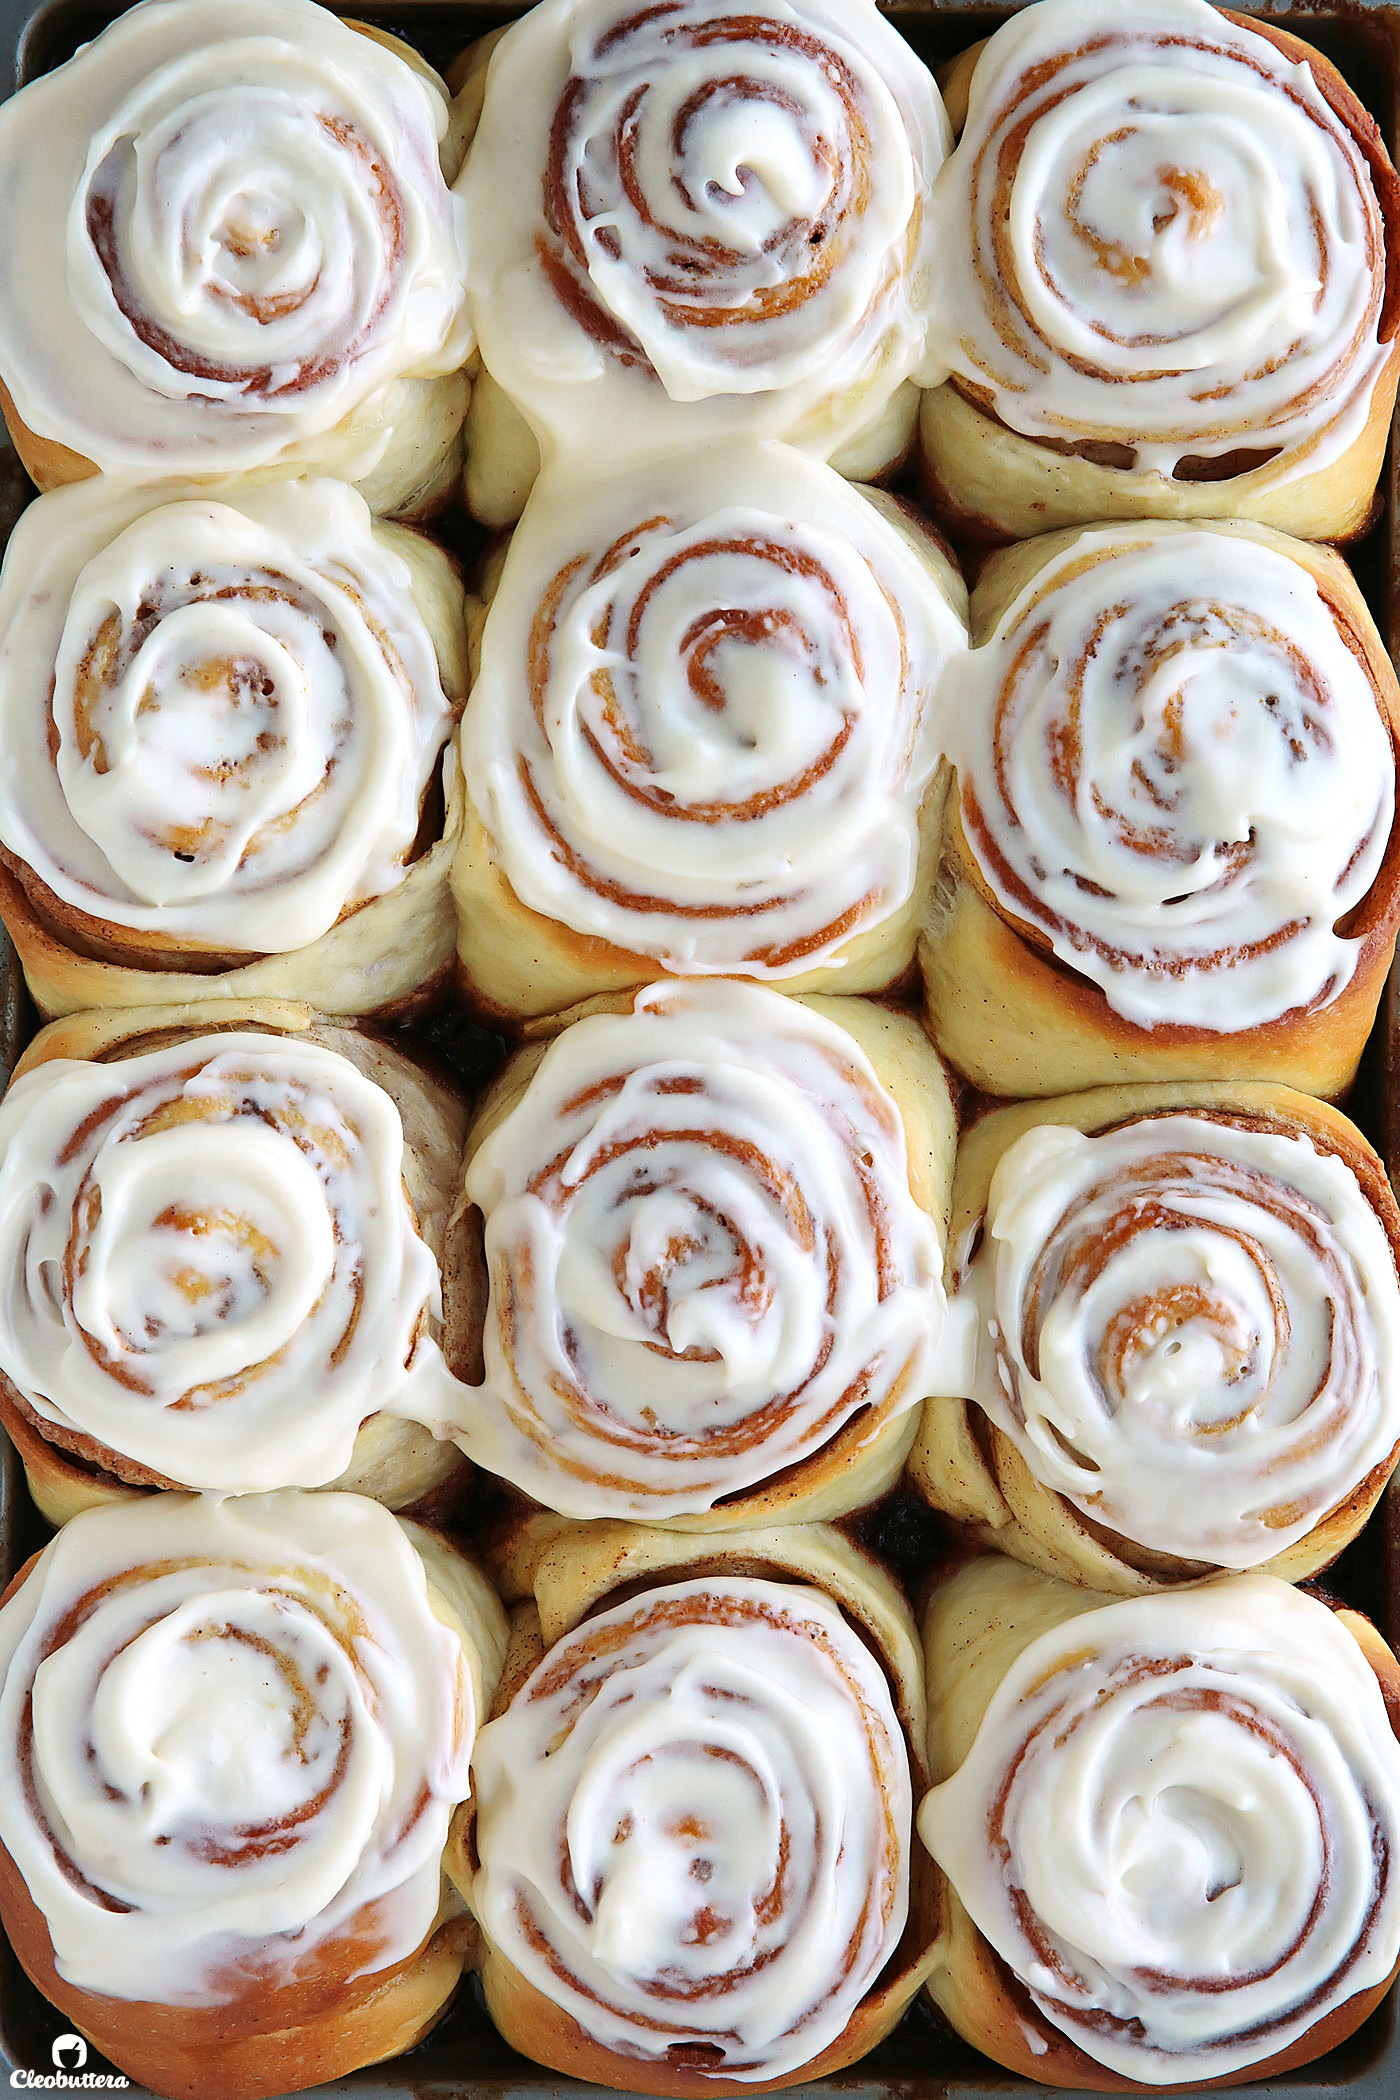
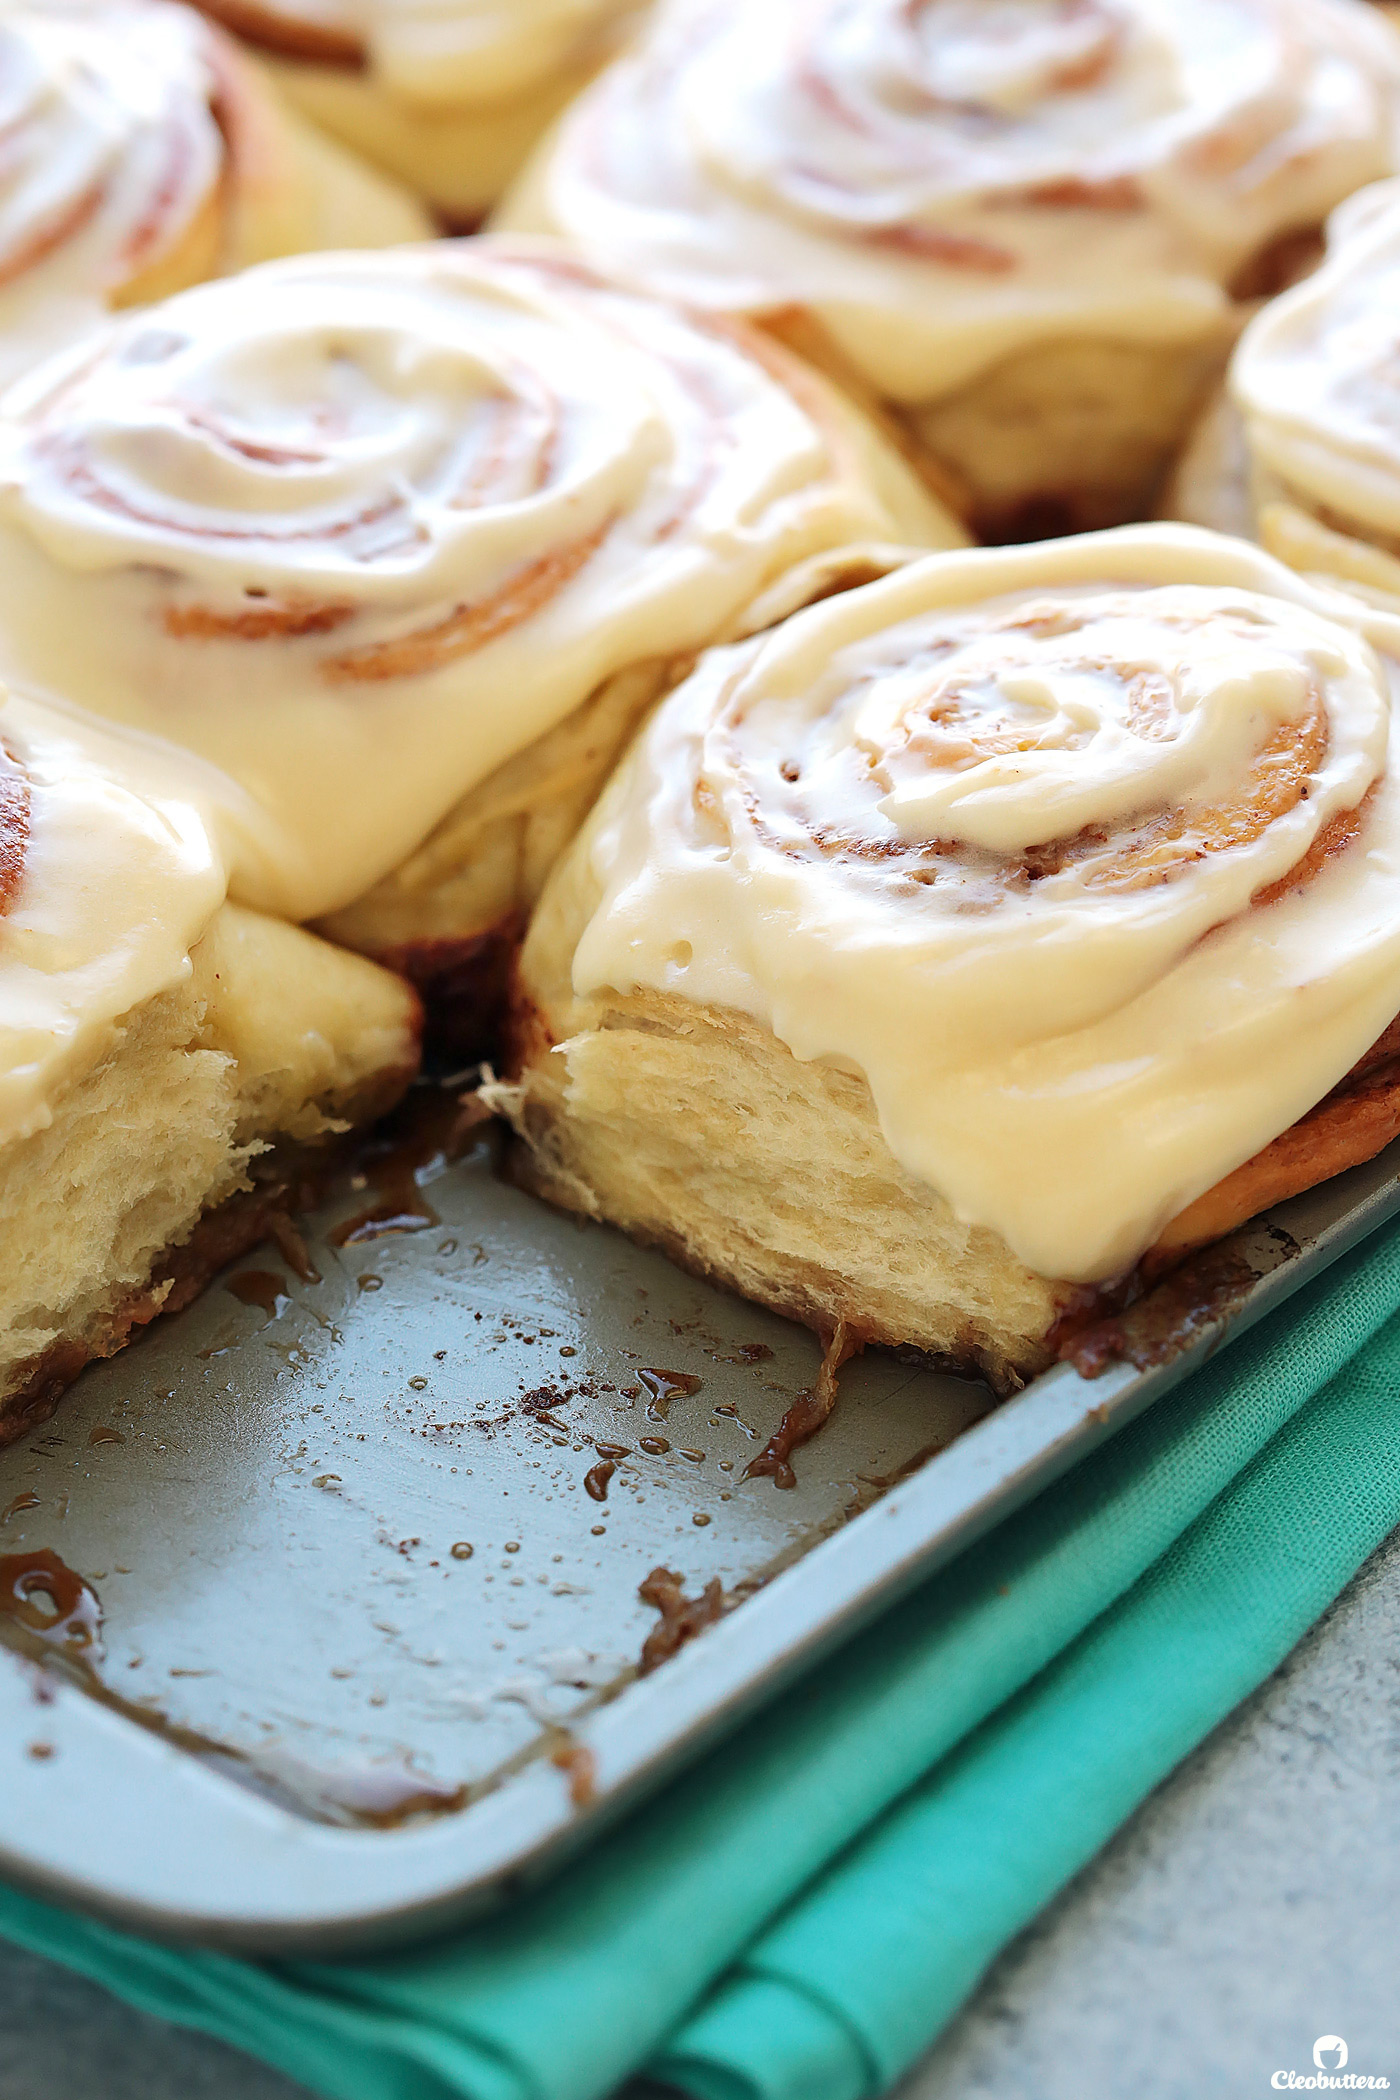
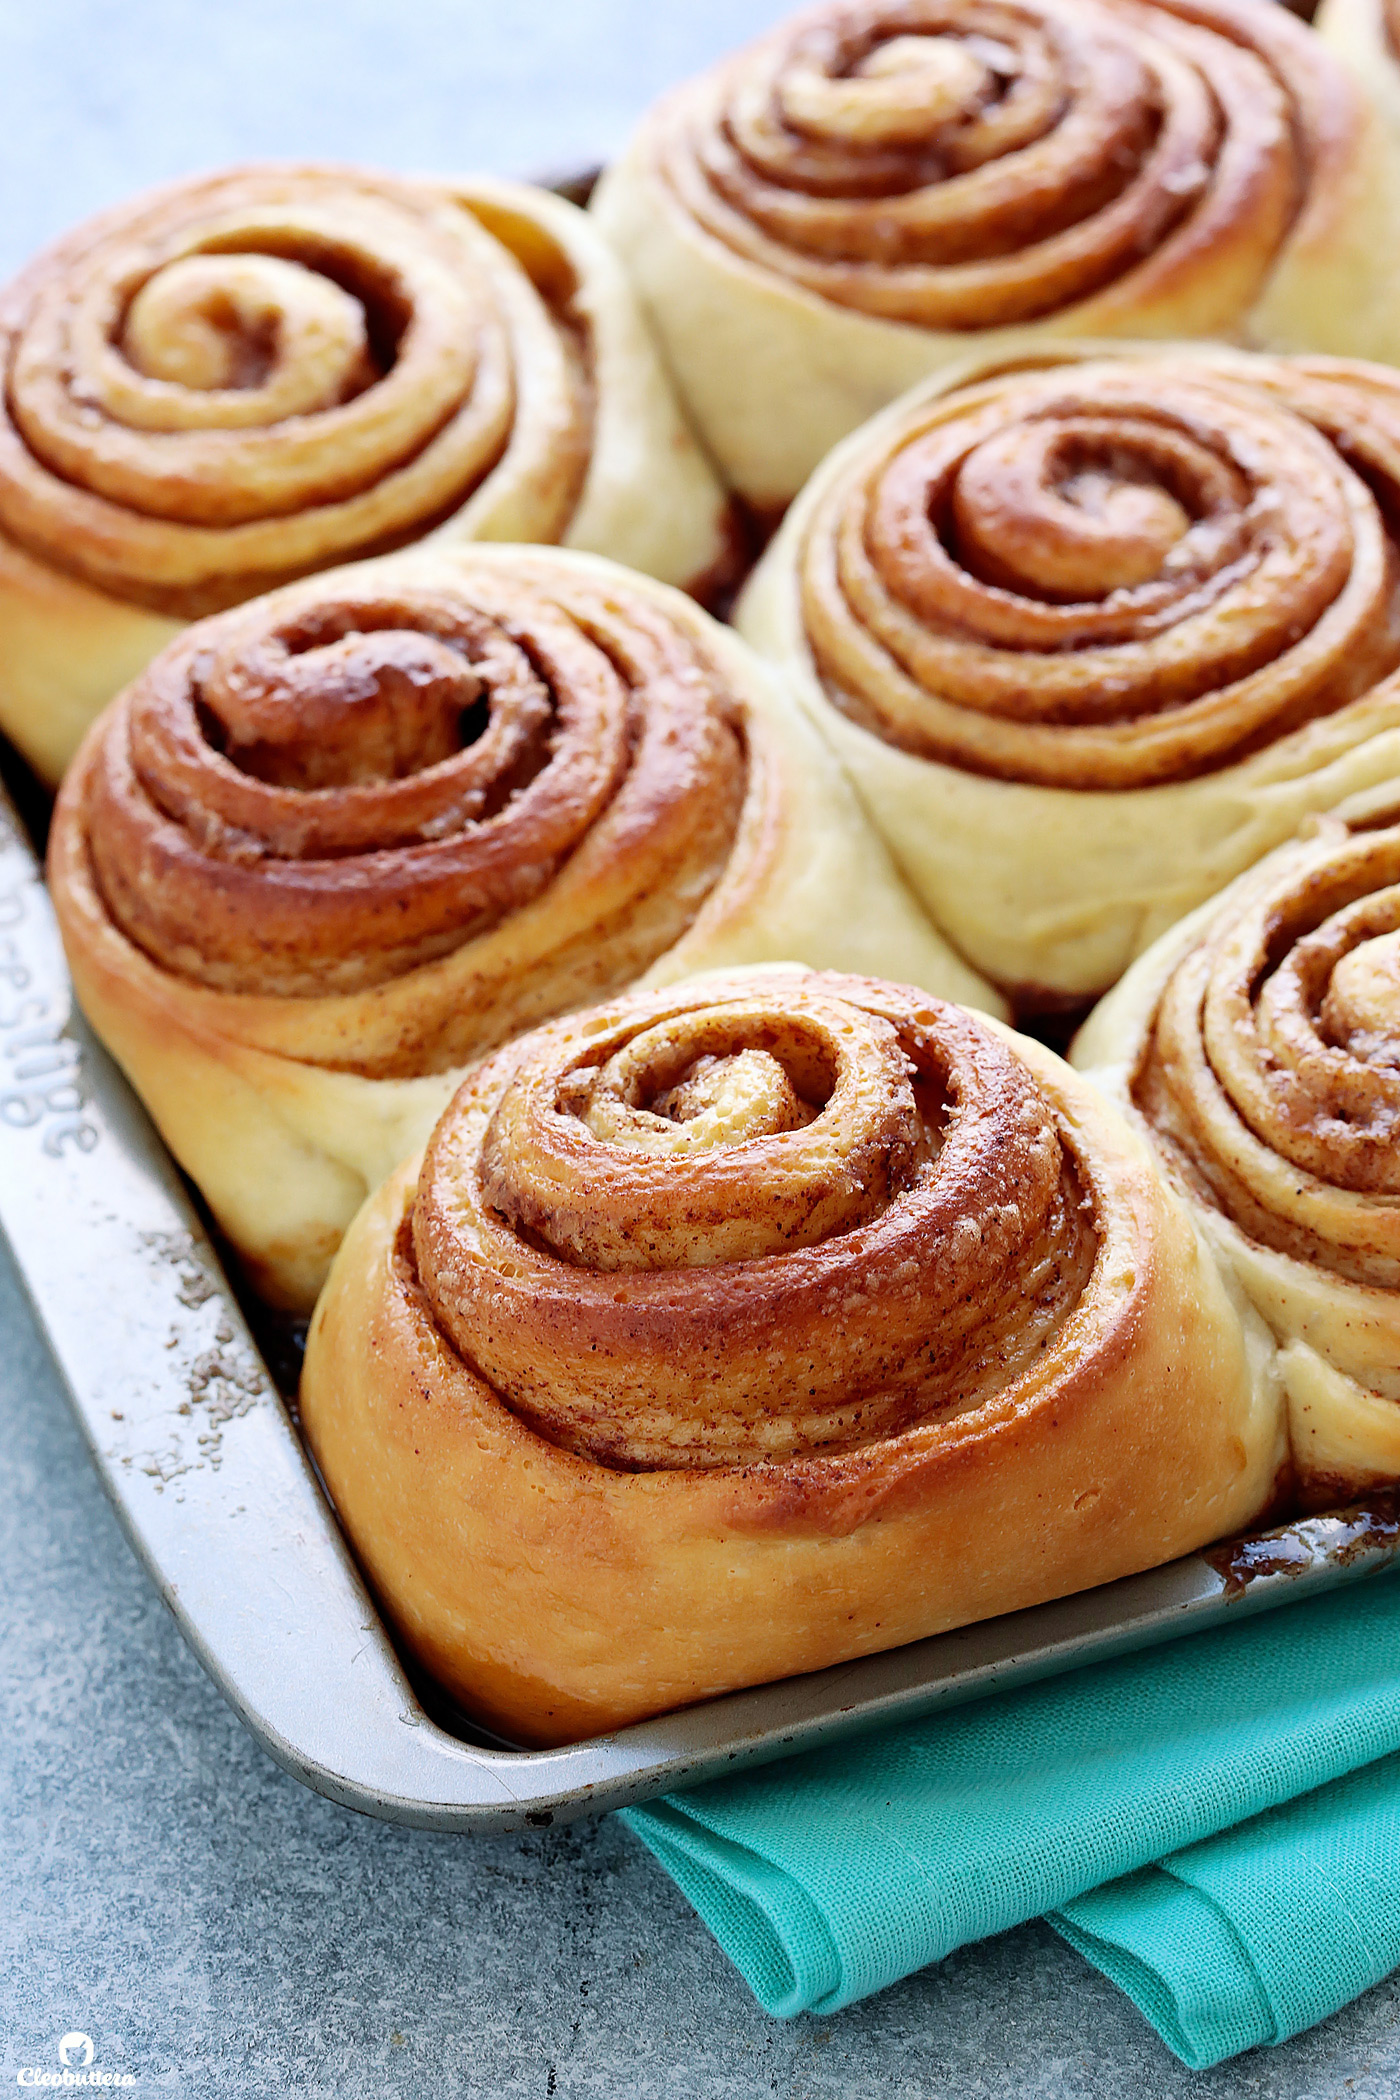
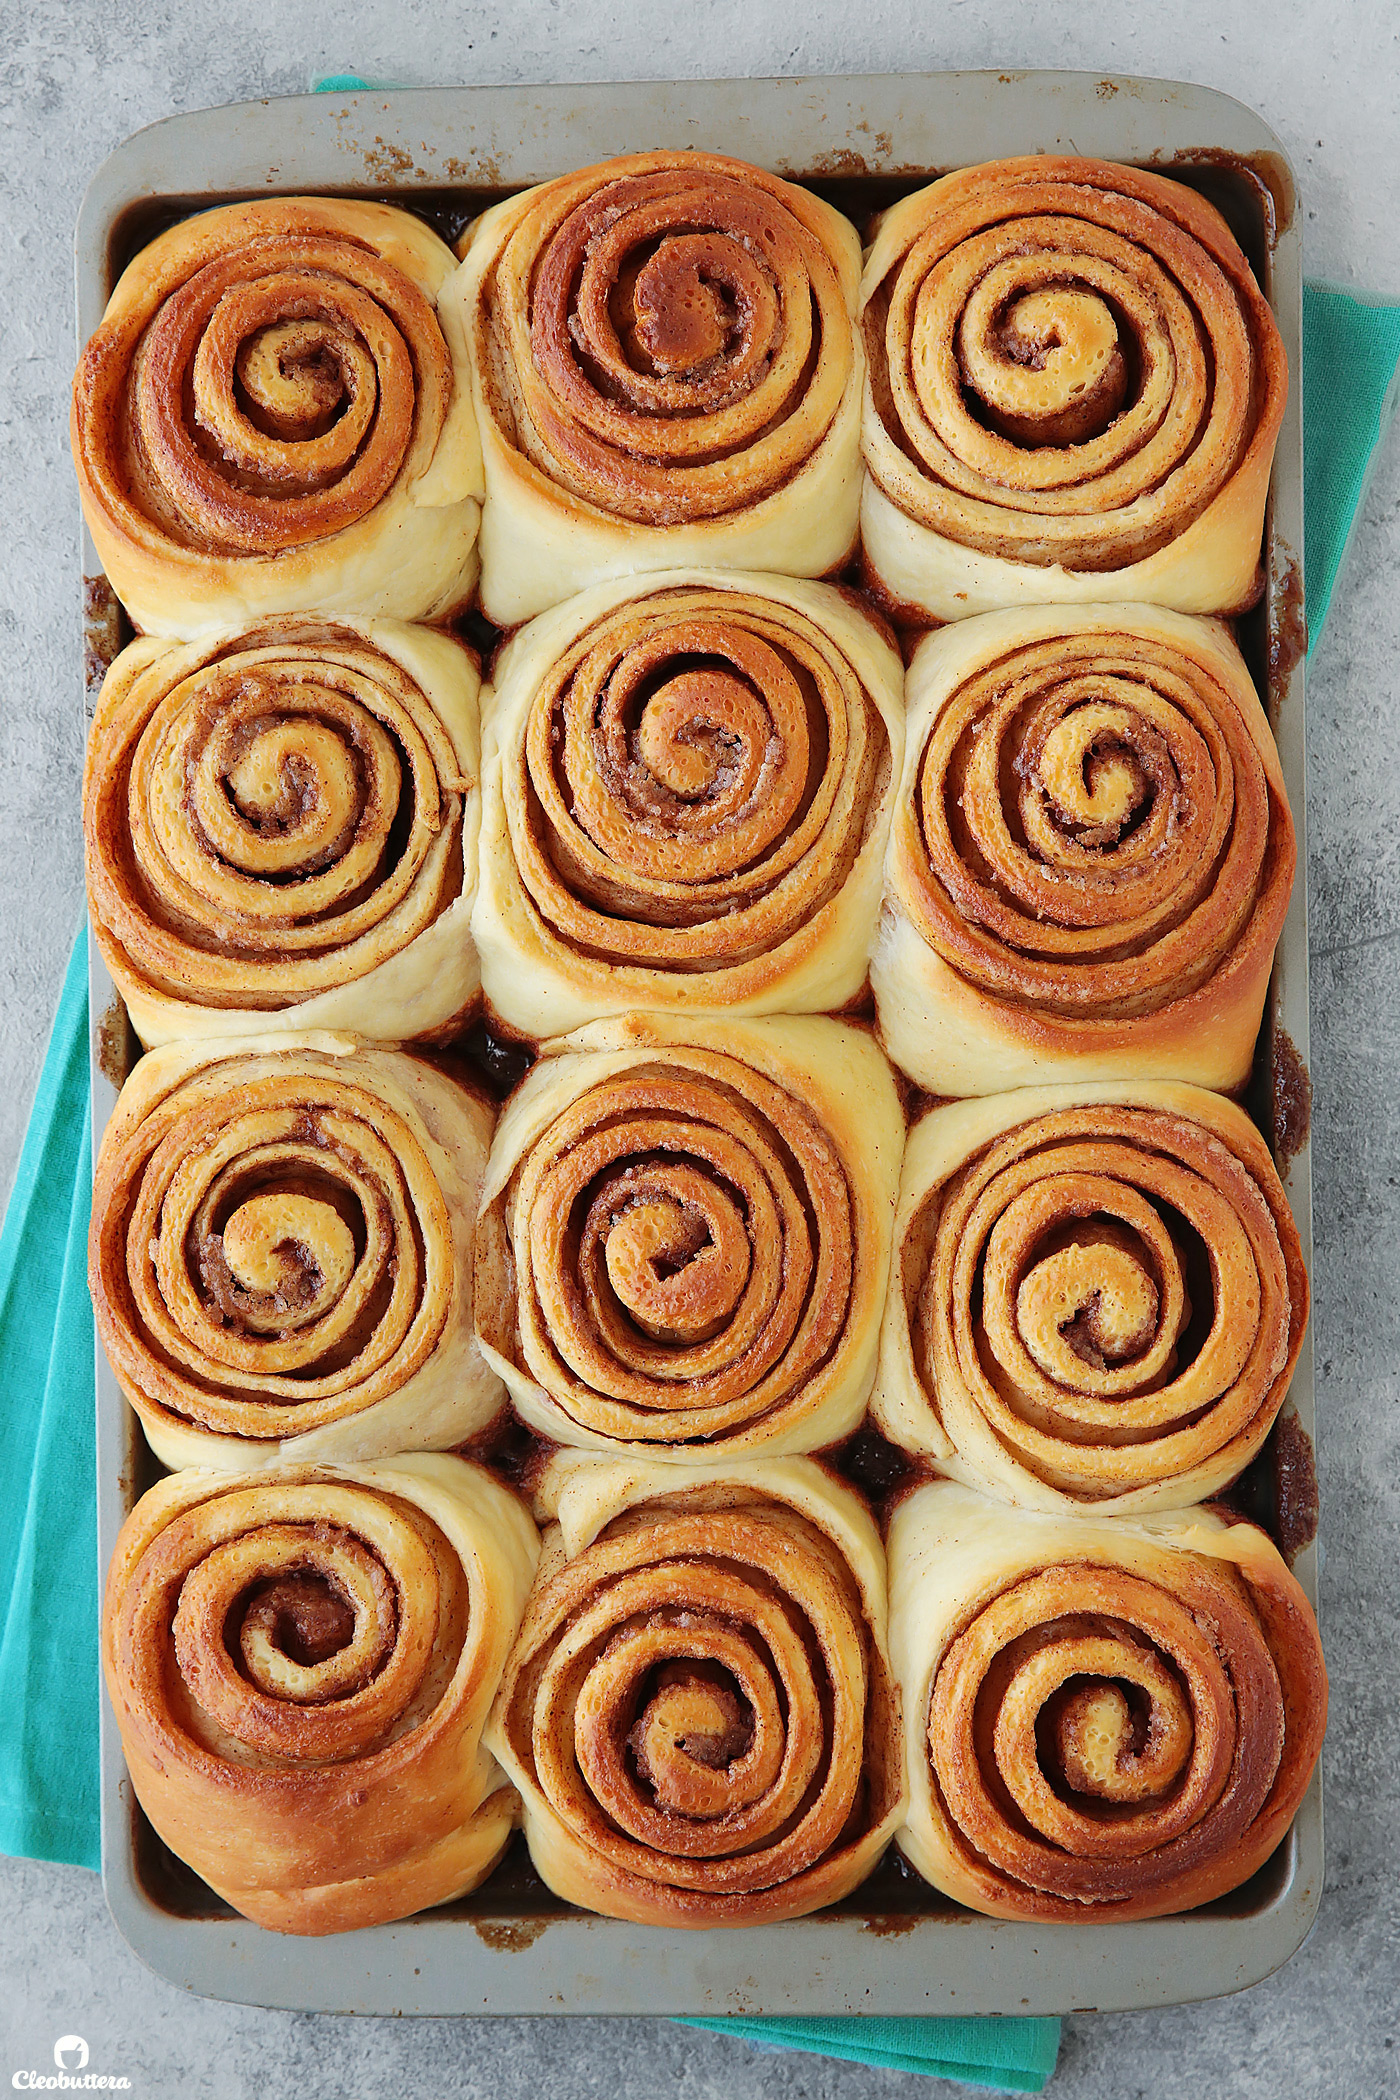
Then bake these babies until golden and gorgeous!
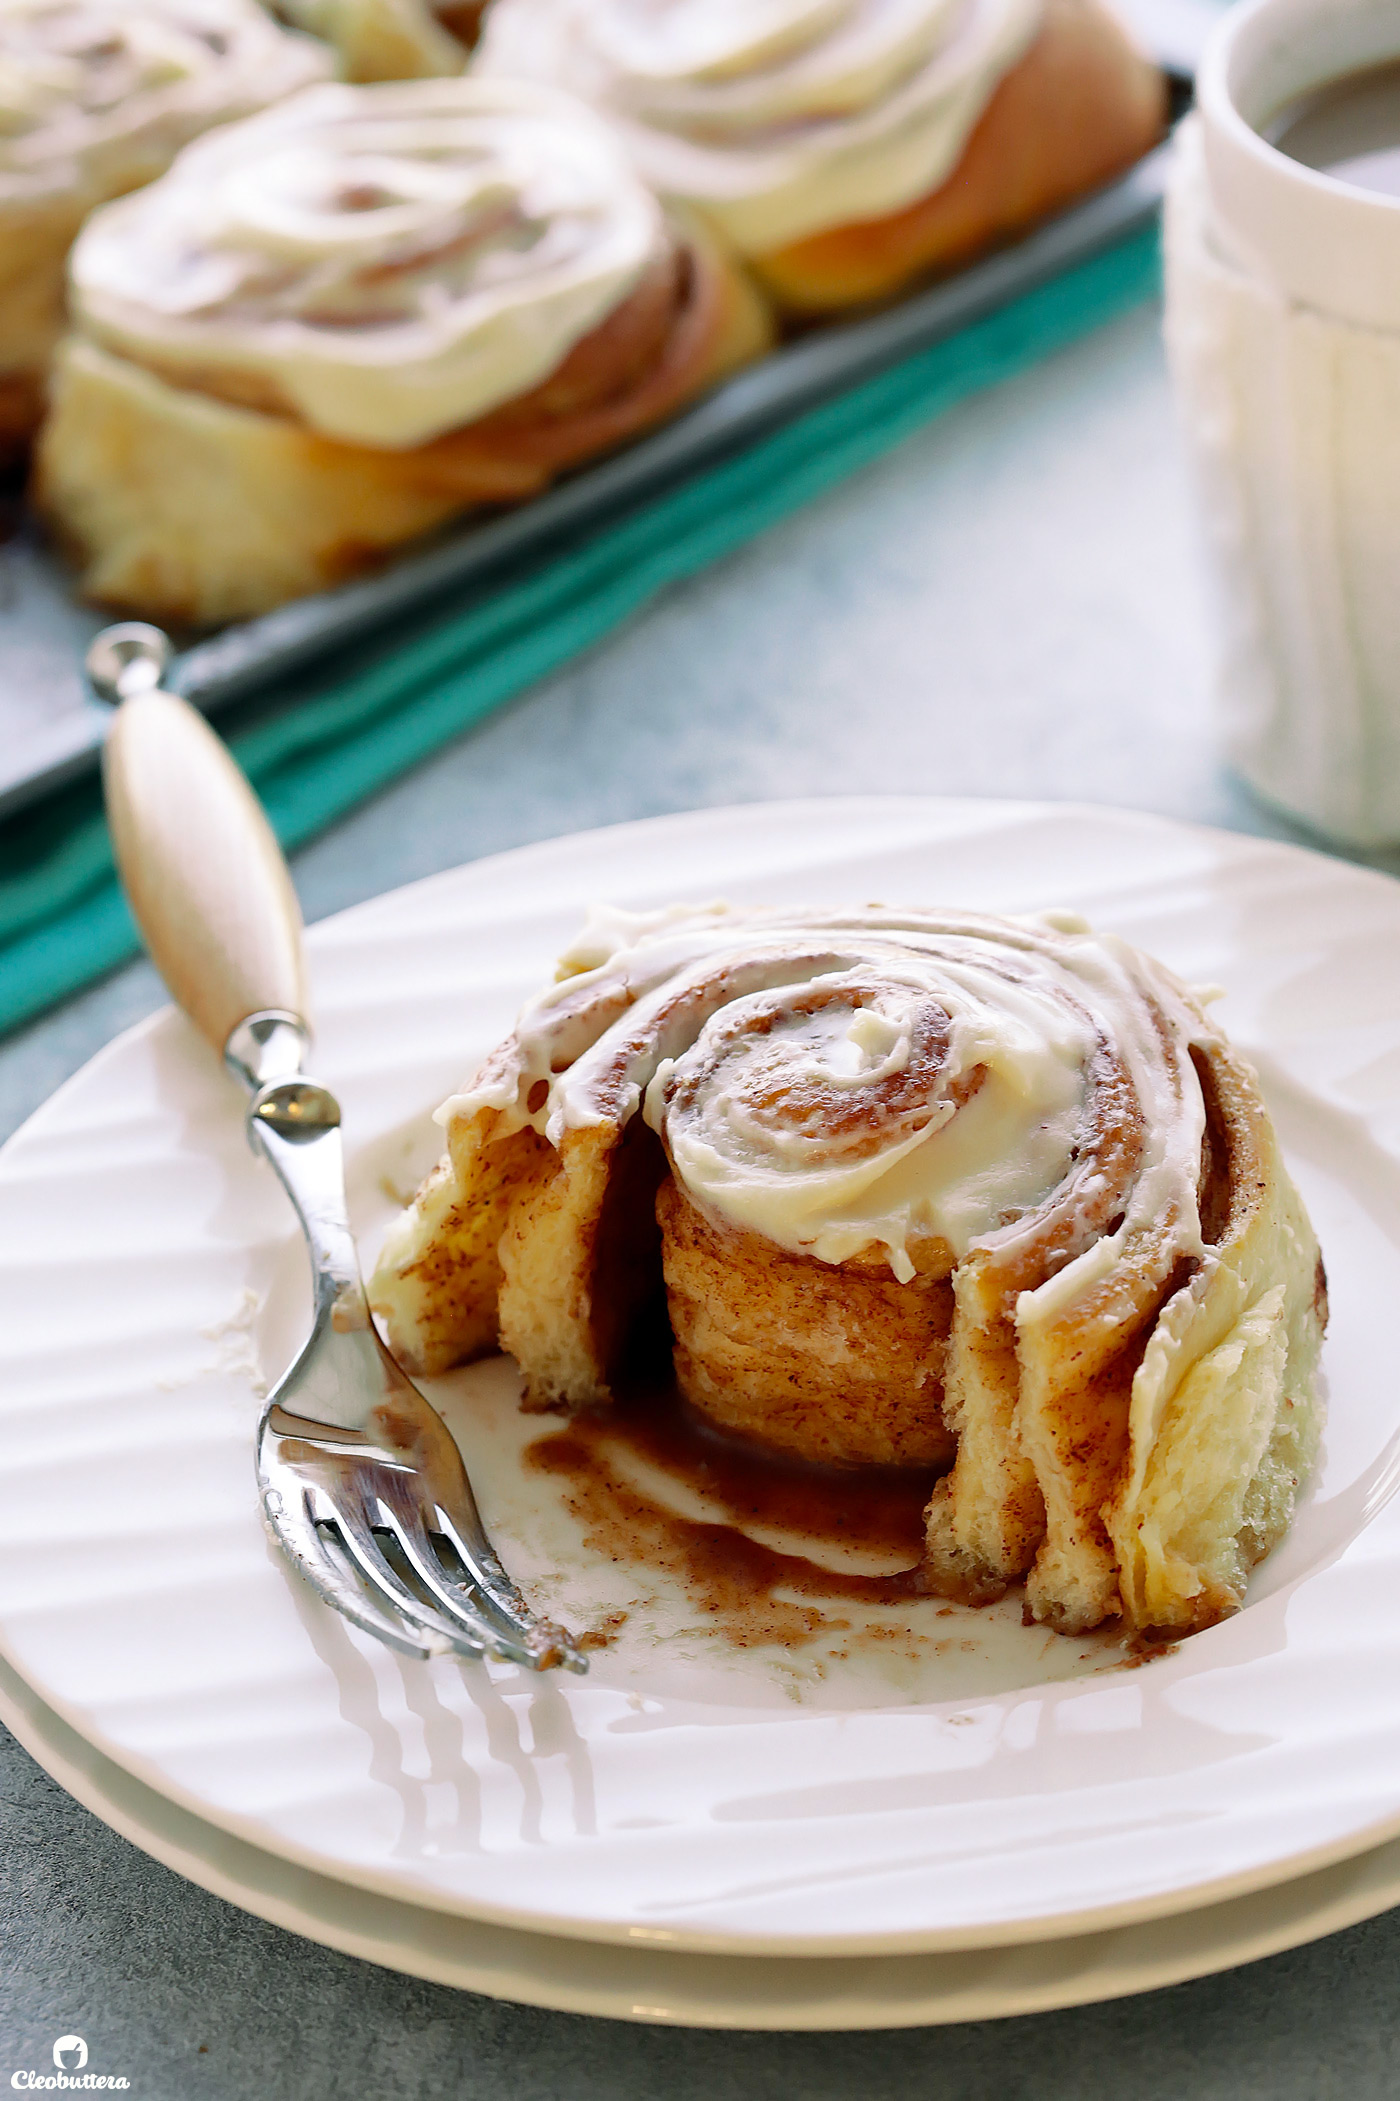
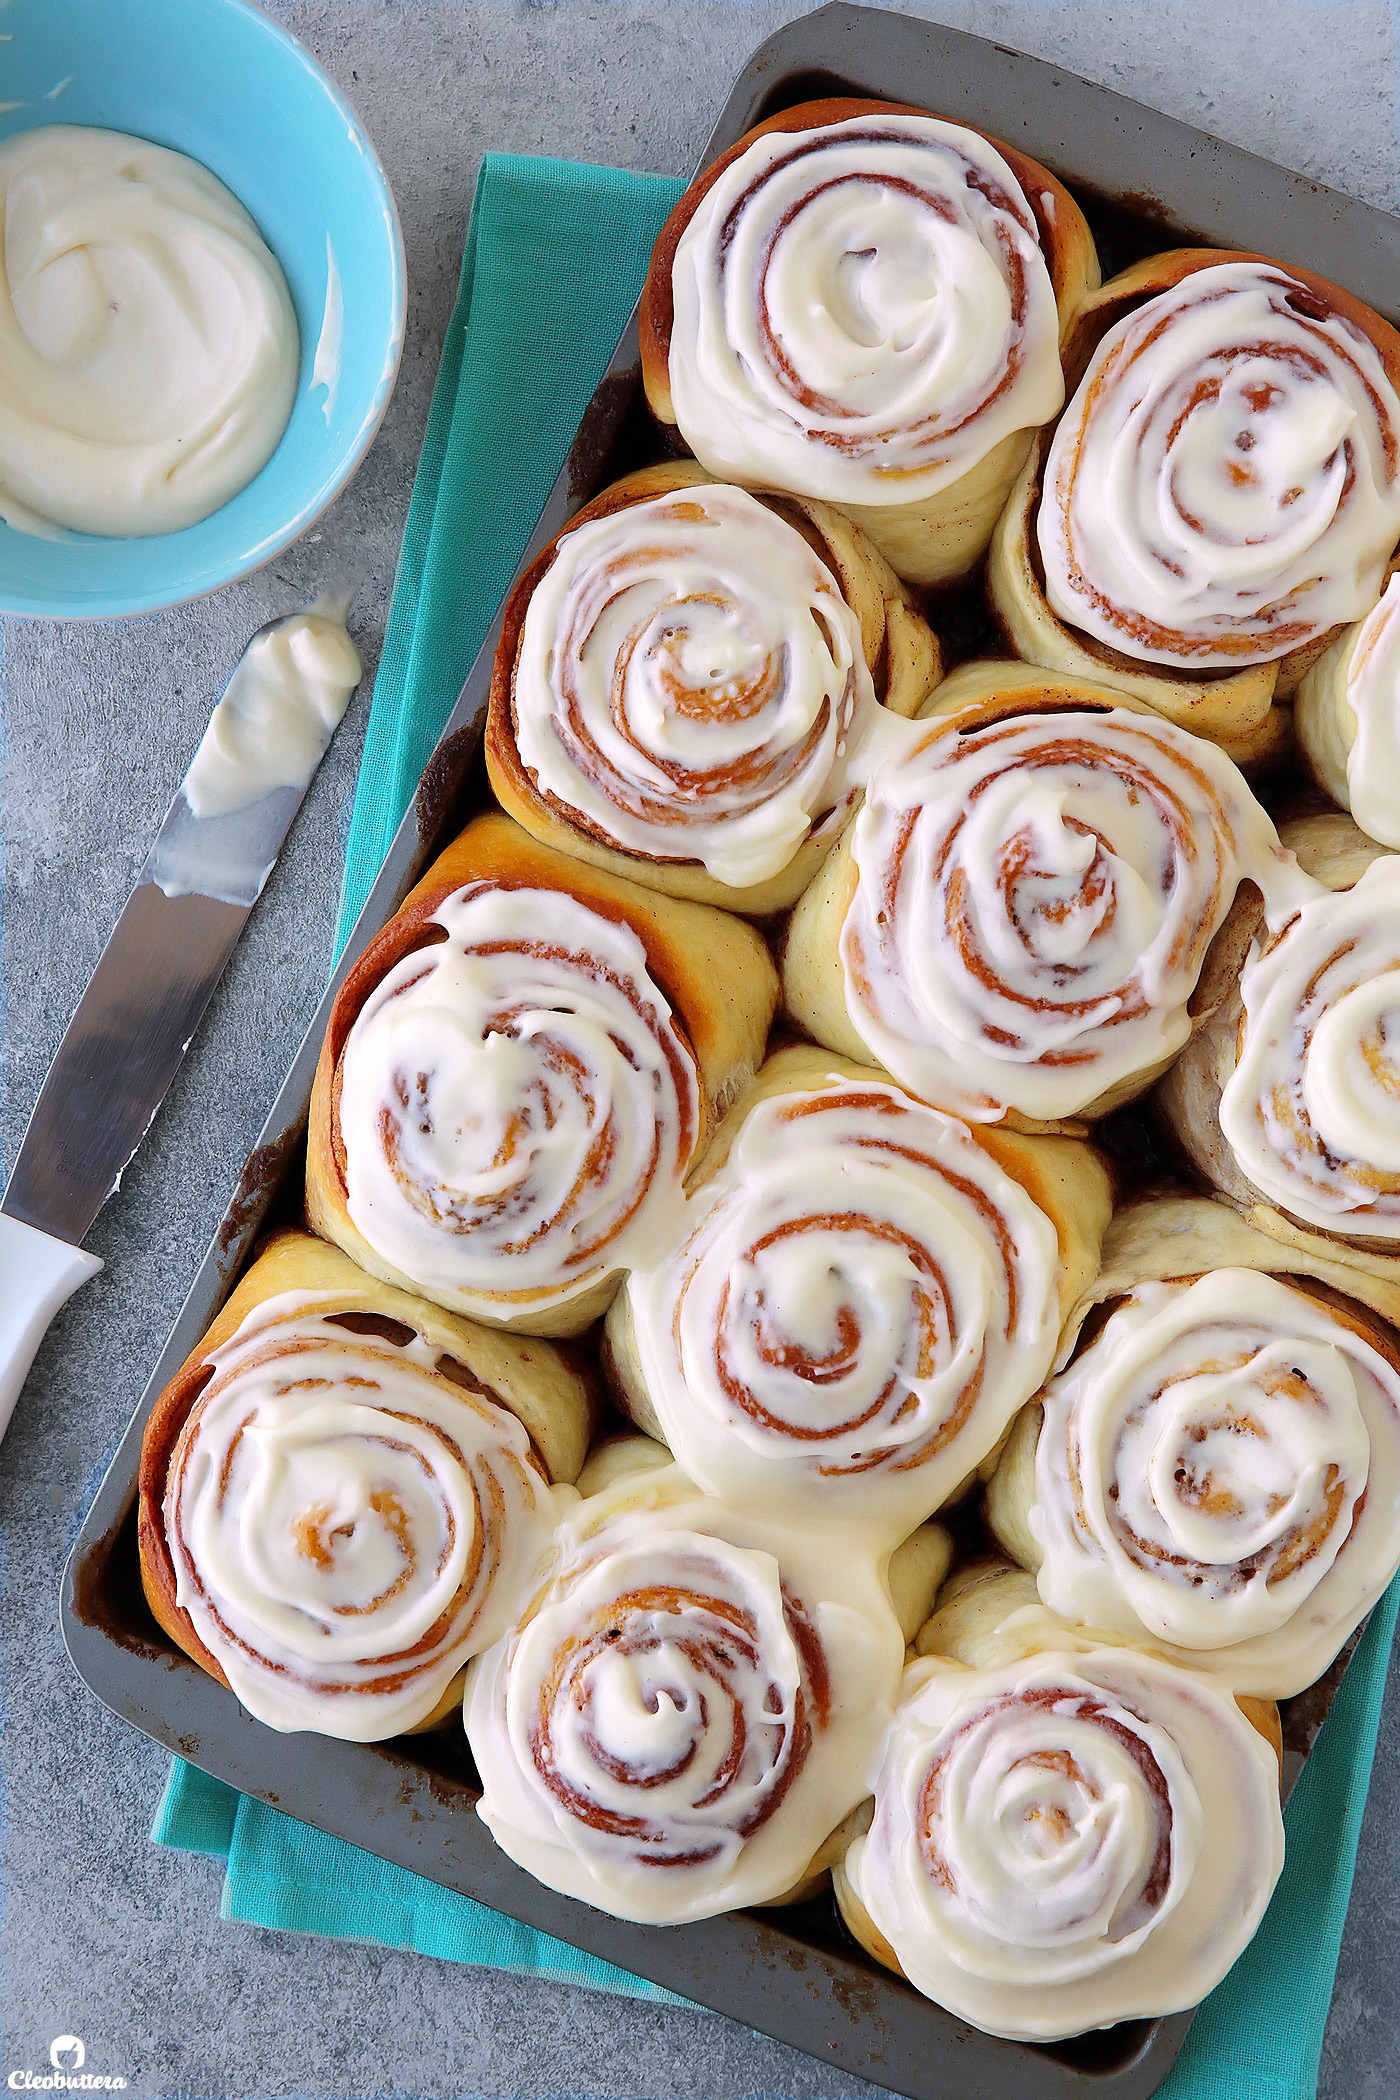
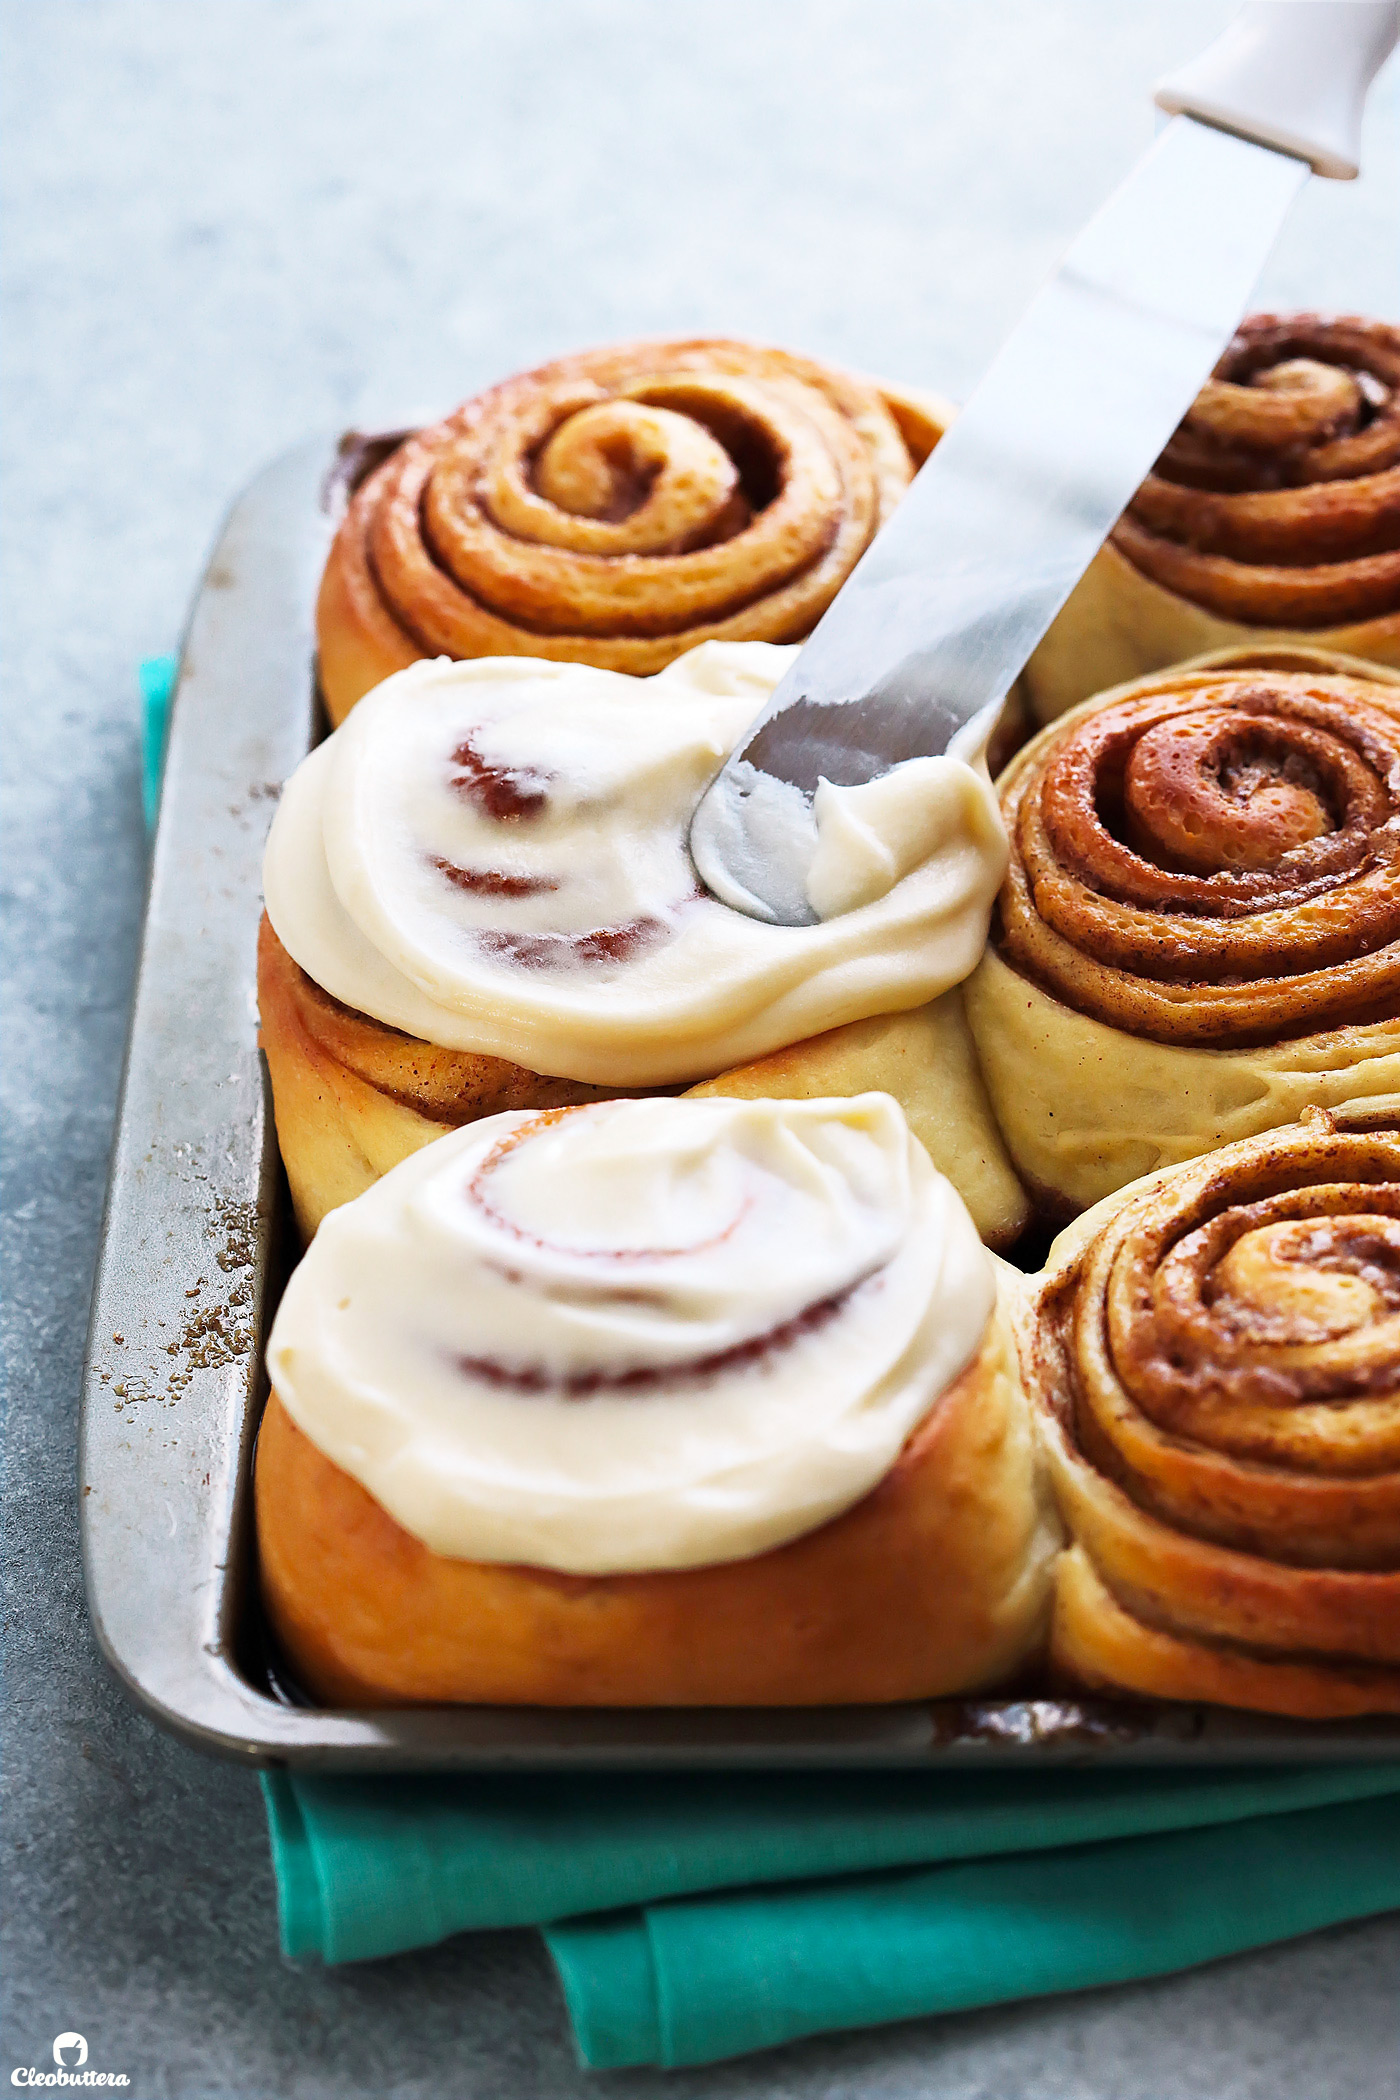
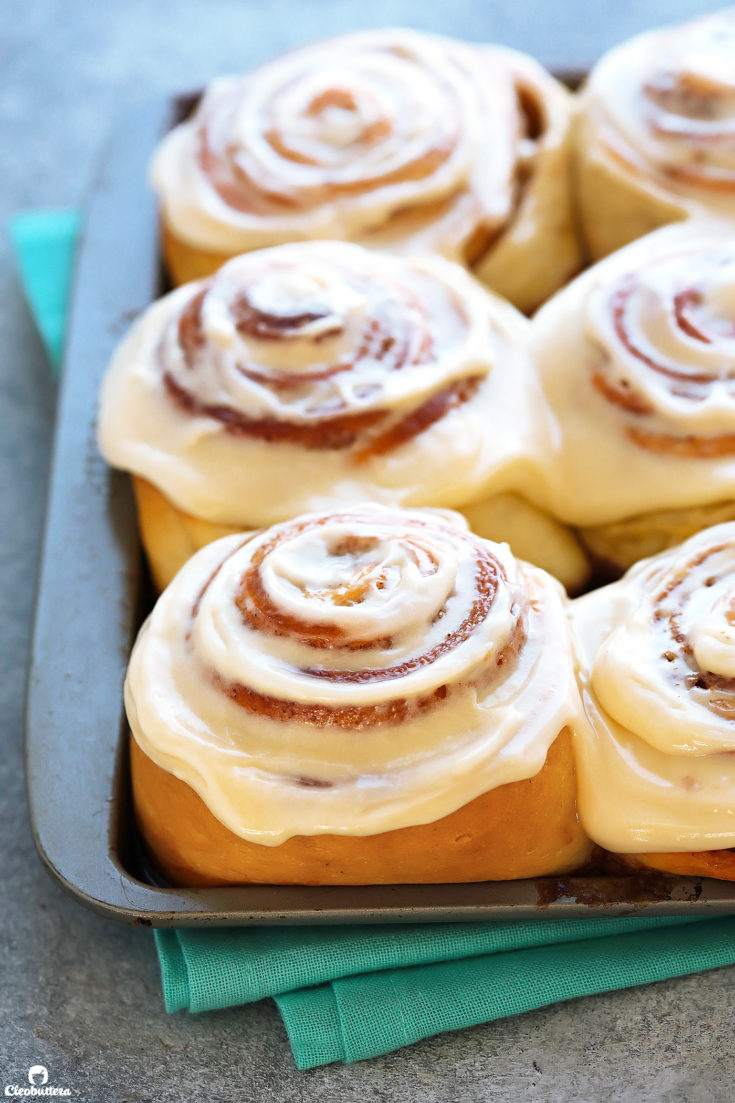
While they’ve still piping hot…slather on that cream cheese frosting…
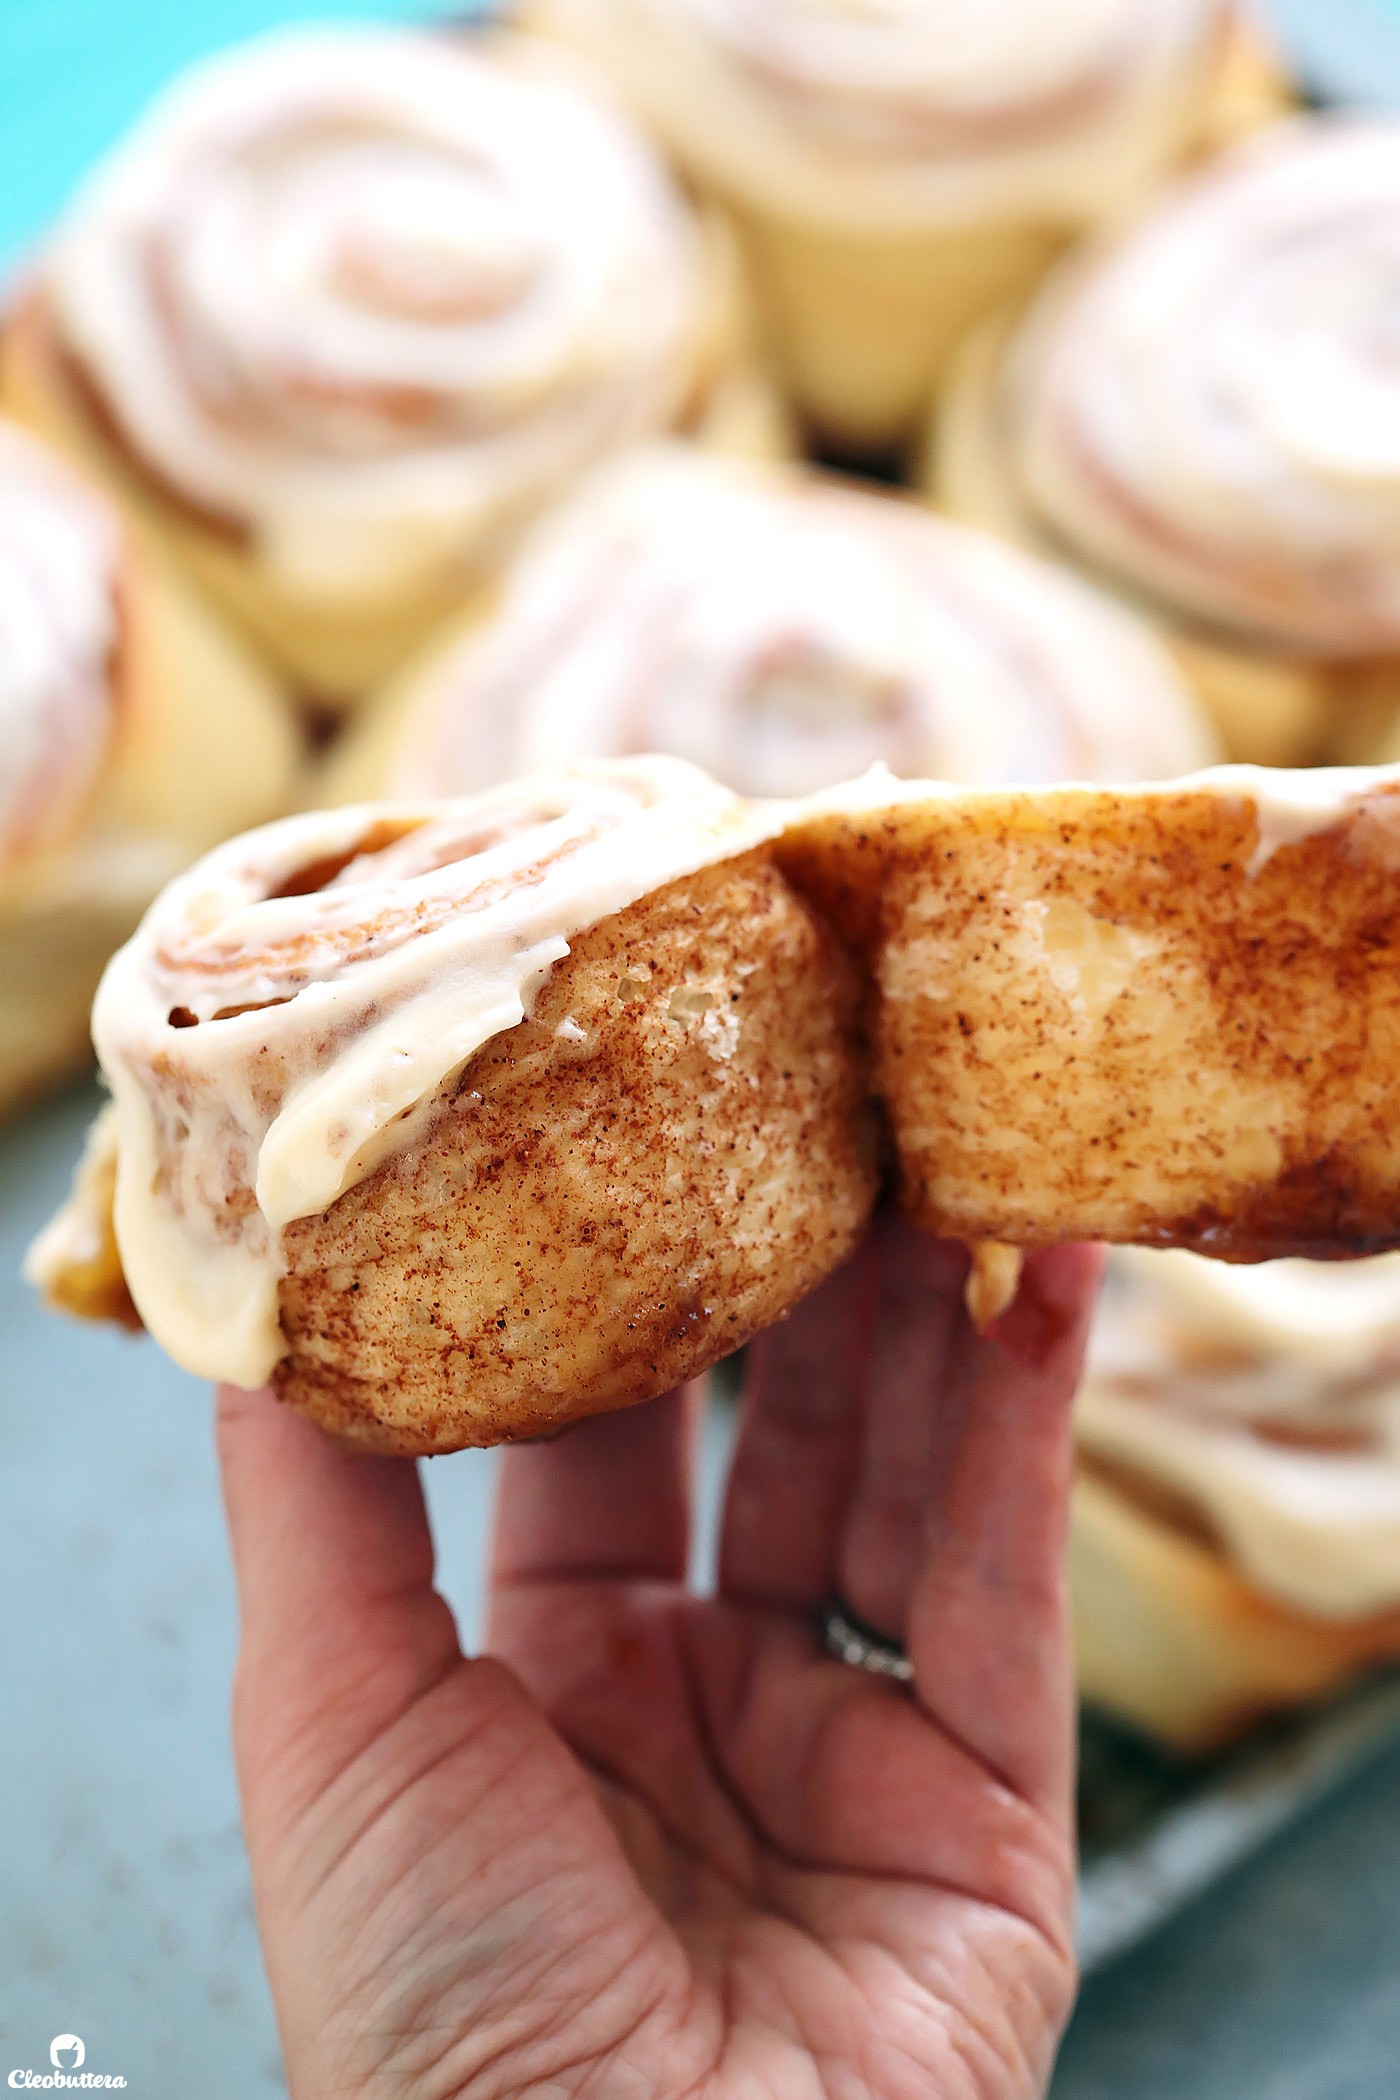
Unravel that heavenliness…
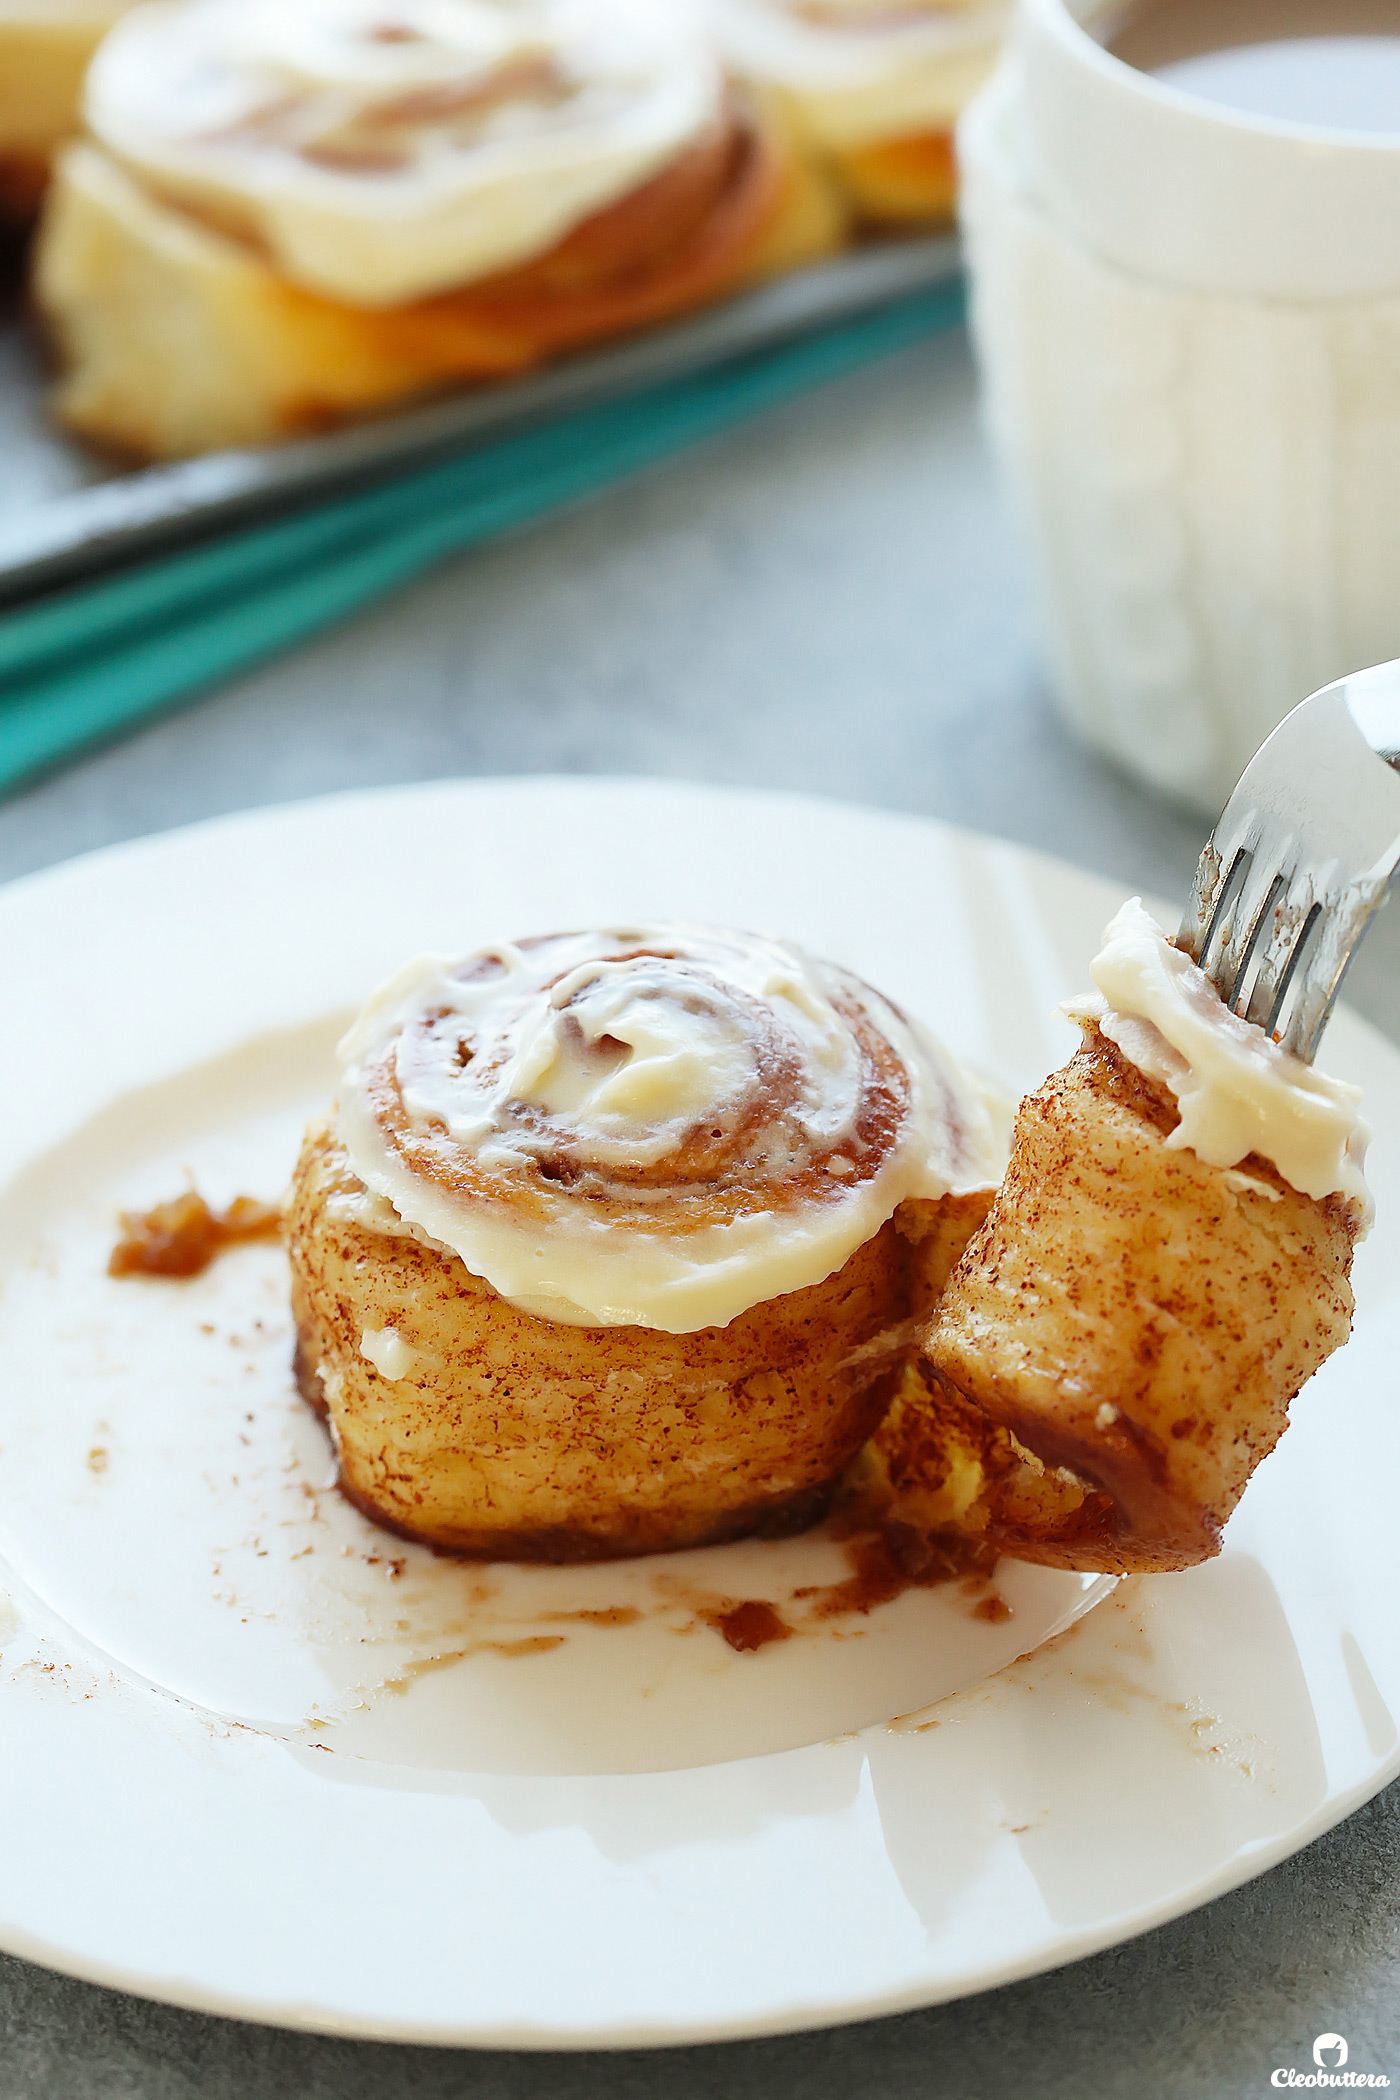
Take a bite, then marvel at that gooey, sticky, golden bottom. It’s like getting a cinnamon roll and sticky bun in one!
Tips for making super soft and fluffy cinnamon rolls:
- Weigh your ingredients. Using a kitchen scale for this recipe in particular (and baking in general) is highly recommended over measuring by cups. It will take the guess work out of the recipe because a gram will always be a gram, but a cup won’t always measure out to be the same. This is one recipe that weighing will make a difference. I even weigh out the liquid ingredients here.
- Don’t be tempted to add more flour. This dough is much softer than most bread/roll doughs. It starts out extremely sticky but will come together as mixing progresses. If you’ve weighed your ingredients, you’ll likely not need to add extra flour. If you’re using measuring cups, then wait until after the 10 minutes of kneading is over before deciding to add more flour. You still want it slightly sticky though, so add with care. Note that adding extra flour than what is called for in the recipe, may cause the dough to bake into drier, denser cinnamon rolls.
- Work with a cold dough. This is completely optional, but helpful. Making the dough a day in advance and letting it rise slowly (aka cold rise) in the fridge, makes the dough infinitely easier to roll into a neat cylinder and slice neatly. It also divides the work over 2 days, so there’s much less to do on the day you’re serving them
- Use the right pan size. Either a 15X13-inch rimmed baking sheet or 13X9-inch baking pan works perfectly for this recipe. Because the 15X13-inch baking sheet (as shown in the pictures) is bigger, it will yield slightly wider rolls with more browning around the edges. Whereas a 13X9-inch baking pan will yield taller but slimmer rolls that are softer around the edges.
- Create a warm environment for the rolls to rise. There are 2 bullet-proof ways to help yeast doughs rise in a reasonable amount of time. 1) Adjust oven rack to middle position and place a loaf or cake pan in the bottom of the (turned off) oven. Place the bowl of dough on the middle rack and pour boiling water into the pan. Close the oven door and allow the warm steam to help rise the dough. 2) Alternatively a warm, turned off oven may be used instead, just be sure that it’s not hot, as that could kill the yeast. It should feel like a warm summer day.
- Use an instant read-thermometer to check for doneness. Knowing if dough is baked through is trickier than cake, a foolproof way to know when dough is done, is by taking it’s internal temperature. A thermometer inserted in the center of the roll should measure between 190F-200F (88C-93C). Overbaking is known to dry out doughs, while under-baking can result in a raw center. If you don’t have an instant read thermometer, a toothpick inserted in the center of the roll, should go in and out smoothly, meet no resistance and come out clean.
- Tent the rolls with foil. These rolls tend to brown fast! So lightly tent them with foil, half way through baking, to avoid overbrowning.
- Frost rolls while still warm. Frost as soon as the rolls emerge from the oven. The frosting will partially melt, seeping down into the nocks and crannies and between of the rolls.
FAQs:
How can I make these cinnamon rolls ahead of time?
You have 2 options: 1) Prepare the dough up until step 5, but don’t let it rise. Cover and place in the fridge to rise overnight (slow cold rise). On the next day, roll out, fill, shape, rise and bake the rolls. 2) Bake the rolls the night before, but do not frost them. Allow them to cool and then cover tightly with plastic wrap. On the next morning, remove the plastic wrap, tent the pan with foil, then reheat them in a 350F/180C for about 5 minutes until very warm. Spread with the frosting. Alternatively, warm individual servings in the microwave; tastes as good fresh.
Letting the filled, unbaked rolls rest in the fridge overnight is NOT recommended as the cinnamon filling tends to liquify and leak out of the buns yielding soggy rolls.
Can I freeze the shaped and filled rolls?
“Freezing the unbaked rolls may result in a poor rise, and the filling is likely to leak out and pool in the bottom of the pan as the sugar melts. Instead, freeze the cinnamon rolls after they’re fully cooled, without any icing. Wrap tightly in plastic wrap and freeze for up to one month.” -King Arthur Flour
Can I use active yeast instead of instant?
Yes! Instant yeast can be used interchangeably with active dry yeast but you’ll need to proof it first. Stir 1 tablespoon of active dry yeast with the 3/4 cup of the milk from the recipe (warm it up though) and 1 teaspoon from the sugar amount. Let rest until it foams up, about 10 minutes, then proceed with the recipe by adding it to the dry ingredients along the butter and eggs.
Can I skip the powdered milk?
I have not tried omitting the powdered milk from this particular recipe, so I can’t tell for certainty what the outcome will be. However, I have tried a different tangzhong-based cinnamon roll dough that doesn’t call for powdered milk and noticed a downgrade. The purpose of powdered milk is to add another dimension of flavor as well as tenderize the dough. It’s not going to make a significant difference if you leave it out, but for bonkers awesome rolls, try to keep in if you can.
Can I make these gluten free?
I’m so sorry, but gluten-free baking is not my area of expertise, so my guess is as good as yours. If you do experiment with a gluten free flour, we’d love to know how it turns out, so others with the same dietary restrictions can benefit from your experience.
My rolls turned out denser and drier than expected…what have I done wrong?
The 3 main reasons that may cause the rolls to come out dry and/or dense, is adding too much flour, over-baking or under-proofing the dough. So be sure to weigh your ingredients using a kitchen scale for bullet-proof results, use an instant-read thermometer to check for doneness, be sure to check the expiry date of your yeast and make sure the dough is doubled in size in both rises before proceeding.
What if I don’t have a kitchen scale?
The most important ingredient to measure correctly is the flour. So be sure to lightly spoon the flour into your measuring cup, then sweep off excess using the back of a knife. You might feel the need to adjust the amount of flour after the 10 minutes of baking.
Can I knead the dough by hand?
Yes! But be ready for an arm workout ?? I’d suggest starting out by mixing the dough in a large bowl using a wooden spoon, and then when it starts coming together and feeling less sticky, use oiled your hands to knead until smooth and elastic.
Do these taste like Cinnabon?
I haven’t had Cinnabon in such a long time, so my reference of comparison is blurred, but I’ve been told that they’re better ?
Why are your posts so darn long?
Admit it! You so want to ask that ? Send help! I swear every time I promise myself to keep it short and sweet, it ends being longer and longer. I wish I can make my posts shorter, but I also wanna cram in as much information as I can to help you understand the why’s and how’s behind every recipe, especially more technical ones like this. I hope that my endless recipe rambling minimizes any room for error and helps you achieve the results you’re hoping for.
Would you like to see me make these rolls LIVE?
Head to my Instagram and watch my mini tutorial on my highlights labeled ‘Cinnamon Rolls’!
The Ultimate Cinnamon Rolls
An amazing recipe for squishy soft cinnamon rolls with a super fluffy and tender texture and a gooey filling that caramelizes in the bottom. A halo of perfectly sweet cream cheese frosting ties everything. A brilliant Asian technique called Tangzhong, ensures moist, airy rolls that stay soft for days.
Ingredients
For the Tangzhong (flour paste):
- 5 tablespoons (71g) water
- 5 tablespoons (71g) whole milk
- 3 tablespoons + 1 teaspoon (28g) flour*
For the Dough:
- all of the tangzhong (above)
- 6 tablespoons (85g) unsalted butter, melted
- 3/4 cup (170g) whole milk, cold or cool room temperature
- 2 large eggs
- 4 cups + 2 tablespoons (496g) flour*
- 3 tablespoons plus 1 teaspoon (21g) powdered milk (dry milk powder)
- 1 tablespoon (9g) instant yeast
- 1/4 cup (50g) granulated sugar
- 1 3/4 teaspoons salt
For the Filling:
- 1/2 cup (114g) unsalted butter, very soft; partially melted
- 1 1/4 cups (250g) soft light brown sugar, packed
- 2 tablespoons (14g) cornstarch
- 2 1/2 tablespoons (13g) ground cinnamon
- 1/2 teaspoon fine salt
For the Frosting:
- 1/4 cup (57g) unsalted butter, softened to room temperature
- 2 oz (57g) cream cheese, softened to room temperature
- 1 cup (114g) powdered sugar
- 1 tablespoon milk
- 1 teaspoon fresh lemon juice
- 1/2 teaspoon vanilla extract (or 1 teaspoon imitation vanilla flavoring)
- Pinch of salt
Instructions
To make the Tangzhong (flour paste):
- Combine the tangzhong ingredients; the water, milk and flour in a medium saucepan, and whisk together until no lumps remain.
- Place the saucepan over medium heat, and cook, whisking constantly, until the mixture thickens to a smooth, pudding-like consistency; 2 to 3 minutes. Remove saucepan from heat.
To make the Dough:
- To the saucepan with the tangzhong (flour paste), whisk in the melted butter and milk until very smooth. Add in the eggs and whisk until fully incorporated. The liquid ingredients will cool off the hot tangzhong and the mixture should now feel lukewarm.
- In the bowl of a stand mixer (or a large bowl if kneading by hand) whisk together the flour, powdered milk, and yeast to combine. Pour in the flour paste/milk mixture.
- Fit the stand mixer with the dough hook and mix on low speed until all the flour is moistened and a shaggy dough comes together; 1 to 2 minutes. Let the dough rest, covered, for 20 minutes; this will give the flour a chance to absorb the liquid, making it easier to knead.
- After the 20 minutes, add the sugar and salt and mix on medium-low speed until a smooth, elastic and slightly sticky dough forms; about 10 minutes. The dough will be very sticky when mixing begins, but resist the urge to add more flour; the dough will absorb the excess moisture and come together nicely as the mixing progresses. After the 10 minutes of kneading, the dough should feel slightly sticky but not messy and should easily come together in a taut ball when handled with lightly oiled hands.
- Using lightly oiled hands, shape the dough into a ball, and transfer to a lightly greased large bowl. Cover tightly with plastic wrap and allow to rise in a warm place, until almost doubled in volume, about 1 hour. Alternatively, you can let it rise slowly in the fridge overnight; my personal favorite method, as a cold dough is so much easier to work with. Meanwhile, prepare the filling.
To make the Filling:
- In a medium bowl, whisk together the brown sugar, cornstarch, cinnamon and salt until well combined, Cover with plastic wrap and set aside until ready to use.
To make the Rolls:
- Gently deflate the risen dough, then turn out onto a pastry mat or very lightly floured counter. Pat, stretch and roll out the dough to form 16X18-inch rectangle with long edge nearest you.
- Evenly spread the partially melted butter all over the surface of the dough, then sprinkle the brown sugar filling over the butter, leaving 1-inch border along top edge; smooth the filling into an even layer with your hand, then gently press mixture into dough to adhere.
- Starting with long edge nearest you, roll the dough into a cylinder. Pinch the seam to seal the dough shut and roll cylinder seam side down. Mark gently with a knife to create 12 equal portions. For the cleanest cut, slice by holding a strand of dental floss underneath the cylinder, and cross ends of the floss over each other and pull. Slice cylinder into 12 portions (about 2 inches each) and transfer to a 15X13-inch rimmed baking sheet or 13X9-inch baking pan, that's been greased with cooking spray.
- Cover the pan loosely with plastic wrap and allow the rolls to rise until puffy and the rolls are touching one another; 40 to 50 minutes . In the last 15 minutes of rising, adjust oven rack to medium position and preheat the oven to 350°F/180°C. Meanwhile, prepare the frosting.
To make the Frosting:
- In a medium bowl (or food processor), using an electric mixer, beat together the butter and cream cheese until very smooth and creamy; about 2 minutes.
- With the mixer running, gradually add in the powdered sugar. Continue beating, until the sugar is fully incorporated and the mixture is light and fluffy; about 2 more minutes.
- Add in the milk, lemon juice, vanilla and salt, and beat until well combined. Cover until needed.
To bake the Rolls:
- Remove the plastic wrap from over the risen rolls and bake in the preheated oven for 20 to 25 minutes, tenting with aluminum foil halfway through baking to avoid over browning. The rolls are done when the center of the dough registers around 190F on an instant read thermometer, or when a toothpick inserted in the center of the roll, should go in and out smoothly, meet no resistance and come out clean..
- Remove the rolls from the oven, and immediately spread the tops with the frosting; it'll partially melt into the rolls. Serve warm. Store completely cooled rolls in an airtight container for a couple of days at room temperature.
Recipe Notes
- For a dough that produces soft, light and fluffy rolls, it is strongly recommended that you measure ingredients, especially the flour, by weight using a kitchen scale, rather than measuring cups. If you don't have a kitchen scale to weigh the flour, use the Spoon & Sweep method: Use a spoon to lightly fill measuring cup with flour until required amount is obtained, then sweep access with the back of a knife. You might need to adjust the amount of flour after the 10 minutes of kneading.
- King Arthur Flour, the source of the dough's recipe, calls for bread flour here. Bread flour is not available where I live, so I use all-purpose flour instead with great results. However, please note that the all-purpose flour in my country is high in protein, which makes it similar to bread flour. Using low-protein all-purpose flour will not guarantee perfect results, so stick to bread flour if it's available to you.
- To create a warm environment for the dough to rise, adjust oven rack to middle position and place a loaf or cake pan in the bottom of the oven. Place the bowl of dough on the middle rack and pour boiling water into the pan. Close the oven door and allow the dough to rise as instructed. Alternatively, a warm, turned off oven may be used instead, just be sure that it's not hot, as that could kill the yeast. It should feel like a warm summer day.
- Make ahead tip! To make the rolls in advance you can either 1) Prepare the dough up until step 5, but don’t let it rise. Cover and place in the fridge to rise overnight (slow cold rise). On the next day, roll out, fill, shape, rise and bake the rolls. 2) Bake the rolls the night before, but do not frost them. Allow them to cool and then cover tightly with plastic wrap. On the next morning, remove the plastic wrap, tent the pan with foil, then reheat them in a 350F/180C for about 5 minutes until very warm. Spread with the frosting. Alternatively, warm individual servings in the microwave; tastes as good fresh. Letting the filled rolls rest in the fridge overnight is NOT recommended as the cinnamon filling tends to liquify and leak out of the buns yielding soggy rolls.
- Be sure to read through the tips and FAQs in the post before proceeding with the recipe.
Dough recipe adapted from King Arthur Flour with changes, and these Ultra Fluffy Milk Bread Rolls.
Filling and frosting adapted from Lauren's Latest with changes.
Measurements Note: All recipes of this site have been developed using weight measurements. Although US volume measurements have been included for your convenience, it is highly encouraged that you weigh your ingredients using a kitchen scale to get the best possible results. Due to the sensitive nature of baking, kitchen scales are proven to yield more accurate and consistent results than measuring cups. Enjoy!
Powered by ![]()
This post may contain affiliate links.
All images and content are owned by Cleobuttera® and are copyright protected. Please do not use my images without prior permission. If you would like to republish a recipe, please rewrite it in your own words and link back to the recipe page on my site. Original recipes and creations of this site are intended for personal and home use. Commercial replication or media consumption are only allowed with a written consent and agreement with Cleobuttera owners. Otherwise it is considered a violation of intellectual property. Thank you for respecting and appreciating the amount of time and effort that goes into creating free, unique recipes that make people happy.


Hey
Can i use cream cheese spread instead?
Hello Fatema. I’m sorry but I’m not entirely sure what you mean by cream cheese spread. May you please clarify and maybe give examples of specific brands?
Haha sorry ? so excited to try it out.. what i meant was Carrefour Spreadable processed cream cheese!!
Oh no sweetie…that wouldn’t work. I use Kiri squares; they’re perfect here.
They are delish!! Thanks for all the info!
If I don’t want the sticky bottom should I let the second rise happen in the fridge?
Attachment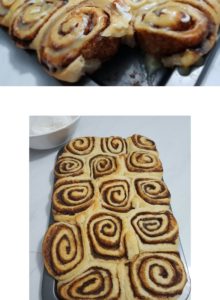
Hello. Among all those recipes I have tried, I must say this is the best!! Thankyou so much! ? It turned out great!!!! Just one question, can I double the measurements of the ingredients? For me to make 24 pcs of cinammon rolls? Thankyou!
These look stunning Kimmy! So pleased to hear that you loved them so much ?
As for doubling the recipe, if your mixer can handle the extra amount of ingredients, then go for it! Should work just as well. You just might end up kneading a few minutes longer.
Hey, I never made cinnamon rolls but I’m dying to and after scrolling over many recipes, I could say I’m in love with yours, probably largely affected by the visuals your pictures gave off. QUESTION THOUGH, may i use no equipment and just the traditional wooden spoon and bowl kneading for this dough recipe? Or should I settle for a different dough for that. I must admit I really wanna try this though but I just got no mixer. Please let me know ASAP as I wanna try this right away!
Hi Hannah! I hope you love this one ? Sure you can most certainly knead it by hand. Just expect an arm’s workout because it does require quite a bit of kneading. Best of luck ??
looks awesome as all of ur recipes ♥
i already tried the ultra fluffy bread dough several times with diff filling but never though of cinamon rolls xD
chees and agwa (dates) and zatar was the bes , tried it with jam too but it was a big fail xD jam flooded every where lol > still it taste good too 😛
going to try cinnamon too soon 😀 may be i will give u my feedback again about it later :3
Thank you so much Usaira! Isn’t this dough the most versatile ever?! Love your variations on it! I’ve been using it for so many things too. One of my favs are wrapping it around hot dogs for a pigs in a blanket sort of thing…you need to try it. I hope you love this dough for cinnamon rolls as much as we do!
well … i am back 😀
i tried it yesterday and it turn out amazing :3 my guests loved it , even one of the kids told me to open bakery shop bcuz he loved it so much xD
thank u for ur great recipes ♥
next time i will try it around hot dogs as u suggest 😀
Wooohooooo! Welcome back! So happy to hear that they were very well received ?
TASBIH! This post is THE MOST AMAZING!!! Your dedication to perfecting this recipe and methodically and clearly sharing the steps to replicate your results is just mind-blowing. Loved reading through this entire thing and can’t wait to try these myself!!!!
Coming from someone who bakes 9 different recipes of cinnamon rolls in one day and comprehensively comparing and contrasting each one of them, means the world to me! You have no idea how happy I am to know that you’re likely this. Can’t wait for you to give me a “data-based” analysis on this one ?
Cheers to the perfect cinnamon rolls! Thank you so much Tasbih! I’ve been craving for cinnamon rolls since like forever and i haven’t found one here in France. The recipes I found online weren’t convincing enough I was afraid I’d just end up feeling frustrated…until I found your recipe and BOOM!! You’re a heaven sent.❤
Wooohoooo! That’s music to my ears Sheryl ? So happy you loved it.
I love it more the longer it gets, you are definitely the nerdiest food blogger ever and I love it , you are the best . I kind of went through the same process my self trying to find the perfect cinnamon roll recipe that ticks all those boxes , i made a couple of really good ones but something was missing ,as I am a food perfectionist , I’m sure this recipe is the perfect one , thank you dear for all you hard work and your amazing recipes ??????
Hahahaaaaaa! I’m not sure if I should, but I love it when people call me a food nerd ? It’s BEST compliment! As a perfectionist yourself, I’ll take it that you are too. I hope you find in this recipe the missing piece of the puzzle that you’re looking for.
Okay !! so now I’m actually freaking out !!
today when I woke up I was craving cinnamon buns SO BAD ! and since where I live the FAMOUS cinnamon rolls shop that we all love SUCKS! (DUNNO WHY) . I decided to make my own , and oh my if I only can share a screenshot of my youtube history , I was watching every video ever created related to cinnamon buns and reading every comment and tips and tricks to the point that I got so overwhelmed and decided to navigate your website (because I know your recipes are as they say “الخلاصة”) to search for a recipe although I’m 100% sure that you didn’t upload one because I’m a very faithful follower (newsletter signed up and turned on post notification on Instagram) type of follower so if you had posted anything I would’ve seen it by then ,but I decided to check it anyway (again, I don’t know why) but I knew that I would end up making a dessert anyway . And since your recipes are addictive and one can’t go wrong with any of them I settled on making the tres leches since it’s my fav ! and just NOW as i was sifting the flour I got the Instagram notification post !!
GUESS WHO’S MAKING CINNAMON BUNS AT 3 AM IN THE MORNING NOW ?? (AND TRES LECHES) 😉 ;);).
Now that’s what I call “Food Telepathy!” I can’t thank you enough for your trust…means everything to me. I hope this recipe hits the spot and curbs that craving.
I like the long posts. VALUABLE INFORMATION contained therein!!!!!!!!!!!!!!!! Keep up the good work.
Thank you so much Lisa! So relieved to know that you actually appreciate it. Sometimes I worry that I might be boring you guys lol!
I just made it. Amazing!!! One word. Amazing!!
WOW! That was quick! And YAAAAAAAAAY so happy you loved it. Thank you so much for that prompt and great feedback.
All i want to say is every single recipe i have tried from your recipes were always a success. They are yummy and not overly sweet. Thank you for sharing and keep up the amazing work you do. ♥️
Thank you so much Sarah for this lovely comment. It’s always great to hear that you’re having good results with my recipes; makes all the obsessive testing worthwhile.
I just baked your better than the box brownies, because I want to find what to do for new years dinner, (for Christmas your pumpkin cupcakes are the winners), and the outcome was delicious, brownies were the winners and then you post these ? and surely are delicious, so the best I can do is resign because will I gain weight! I have to try them ?? I love u!!!!!!!!!
Hahahaaaaa! Good thing New Year’s resolutions is fast approaching so we can take care of the weight ? I’m so happy to hear that the brownies and pumpkin cupcakes are becoming a part of your holliday celebration. What an honor?! I hope ypu enjoy every bit and have a wonderful holiday season.
I double dare you to make a threads of kings ?? (rosca de reyes), it’s a traditional Mexican dessert that is eaten with all the family on January 6! ??
`Ooooooh! Sounds so interesting! I’ll definitely get some research done about it. I love learning about and trying other cultures’ treats.
Congrats on the new website layout.
Is the type of flour will affect the end result?
We use the mostly common all purpose flour.
Thank you so much Ammar! I’m so excited about the website design; I can’t stop looking at it. It’s been a long time coming.
I’ve only every used all purpose flour in this recipe, because bread flour is really hard to find in Egypt. My guess would be that bread flour would be easier to knead without be too sticky, since it’s better than all purpose in soaking up liquids. I also think the texture of the baked rolls would come out slightly more chewy.
I dont usually write reviews, too lazy to do that?
Normally i just try someone’s or a site recipe then alot of ewww or omg thank u ?
But THIS is much different
I believe you saying you couldnt sleep thinking of cinnamon rolls, not that i went that far ? but it really bugged me everytime i made it and once it’s cold all the magic is gone!
At this moment, I’m enjoying my coffe with the best cinnamon roll i ever got to bake ???♀️
I baked it yesterday and eating it now after heating it alittle AND YES IT’S AMAZING!
So I saw I should be writing this and did I say I love you?
Esraa! The fact that you loved these cinnamon rolls so much that it get you to write a comment, means EVERYTHING to me! Thank you so much for taking the time to share your wonderful feedback. I’m so happy you enjoyed them.
I don’t have powdered milk; is there something I can substitute it with?
Hi Laarni! I’m not really sure what substitute would work best here as I’ve only tried it with powdered milk. You can omit it, if you must, but the texture might turn out just a little less tender.
I love your blog. But I have a question, when u say cream cheese.. do u mean a cream cheese like Philadelphia cream cheese( I live in the United States). Or the Kiri cheese squares in the blue box.. thanks.
Thank you so much Dina! Philadelphia and Kiri are both great cream cheeses and either would work just as well. The flavor is almost identical; the only difference is the brand name. Since you’re in the US, then go with Philadelphia (the one that comes in a block, not the spreadable type that comes in tubs). It’s better suited for baking and desserts applications.
Hello, i was trying to make these rolls and the mixer just stopped in the middle of kneading so i decided do the rest by hand and let it rest .. now as it is resting and waiting for it to rise .. how would i know if i under kneaded the dough ? And can i try kneading it again after it rested and rose ?
Oh no Hanin…Hope your mixer is still ok!
The dough is well-kneaded when it feels very smooth, shiny and is very elastic. Elastic meaning that you can pull on it and it would stretch without tearing right away. I hope yours have reached this point, because unfortunately you shouldn’t knead after it hass risen, because that would deflate all the air bubbles the yeast has worked into it.
Best of luck!
Hello tasbih!
I have a silly question, what do you recommend to oil the bowl with before leaving the dough to rise? (Olive oil? Or something less fragrant?)
Also, would love if these came in chocolate!!
Hi Lulu! I use sunflower oil to grease the bowl, but anything neutral-tasting like canola, vegetable or corn oil will work well too. I’d steer clear of olive oil here as it can impart a savory/olive-y flavor into the sweet dough.
As for a chocolate version…have you been reading my mind? Been thinking all day of how it can be tweaked for chocolate. Rest assured its on my mind. And as soon as I get it right, I’ll immediately share ?
Hi!!
Just made these and they are AMAZING!!
I have a question, in Step 4, once the dough has been rolled, shaped, and filled, can we put it back in the fridge for the final rise, or can the final rise only happen at room temperature?
Hi Susie! I’m so excited that you loved this recipe!
Technically, your suggested make-ahead method, will work, but at the expense of a less amazing texture. I’ve found that proofing the filled rolls overnight in the fridge, causes some of the filling to liquidize and seep out of the rolls, and puddle in the bottom of the pan. While they still puffed and baked nicely the next day, the texture turned out a bit soggy and doughy, rather than light and fluffy. I honestly didn’t love the results. I’ve also noticed the same problem with other cinnamon roll recipes that I’ve tried and not just this one. Hope this helps!
I have never reviewed a recipe but……
I saw this recipe pop up on instagram just before xmas and thot I have to see what made this the Ultimate cinnamon roll as I had stuck to the same recipe. I have since made these rolls twice (and would have made it more times but trying to watch the waistline). THEY ARE A-MAZ-ING. The instruction and notes are very valuable and rolls easy to make. My family and I are in love. It last about 20 mins after it comes out of the oven. Thank you for taking the time to perfect this recipe and sharing.
Thank you so much Tee for taking the time to write your wonderful feedback. The fact that it’s your first time to review, means EVERYTHING! I’m really happy the rolls were such a hit with your family. I’m also so glad you found my excessively long post useful. Was worried it would bore you guys ?
Hi! I was wondering if I could do the overnight rise, bake them the next day, then cover them tightly and frost a day after? Or will that be too long? What’s the longest they could proof in the refrigerator? Thank. You!!!
Hi Alexandra! Please accept my apologies for my late reply as I’ve been very sick lately. Thankfully I’m feeling so much better and started to ease into replying to comments. Your plan sounds perfect! I think it should work really well. Ideally, you shouldn’t leave the dough to proof in the fridge for longer than 16 hours. If you leave it longer, you’ll probably need to punch it down several times so it doesn’t overproof. Enjoy ?
Attachment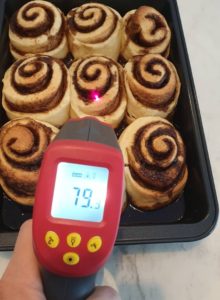
Tried this recipe today! It’s awesome. Thank you for sharing ! From Singapore
They look so delicious Shawn! So happy you loved this recipe so much. Thanks for sharing your photo with us.
Hi, i wanted to know what all-purpose flour brand do you use/recommend for this recipe?
I also wanted to know what brand vanilla extract, milk powder and unsalted butter you use?
I love your blog, your instagram page and your recipes look mouth-watering. This will be the first recipe I try from your blog, so I hope it goes well. Keep up the great baking!
Hi Ayesha! Thank you for all your kind words. I’m happy to hear that you’ll start baking along. I hope you enjoy every single recipe you try from here.
Here are the brands I use:
All purpose flour: Al Doha
Vanilla: Parade (I get it from Miriam Market in Maadi)
Milk powder: Nido
Unsalted butter: Lurpak
Hope that helps!
Hi chef,
My question here is what is the brand of butter used in the frosting because when I make cinnamon rolls I always feel the butter taste is not good enough for me? I think I should use a butter which is used for eating not baking but I still need your recommendation?
Then, I want to ask you If i can use a little bit of potato mash in the dough as it made wonders in your burger buns recipe?
Hi Nada! I absolutely LOVE using Lurpak butter in baking; the quality really shines.
I don’t recommend adding mashed potatoes here as it is not needed. The flour paste (Tangzhong) is the magic ingredient in this recipe, and does the same wonders as potatoes does for the other. Enjoy ?
I rarely comment but HAD to for this recipe… I have made cinnamon rolls a handful of times and had a few recipes I liked. Then I saw this recipe and your amazing step by step stories on Instagram… I saved it and had been wanting to make them for weeks but never wanted to put in the effort. Well… I just made these and I am so mad I waited so many weeks. They are AMAZING. Easily the absolutely best cinnamon rolls I have ever had- not just made, but had! The frosting was perfect as well. I cannot thank you enough for this recipe. It’s 100% worth all the work and I truly am going to have to control myself from making these every week!
Wooooohoooooo! That’s always so great to hear Cara! I’m really glad you loved them so much and that they were well worth your time and effort. Good luck not making them on a weekly basis lol! And thank you so much for taking the time to write your comment. I absolutely LOVE it when I get great feedback like yours.
See if you can understand my bad English!
( folks from Brazil say hi)!!! If I choose rise overnight, (12-16 hours) will the buns be larger after bake? Or doesn’t it make a difference? Cuz i like them small and uniformes!! Thank uuuu and Congratulations on the website! I’m devouring every recipe!!
Hi Patty! Sending you guys lots of love all the way from Egypt!
Whether you choose to rise the dough overnight in the fridge or on the same day in a warm place, the dough will rise to almost the same size, so it won’t really make a difference. If you prefer smaller rolls, you can roll the dough into thinner logs and cut 24 rolls instead of 12. I recommend checking King Arthur Flour’s site for instructions on smaller rolls. Best of luck! Oh and your English is great by the way ?
Pingback: Black Sesame Cinnamon Rolls with Matcha Glaze - Kitchenpedia.co
The recipe seems amazing but what to do if I want to try it with chocolate?
Thank you Nada! Coming up with a chocolate version of these rolls is on top of my baking bucket list. Unfortunately, I still haven’t got around trying it, so I can’t tell for certainty how to approach it. However, my plan is maybe switching unsweetened cocoa powder for the cinnamon and add chopped chocolate in the filling too, and drizzle chocolate sauce on top. I hope that helps for now ?
Pingback: Black Sesame Cinnamon Rolls with Matcha Glaze – Beauty in Home
Pingback: THE ULTIMATE CINNAMON ROLLS Recipes - Best Recipes Collection | All Favourite Recipes
Hi Tasbih! These are going to make a fantastic Sunday morning breakfast! 😉 I’m doing the cold rise and was just wondering if it’s okay to bake them in a glass pan? Do I need to decrease the temperature? Any thoughts? I ended up halving the recipe so thought if using an 8×8 square pan 🙂 thanks in advance!
Hello Mahvish! Sure…a glass pan is ok to use. Just note that it might cause the rolls to bake in less time than a metal pan, so check for doneness earlier than suggested in the recipe. ~Enjoy
Just took them out of the oven! I did have to add more flour, even after the 10 min kneading in the machine it was more like batter than dough, and I weighed ingredients. But just a bit maybe 1/2 a cup. Nice and soft, big and squishy, and I especially like the frosting taste! The last recipe I followed tasted almost 100% of powdered sugar, but yours has great flavor. Thanks so much!
So wonderful to hear that you enjoyed these Elizabeth! I’m so glad they were still nice and squishy even after the added flour, which was a wise call at your end. Thank you for taking the time to let us know how it went ?
Tasbih,
I love love love your site! Especially the way that you go into great detail to explain WHY you do the things that you do. Your passion for detail is unparalleled and you should never apologize for that or change it!
My question is regarding your cinnamon rolls vs monkey bread recipes. Why do you not use the Tangzhong technique (proven superior as evidenced by your Fluffy Dinner Rolls) on the monkey bread recipe like you do on the cinnamon roll recipe? Is it because this cinnamon bread recipe came along years later?
Your rolls are the best I’ve ever eaten so can we somehow use that technique on the monkey bread? Or can we just substitute the cinnamon roll recipe into the monkey bread recipe minus the frosting?
Thank you so much in advance for everything you do. You’re awesome!
Bruce
Oh wow Bruce! I’m tickled by your appreciation and encouragement. It’s always great to know that passionate, wonderful people like yourself, are actually interested in the why’s and how’s behind each recipe. Makes all the work that goes into each post worthwhile. Your kind words are reassuring. Thank you ?
Regarding the monkey bread…you’re right! It’s because it was from years ago, way before I discovered the magic of Tangzhong method. It’s funny because it’s like you have read my mind. I’ve been wanting to test this dough for monkey bread, but never really came around it, because red velvet cupcake testing having been taking over my kitchen lol! I think it’s better to use this very dough for monkey bread, as opposed to incorporating the Tangzhong technique in the other. To do the latter, you’ll have to adjust some ingredient quantities using a specific formula, which is not difficult at all, but it’s just that this one is tried and true and guaranteed.
Please let us know how it goes if you do experiment with it! We’d love to follow suit if turns out a success.
Tasbih,
What are your salt measurements on ALL of your recipes? Table or kosher? If kosher, which brand?
Thank you!
Bruce
Hi Bruce! I use fine table salt for all of my recipes, unless otherwise noted. I find that it disperses more evenly into batters and doughs than kosher.
Tasbih,
Here’s the update on my attempt to make your monkey bread but substituting this recipe for the cinnamon buns. I followed your instructions (the floss trick for cutting the dough is pure genius) but made the caramel sauce for the monkey bread and layered the cinnamon buns in the bundt pan as per that recipe.
Everything was rocking along and looking great until…….it happened. After only thirty minutes into the second rise, I looked and the buns had grown to a monstrous size and were literally mushrooming several inches above the top of the pan! It looked like something out of Stranger Things on Netflix. With a little bit of panic setting in, I decided to cut the second rise short. Unfortunately, they were so tall that I could barely put any of the caramel sauce on top of them before baking but I put what little I could.
As expected, they continued to rise even further during the bake and grew so large that my kids couldn’t stop screaming and laughing while we watched them through the oven door. It morphed into an irregular, yet beautiful rustic piece of golden brown loaf that resembled a piece of driftwood that had been battered by the ocean for decades. After 30 minutes, I took it out of the oven and sadly wasn’t expecting very much due to the miscalculation in the size and scope of the dough. I drizzled it with some of the remaining caramel sauce, fully expecting the whole thing to be a waste of time and money.
O…M…G. It was one of the best things I have ever put in my mouth. Obviously, this amount of dough was waaay too much for a standard size bundt pan but talk about serendipity! What I thought was going to be a terrible result was devoured by my family and we were all blown away by the mixture of tastes and textures. Some parts of the bread were more brown and had a little more chew and the other parts were gooey and ultra soft. Meanwhile, the cinnamon filling had caramelized and was oozing like lava through the river of caramel cascading down the buns. It was the perfect marriage of two things that were meant to be together.
All I need to do now is scale things down so it will fit in one normal sized pan. Other than that, blending these two recipes was a wonderful idea. Thanks for the encouragement Tasbih! And thank you for sharing your love of cooking with all of us!
Bruce
Between the suspense, comic relief and drool-worthy description in your comment, I’m currently in a state of literal LOL-ing, tummy rumbling and salivating. OMG Bruce! Will you ship me a piece already…I’m dying here ? What a relief to know that it all worked out in the end. So glad it didn’t end up on the bottom of your oven, which it sounded like it could’ve happened. I’m so making this soon! I think the amount of the fluffy milk rolls will be a better fit for the standard bundt pan; its basically just about two-thirds the amount of this one. Just be sure to reduce the amount of sugar in the dough by half as the added sugar in the filling and sauce is more than enough to sweeten it. Best of luck and enjoy ?
Dear Tasbih,
I finally baked these cinnamon rolls today. And I must say… this recipe is great. They came out awesome. I had the same requirements as you for these baking goods, and this was the green light to move forward with it. And I made the dough exactly as you described. It was not my first time with the asian technique as I sometimes bake Japanese milk bread and it makes all the difference. Therefore, I knew the results had it all to be more than good. I only used the stand mixer to perform the kneading job. Beautifully done. I found it interesting the amount of yeast for a sweet dough. Normally I would use 7g for about 680g of flour, and always have some tension anticipating if it will rise well or not (for which I proof sweet doughs in a slightly warm oven with humidity). I also used all purpose flour (not a huge fan of Bread flour), but as it is 13%, I was safe! For these cinnamon rolls the dough was a bit more than double its size in one hour. Usually I do not love stretching and rolling dough, but this one was a joy to do so, not sticky and responding very well to the rolling. The filling was not overly sweet, and I love that you recommend salt. I always add salt to filings like this one. That’s part of the WOW factor. However, I thought it not necessary to use all of the filling, and ended with a small amount left. Results: I had 16 rolls, baked in about 25 min, some overflowing (mushrooming big time!!) as my baking pan was in between sizes. I was afraid of the amount of yeast, but to my surprise the final rolls did not taste yeasty. Even better. It is moist and flavorful, no need to mention the delicious perfectly caramelized bottom. Just skipped the frosting, as usual, because I enjoy tasting the buttery flavors of good doughs. I love the science of baking, and enjoy so much trying your recipes. Next one will be the red velvet. Recently I baked the amazing sticky toffee pudding, and will leave a review soon as well. Thank you for developing them. I think I wanna work with you!! Take care and have a great week!
Hi Camila! You have no idea how much I appreciate and enjoy reading detailed feedback like yours. Thank you so much for taking the time to share with us your experience. I’m really glad these came out the way you had imagined; that’s always so reassuring and very encouraging to hear. I’m also really happy that you loved the sticky toffee pudding; its one of my all-time favorite desserts! SO excited for you to try the red velvet cupcakes…hope you love them as much as we do!
I love this recipe so much! I’ve used it multiple times. I love all the detail you put into the post. I do find it difficult to locate the recipe in the post when going back to it though. Could you add a shortcut link at the top of the post? Thanks!
Hi Brooke! I’m so happy to hear that you love this recipe and enjoy reading about it!
I completely feel you about not being able to get to the recipe quicker; I go through the same frustration myself. Adding a ‘Jump to Recipe’ link at the top of the post is something I have been wanting for a long time. However, the recipe plugin I have, does not currently support this feature. I’m working on it to convince the plugin company to add it, and so I’ll definitely be passing on your feedback to them. Thank you so much for your suggestion.
I made these and they were amazing! My mom wants to tey them and likes raisins and nuts in her cinnamon rolls. How much of each would you recommend?
Hi, too late now Im sure, but I wouldnt add more than half cup of each of the added fruit. You dont want the rise inhibited nor do you want them falling all over the place. Make sure the nut pieces are small so they scatter and blend well.
Hello Tasbih,
Firstly, thank you for your awesome photos, step-by-step instructions and wonderful level of detail!! Again, awesome! I recently discovered your site and this recipe for cinnamon rolls. I’m anxious to try it out . . . and based on comments from folks who have already made them, I have no diubts that they will be delicious.
My question (and please forgive me if you stated this and I missed it) is . . . have you ever made these, baked them fully, allowed them to cool UN-ICED, then wrapped them well individually and frozen them for eating, and icing, later?
Thank you again for the recipe and your wonderful website. Take good care and have a fabulous day!
I’m so happy you found your way here Sheila! Welcome aboard and thank you so much for your kind and encouraging words.
As for freezing, I haven’t tried it myself, but based on King Arther Flour (the source on which I based this dough), it should work well. I’ve included instructions for freezing in the FAQs section of the post. Hope that helps!
Dear Tasbih,
I am sorry, I can’t even read to the end of this recipe, I so feel the need to talk to you 🙂
Because, as I have realized before, you are the only person I’ve ever “met” (so what if it’s only online) who is equally obsessed. I have tried (and highly praised) your lemony lemon cake (and other stuff) before, and that RELIEF you mentioned when you can finally check of one item from the list – it’s priceless.
And here comes the next challenge. Every word you wrote about cinnamon rolls is my thoughts, exactly. And when I reached the part where you tried the dough without sugar, I thought: “Oh no, Tasbih, don’t end up there, it’s gonna be bread-like, even with all the filling and frosting”… and when I read on and you said exactly that, I just felt so “sisterly” and alike, I had to tell you. And, of course: I am going to try this recipe! I have been using a pretty good recipe for a while now, but it lacks the caramel bottom and it does not stay great for days. So your way deserved a run, and I am gonna try it rather sooner than later.
Thank you for being my far away sister, thank you for being obsessed, and thank you for talking about food so much – nobody else I know would want to. Love from Germany, Carolin
Carolin you are the sweetest! If there’s anything that I love about blogging…it’s THIS. Bringing you close to such incredible people like yourself from all over the world, who share the same passion and enthusiasm about food (or anything) the way I do. This alone…is worth EVERYTHING and I’m so grateful for it. Dear if you have Instagram…we can start chatting about food and obsessing to our heart’s content over the DMs. The pleasure would be mine. And if that doesn’t work…honey, I’d book the next ticket flying yo Germany just to see you lol!
Attachment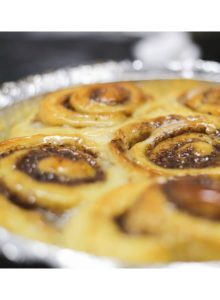
Yaaaaaaaaaay!!! Thanks for the absolute cinnamon rolls recipe ???? you are the best ❤
Roshni your rolls look absolutely gorgeous and I’m so happy to hear that you loved it so much! Thank you so much for sharing your beautiful picture with all of us.
These were phenomenal! Brought them to a party and they were the first cake to be gone. The recipe is so well written, and the dough is a pleasure to work with. I also really like the level of sweet and the balance with the salt. I will surely make these again. What a pleasure!
So wonderful to hear they were such a hit Heidi! Thank you so much for taking the time to share your amazing feedback.
………wait…1 minute….don’t go…mmmmm!
I am mesmerized. Captivated my the entrancing spell. In other words: I love YOUR CINNAMON ROLLS!
Thank you so much for the recipe!
Truly wonderful!
P.s: Maybe magic isn’t a really thing but you are honestly a true magician!
🙂
Oh WOW! Don’t be surprised if I print out your comment, frame it and hang it on my wall ? Thank you! That’s such high praise that I wish I deserved.
Hello. Great review. I have a question about the fluffiness of the dough and the cold rise dough.
You mentioned the rolls tend to be more fluffy and soft when you cut into bigger chunks like 2 inch? Did I read that right? I’ve been scratching my head trying to figure out why one batch of my rolls were better in taste than my other batches. I followed the recipes to the T! The only thing I could think of is the cutting. The 1st batch I cut into 2 inches, 14 total. The 2nd batch I let sit in fridge overnight after it was rolled. The sizes were smaller. The 3rd batch I didn’t do overnight,. But I did cut into smaller chunks. So could that be the culprit? The cutting?
I agree with you about the cinnamon and sugar seeping out in the pan once rolled and placed in fridge. I did it once and it didn’t settle right with me. I also thought it was still a lot of work to have to roll, cut and still put in fridge. I’ve been trying to think of an easier option and your suggestion of cold rise while the dough is in a ball make be the answer.
Hi Myra! Well the way I think of it, is that the bigger the rolls, the more surface area you’ll have, which means you’ll end up with larger soft areas. Smaller rolls should still be soft and fluffy though, but note that they’ll bake in less time. So did you by any chance bake the thinner rolls for the same amount of time as the larger ones? If yes, then note that overbaking will result in drier rolls. My personal least favorite batch was when I let the rolls rise overnight (filled and rolled) in the fridge. The interior was soggy, most of the filling had escaped and the bottoms didn’t caramelize nearly as well. Hope that helps you find the answer!
Hi Tashbi,
Thank you very much for your recipe.
Unfortunately I did not have instant yeast so I used fresh yeast which I activated with warm water and sugar. My dough looked just like yours but it did not rise at all (I also used bread flour). Would you have any suggestions? Looking forward to hearing from you.
Marion
Hi Marion! So sorry to hear that the dough didn’t sufficiently rise. Unfortunately, I don’t have any experience with fresh yeast to be able to help in this area. If either instant or active dry yeast are available to you, I’d highly recommend fetching some. They’ll ensure you end up with a well risen dough. Wishing you better luck next time.
These were very good. I’m so glad that I did the overnight rise as it made the dough much easier to work with. Canadian all-purpose flour is also “hard” so I used this in the rolls. My husband did say the filling was a tad too sweet for his taste, but my children didn’t complain. That will be easy to adjust next time. Our favourite thing about this recipe was the texture of the dough. I frosted them a bit too soon after they came out of the oven so the icing ran a bit more than I would have liked. I’d like to know how you were able to roll such a tight cylinder as I had trouble making the rolls as tight as I would have liked. Thank you for a great recipe. – a Mom from Abbotsford, BC Canada
Love hearing that these turned out so well Lauren! Thank you so much for your great feedback. To roll the dough tightly, I kind of pull back the cylinder each time I make a full roll. It’s hard to explain in words, but if you check my Instagram video I have on my highlights labeled ‘cinnamon rolls,’ you can see exactly how I do it. Hope that helps.
After weeks of checking out this recipe, I finally took the plunge and attempted it. It was so worth it! To date, breads, rolls, in fact anything involving yeast has been my stumbling block. That is, until now. Simply divine! I was worried my dough was a little under kneaded, as it was a little sticky to handle when I was trying to roll it out and fill. My rolls certainly had a more homely look to them but tasted delicious. Just the perfect amount of fluffy softness and sweetness. I thoroughly enjoy your blog, love the fact you are “obsessive” with the recipe testing and I am always excited to try a new recipe from your selection.
That’s so wonderful to hear Shakila! Thank you so much for your lovely comment. I’m really glad these came out such a success…hopefully they’ll only become the start of more triumphs in the yeast baking world. It’s a beautiful place, so keep going.
These are so good!!! I love how fluffy they got.
I did something wrong though… I put a whole 250g (8 oz) block of cream cheese in the frosting instead of the simple 2 oz. Whoops. It still ended up great and I have no regrets, haha. Tasty, tasty!
The more cream cheese the merrier ? So happy you enjoyed this one Kaitlyn.
Hi made these today, but they turned out a bit dry maybe i have added a bit more flour as you mentioned in the FAQ. Will remake them again and will lessen the amount of flour. Thanks for the recipe.
Thank you for trying the recipe Paula! Hopefully they’ll turn out perfect the next time around, when you add less flour?
Have just made 3 batches and they are all perfect. I added an extra 1/4 c flour (approx) and suspect that our own eggs are larger than yours, contributing to more liquid. Bread flour (15% protein) and all-purpose flour worked with similar good results.
The tip about chilling the dough to make rolling out easier is brilliant. I mixed the dough in the evening and set it in the refrigerator overnight. By morning I could roll the dough much easier than when the dough was at room temperature. I couldn’t roll as tightly as illustrated but my family is happy.
A little lemon or orange zest in the icing gives it a nice lift.
My sincere thanks for your test-driving! Continued success on your journey.
Julie in Canada
That’s always the best the thing to hear Julie! I’m so glad the rolls were so well received and that you enjoyed working with it. Thank you so much for taking the time to share your experience and for your sweets wishes ?
These turned out exactly as described: soft, fluffy, big, gooey, and delicious!
I’m so pleased and proud of myself.
Thank you for sharing your recipe.
Woooohoooo! Best thing I could hear! So happy they met your expectations Janet ?
I made these Saturday night and let them rise in the fridge overnight to bake on Sunday morning. Holy hell. They were everything.
I was making them in someone else’s kitchen. I didn’t have anything I would normally have. I had to knead by hand and I used a Tito’s bottle for a rolling pan. Despite that, they were amazing. Perfectly soft and gooey. I baked them in a 9×13 copper pan, and it kept them from browning too much. I put a few on a cookie sheet and baked side-by-side. The rolls on the cookie sheet cooked to 215 degrees when the copper pan were at 151.
I didn’t have a lemon, so I ended up using an orange with some zest. I would like to try with the lemon as directed next time. The orange was very strong.
Thanks for your efforts to perfect this recipe!
Oh WOW! Your feedback is EVERYTHING! So happy to hear they turned out so good and that you loved them so much. Hats off for getting through all the hand kneading…must’ve been a workout lol! Glad they were worth the effort ?
Attachment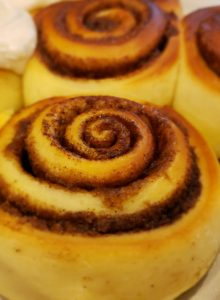
Thank you; these were absolutely heavenly! Better than any other recipe that I’ve tried… And the directions were wonderfully descriptive. Thanks. I’ll be making these again… And visiting my creaking elliptical more frequently.
That perfect swirl is so mesmerizing Julie! So happy you loved them so much. Thanks for sharing your feedback and beautiful picture?
Wow… Wow… This is amazing… Thanks for sharing this with us
My pleasure ? Glad you like it!
I made this recipe 2 times. The first time I made it was in January when it was still cold out and it turned out P E R F E C T L Y. I was so in love with this recipe. I made it for my fiancé and he was literally over the moon while eating it.
Second time around, it was in the hot weather and surprisingly the dough would not stop being sticky. I left it in the mixer for 10 minutes and resisted the urge to add more flour, but even when i added more it wouldn’t come together. I left it to rest cause the friction from the dough to the mixing bowl heated up the dough so much. Do you think this is linked to the weather? I added everything you listed by scale and this happened 🙁
Maybe it’s just my luck hahaha
Hi Nada! Glad to hear that you loved them the first time around. If you live in a humid area, that could surely affect the consistency of the dough, and you might feel the need to adjust the amount of flour slightly. I hope they still turned great regardless of the sticky texture of the dough.
Hey! I was wondering if I can use instant non-fat dry milk? Is there a specific powdered milk you use? What kind do you use? Does it matter?
Hi Jennifer! I use Nido, made by Nestle, which is the most popular brand where I live (Egypt) As far as I know, I think it’s full fat. However, I don’t think the fat content should matter here, as the dough recipe I based this one on from King Arthur Flour’s website, uses non-fat milk powder. Hope that helps ?
Attachment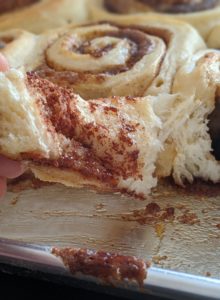
This is brilliant!! I have been getting into tangzhong baking and these were absolutely amazing. The second time I made this recipe I folded in the butter after the 20 minute rest, and I think it made the texture even more brioche-like. Cinnamon rolls don’t get any better than this.
Oh that’s a great idea! Gonna have to experiment with that soon. Thanks for the tip Genevieve. I’m happy you liked the rolls ?
Don’t worry about the length of directions, they’re as important as the ingredients if not more. Plus your experiences with each recipe saves us the frustration of trial and error!!
Oh Judy! It’s always a relief to know that my lengthy posts go appreciated. Thank you so much for letting me know that ?
Hi, I love this recipe! Do you think it could work as a Doughnut Dough also, fried ones?
Hi Britt! I’ve never actually tried frying it, but think it could just work really well. Please let us know how it turns out if you do give it a go. I’m so tempted to try it as well. You might want to check out my doughnut dough recipe…it’s so good too.
https://cleobuttera.com/breakfast-muffins-and-donuts/nutella-donuts-ponchiks/
Hey, I’m Jennifer, I commented earlier about the dry milk.
I made these two days ago and oh my goodness, they’re beautiful and delicious. I was a little off on the dry milk, I was missing a few grams but they were still delicious. I also rolled out the rectangle longer than the 18 inches the recipe called for. They still turned out to be huge, fluffy and delicious. These cinnamon rolls are also sweet (but not overwhelmingly sweet) without the frosting, for those of you who are like me and don’t like frosting.
I had a little trouble where they didn’t stick together once rolled up. Many kept opening and unrolling unless I put them next to each other. Any suggestions? Why did this happen?
SO wonderful to hear that you loved them so much Jennifer! A tip so the rolls don’t keep unraveling is to pinch the seam as hard as you can to the dough log. Also make sure that the baking dish you’re using isn’t too big, because you’ll want the rolls to touch one another once they rise. This will prevent them from opening up as they bake too.
Attachment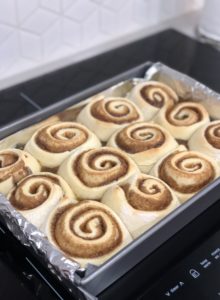
These turned out great! I had to do it in a hurry for hungry kids, so I didn’t let the dough rest before putting the sugar/salt in. Then, I only proved the dough for 15 minutes, rolled out the rolls and let them prove for 20 minutes. Baked them and they were great!
Oh wow! I’m so amazed by how wonderfully puffy they look with so little rising time. That’s great news! Who doesn’t like cinnamon rolls in a hurry?! Thanks for sharing your gorgeous photo ?
Hi!
May I ask what stand mixer you are using?
TA!
Hi Susie! My mixer is KitchenAid (the Architect model) ?
As-salaam. It was the first time I tried a yeast dough because I was always too scared. But with your step by step instructions it was so easy! And soooo tasty. I can’t believe you made my dream come true. I also wanted to know how I would go about making smaller rolls?
Yay! I’m so happy you smashed yeast baking on your first go! Really glad you enjoyed them too. For smaller rolls, I’d recommend following steps 8 through 11 in the recipe link below:
https://www.kingarthurflour.com/recipes/soft-cinnamon-rolls-recipe#reviews
When I measure the butter that added to Tangzhong mixture.. after melting or before?
It shouldn’t really matter because the weight should be the same before or after melting. I do, however, weigh it before melting.
Your web blog is really amazing. I love this web blog. Thanks for sharing such an awesome post.
Thank you so much!
As salaamu alykum. Tasbih. How are u? I just want to say that I tried your recipe out. These cinnamon buns were gorgeous. My name is Nasreen from South Africa. The last Ramadaan. ..Ur Mesh om Ali went completely viral in SA. I simply love reading ur posts and stories….This is the 1st recipe of urs that I have tried and simply in Iove with it. I have been to Egypt 3 years ago and I had a staple food of the Egyptians called Koshari/Kushari. ..sorry for spelling. But I have searched ur recipes to see if I could find it. It was not there…could u perhaps be so kind and send me one. I have been wanting to make it for a long time now. And jazakalla khair for all ur recipes can’t wait to try out mor of them.
Walaikom Assalam Nesreen. Oh that Mesh Om Ali…I’m still in utter disbelief at how popular it become in South Africa. All thanks goes to The Girl Who Ate the World for helping it spread for a beautiful cause. Bless her ?
I’m so happy to hear that you loved the cinnamon rolls. As for Koshary…it’s high up there in my Top 10 favorite foods, so I totally get your love for it. Unfortunately I don’t have a recipe for it here, because the blog is focused on the art of baking and desserts only. I make a really good one, but actually wing all the ingredients…I know! So unlike me ? However, I’ve found that my friend’s, Matters of the Belly’s recipe, is almost identical to mine…only hers has actual measurements lol! So I highly recommend checking her recipe out. Everything I’ve tried from her blog, has been a smashing success, so I’m sure you’ll love this one.
What do you think Buttermilk would do to the recipe? What about using bread flour?
Hi Jen! Although I haven’t tried buttermilk in this particular recipe to be able to know for sure, I believe it should work just as well. It will probably just add pleasant tangy undertones.
As for bread flour, kindly refer to point #2 in the ‘Recipe Notes’ for details regarding that. Although it’s believed by King Arthur Flour (the original source of the dough’s recipe) to result in higher rising rolls, I’ve had readers who’ve tried both flours, comment back that they’re preferred the ones made with all purpose flour. Hope that helps ?
This is my first time leaving a review on a recipe. Oh my goodness! These are really wonderful!! This was also my first time making cinnamon rolls, have wanted to for years, but was intimidated by them. I read through every bit of the post, and tons of the reviews before making these. They were a lot of work, lol, but totally worth it! My family devoured them❤️ Thank you for such detailed instructions. Oh yeah, and I did weigh my ingredients instead of measuring, that was a first.
I’m really happy to hear that you’ve had so much success with this recipe! Thank you so much for taking the time to share your wonderful feedback!
Pingback: The Ultimate Cinnamon Rolls - The Canvas
Is powdered milk necessary? Any substitute?
Hi Rachel! Powdered milk helps tenderize the dough even further and creates depth of flavor. You can leave it out if you don’t have it and still get great results.
What would you recommend me to use to reheat them one at a time? Over? Microware? Should I spray water over it before reheating? Would the frosting melt? Should I add more frosting after reheating? Thank you.
Hi Mac! Please accept my apologies for my late reply, as I’ve been very ill. I recommend microwaving them one roll at a time, for about 30 seconds until warmed through. No need to spray water over it. Yes the frosting will become a bit runny. You can add more frosting if you prefer.
Hi, I must say your cinnamon rolls looks delicious!!!! I live in Switzerland. I wanna make these 2marrow. Can i use the Philadelphia cheese they have here? Do u recommend a next cheese? Txs
Thank you Sher! Sure Philadelphia is a wonderful cream cheese brand. Definitely go for it! Enjoy ?
Hi Tasbih .. can you please tell me how many calories/serving ? ?
And I recommend to put nutritional information about each recipe ?
Love all your work ?
Hi Sara! I haven’t attempted to find out the calorie count on this one, because honestly I’d rather not know lol ? I prefer to stay in the dark, than be tormented with guilt as I bite into this occasional piece of indulgence. But that’s just me ? If you’d really like to know, I’d recommend using an online calorie calculator such as the one on happy forks,com. Enjoy!
Oh another question !
Can I use baby’s powder milk ?
As in baby formula milk? Hmmmm…not sure about that. Feels…weird? ? I use Nido with great results.
Attachment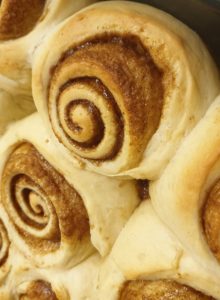
Salaam Tasbih!
I’ve not wrote a review on a recipe before but these came out perfect!! You had all my questions answered in your post already so I could just get straight into it. It took a while as you have mentioned but it was so worth it.
I didnt have cream cheese so I just made a simple icing to go on top otherwise I followed your recipe to a T! (But I somehow ended up with 10 so that’s my bad math xD)
Thank you for this recipe and all your other amazing ones please keep it up and may your work be blessed ameen!❤
These look so beautiful Safa! I’m happy to hear that you enjoyed these cinnamon rolls. Less rolls just mean bigger rolls…I’m all in for that ?
Alright. Story time.
My mom has many dessert loves that she’s picky about. Two of these are cinnamon rolls and vanilla ice cream.
When she randomly gets cravings, there is no stopping her. So when she came home with a carton of vanilla ice cream one day and the very next proclaimed it “way too sweet”, then insisting that I use it to make cinnamon rolls, there was literally nothing I could do but comply.
This was not my first time making this recipe (which is an absolute TREASURE that ensures perfect cinnamon rolls every time), but it was my first time making it with a considerable ingredient change: melted vanilla ice cream in place of milk.
Yeah.
The dough was sticker than usual, had small black flecks from the vanilla bean aspect of the ice cream, and I used no sugar in the dough. It smelled like sickly sweet vanilla, rolled considerably worse than the original recipe, and didn’t rise as much for some reason.
BUT!
To my mother’s utmost delight, as the cinnamon rolls came out of the oven, they smelled no different. And to my relief, we soon found that the taste and texture once baked was actually very similar to the original. It was slightly sweeter and stickier, something that I didn’t appreciate but she actually didn’t seem to mind. We brought them to a picnic the following day and they were devoured in minutes without a single question, surely a good sign.
Moral of the story: you can make cinnamon rolls (or at least this recipe) with melted vanilla ice cream in place of milk in the dough. It is extremely stressful and, in my opinion, produces results that aren’t nearly as good as the original. But it can be done.
(Story time aside, this recipe is a literal gem. Cinnamon rolls are time-consuming, and I worry every time I made them before this recipe. As long as you follow the directions, it’s perfect. So, Tasbih, thank you so much!)
-Ariadne
Attachment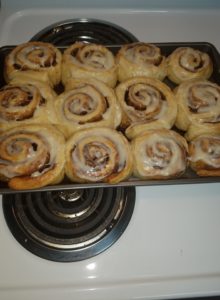
I will never ever ever use another cinnamon roll recipe ever again! This is hands down the best (and believe me I have tried a ton) recipe I have baked! I don’t have a stand mixer and used my hand. This dough was never a sticky mess as other recipes have been! The bottom was carmelized and using a longer baking sheet worked wonders. I truly thank u for this recipe. I have finally found a cinnamon roll recipe that works and was easy to make yet delicious to eat!
You are my Superstar ❤️❤️??….
Tried the recipe,followed it to the T,loved it sooooo much that someone asked me to make it for their family dinner…
Lots of love coming your way from India.
Attachment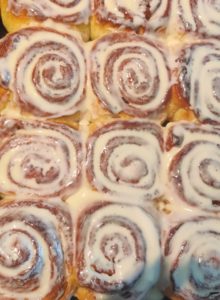
This was my first time I ever made cinnamon buns and they were a smash hit!
Thanks for all the detail, it really helped.
Attachment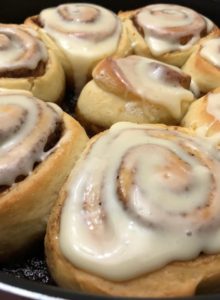
This was an ultimate hit as always!!! Can’t thank you enough for such a heavenly goodie which we never ever expected to fluff or finish up as unworldly! It tasted wonderful, so air-ey, and indeed way more exciting than an average Cinnabon! Loads and loads of love and gratitude! Baking the world a better place, a recipe at a time with Cleobuttera <3
Oh. My. Golly. Tasbih, these are the cinnamon rolls of my dreams. How did it take me so long to find you? I recently made the Japanese milk bread rolls from King Arthur and decided I would start experimenting with cinnamon rolls using the same technique, but you did it for me! I keep taking another bite just to reassure myself that I’ve finally found the perfect recipe, and each bite confirms it. Thank you thank you!
Hahaaaa I’m so happy your tastebuds agree ? King Arthur’s milk bread rolls are the best; they’re my favorite too. I’m so glad you loved the cinnamon roll variation of it. Thank you for your wonderful feedback.
Absolutely the best cinnamon rolls I have ever made. Soft and cinnamony. Recipe was very easy to follow. Did not change anything. Thanks for all of the details and lovely photographs!
Attachment
This might be the very first time I’ve ever made cinnamon rolls from scratch (popping open a can of Pillsbury doesn’t count). They turned out decently but I found the ones on the edge of the pan to cook much faster than the ones in the center. I measured the center of the buns by putting an instant read thermometer inn the filling and then piercing some dough. I left them in the oven for 5 minutes longer than the recipe called for to get the middle ones to cook but is there something I’m doing wrong there? Would you recommend lowering the temperature and adding time? And the rolls weren’t quite as tightly rolled as the ones in your picture but I figure that just might come with practice.
Hi there, Post says their is a mini tutorial we can watch on Instagram. I see your post of the cinnamon rolls but not the tutorial, is it still up? I’d like to watch and see how you get the dough rolled out so perfectly ?. Amazing recipe. Have made several times now and my family practically begs for them.
It’s very informative and useful post for the online readers. Thumbs up for you!
Our team for Windows App Development services expertise on Windows 8 SDK, Windows Store Application Development. Providing you with the best we, the best Digital Marketing Company In Delhi can ensure you for impeccable results in your business.
Pingback: THE ULTIMATE CINNAMON ROLLS - #CINNAMON #Rolls #Ultimate
I’ve tried a few tang zhong recipes for cinnamon rolls and this is by far the best! I used this recipe for cinnamon pull apart bread and it was great! Thanks again for posting this!
I decided to try this recipe after reviewing other recipes and the comments/feedback for these cinnamon roll. These were easy to make, especially if you read the instructions a couple of times prior to starting. I really like the height of the rolls, the dough rises perfectly. The rolls taste ok, I think they got over baked because I didn’t vent them, as instructed, and I should have reduced the time by 3-5 mins. I cooked the rolls for 20 mins and they were brown all around, not just on top. I’m going to try this recipe again and give an update.
My family enjoyed them and wants me to more because one dozen (actually got 16 rolls out of this batch) wasn’t enough for every to get “seconds”.
After months of scoping out your recipe, I FINALLY had a great reason to make these – friends over for breakfast!
I followed everything exactly and used a scale. Quick note to American bakers – one envelope of instant yeast is 7g, at least the Fleischmann’s brand. This recipe calls for 9g instant yeast and if you’re like me you may freak over 2g difference but it was fine lol.
Also after adding cold milk and cold eggs to the tangzhong, it was basically tepid, so I popped it back on the heat for maybe 30 sec just to get it slightly warm again before adding to flour.
Was definitely tempting to add flour during the first knead – it just looks too sticky! But after feeling it and tapping into my baking instincts (and seeing that you said NOT to add more lol) I just went with it. Glad I did!
I did the overnight rise. Seemed to work awesome – I just had trouble getting a good and even rectangle, but that’s just because I need more practice rolling 🙂
Finally, I only had a glass 13×9, and for some reason my total bake time was maybe 30-32 minutes. Maybe because they were more squished together, and baked taller?
Long story short – everyone loved them. Specific comments on fluffiness and softness. Will DEFINITELY make again 🙂 thank you for an awesome recipe and also for awesome details that help me learn more about baking!!!
Attachment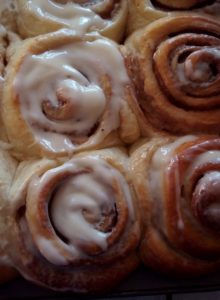
I had a great time making this recipe! We are in Love with these cinnamon rolls! So easy the way you use the yeast, I am going to try doing the Three King’s cake with this method, let’s see what happens!
These were soooooooo amazing. They really are soft the next day. My dad took one home and called the next morning and told me to confess! He wanted the truth of rather I made them or not! ????.
I have always looked for the perfect cinnamon roll recipe. You have delivered! CLEOBUTTERA YOU ARE THE TRUTH! THANK YOU!
WOW Ebony! I don’t know what to say? You’re the best! Oh and your dad too; he’s awesome! Your comment made my day. So happy you loved these rolls so much ?
Hi Tasbih,
I need to say that this website is the best one I’ve ever visited. I tried most of your recipes, and all of them turned to be the best. I actually feared for a long time to try making Cinnamon rolls, but with you I was so excited. I made the dough yesterday and left it overnight in fridge, it was runny and loose after the 10 minute kneading, but I thought I would resist adding flour as you advised. Today I read your notes again and found out that the dough should easily form a ball, mine didn’t actually! My question is can I add flour after the rising step? Please advise me, because I don’t want to waste it. Thank you.
Thank you so much Futoon for your kind words. I’m so grateful that everything you’ve been making from the blog has been a success!
You can definitely add in a bit more flour to the dough, if you’re finding it too sticky to work with, as you’re rolling it out. Do not, however, knead it into the dough as that would deflate all the air bubbles that were developed during the rising time. Just dust your work surface with flour and add a bit more flour on top of the dough and roll. Keep dusting the dough with flour as you roll, till it’s no longer to sticky. Best of luck!
Hi Tasbih,
It turned out to be just perfect. At the end it didn’t need much of flour to add. And finally Cinnamon rolls a dream comes true! Thanks to you. Please keep the hard work because you’re one of a kind. Love you♥️
So happy to hear that it all worked out in the end. Thanks Futoon for that wonderful update ?
Thank you very much for the reply. I’ll update you with the results ?
I LOVE this recipe!! Thank you so much. I have one question. I have made the recipe three times now, refrigerating the dough over night and finishing the next morning. Each of the three times when I have baked them, the very middle of each roll pops up. This does not affect the yumminess, but because I am giving these as gifts, I would prefer this not happen. Am I letting the rolls rise too much before baking, or do I need to raise the temperature at which I’m baking? Any suggestions to eliminate this from happening?
Really happy to hear that you love this recipe so much Joann! When the middle of the rolls pop up so much, it’s probably a sign that they’ve been rolled very tightly. If you’d like to prevent this, I suggest rolling the cylinder a little looser the next time around. Best of luck!
I made these last night and, oh MY, they are so good! Hands down, THE best cinnamon rolls I have ever had. Worth the extra effort. They were a huge hit at my morning meeting today. Thank you thank you thank you for sharing!
That’s so exciting to hear Abby! So glad it was so well received. Thank you so much for your wonderful feedback.
Pingback: The Ultimate Cinnamon Rolls | Cleobuttera - Best Chicken Recipes Ideas
I seem to be missing the baking temperature? and where is the FAQ of this recipe? can I use the same dough for croissant?
Hi Mirna! Baking temperature is 350°F/180°C. The FAQs are just above the recipe box. I wouldn’t recommend this recipe for croissants, as they require a special ratio of ingredients.
Absolutely the best cinnamon rolls!!! Thank you for sharing this recipe! God bless!
Love hearing that Theresa! It’s my pleasure ?
Marhaba!
Thank you so much for this recipe, this is the BEST of all the recipes that I’ve tried!
Shukran jazilan!
You are most welcomed Theresa! Thank you so much for your sweet comment. I’m really happy you liked this recipe so much ?
Attachment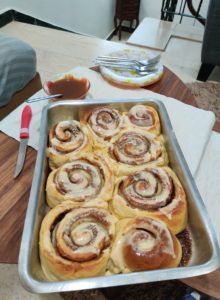
This is the second recipe of yours that I’ve tried after your chocolate chips cookies and let me tell you, as usual, it turned out perfect ??.
Thanks for your great work developing recepies and telling us exactly how to go about it in your bloooooog ?
I rarely comment anywhere but after reading your last Instagram post, I though however little this would help, It’s totally worth it. Hope you’re feeling better now and soon isa you’ll get back to doing what you love.
Thank you so much Amr! Your comment means so much to me. You’re right, it absolutely made me feel wonderful! Your cinnamon rolls on the hand hand are a thing of beauty. I’m really happy you liked it so much.
Hello dear can I use parchment paper instead of greasing the baking sheet with oil?
Hi Samia! Sure ?
Pingback: Pillowy-Soft Cinnamon Rolls – Make + Bake My Day
Pingback: THE ULTIMATE CINNAMON ROLLS – Deavita
I can’t thank you enough for this magnificent post! Your obsessive attention to detail, beautiful photography, and practical tips set you apart from other recipe websites, and I’m so grateful that I found you!! I’ve tried making cinnamon rolls many times before, but your step-by-step guide led me to perfection. Soft, billowy dough, and a gooey filling that oozes just enough without making a huge mess. Thank you, thank you, thank you!
Oh wow! Well thank YOU Khanh for your gracious and kind words. I really appreciate your wonderful feedback and cannot be happier to hear that you loved the rolls so much.
Hello 🙂
First I want to say that I tried you chocolate chips and honey cake recepies and both turned out amazing!
Second, can normal brown sugar be used instead of the soft light brown sugar? I can’t seem to find it these days.
Thank you
Hi Mai! I’m so glad you had great results with my other recipes. Hopefully this one will follow. If you’re in Egypt, you should be able to find the soft kind at Gourmet; just got some a couple of days ago. If not, then yes, the coarse one would work, but might not produce the same gooey filling as the softer kind does.
So I just made these. A 13×9″ pan ended up being way too small and my buns all ended up with insides “shooting” out because they were over crowded. If you don’t have a 15×13 pan I would suggest splitting between a few smaller pans.
Secondly, I wanted to do the fridge over night rise but the dough immediately doubled within an hour in the fridge. I was very nervous about it continuing to rise and overproofing, so I took the rolls out and just finished them that night.
They were FANTASTIC! Even though I ate them at 11pm the night before… So soft. So caramelly on the bottom. Airy and light and not too sweet. Definitely worth the effort on these buns vs some other ones that can be done start to finish in far less time.
This is so wonderful to hear Katharoni ?
Attachment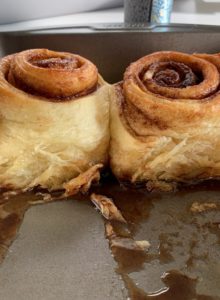
OMG Tasbih, another killer recipe and post! I tried this today and it came out mind blowingly delicious and delivered on every aspect as promised! I honestly didn’t think it would do THAT well!
I wanted 4 instead of 12 so I basically divided everything by 3 and it turned out to be just perfect. The photo shows 2 only because of course who can focus on taking a photo before enjoying those out of this world treats ?
I made some salted caramel and toasted some pecan and topped the ones we ate today a la caramel pecan roll 🙂
I loved your tip about covering the rolls mid-bake to prevent excessive browning, this previously ruined them for me!
Thanks again for the awesome recipe. Your dedication is contagious!
They look divine Amr! Kuddos for going through all this work for just 4 rolls ? I can tell how fluffy they turned out just by looking at the photo. And YUM for adding caramel and pecans. LOVE that combo ?
Hello. I live in a place where bread flour or any high protein flour in never available. I really want to make these rolls, but I want then to be fluffy. ( that’s my main objective!) If I use regular all purpose flour, will the rolls not be soft? Please reply ASAP!! I’m dying to make these 🙂
Hi Rachael! I personally use all purpose flour because bread flour is not easily available in Egypt and I’ve never had a problem with it. I’m assuming that the flour I’m using is high in protein but might not be the case because it’s not written anywhere in the bag ?
I’d recommend going for it, then if after all the kneading, it’s still super sticky and not coming together into a smooth, elastic dough, then you can add a little bit more flour. I personally never needed to. Best of luck!
I’ve been craving and dying to make your cinnamon rolls for so long. I finally got around to it today and spent a good portion of my day reading through your detailed description to make sure I get it right. I chose to let the dough rise a bit over an hour in the oven with the boiling water in a dish at the bottom. When I took it out to start working with it and roll it, it was super sticky and messy and I couldn’t get it to roll out ?. I did my best to form it back into a ball and put it in an oiled bowl and into the fridge. I’m hoping to have somehow saved it, if I use it cold tomorrow? I’d hate to have wasted the ingredients. Everyone is raving about the recipe and getting it right. Where did I go wrong?? ?? Please help
Don’t worry it’s gonna be much easier to work with when it’s cold. Best of luck May!
Attachment
Hello Tasbih
I tried your recipe and it was great and it was fluffy very near to Cinnabon ???thanks alot.
But I noticed that most of suger and cinnamon melted on my pan and it sticks it was difficult to move it out from the pan.
The rolls it self relaxed alot I wish you understand me and tell me what to do to avoid this.
The only changes I made I use 13 gram yeast instead of 9 and I put every 8 in a pan
It make 14 big rolls and 8 small rolls although I follow the instructions well but I have a lot of dough?? I use a ruler to measure it to be sure of dimensions but I have a dough left so I made the small ones,i will attach a photo for bottom and top. But the flavor was awesome.
Thanks
Hi Sara! They look wonderful and I’m happy you enjoyed them ?
To avoid having the filling seep out of the rolls, just be sure that you roll the dough tightly and make sure that the pan you’re using isn’t too big, because you need the rolls to touch one another as they bake. This way they’ll kind of support each other and won’t unravel as they bake. Also make sure that the brown sugar you use is the soft, damp kind, not the coarse one, as this sticks to the dough better. If you haven’t already, I’d also recommend watching the Instagram tutorial I have on my highlights. I think that seeing them getting prepared in video will be more helpful.
I’ve made a lot of cinnamon rolls, usually using the same handful of recipes and after I first pulled these out of the oven I was kind of disappointed. They tasted just like my other ones but had a few extra steps involved in making them. This morning, after reheating them, they were SOO FLUFFY! They rose to a beautiful height and felt like a decadent treat. I will definitely be making these again soon.
It’s so interesting how they got better for you overnight. I don’t think I’ve ever had any leftovers to test this finding; but I’m now determined to try it someday ? Thanks for your feedback Jamie!
Holy cow! I was a scratch baker in a supermarket a long , long time ago and have NEVER had cinnamon buns as good as these! I absolutely love the way you explain the steps and WHY you do it that way! Was fascinated by the powdered milk and the way you explained the slow gluten development. TYVM, TYVM, TYVM!
Wooohoooooo! That means so much coming from a great baker like you ? I’m really happy you loved this recipe so much and that you find my long details helpful ?
Hi. I am in the middle of making this recipe. I already made a mistake, so I hope they come out. I added all the ingredients at the beginning, instead of waiting to add the sugar and salt. The dough is beautiful, though. I am letting is rise in the refrigerator over night before i go to the shaping stage. Do I bring it to room temperature in the morning when I bring it out? Or go right to rolling and shaping?
Really sorry for replying so late. No worries about adding the sugar and salt from the beginning. They won’t affect the outcome, but will only require longer kneading, that’s all. As for working with the chilled dough, I use it straight away from the fridge while its still cold. Hope they turned out great!
i tried this recipe but the dough was messy
Hi Sofia! The dough starts out really messy and sticky at first, but it stiffens up to a clean and smooth dough as the mixing progresses. If everything was measured correctly, you probably just needed to be more patient with it and knead for longer. If after the 10 minutes of kneading, it’s still super sticky, you can add more flour, one tablespoon at a time, until a smooth and elastic dough forms. Wishing you better luck next time ?
I have made your Cinnamon Roll recipe about 6x now. For Christmas dinner I tried the Milk Bun Recipe and they turned out amazing (just like the Rolls do). Anyway I noticed in that receipt you say “Here’s a good indication of telling when the dough is ready. You should be able to stretch it between your hands into a thin film without it breaking right away. When it starts tearing, it will tear in a circular fashion.” I had never done that test when making the Cinnamon Rolls. Does the same apply? Should the Cinnamon Roll dough also stretch into a thin film? Tearing in a circular fashion?
Thank you for your help and the amazing recipe(s) and the detailed instructions with pictures.
Thank you for posting this. I’ve decided that I’m writing this one down in my recipe book so I never lose it. I’ve never been a fan of the dry dense texture of homemade cinnamon rolls. I tried these after trying the soft cinnamon roll recipe on the King Arthur website (which is also delicious). I loved your extra filling and cream cheese frosting. The key to making these is definitely not to add flour while kneading. There is a good tutorial on the King Arthur website about kneading sticky dough by cutting it. Don’t worry if you don’t have a bench scraper. I had use a pancake spatula. It looked funny but it worked! Haha! ? Dough came together after 10 min and I didn’t add flour. Made a world of difference to the texture. I feel like they tasted better the second day too. Thankful to have found the tangzhong method. Thanks again!
Thank you for this wonderful recipe. I guess I should try the cold rise for easy rolling and to make more rolls. It’s so fluffy and airy though I think I put much cinnamon-and-sugar hehe! But overall it’s such a GREAT recipe! I slept 1am making this last night hahaha! Thank you! I hope I could perfect the rolling very soon! I want my rolls like yours that every layers are popping up ? jeeze so hard being such a FOOD PERFECTIONIST! Love you! Gonna try the other recipes of yours. Sending big hugs from ?? ❤️
P.S. I don’t care about the long post because it’s so informative thanks again for every details.
Hi, Tasbih!
I hope you’re doing great and feeling better. I’ve done these guys a couple of times and I love them! Today it’s the first time I’ll do a cold rise though, and as the day got away from me, I’m baking in the middle of the night, and wondering if a 6 hour cold rise would be enough for the yeast to expand and the dough to develop? I truly hope so, coz I gotta go early in the morning to the place I’m taking them to.
Thank you so much, sending lots of love your way ♥️
HI! I would like to know if Milk Full Cream Powder is the same as Dry Milk Powder?
Hi Anna! Yes they’re the same ?
I just wanted to say thank you thousand times for sharing such absolutely wonderful recipes. I totally admire your way of explaining things.. u r definitely the best
Hi! Your recipe looks so great!! I’m going to do it tomorrow but I have one question, I don’t have a scale so I’m using a measuring cup. You wrote in the recipe that the dough requires 4 cups and 2 tablespoons of flour which are 496g, but I looked up and find out that one cup of flour stands for 140g which multiple by 4 is 560. Is that website wrong? I really want the rolls to go well and don’t want to make any mistakes.
Hi Tessa! Different websites have different conversion rates depending on how they measure flour. For example King Arthur flour uses the ‘spoon and sweep’ method which fluffs up the flour and results in 120-125g of flour per 1 cup. Whereas America’s Test Kitchen uses the ‘dip and sweep’ method, which compresses the flour more into the cup and produces 140g per 1 cup. I prefer the King Arthur Flour’s method and use 120-125g of flour per 1 cup. The best way to measure flour using a cup for this recipe is to lightly spoon the flour into the cup, then sweep off the excess using the back of a knife. Best of luck and enjoy ?
Thank you for the fast reply!! I have just one more question, after 10 min of kneading the dough wasn’t elastic, it was soft but not elastic like yours was in your instagram highlights… I kneaded for 3 more but it didn’t change things, is that ok? Maybe I did something wrong?
I am speechless. I made this today the best Cinnamon roll recipe, the most delicious of all the recipes I’ve tried. Thank you so much.
Tried these and they came out amazing! I do have a question, I used a scale for all ingredients and after “kneading” it with my stand mixer for the set time, the dough was still sticky and not as it should have been. I’ll be making them again because of how fantastic they were and want to know if you recommend putting more flour in if the consistency remains sticky? It was difficult rolling them out the morning after because of the dough consistency even with it being cold from the slow cold rise overnight. Thanks for your input!
Attachment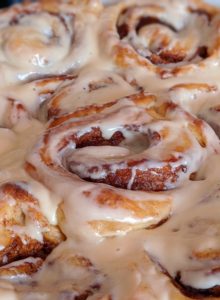
Made this again because I’m craving cinnamon rolls like crazy, I decreased the sugar in the filling and the frosting just a little bit and it was perfect! I had a hard time rolling the dough this time though it was chilled, it must be the weather because I think the first time I made these was during winter. Anyways, another masterpiece Tasbih, you’re amazing! Thank you so much for all the details and explanations, I love understanding the “why’s” behind the process and what a particular ingredient does to the recipe.. I’m learning a lot from you. Thank you so much.
Is there any way I could alter the icing recipe and not use cream cheese or less of it? My husband doesn’t like cream cheese so I’m trying to appease 🙂
Awesome blog, keep it up for more updates. Buy Herbal Skin Care and Body Care Products Online in India at Veramed in best price.
Can I use malted milk powder instead oF instant/dry milk?
Can I use malted milk powder instead of dry/instant milk powder?
Attachment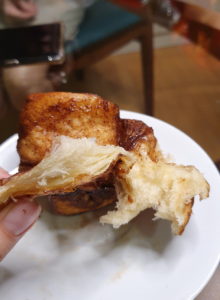
Omgomgomg these were freaking amazing. Ooey gooey BIGGGG and fluffy, soft and cottony, perfectly flavored and hit the spot 100%.
I kneaded the dough by hand (used a chopstick to replicate the dough hook kneading action ? much less messier than hand kneading bc it was so sticky!), omitted milk powder bc i didn’t have that and added clove and nutmeg to the filling. Srsly out of this world!!!! Ive been searching for a good cinammon roll recipe and urs just fit the description of my ideal one. I only made 6 but now I regret bc my family is finishing it up for me ? also tried a couple with dark chocolate filling and they were good but the cinammon ones still win ? definitely gonna make this again and again !!!
Thank you so much for sharing this wonderful recipe! So soft and fluffy even after 3 days! And with the right amount of sweetness!!! They are just perfect! I’m learning so much! Be blessed!
I wanted to let the dough rise in the fridge overnight but by the time I finished mixing, the dough temperature was so warm it tripled in two hours – in the fridge! If I chill all my ingredients – flour, tang zhong, milk, etc. – will the yeast still work? The rolls were delicious but all squished up due to not being able to roll or cut them properly, so I would really love to do i properly.
Hi Tasbih!!
I LOVE THIS RECIPE!! Thank you for the detailed explanation!
I have a question and i really hope you can help.
1.Firstly, can i double this recipe. Will it work well?
2.Secondly, my oven is quite small so i am not able to fit all the rolls in at once in the oven.
Will the rest left outside waiting for their turn to bake be over proofed?
Do you have a suggestion to get them to bake perfectly if i want to churn a big batch please?
3. My rolls tend to really be huge when baking. They don’t turn put cute like yours eventhough i roll them pretty tight and small. Did i do something wrong?
So sorry for the many questions!!!
Thank you for taking time to look through them.
Pingback: 5 מתכונים *מובטחים* שמצאתי באינסטגרם לסופ״ש - Are Magazine
OH MY GOD!!!! THESE TASTE INCREDIBLE!!!
I made these today and my family (and i) went nuts. It’s super soft and extremely delicious! Thanks a million for sharing this recipe Tasbih.
Are you using Whole Milk powder or Non-Fat Milk powder?
The last time I made these, I could not find dry milk powder and I searched in 4 different grocery stores. I ended up using powdered buttermilk and they came out wonderfully. I think I actually prefer the very subtle tang that it adds to the rolls. Love this recipe!
Keep it up for more updates like this valuable blog. Visit Digitaginfo for profitable SEO Services and PPC Services in Delhi, India at the best price.
Really informative blog, if you need Tender Management Services and Tender Management Consultancy in India visit Bidz365.
Lots of useful info. Like your writing and explaining thing. Really a helpful and informative report. Nice blog. Hope you will be generous in work like i can see you in your blog
Yet another batch of cinnamon buns are rising. So damn good! I hope you, your family, and your loyal readers keep well in this Covid time.
Julie in Canada
I’m really happy with this informative blog, thank you so much for sharing this. Sarswati enterprises is a leading Video Wall for Education Institutions and Distributor of Air Conditioners for Malls in India.
They are in the oven AS WE SPEAK and I am so excited but also afraid? I am experiencing a tender anxiety towards these that I mostly feel about my loved ones and that in itself is really exciting. Thank you for your wonderful recipe and I love your whole vibe, I’m bookmarking.
I am so glad to visit this blog, keep it up for more valuable information, Visit Rosiroti for best Online Job Search and Recruitment Services in India.
HI I JUST WANTED TO THANK YOU, I have tried several recipes and also read a lot I bet you are either so professional or knowledgeable in the bakery I love all your recipes and I dare to say from now on whenever I want to try something new I am gonna trust you.
Attachment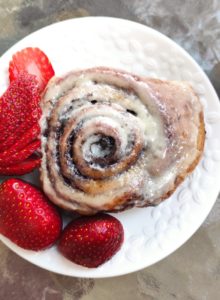
Your recipes turns out always perfect masha’Allah ? Our family crave chocolates more than cinnamon so i replaced it with unsweetened cocoa powder.. Aaaand then best chocobons came out of the oven fluffier and more airy and softer than the store bought ones, so thank you thank you thank you ? I’m definitely making it again ??
I decided to make these for Christmas morning this year. I have always been so nervous about making cinnamon rolls from scratch because I struggle with yeast…often. Haha! I didn’t have a scale to measure grams, so I followed your instructions to the letter. Let me say, these were AMAZING! I thought I messed up when my cooked dough went a bit past the pudding phase, but it all combined perfectly in the mixer. I was really nervous because of how sticky my dough was when I rolled it out. I decided to very lightly flour my parchment, rolling pin, and the dough, which made it a lot easier to roll up. Chilled the dough overnight like you recommended. These were better than Cinnabon. By far. Everyone loved them! This recipe will be my go to from now on! Thank you for such an amazing recipe! I will say, my family has asked me to leave off the frosting next year, even though it was delicious. I think we might chop pecans and roll them into the cinnamon rolls next time instead of adding the frosting. I did tag you in an IG post, but I only had one roll left when I took the picture. Haha!!
The recipe looks good, but I was dizzy trying to read the recipe. There are so many ads that cause the page to jump around. It just makes for a miserable experience.
This worked!!!
I, too, am doing the happy dance!
Perfect even thought I FORGOT THE BUTTER AND ADDED IT AFTER THE
DOUGH WAS RISING and I dug the whole thing out and put it back in
the mixer to add the butter. Sheesh!
* I did not over-flour like I always did, I rose it in a straight sided container so
I could measure when it was double.
* The temperature taking was genius.p
* Thagzhong method is amazing.
Thank you!!! ?????