The Flakiest All-Butter Pie Crust
Forget everything you know about pie crust making! This recipe uses an unconventional mixing method, to create the flakiest, most flavorful all-butter pie crust, that is a breeze to roll out, without the use of unusual ingredients. It’s a game-changer!

People…people…people! Have I found the most amazing (if not the BEST) all-butter pie crust recipe for you!
This is IT you guys!
The last pie crust recipe you’ll ever gonna need.
The one you want in your back pocket for all your pie creations.
Your new go-to that you’ll use over and over again, complimenting all sorts of fillings, be it sweet or savory.
At least I know my search is over, and oh what a relief that feels.
Yes I’m aware that calling it the “most amazing” is such a bold claim…but that is how confident I am in the beauty of this wondrous crust.
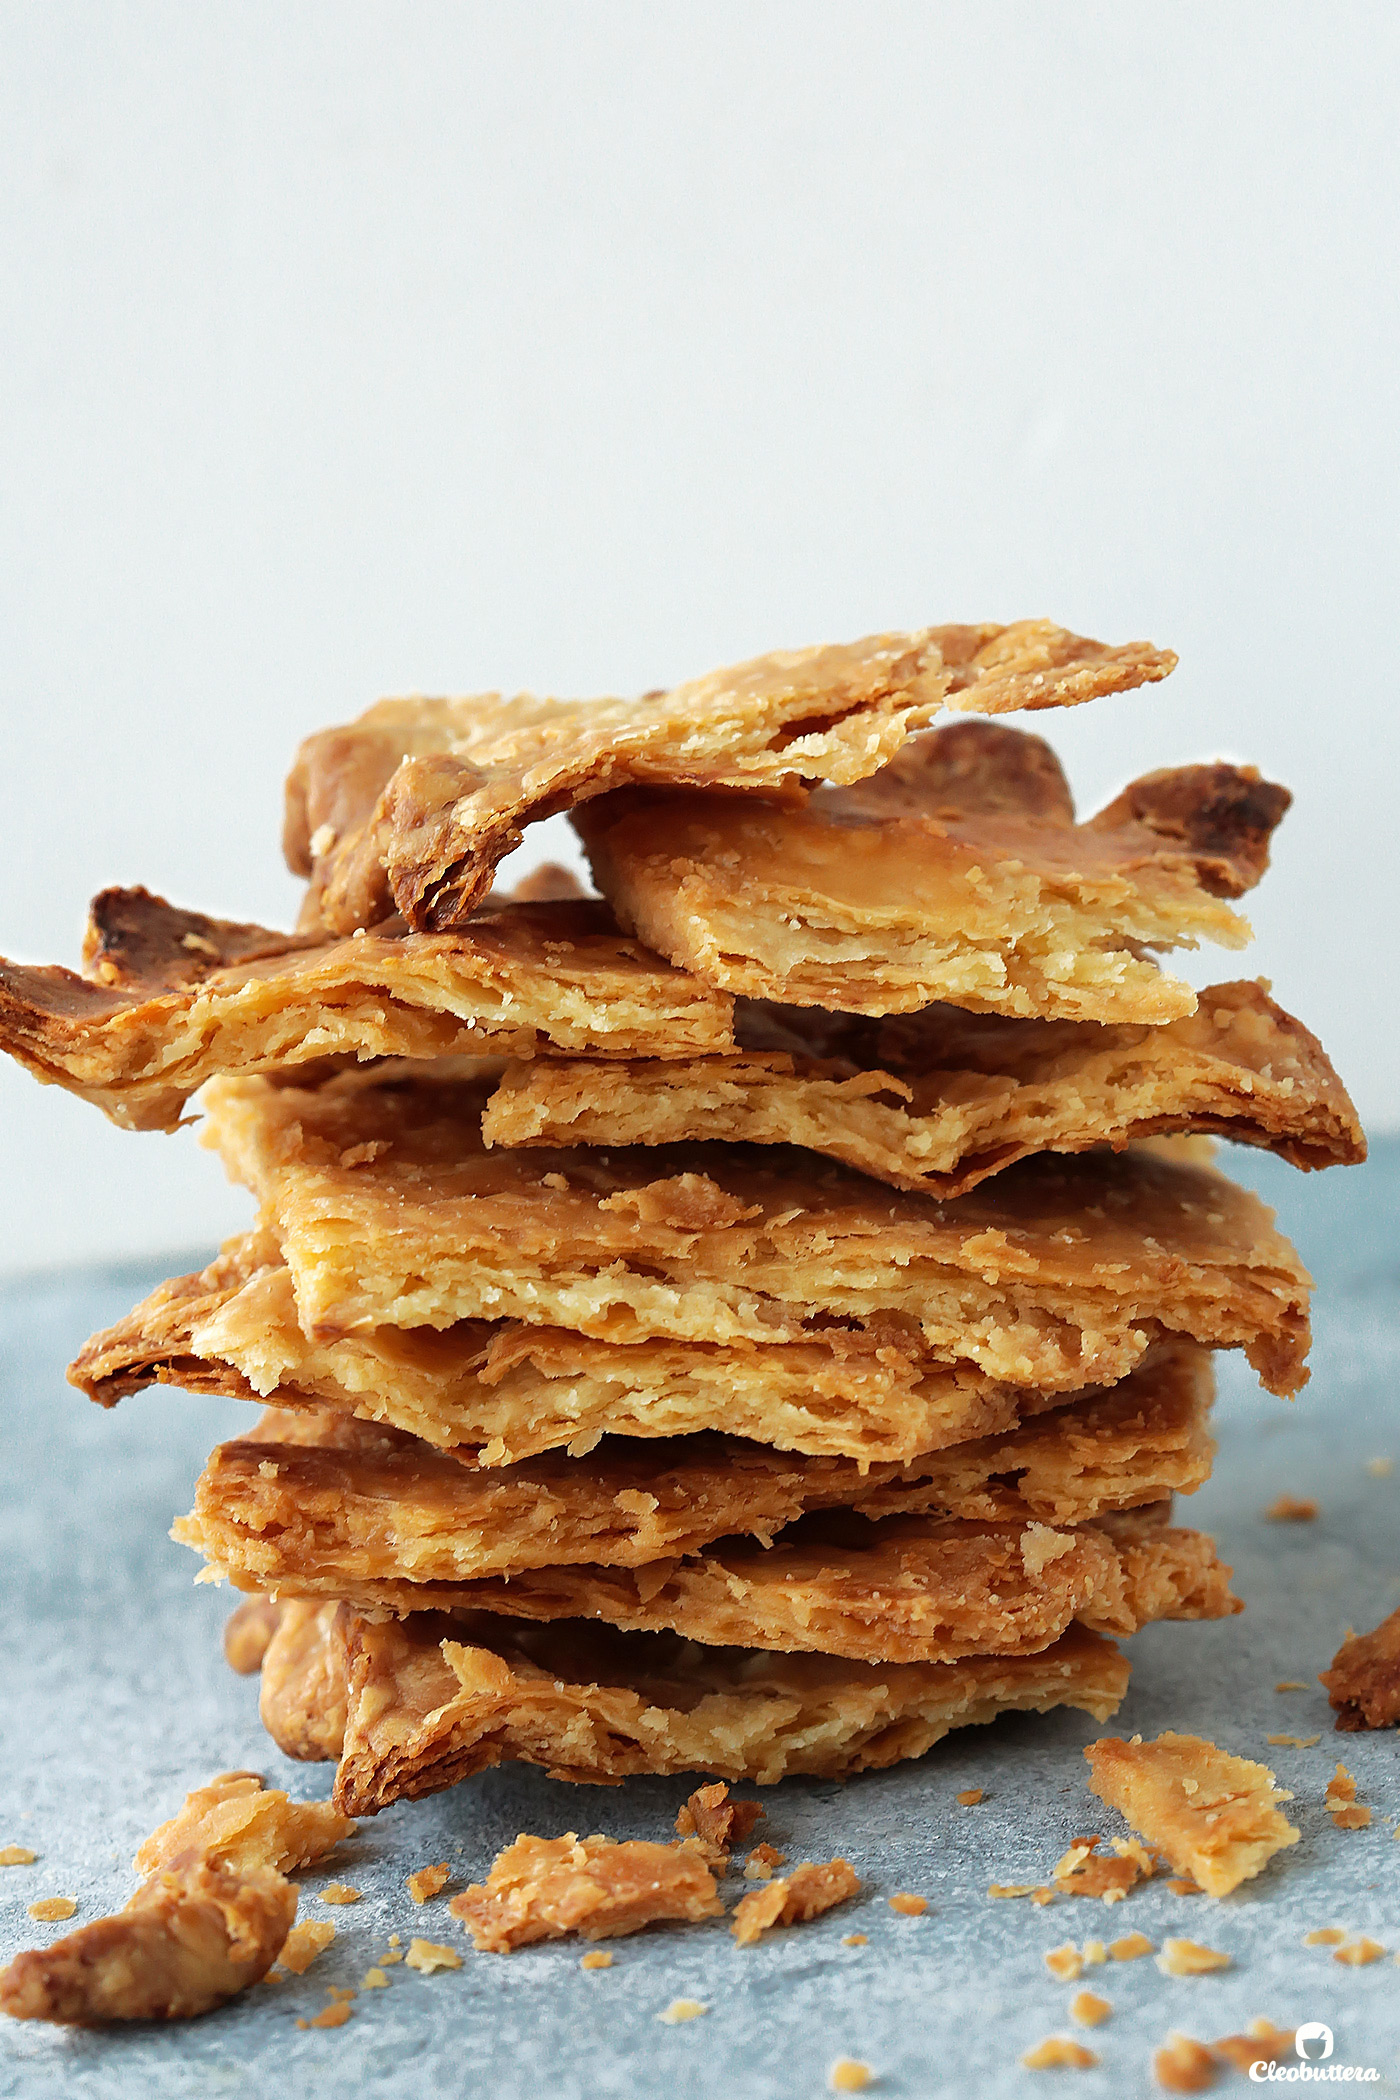
I mean that flakiness…is unreal! This is by far the flakiest and most flavorful pie crust I’ve ever made or had.
My daughter says it tastes like a crisped up croissant, my sister-in-law thought it was puff pastry, and my parents said that it reminded them of mille feuille. So if that doesn’t say much about this crust, I don’t know what will.
I’m literally obsessed with it and believe it deserves some kind of award.
I wish I could take credit for this ground breaking recipe that is about to revolutionize pie making, because take my word for it…it will, but it’s really all the hard work of the geniuses at Cook’s Illustrated, namely their senior editor Andrea Geary. Even the more reason to have trust in it, because if there’s anything Cook’s Illustrated is known for, it’s the extensive research and testing they put into each recipe. If you can’t already tell…die hard fan over here!
There’s no denying that the foundation of every great pie is a great crust, and its mastering the crust is what scares many people, including myself, away from making pie. The disappointment that ensues from too many tough, soggy, shrunken, and crumbly crusts have taken their toll on me.
But now, thanks to this recipe technique, I’m past my pie crust phobia days, and can finally announce triumph! I want to do the same for you, so I’m here to virtually hold your hand and help take that fear away by assuring you that this recipe right here, is something else. It’s a game-changer!
Like every pie crust desires to be, this one is:
- Buttery. Obviously; there’s not a sight of flavorless shortening or lard in here.
- Incredibly flaky. We’re talking almost puff pastry-flaky, only richer, with delicate distinct layers.
- Tender. Falls apart to the bite without a hint of toughness and slices effortlessly.
- Crisp. Has a great snap to it and a crunch that you can actually hear.
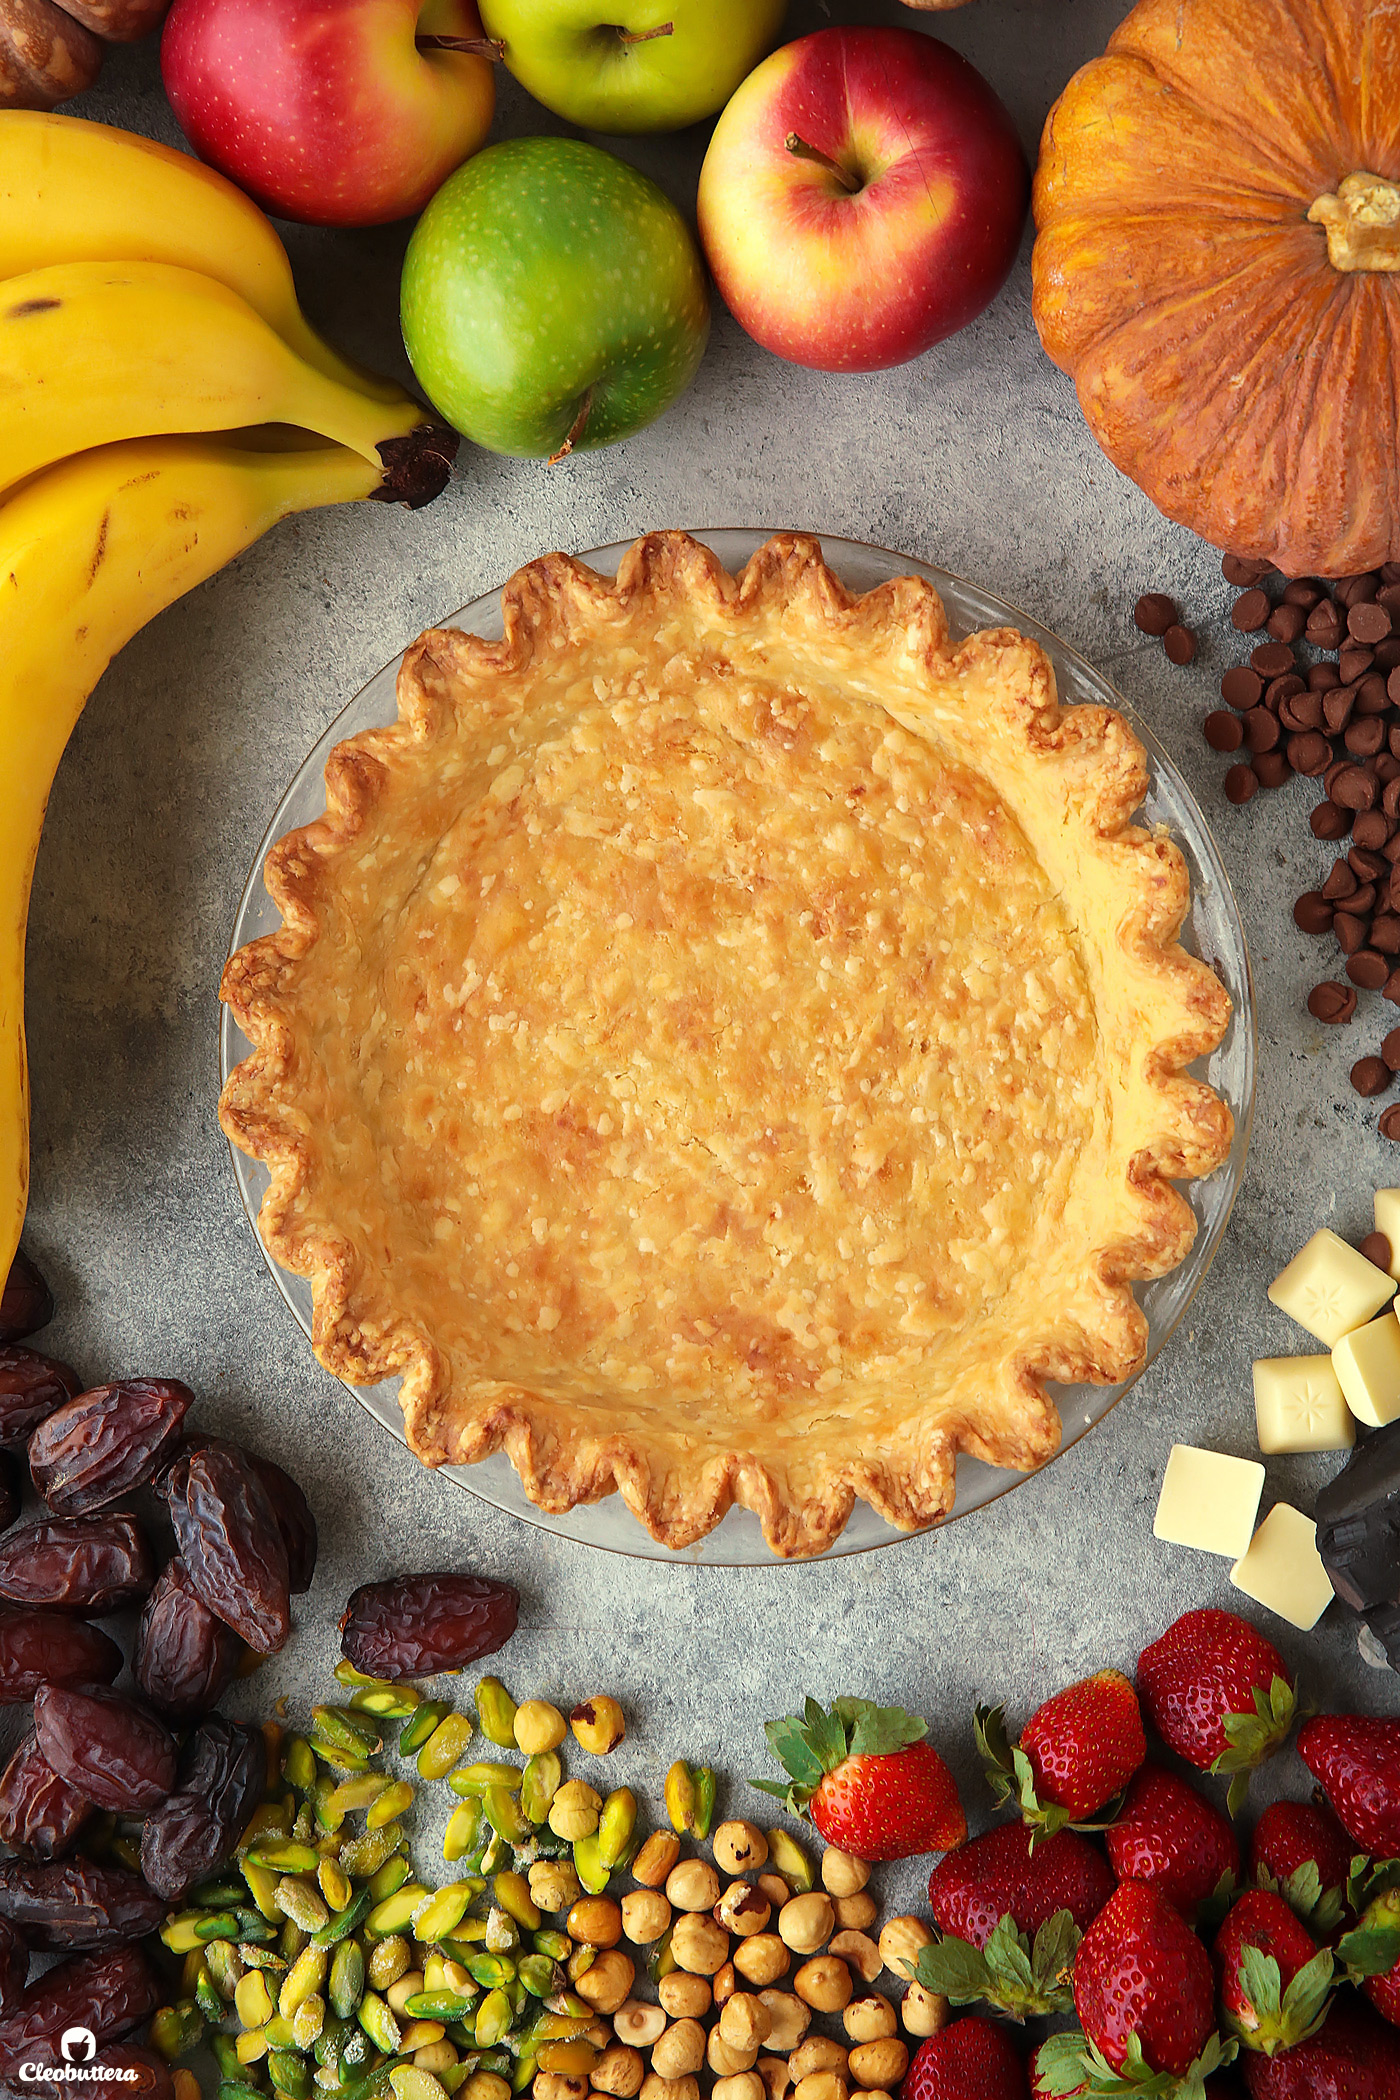
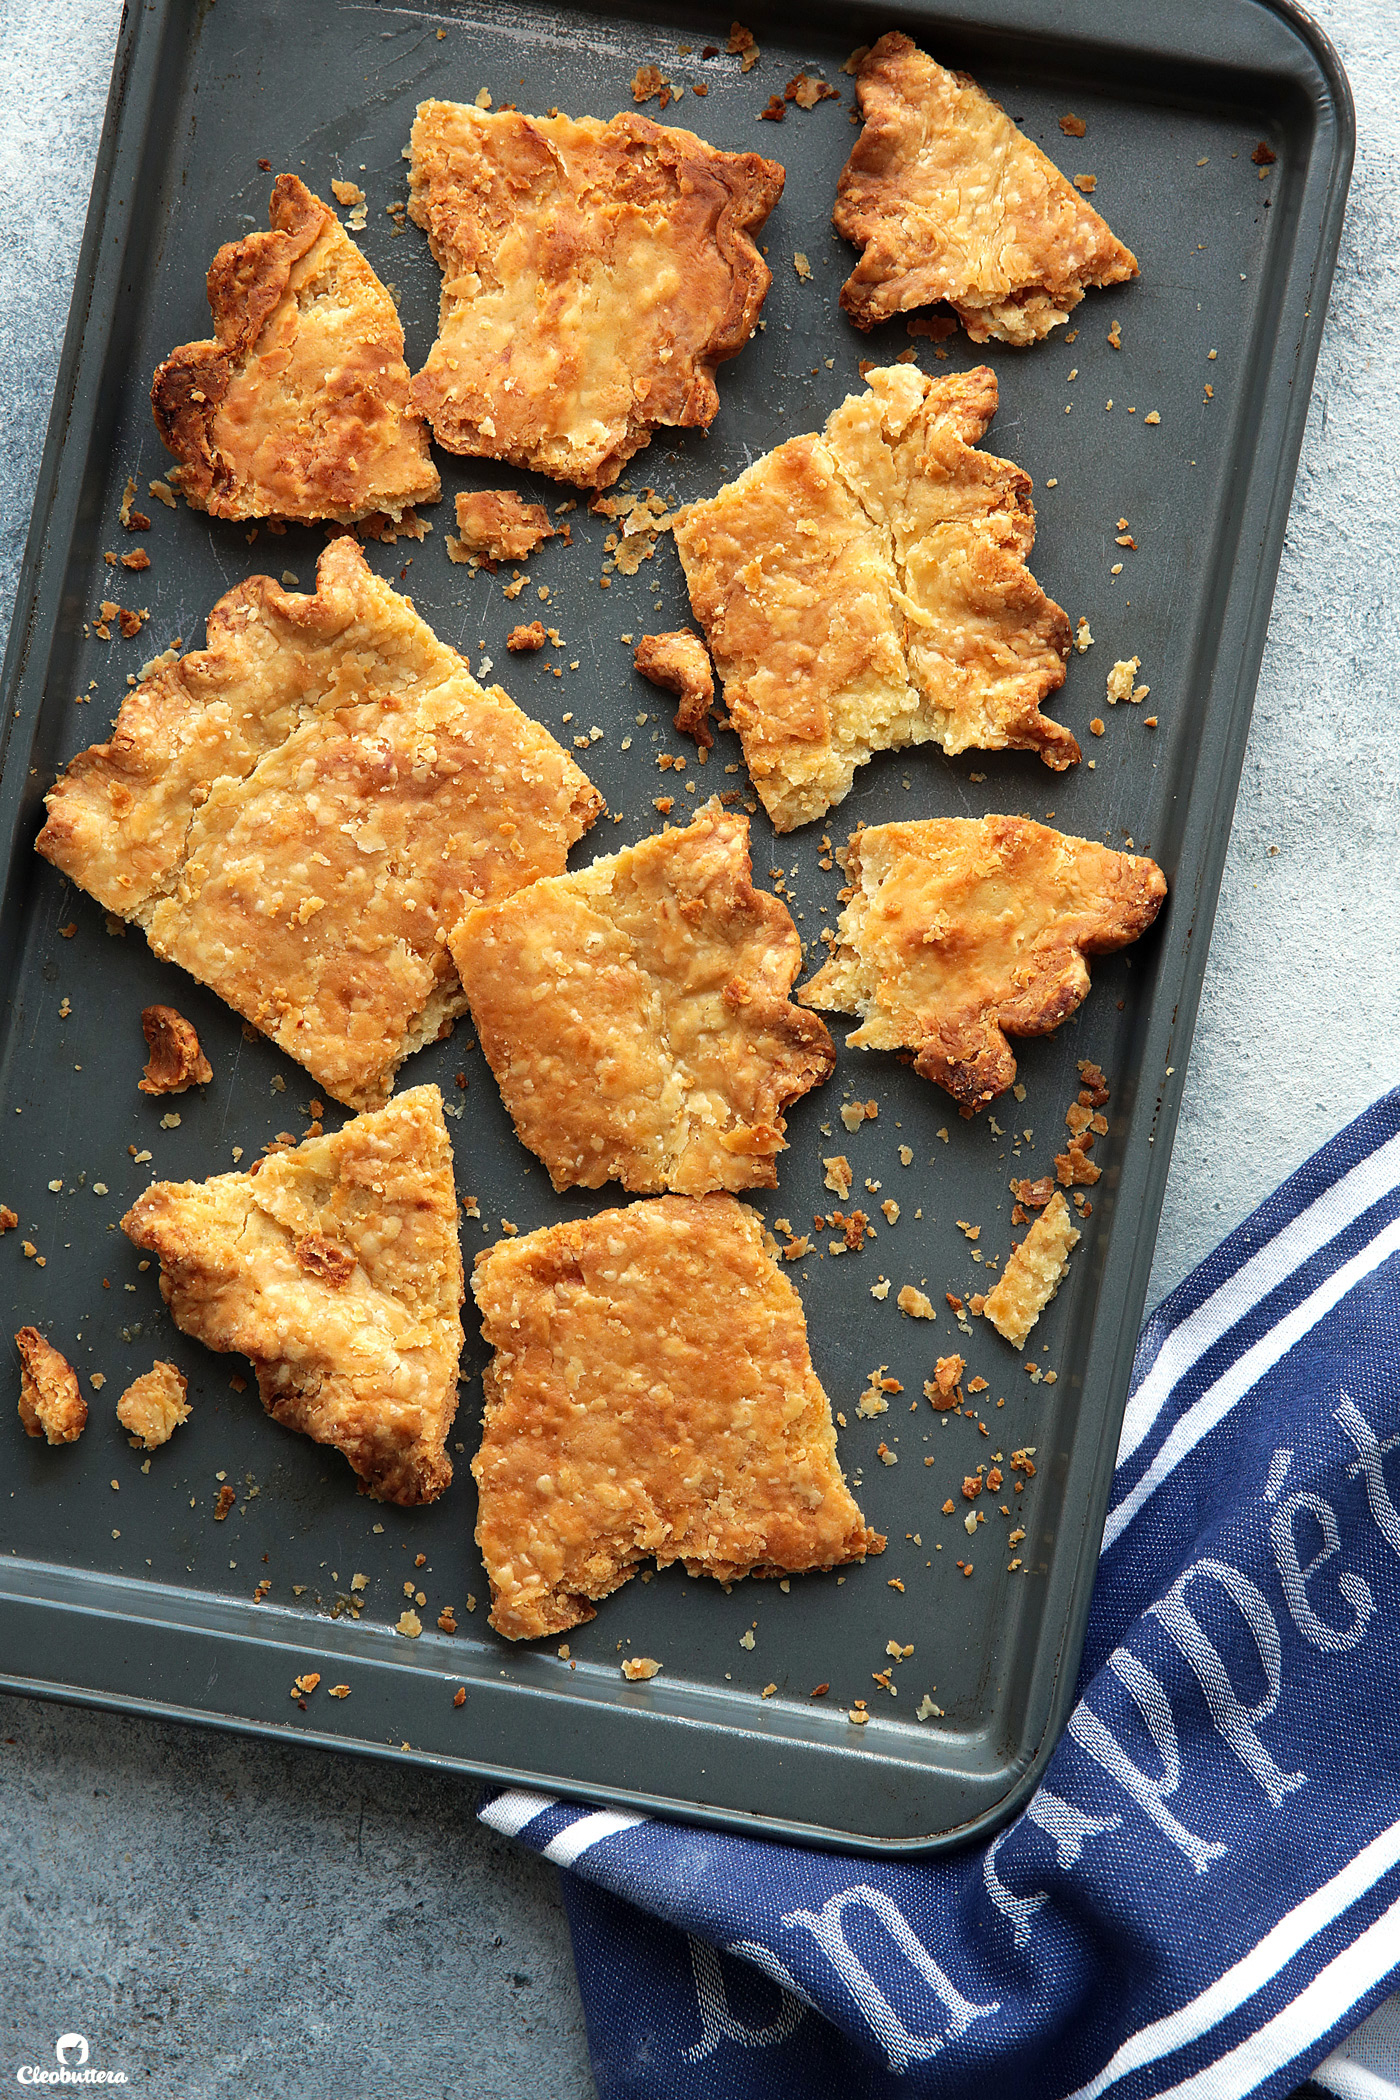
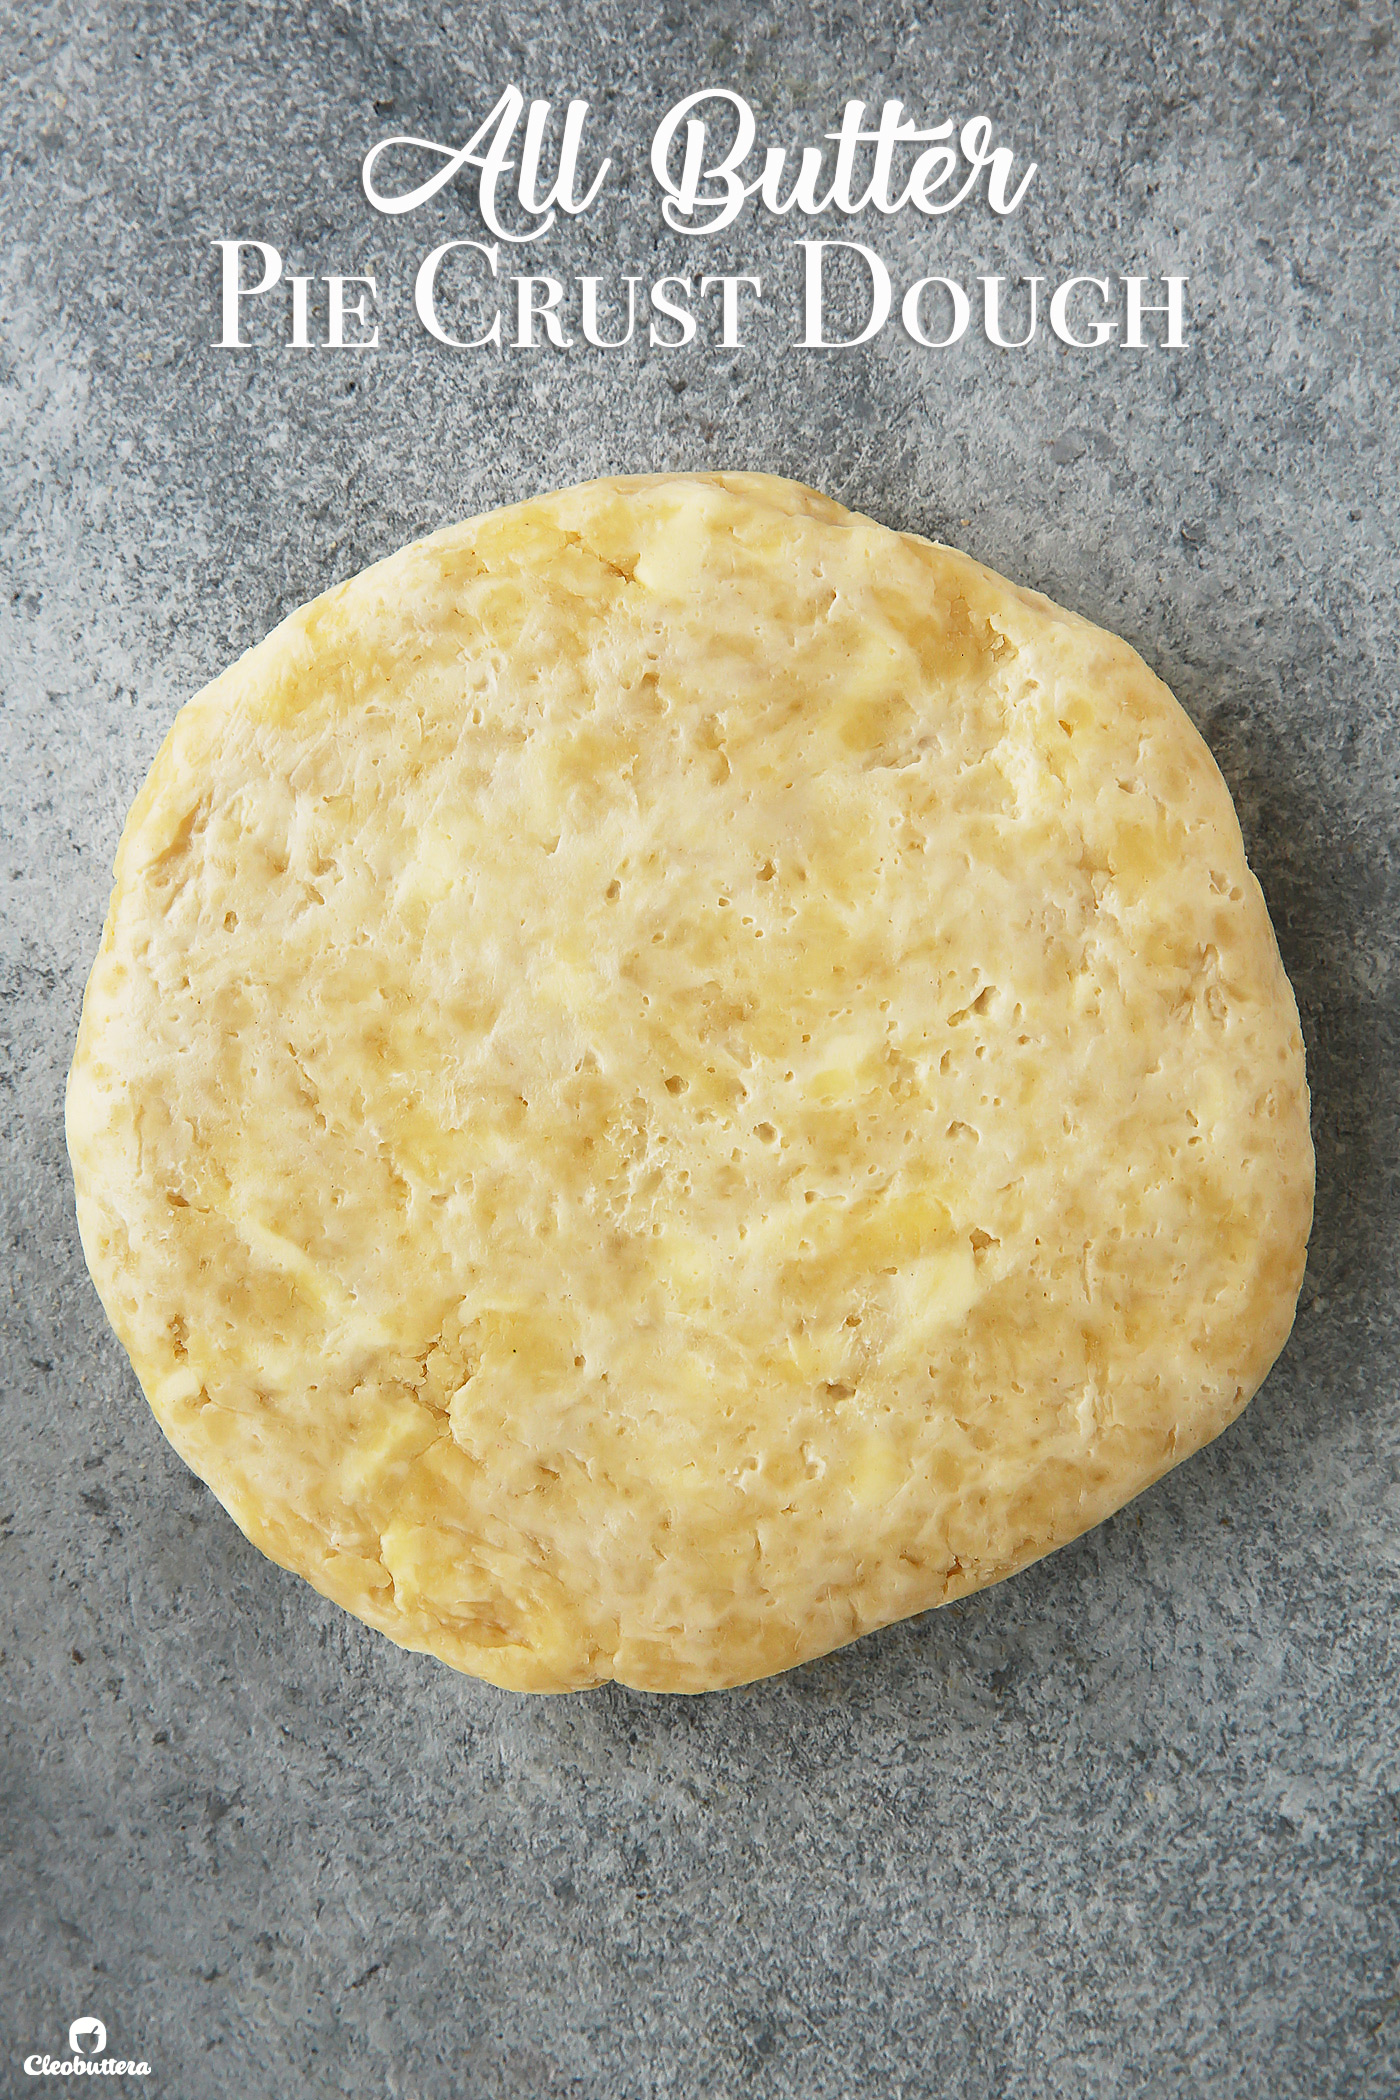
I broke one open for you just so you can see that incredible texture. So will you take look at all those crisp, bubbly, shattered flakes of crust. I don’t know about you, but I can skip the filling and just eat that by itself, and be as happy as can be.
Unlike most all-butter pie crust doughs though, this one is:
- Foolproof: An unconventional mixing method reduces the room for error, so you’re more likely to succeed than with other traditional methods.
- Moist: This dough is wetter than most traditional doughs, so it’s not dry or crumbly and is so easy to work with.
- Easy to roll: Much softer than traditional doughs, so it rolls out like a dream.
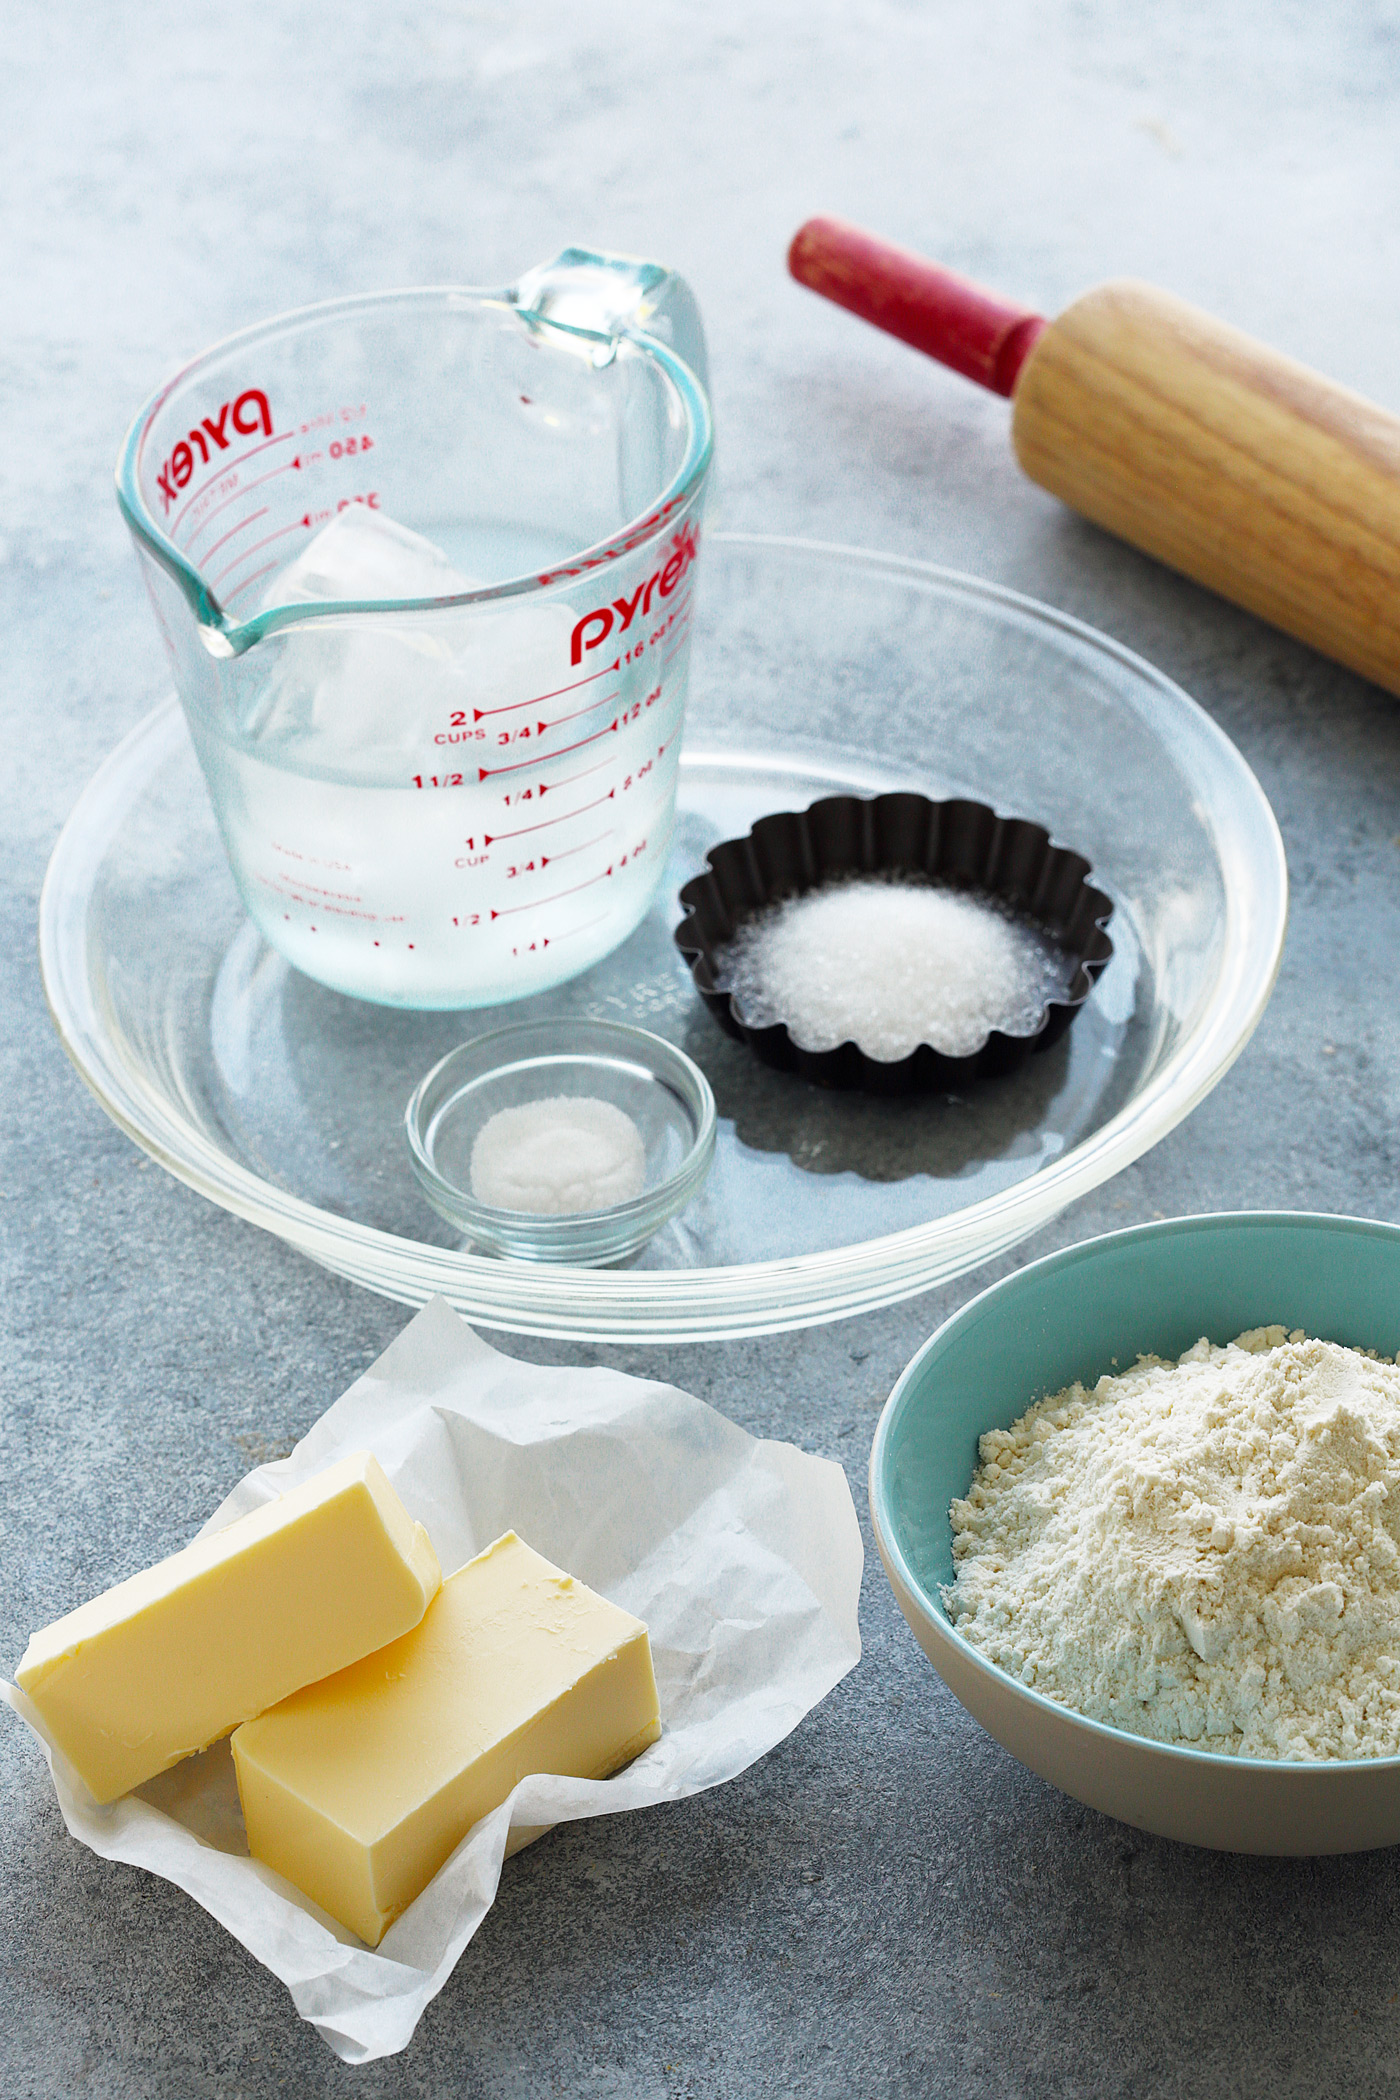
- No unusual ingredients: To achieve a supple dough that is easy to work with and bakes up with great texture, a lot of recipes rely on ingredients like shortening, sour cream and vodka (which we’ll get to later). This one uses the basic stuff, nothing out of the ordinary and things you probably have on hand right now; flour, butter, water, sugar and salt.
So if the ingredients are so “normal,” what makes this recipe so special?
It’s all about the MIXING TECHNIQUE! This is where the secret and magic lies.
Now I want you to forget everything you know about pie crust making and keep an open mind because things are about to get crazy!
Everything about the method of this dough will seem so wrong until it actually comes out of the oven looking so right.
To appreciate just how revolutionary this new technique is, it’s important to reflect on the way that pie dough has been made for centuries.
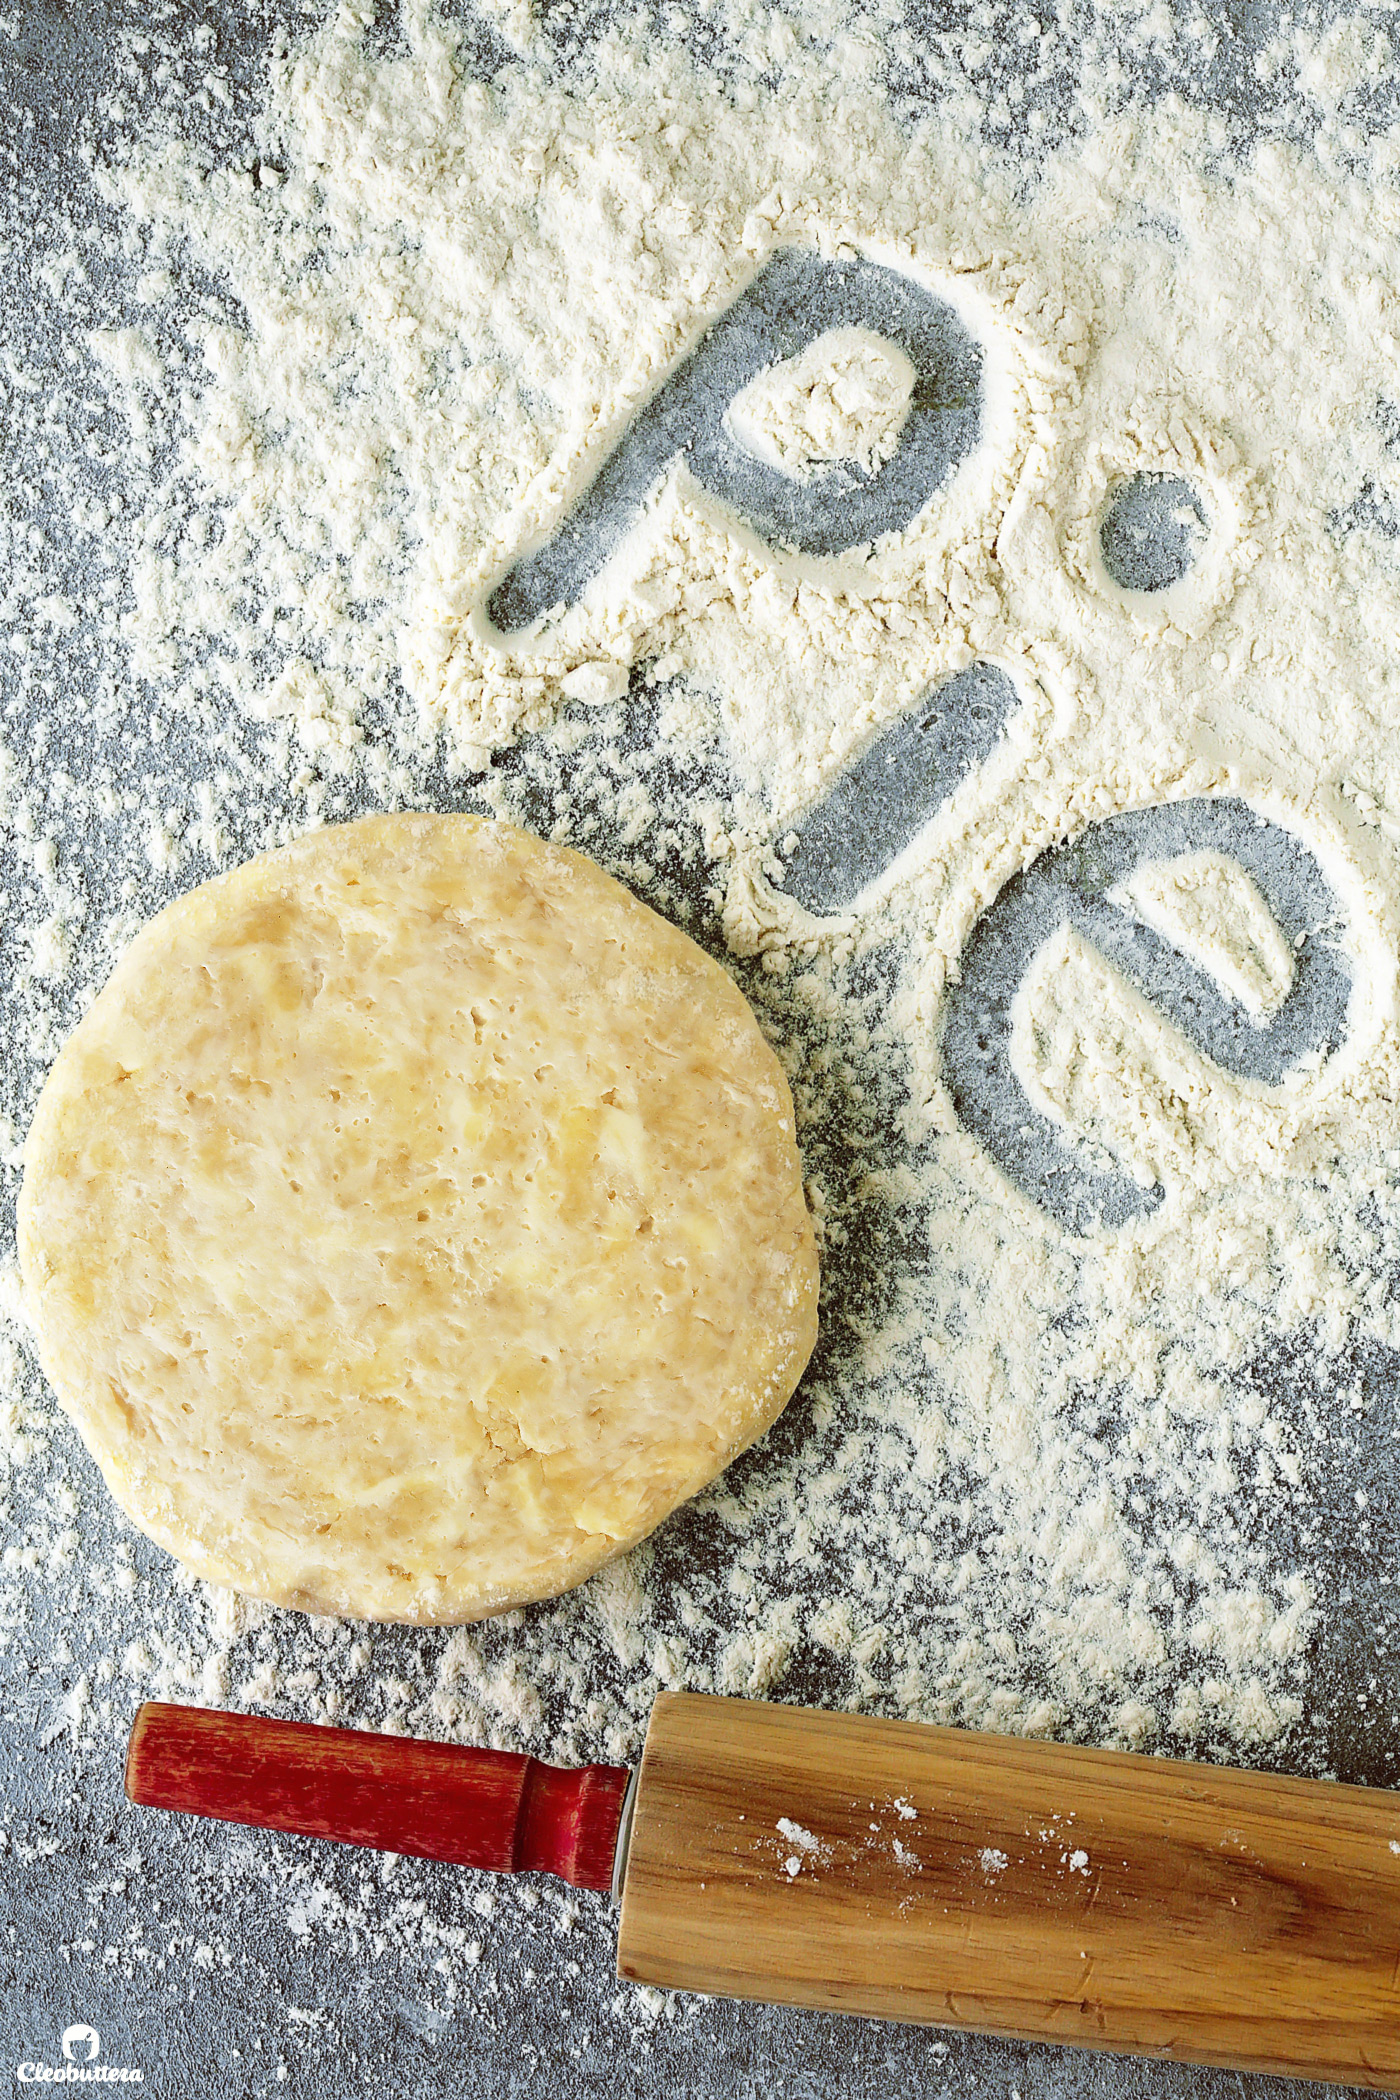
Dry ingredients—flour, sugar, and salt—get combined. Super cold butter gets cut into the dry ingredients, until it’s broken into pea-size pieces. Then water is mixed in until the dough comes together in a crumbly mixture with visible bits of butter throughout. Just like the picture you see below.
“Too little water, the dough will be crumbly and impossible to roll and the baked crust will fall apart; too much water and the dough will roll out easily enough, but it may shrink when it bakes and will certainly be tough.” -Cook’s Illustrated
But even when the water amount is just right, all-butter doughs tend to be difficult to roll out especially for inexperienced bakers. After the mandatory chilling period, they come out from the fridge rock solid, which can cause cracking and tearing while rolling out. If you let the dough soften too much to be able to roll it, the butter nuggets can melt into the dough, which can eventually cause the baked crust to lose its flakiness. (Traditional pie dough picture below).
This problem is often solved by mixing in some shortening (or lard) along with the butter, and many times even have it replace the butter all together. Shortening makes the dough so much easier to work with and some bakers swear by the incomparable flakiness it creates. However, we all know that nothing beats the flavor of butter.
In an attempt to create a soft, workable dough without having to sacrifice on flavor, some recipes have added sour cream or vodka to all-butter doughs, which seem to have done the trick. Up until stumbling upon this new recipe, my go-to pie crust was a sour cream based dough which was pretty good (albeit unimpressive), but I hated having to buy a tub of sour cream just so I could use 2 tablespoons of it. It was impractical. Similarly with vodka, it posed an issue for people who avoid alcohol or don’t constantly keep spirits on hand.
Enter this modernized pie crust dough with the quirkiest mixing method! It keeps ALL the butter, easies the method, dials up the flakiness, makes everyone happy.
Cooks Illustrated calls it “Foolproof” pie dough; I call it “The Flakiest”! Because besides being the flakiest crust I’ve ever come across, while we may have struggled with pie dough making in the past, we ain’t no fools ?
I just wanted to note that I’m certainly not against any of the aforementioned methods/fat combinations/unusual additions, I mean they stood the test of time after all, but this one has just proved to work the best for me and has given me the best tasting, flakiest results I’ve ever had. Hmmmm….maybe I am a fool? ?
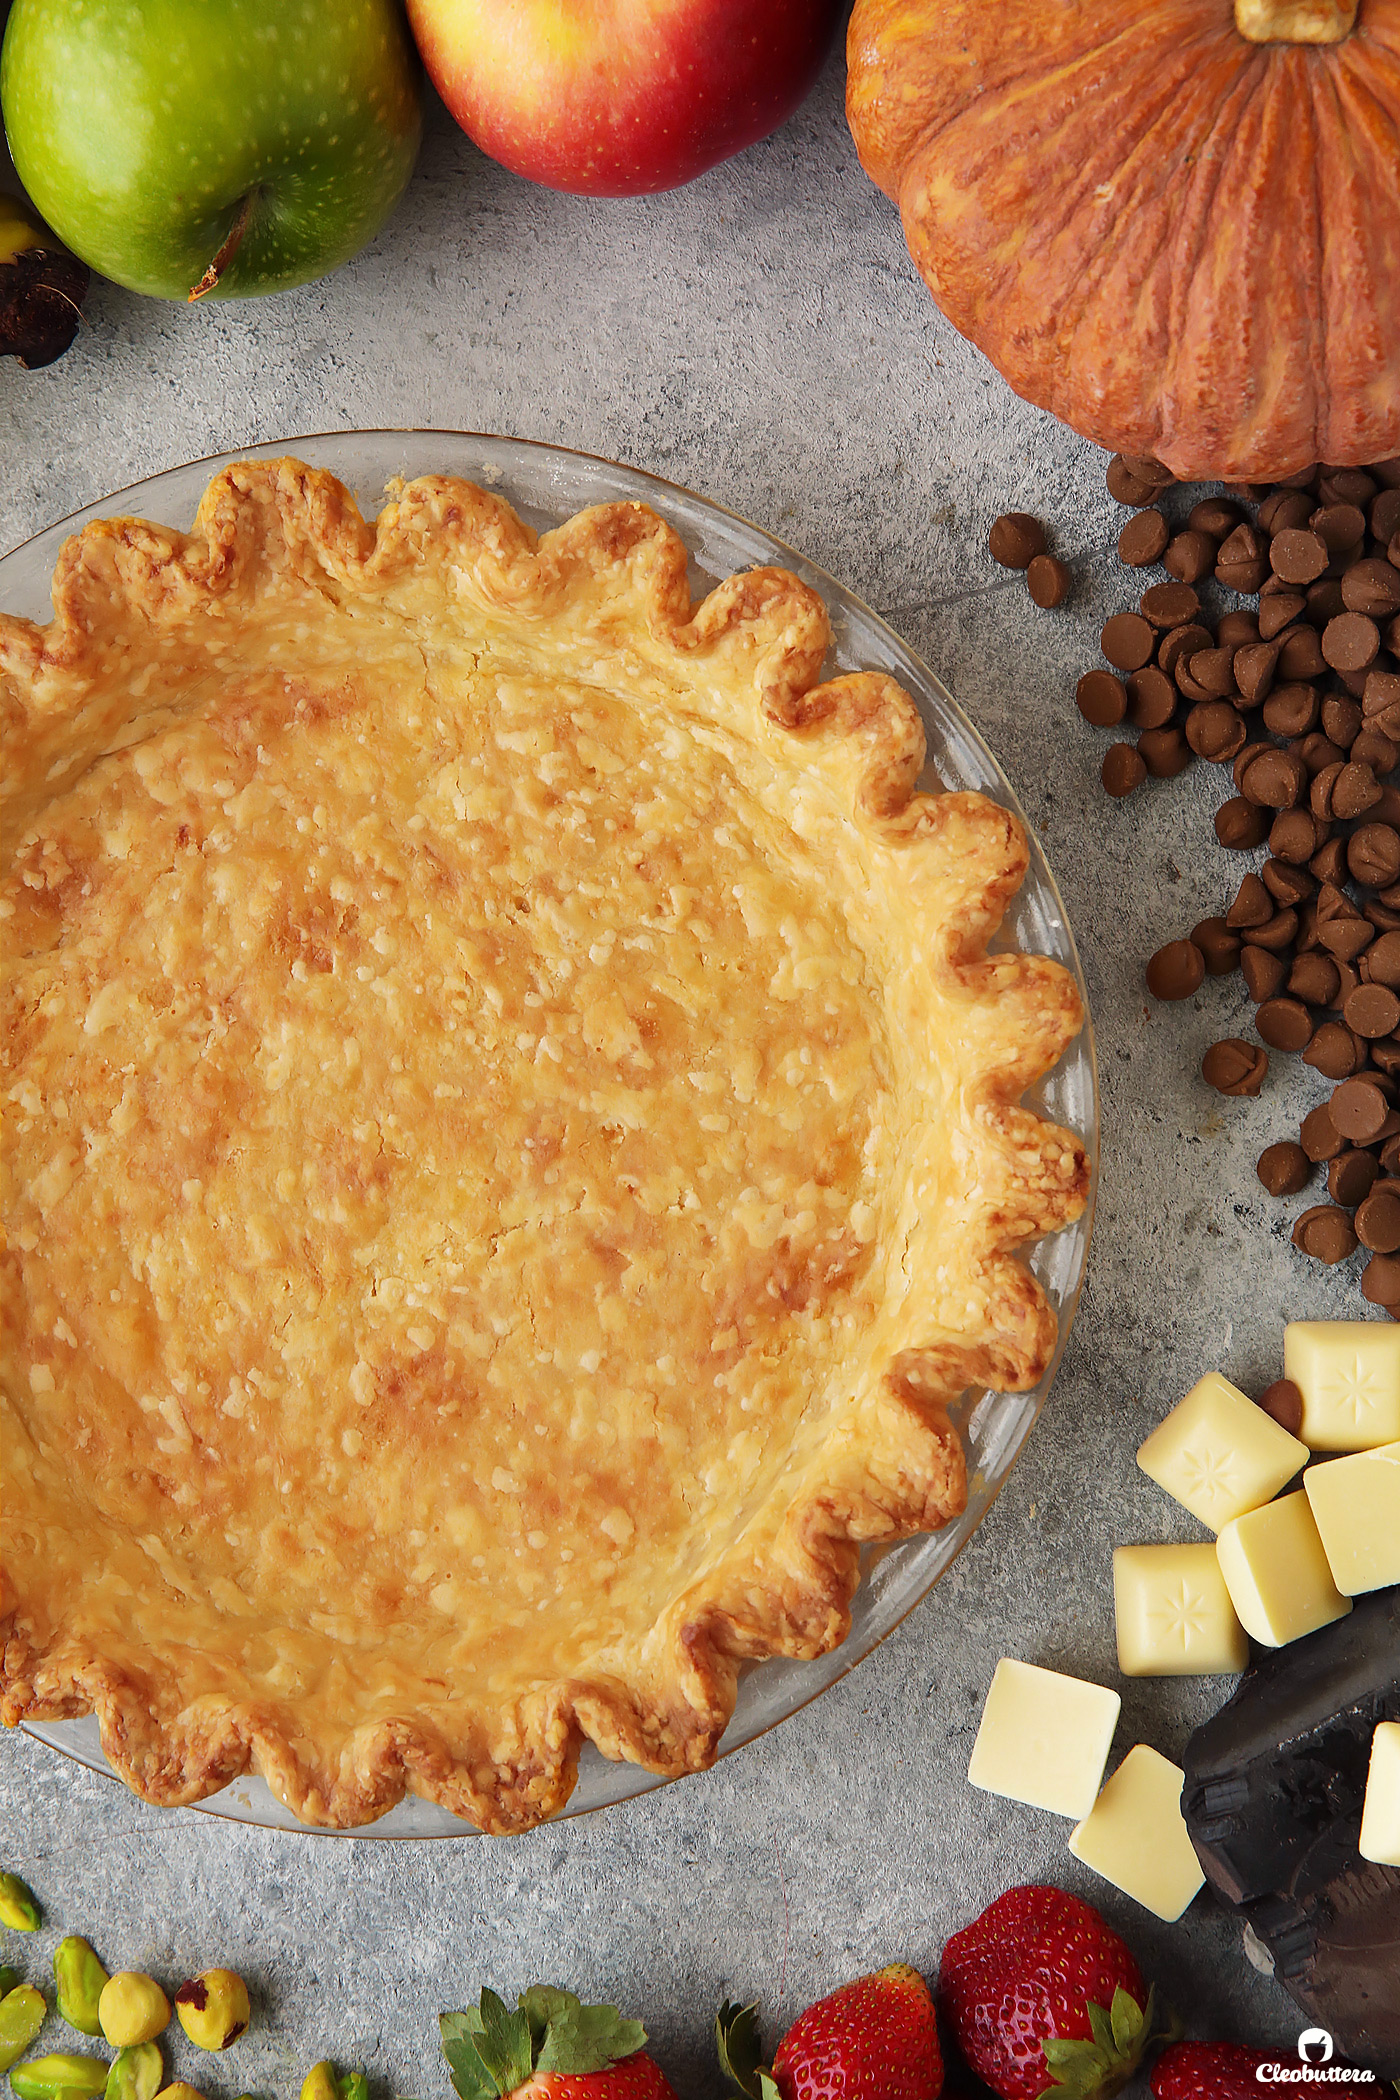
So let’s get to business! Below I’ll show you how to make a single pie crust, but you’ll also find details in the recipe below for both single and double-crust pie doughs.
How to make The Flakiest All-Butter Pie Crust Dough?
Like I mentioned before, the method is so crazy, but it really works and that’s what matters right?
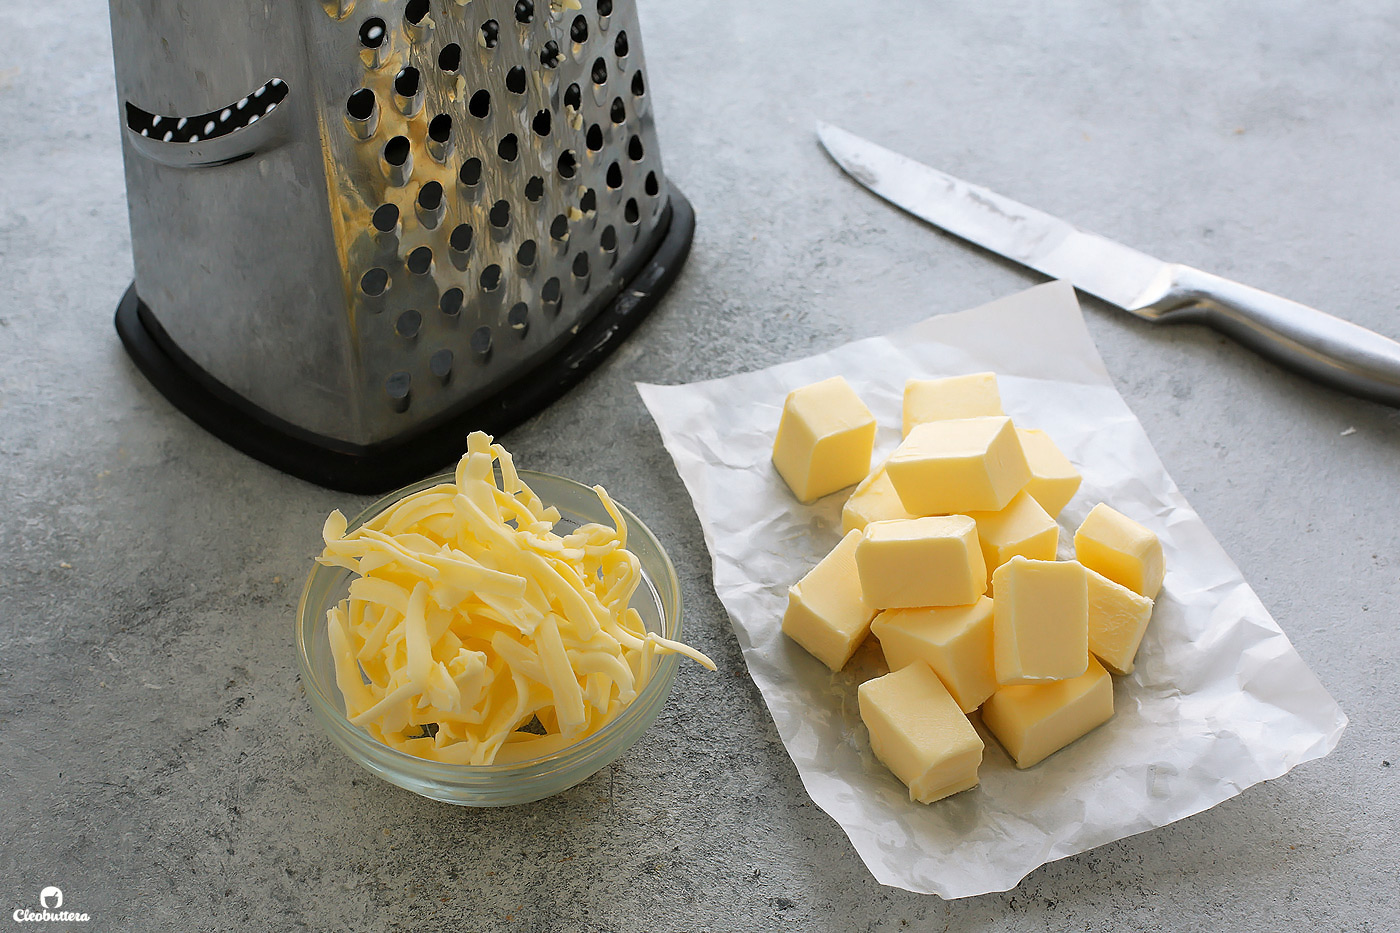
In this method, you still want to keep the butter very cold too, but instead of cutting it into the dry ingredients, we’re going to grate 2 tablespoons of the butter, place that in the freezer until solid, then cut the remaining 8 tablespoons into ½-inch cubes.
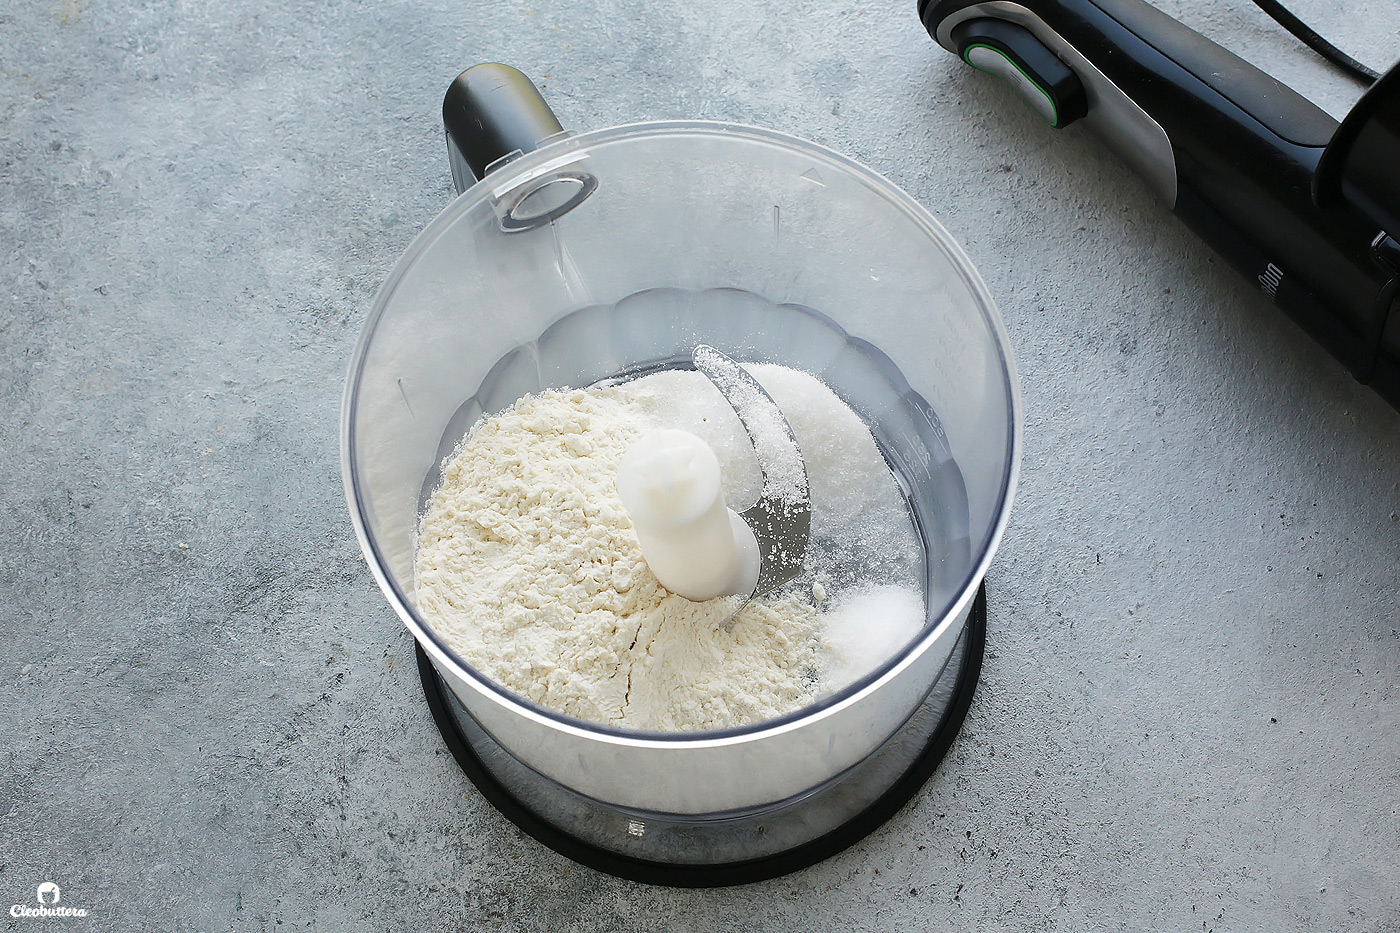
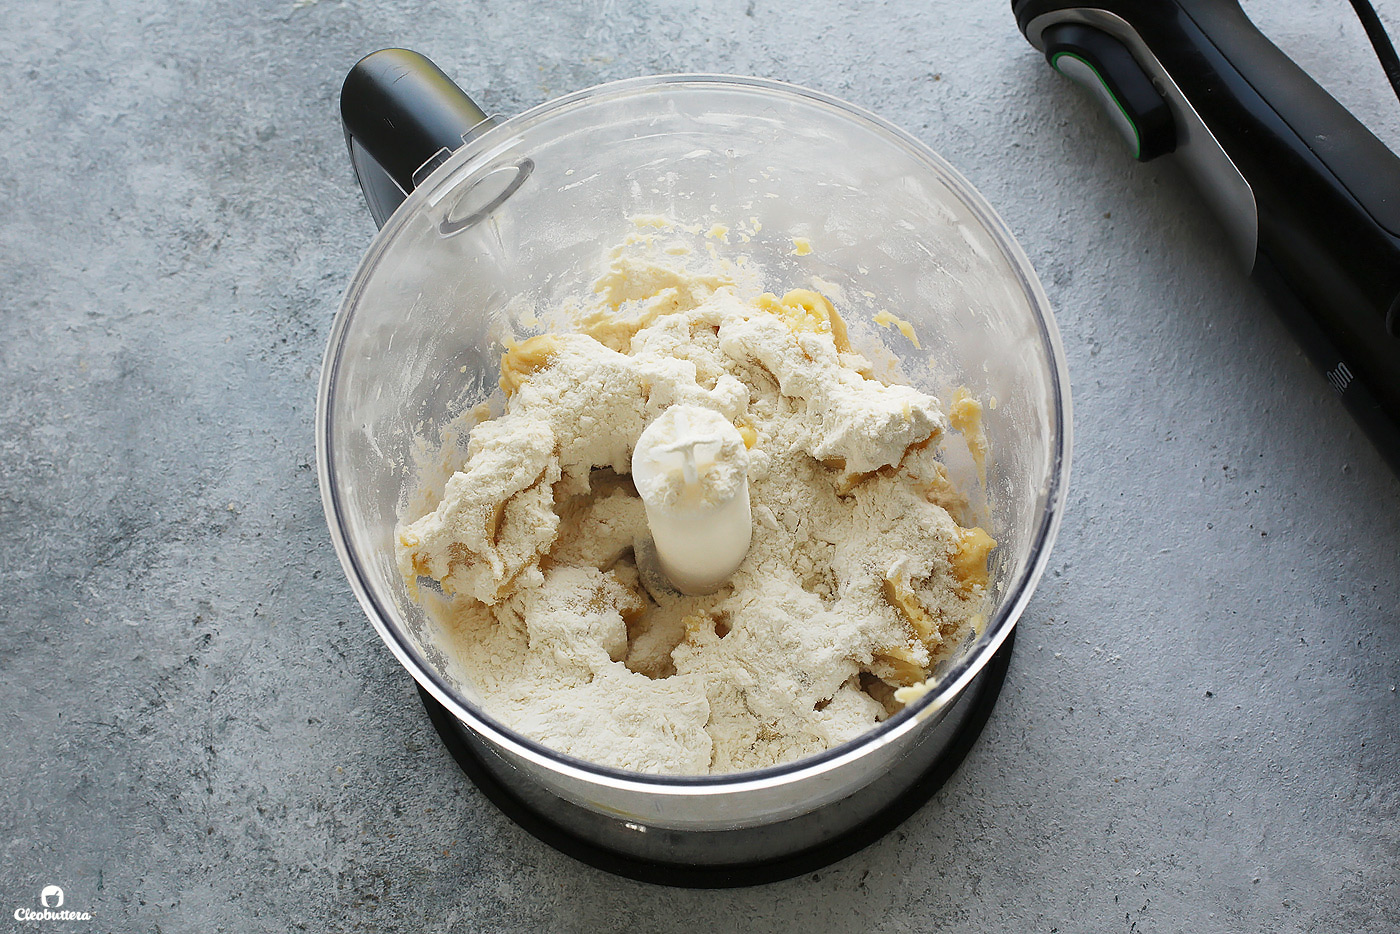
Then in a food processor, you’ll pulse together two-thirds of the amount of the flour, sugar, and salt to combine.
Add in the cubed butter…
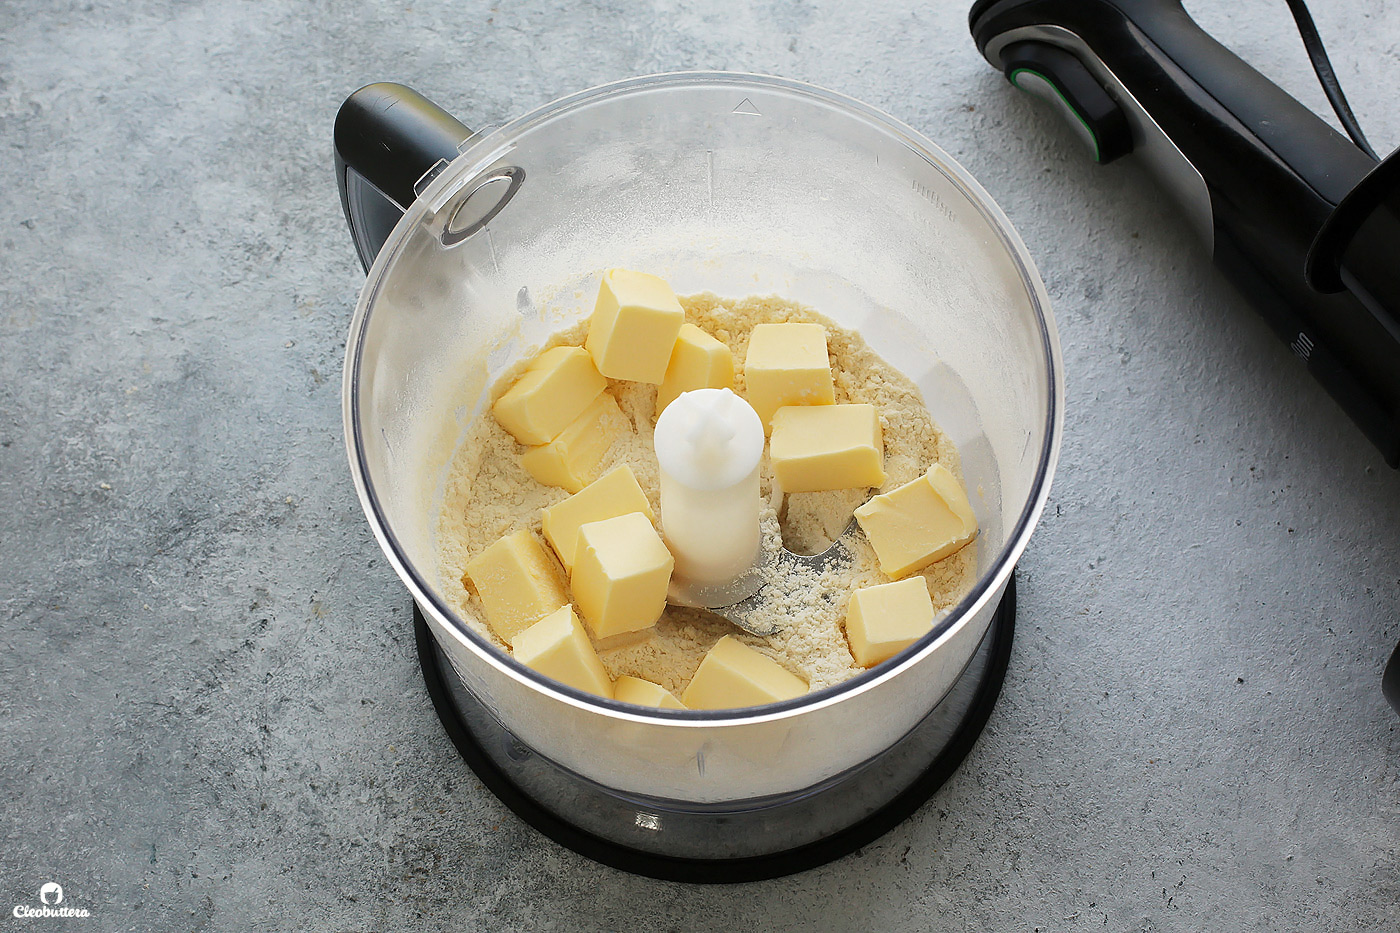
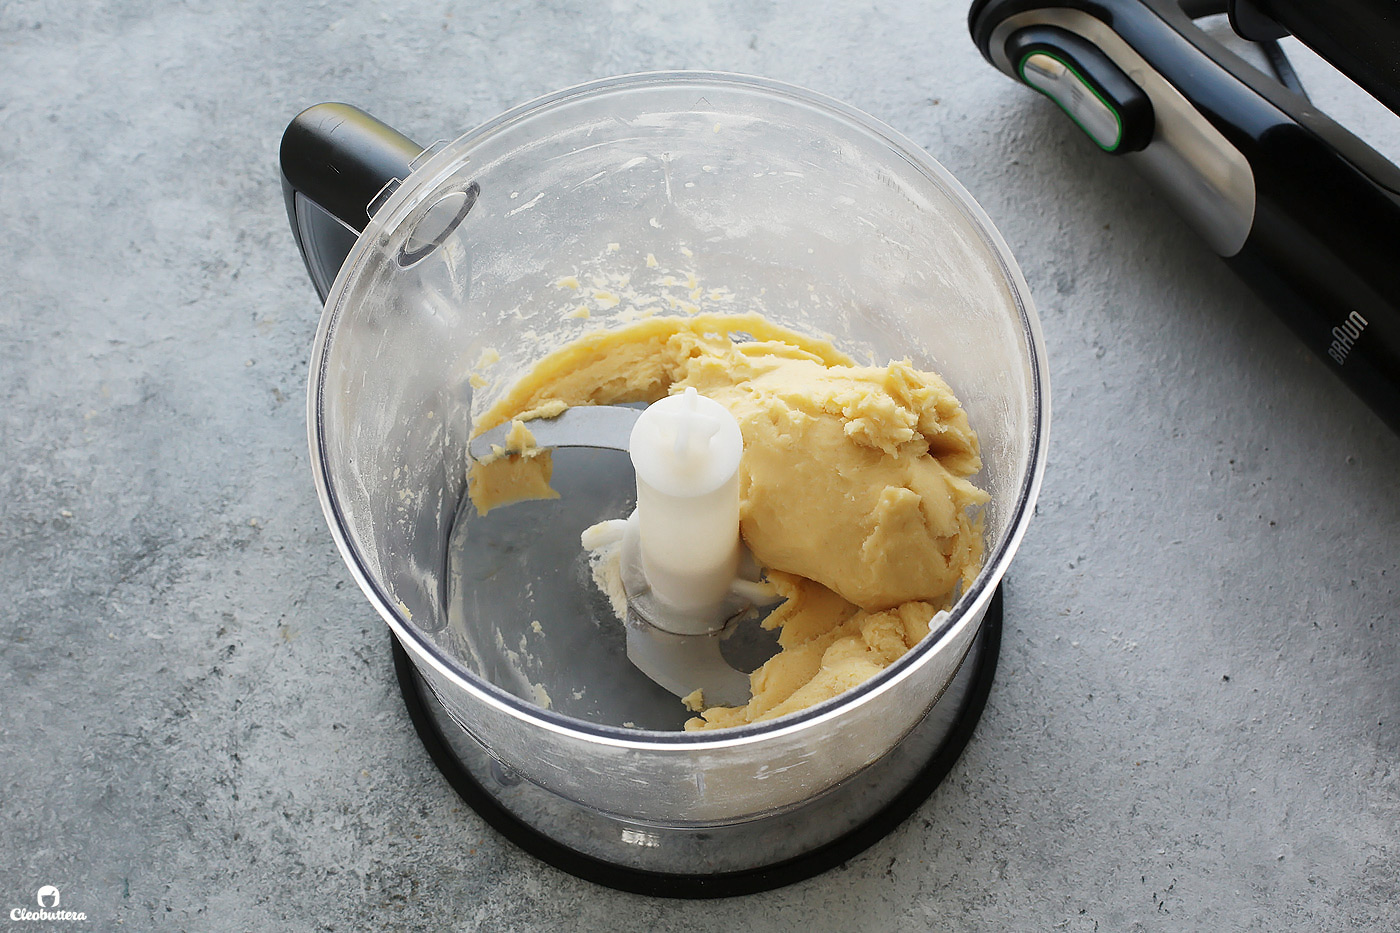
…and process until a homogeneous paste forms, about 30 seconds. If you’ve made pie crust before, I’m sure you’re cringing right now, but hear me out.
By coating two-thirds of the flour with butter, it not only makes the mixture pliable, but more importantly resistant to absorbing moisture. It’s almost like we’re waterproofing the flour, which in turn reduces gluten formation. That means that the water called for in the recipe, will only hydrate the remaining third of flour, leaving that pliable as well and produce just enough gluten to build structure.
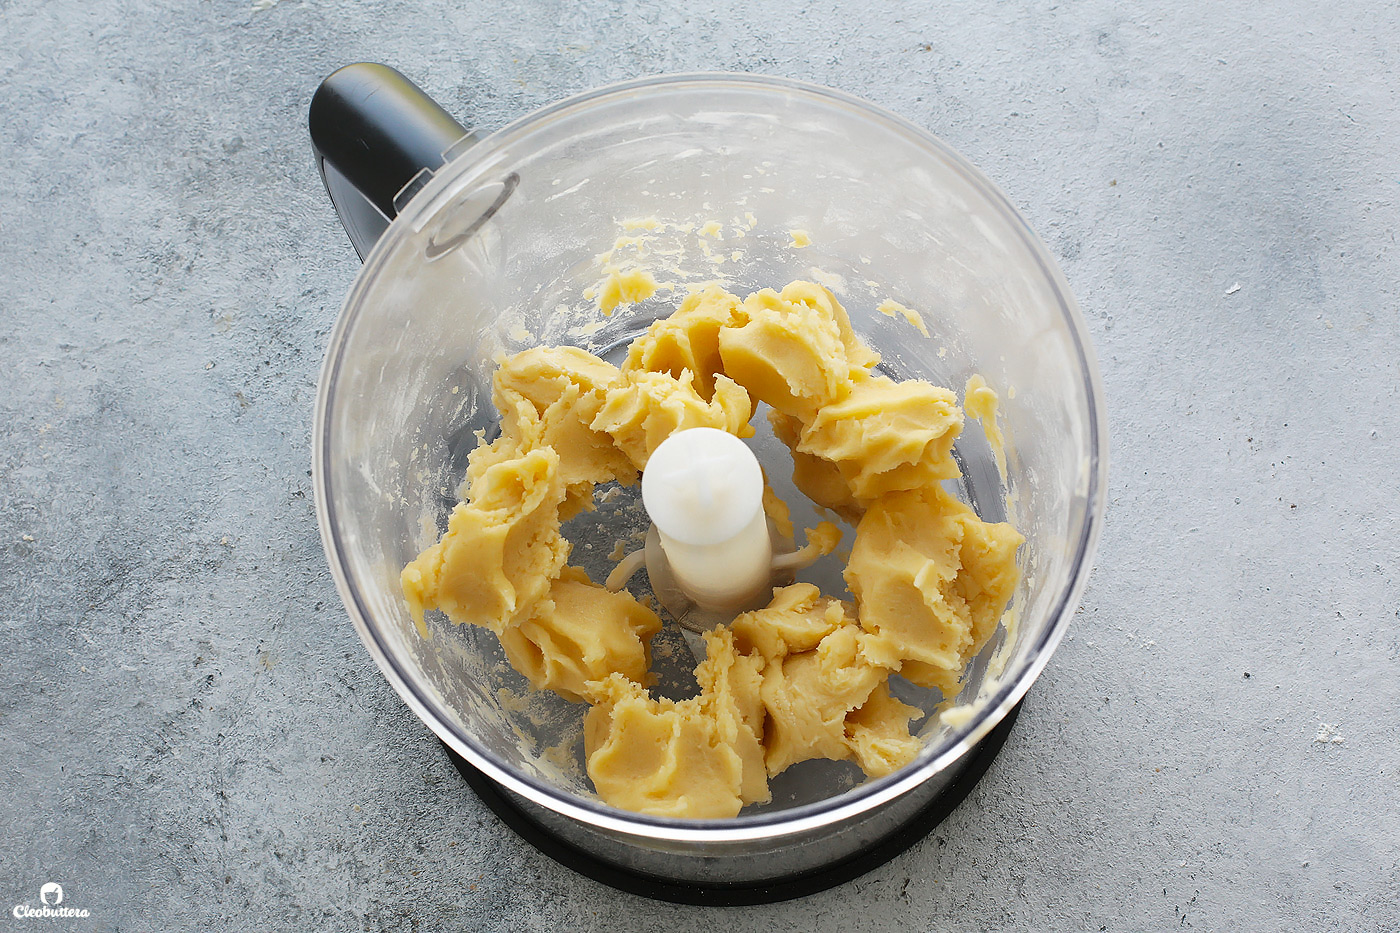
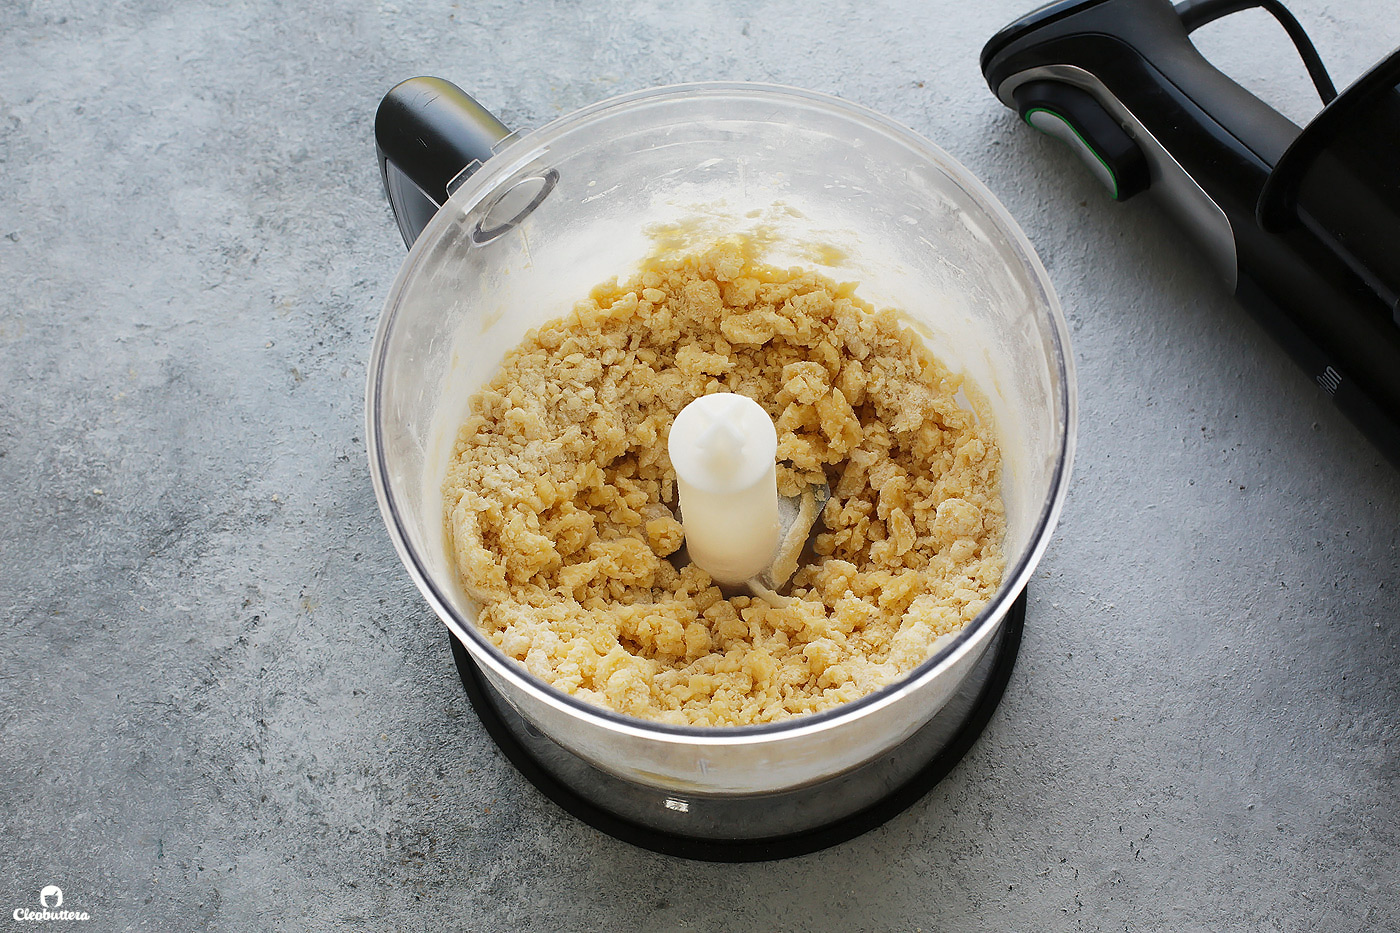
Now using your hands, gently break the paste into 2-inch chunks.
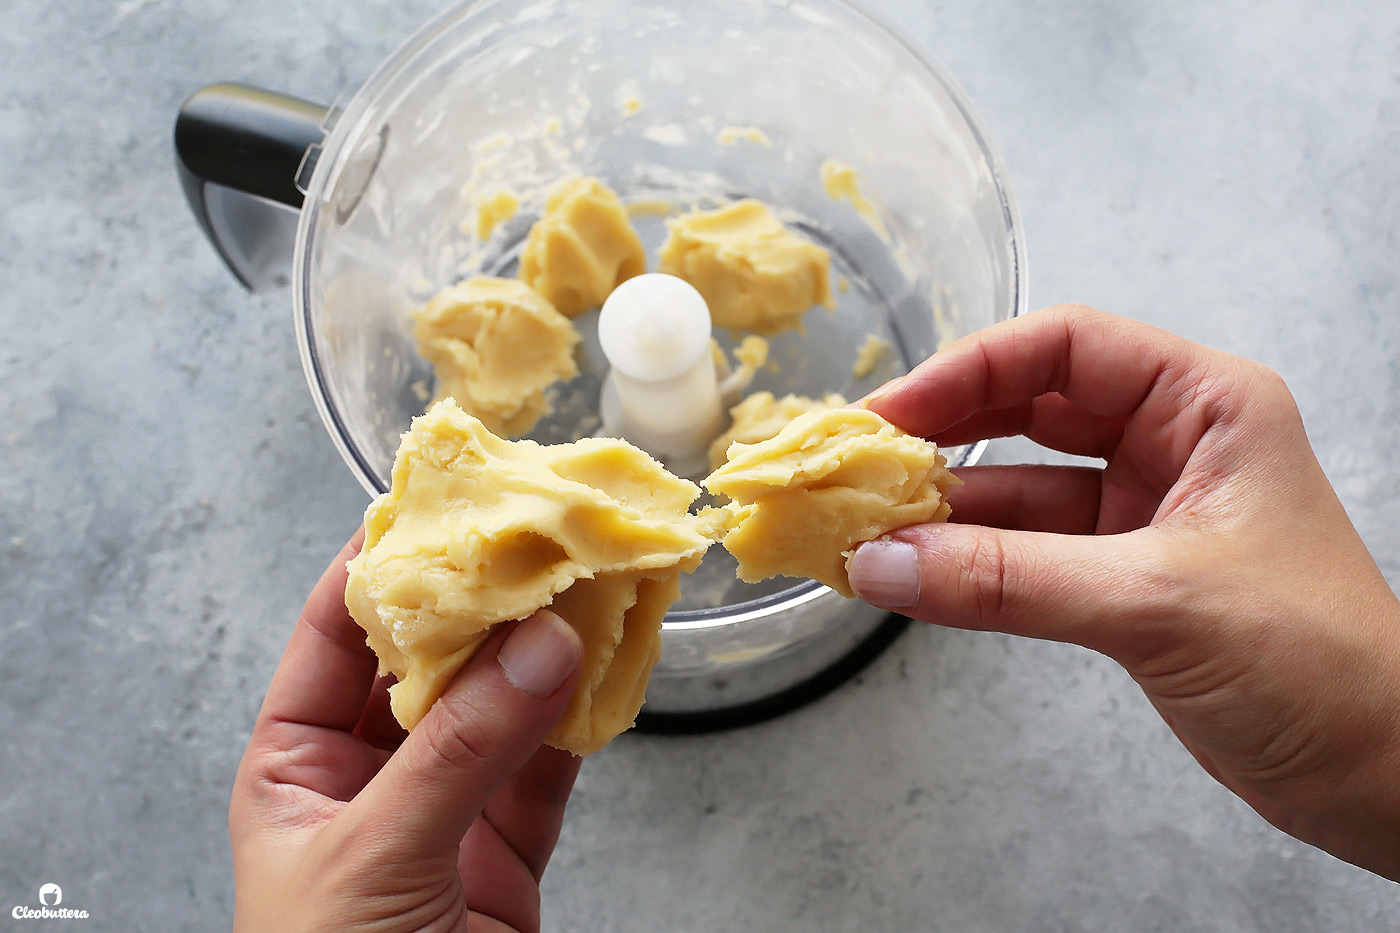
Redistribute the chunks evenly around the processor blade.
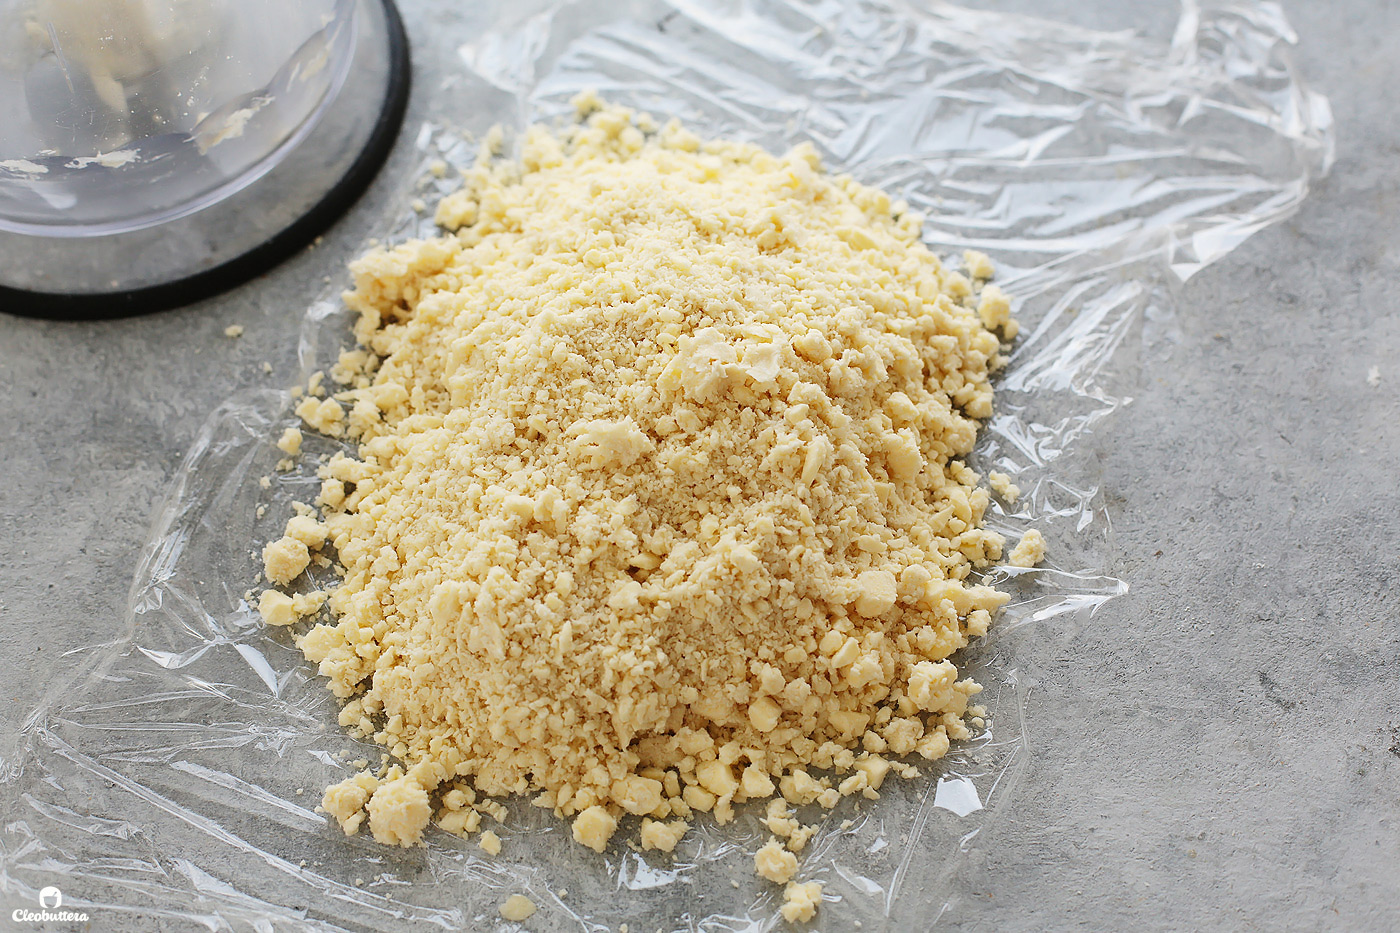
Then add the remaining flour and pulse 4 to 5 times…
…until the mixture is broken into pieces that are no larger than 1 inch (most pieces will be much smaller).
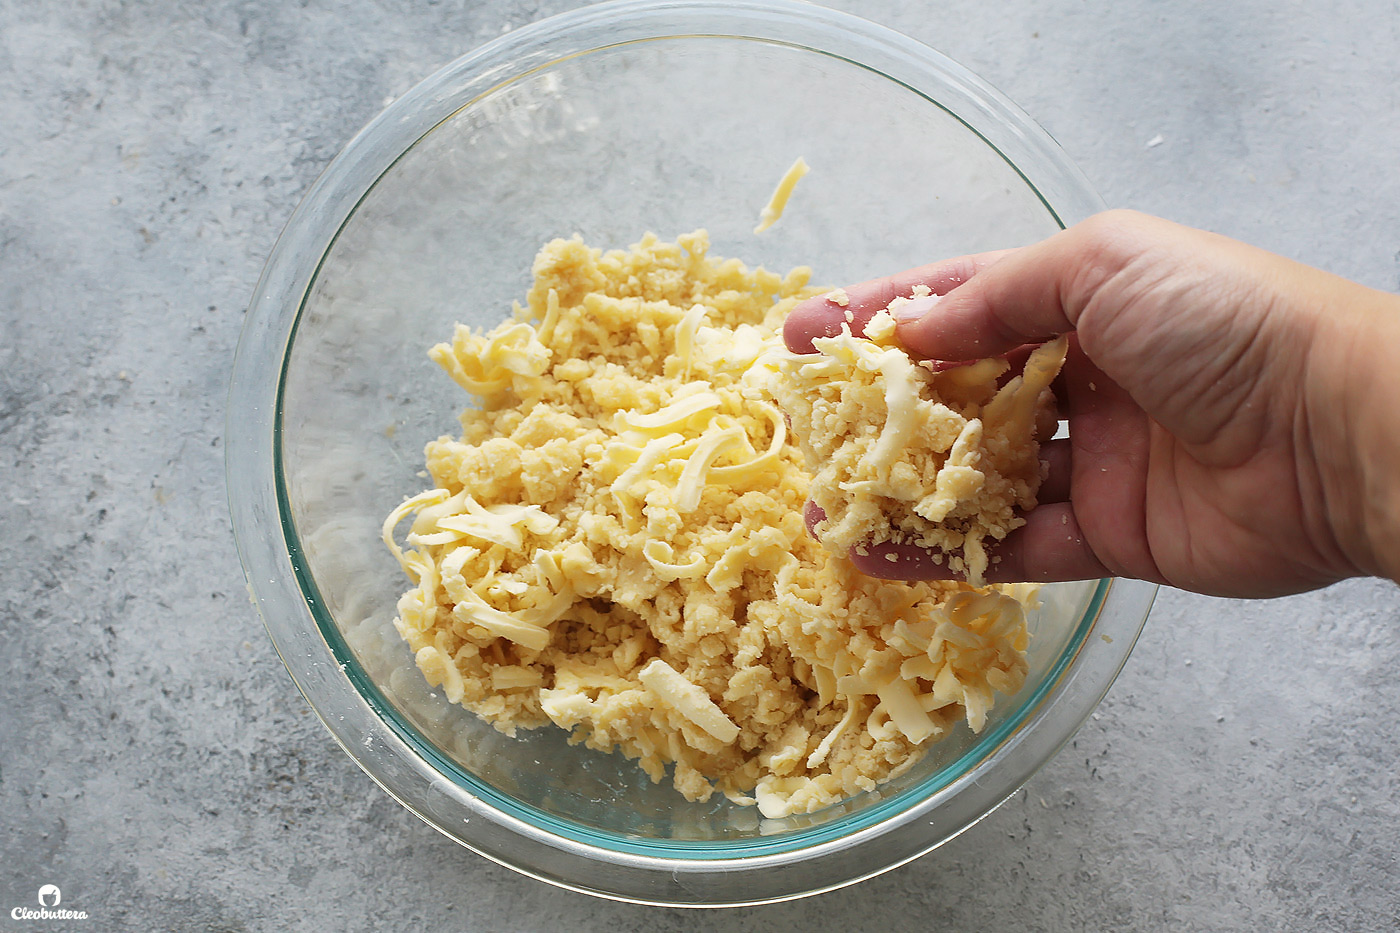
Transfer the mixture to a medium bowl and add the frozen grated butter…

Toss until the butter pieces are separated and coated with the flour. Be sure to work quickly, as to not let the warmth of your hands melt the butter.
Why the grated butter? Rather than blending all the butter completely into the flour, some are held back, grated, then added to the dough. “This leaves more of the flour available to form gluten, so the crust has more structure to support flakes.” -Cook’s Illustrated.
Now sprinkle 2 tablespoons of ICE water over the mixture.
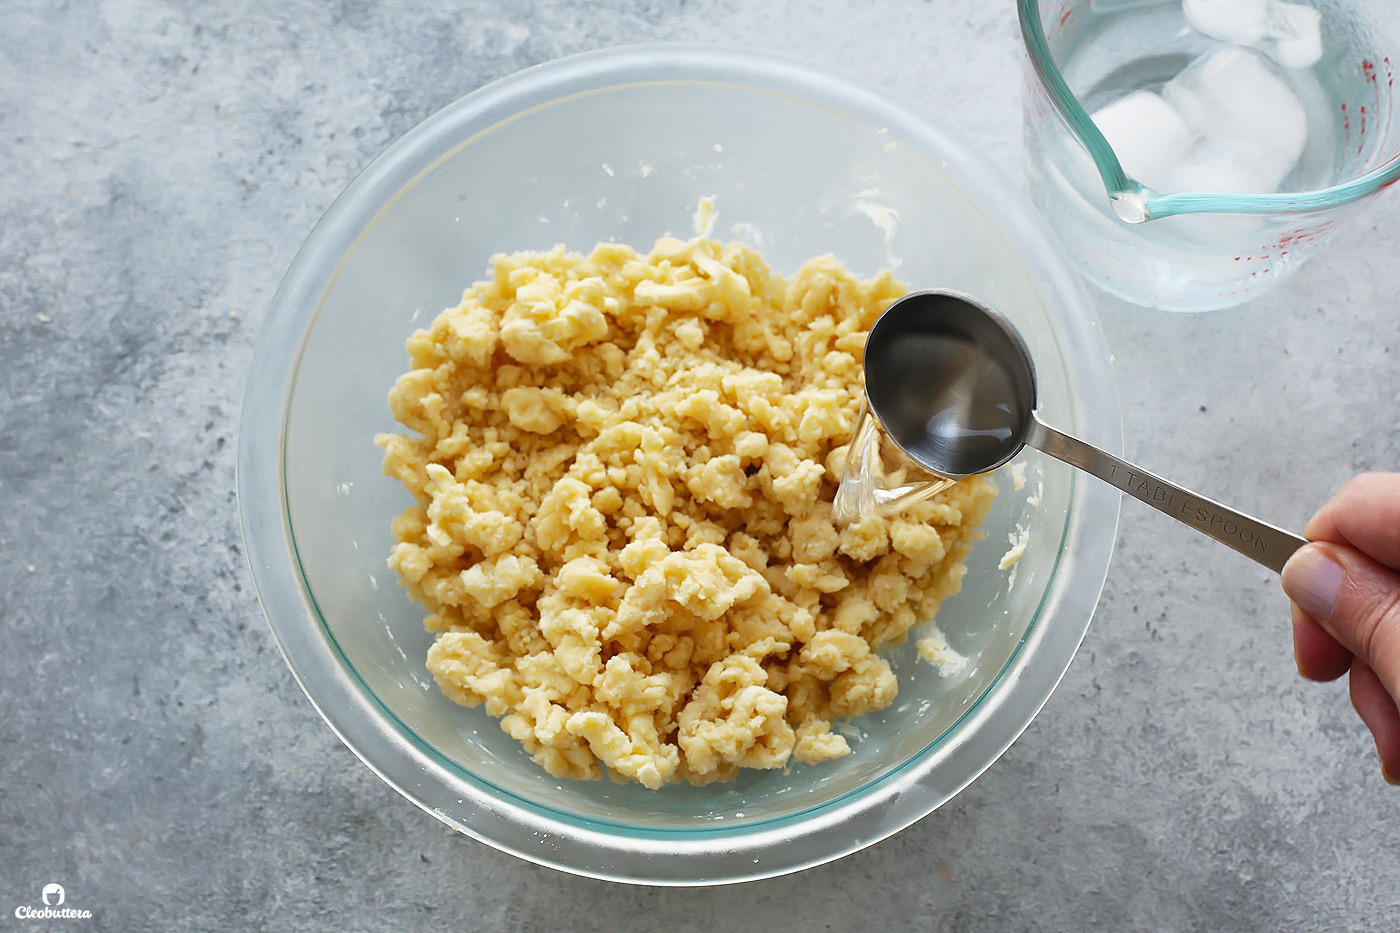
Then gently toss until the mixture is evenly moistened.
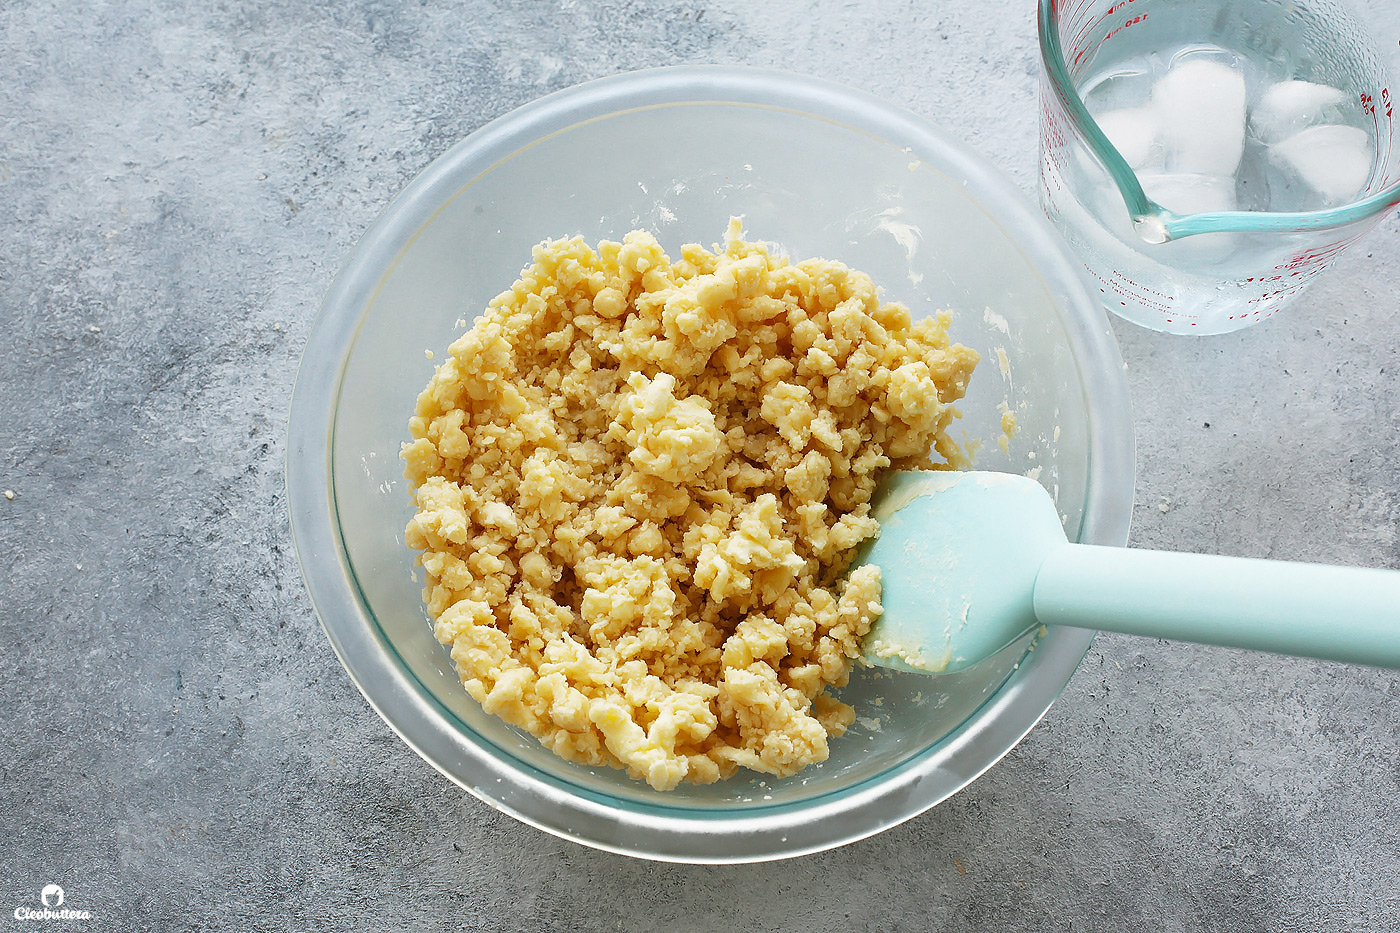
Sprinkle remaining 2 tablespoons ice water over the mixture and toss to combine.
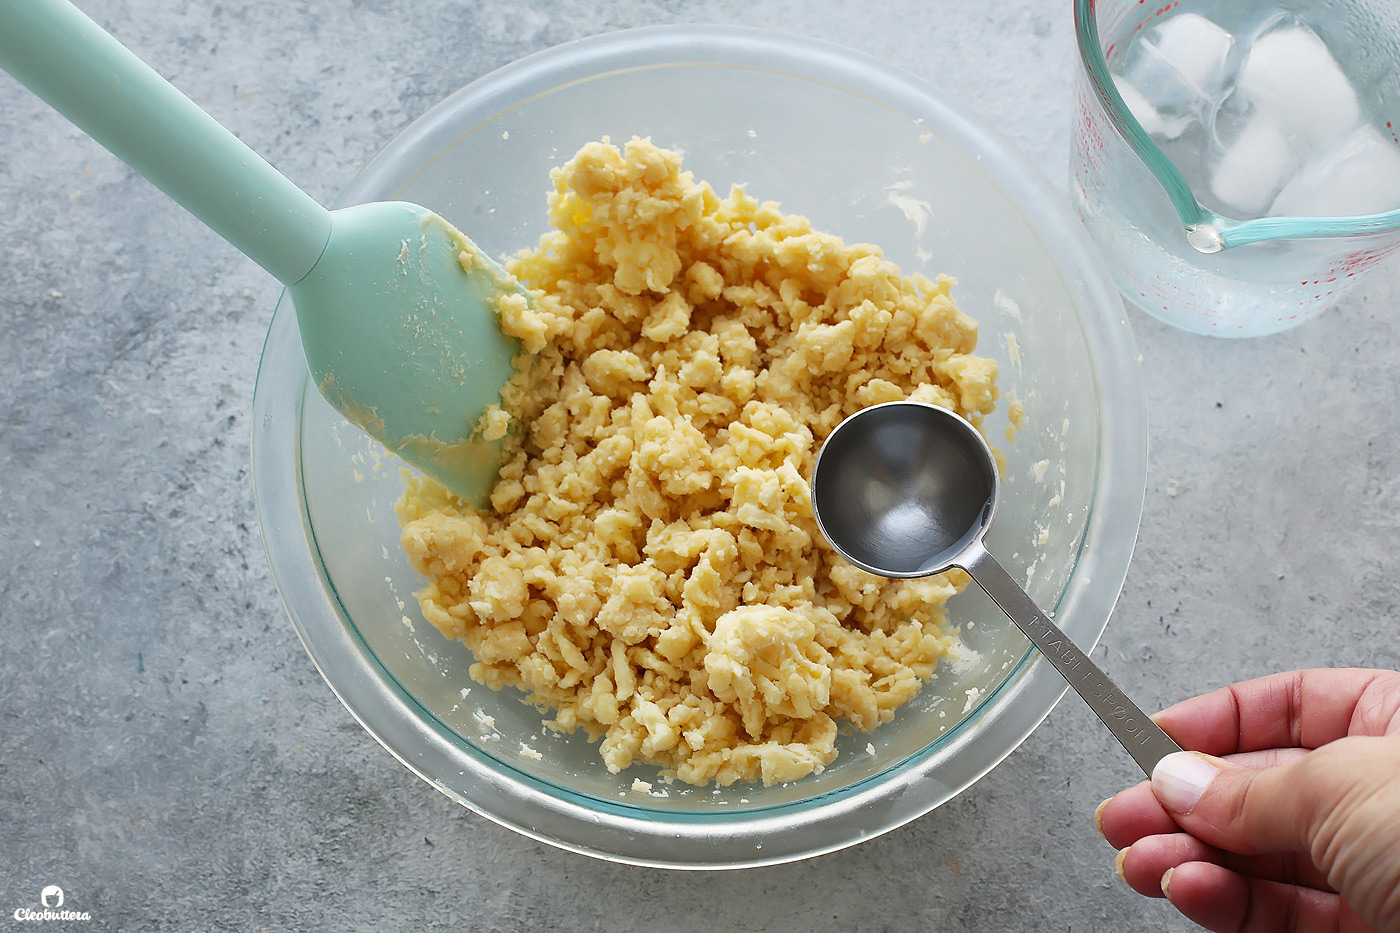
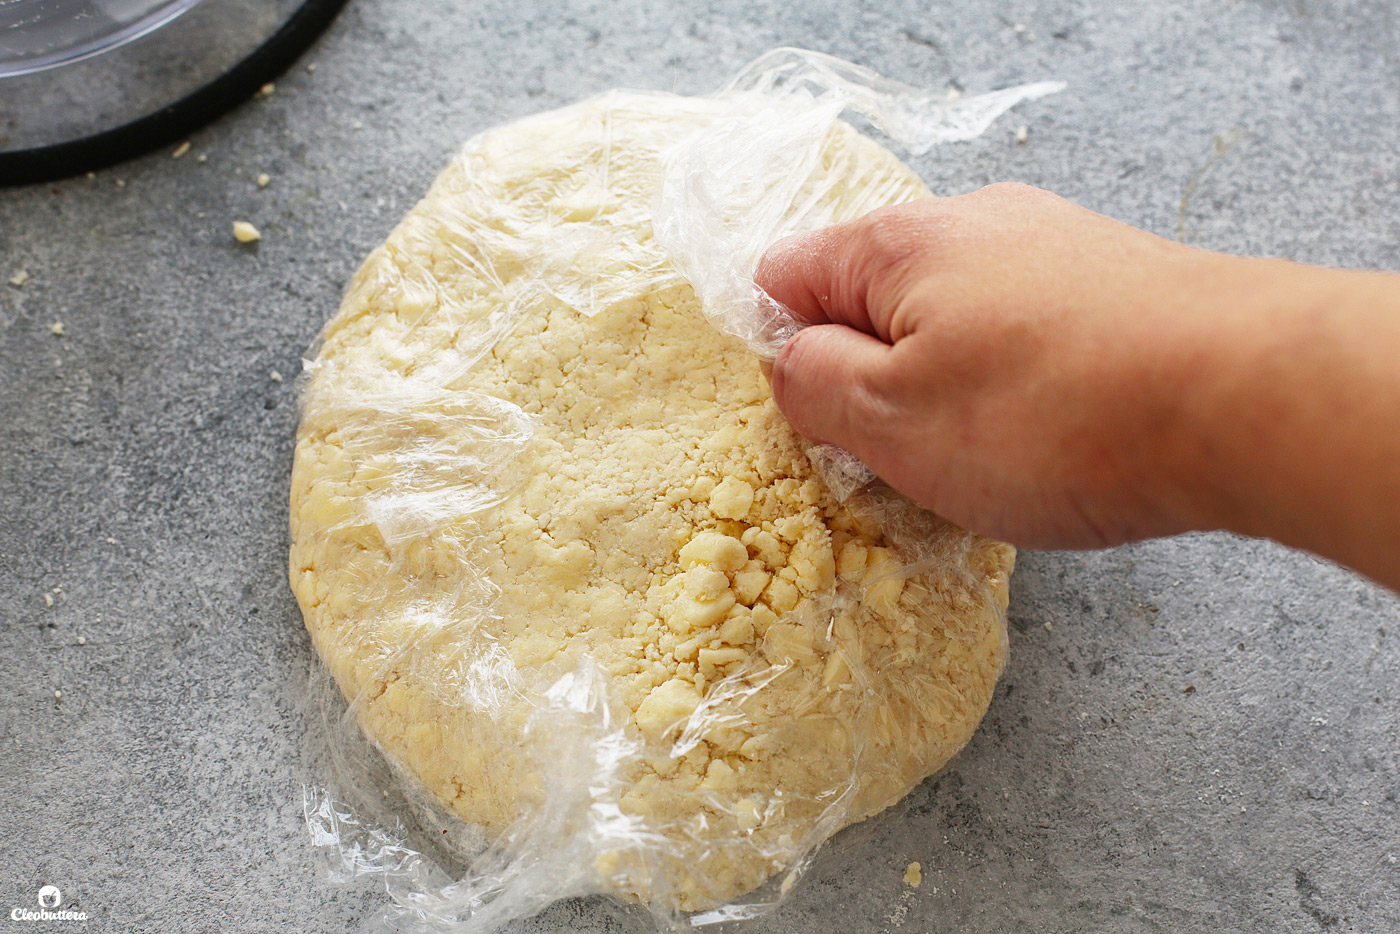
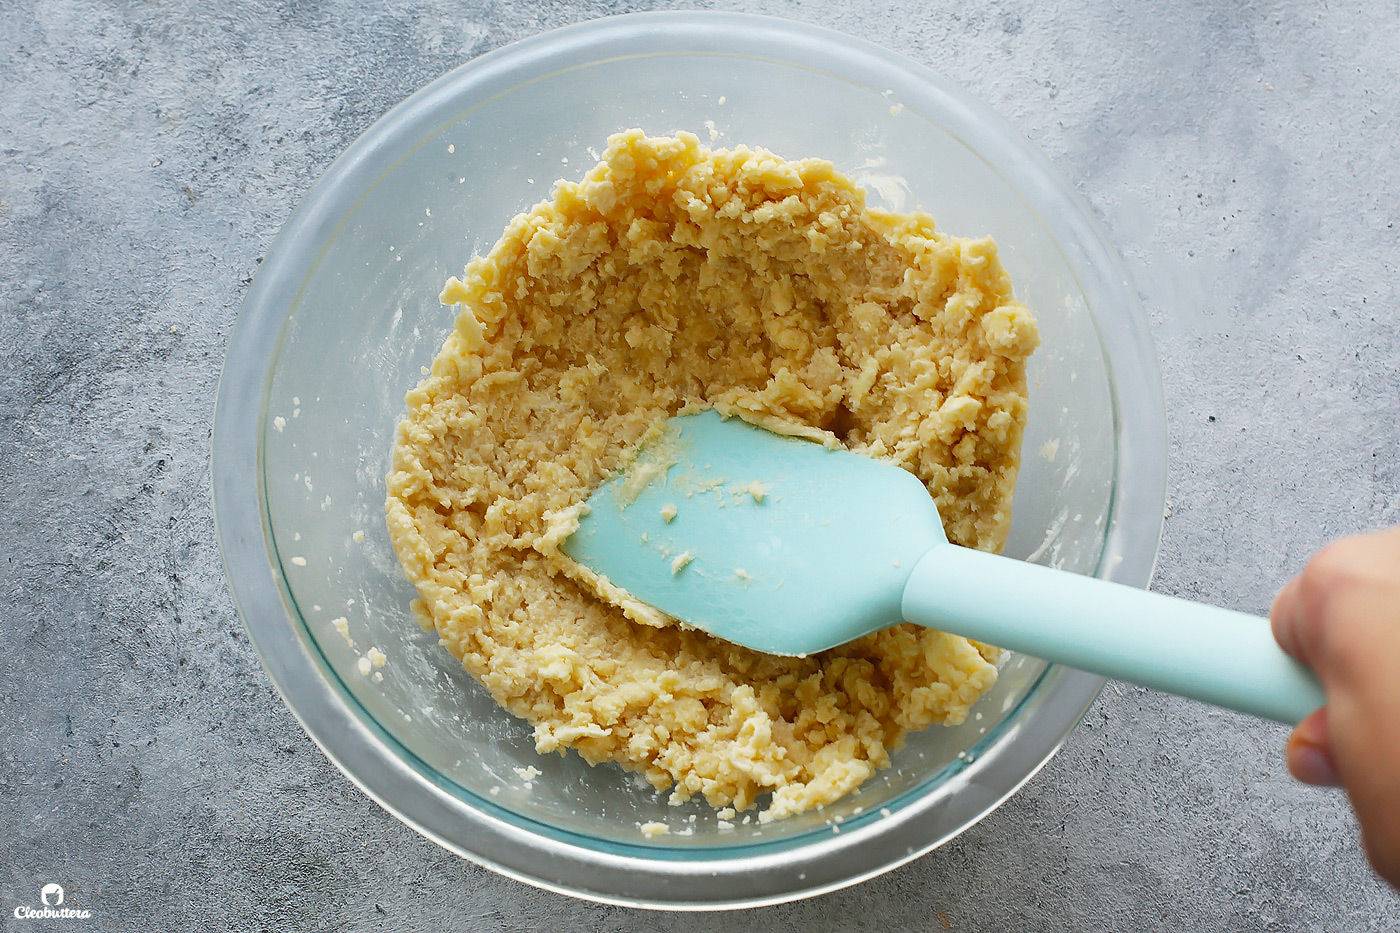
Press dough with the spatula until the dough sticks together.
Now don’t be alarmed! Dough will be sticky like cookie dough and much more moist than any pie dough you’ve ever made, but as it chills it will absorb a lot of excess moisture and all will be good.
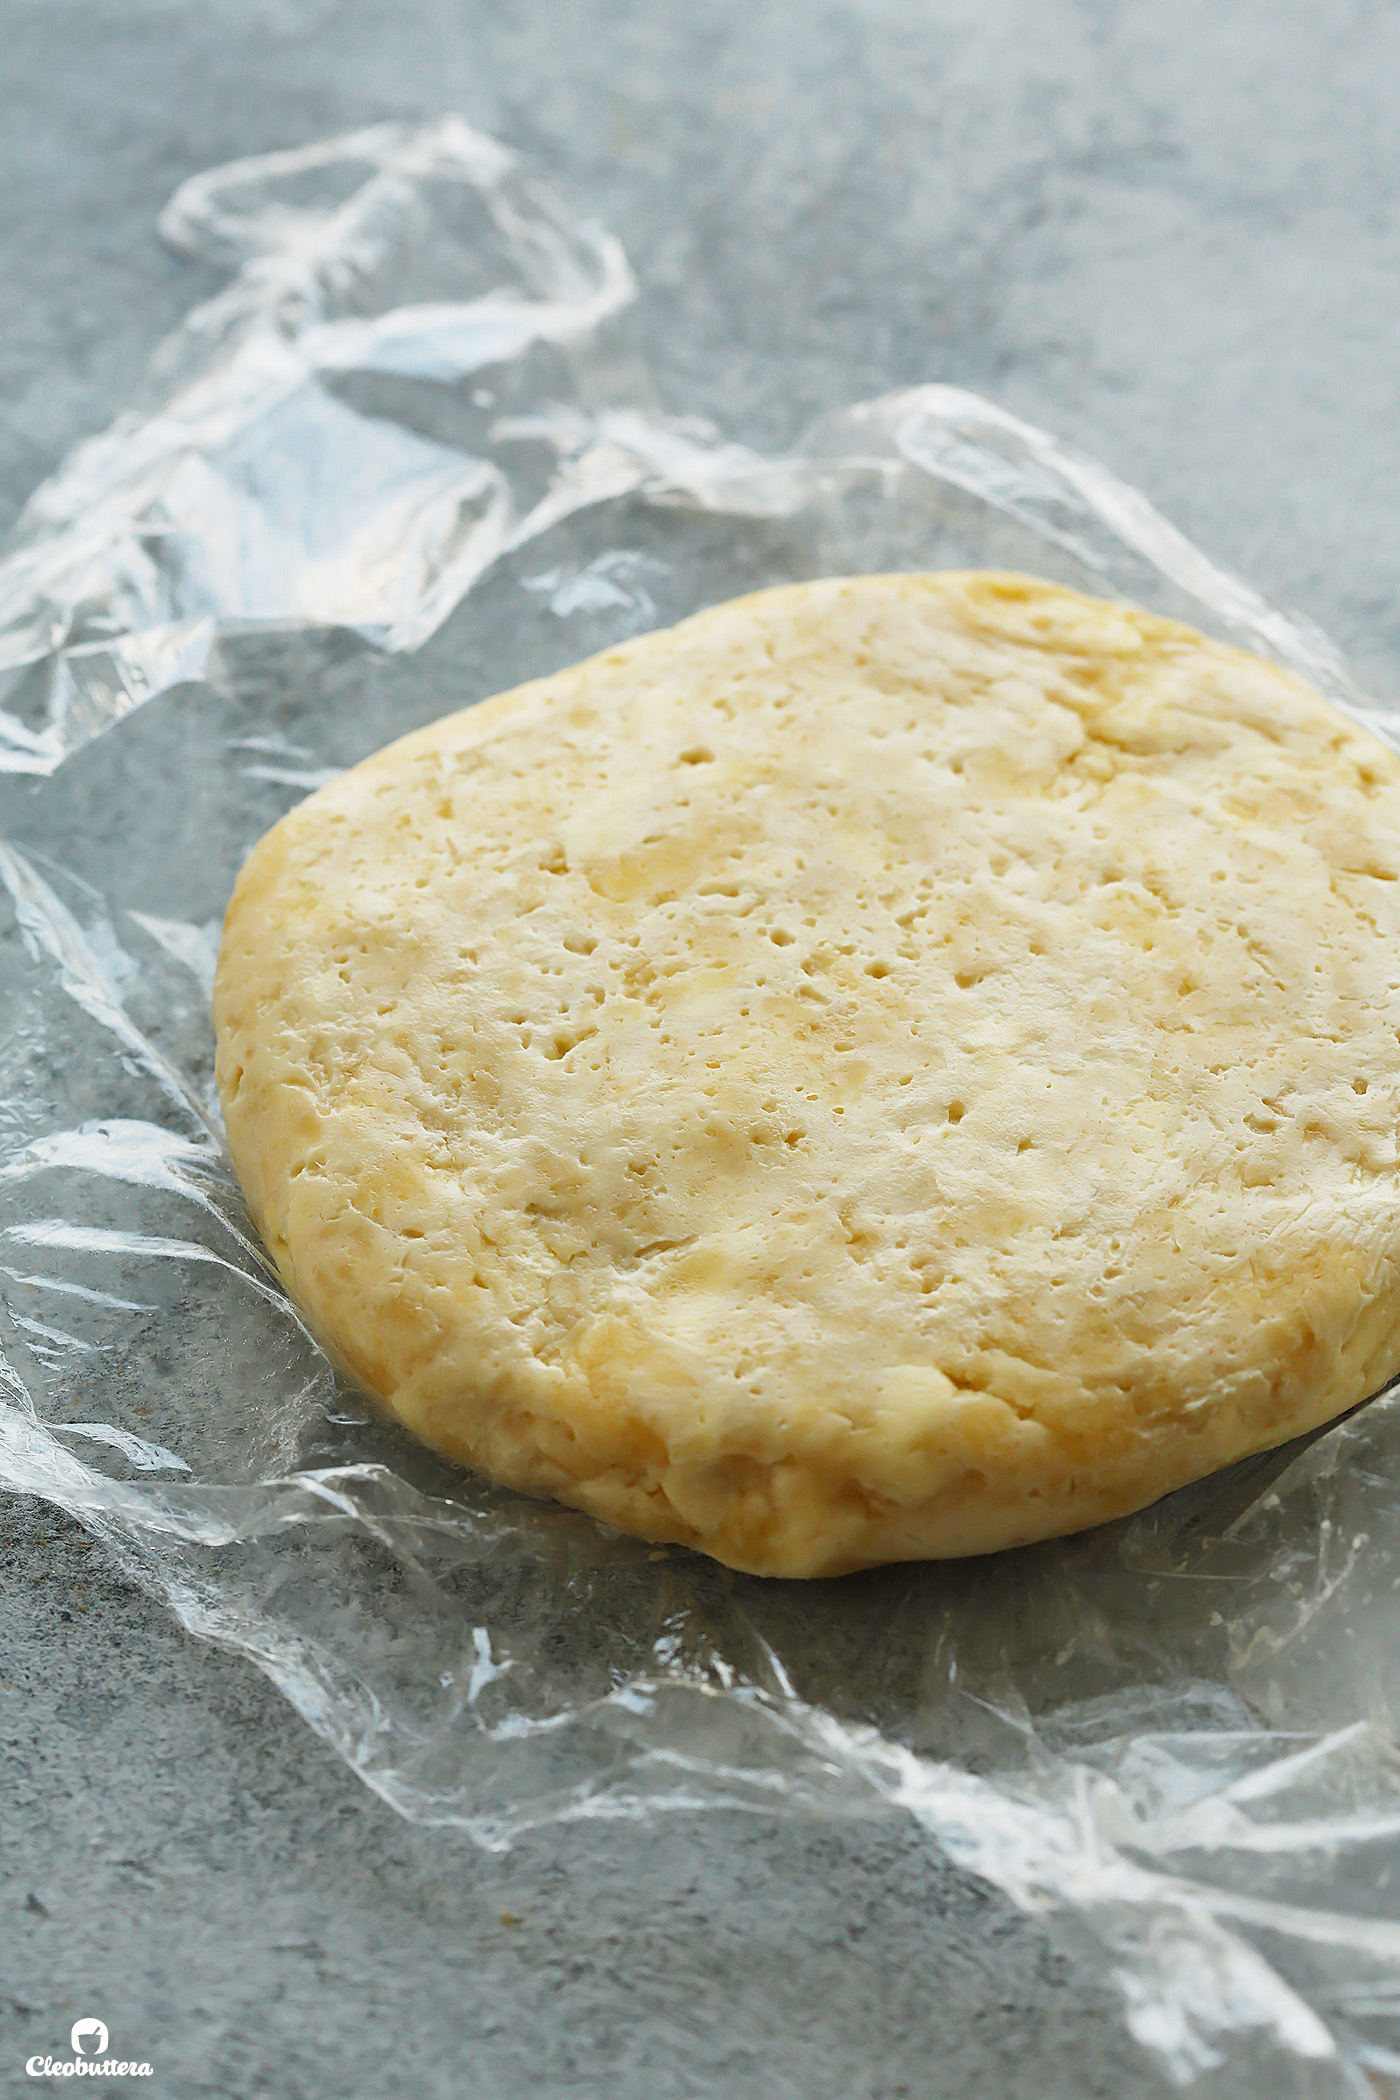
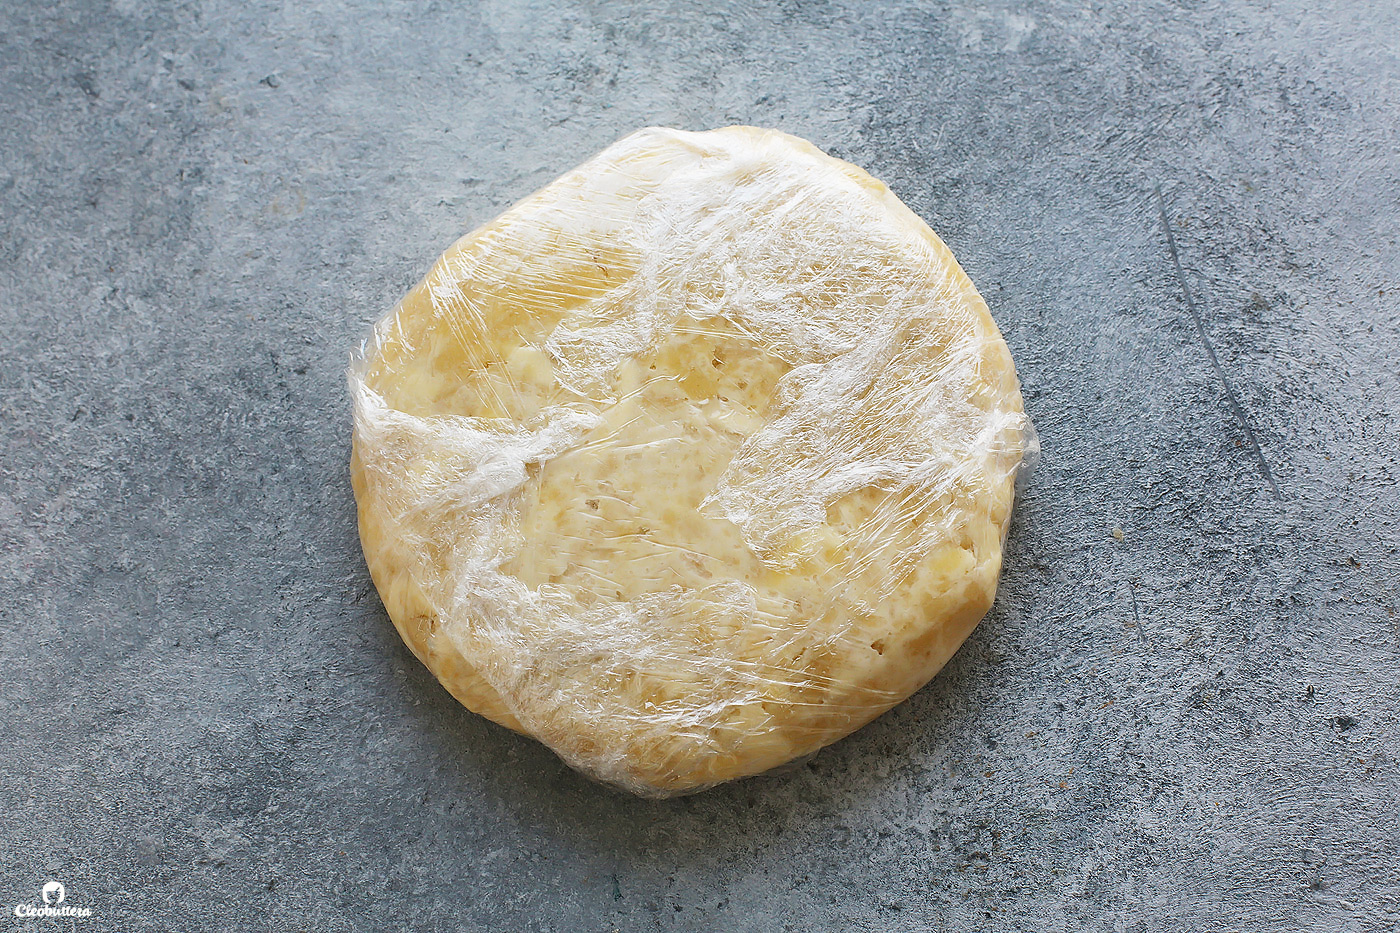
Transfer dough to a sheet of plastic wrap and use it’s edges to press it into a 5-inch disk.
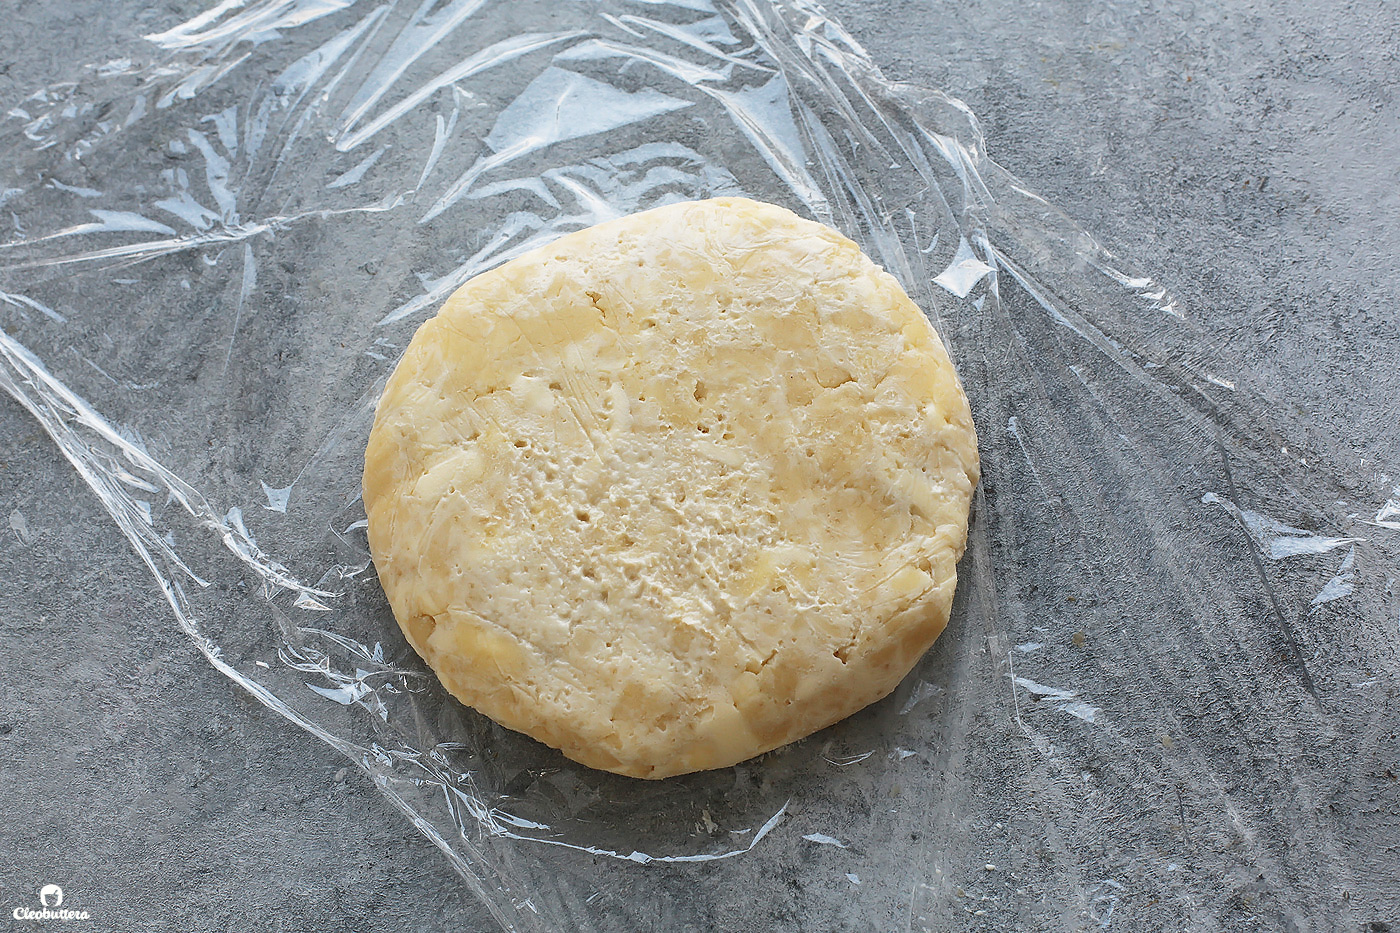
Wrap well and refrigerate dough for at least 2 hours or up to 2 days and watch the magic happen. Chilling is non-negotiable! So please don’t skip it. It will transform the dough from a sticky mess to a wonderful workable dough.
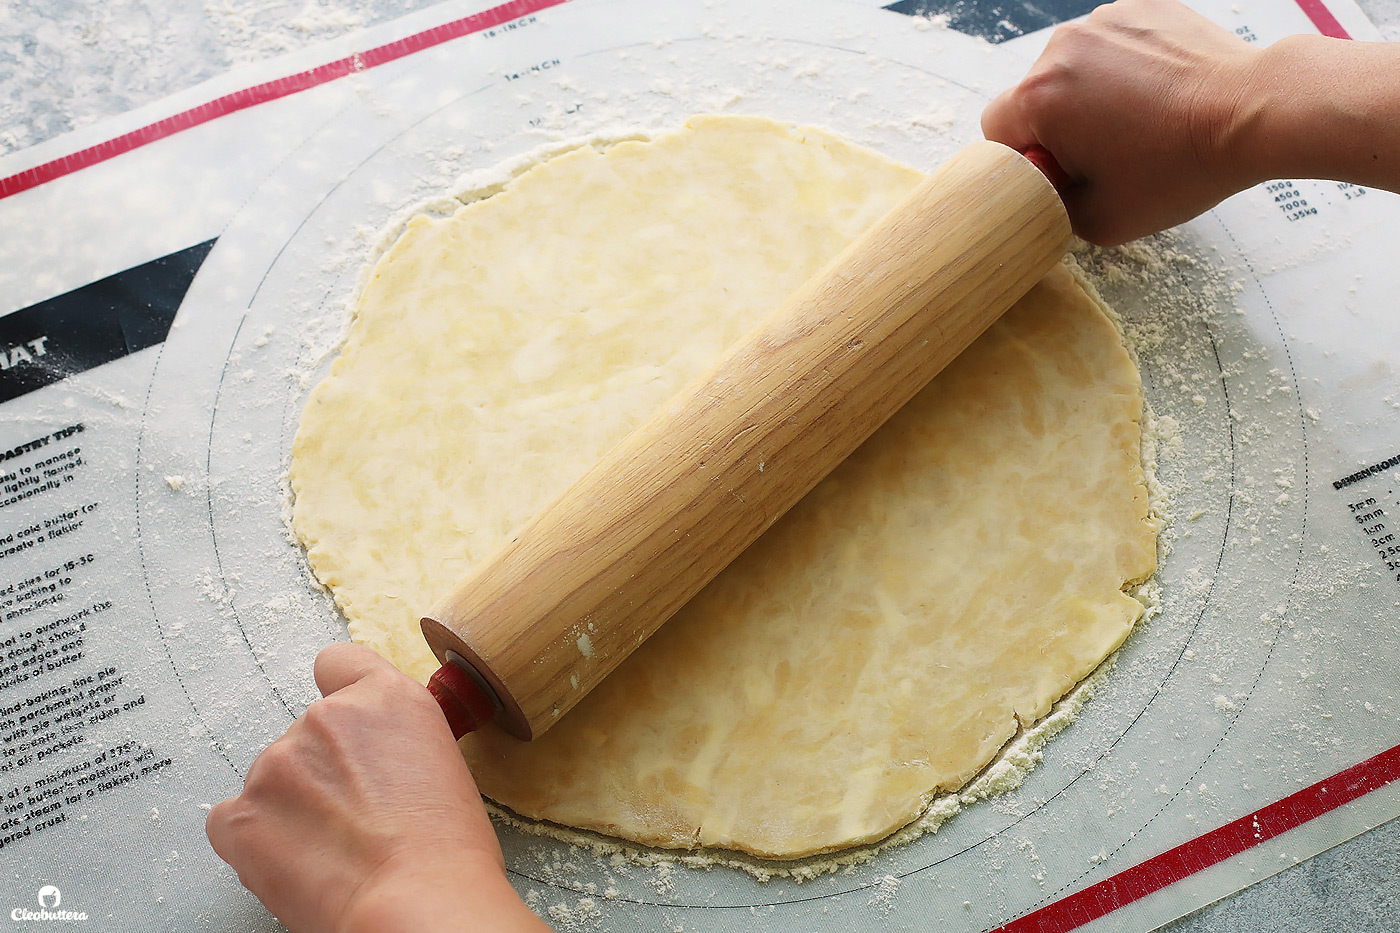
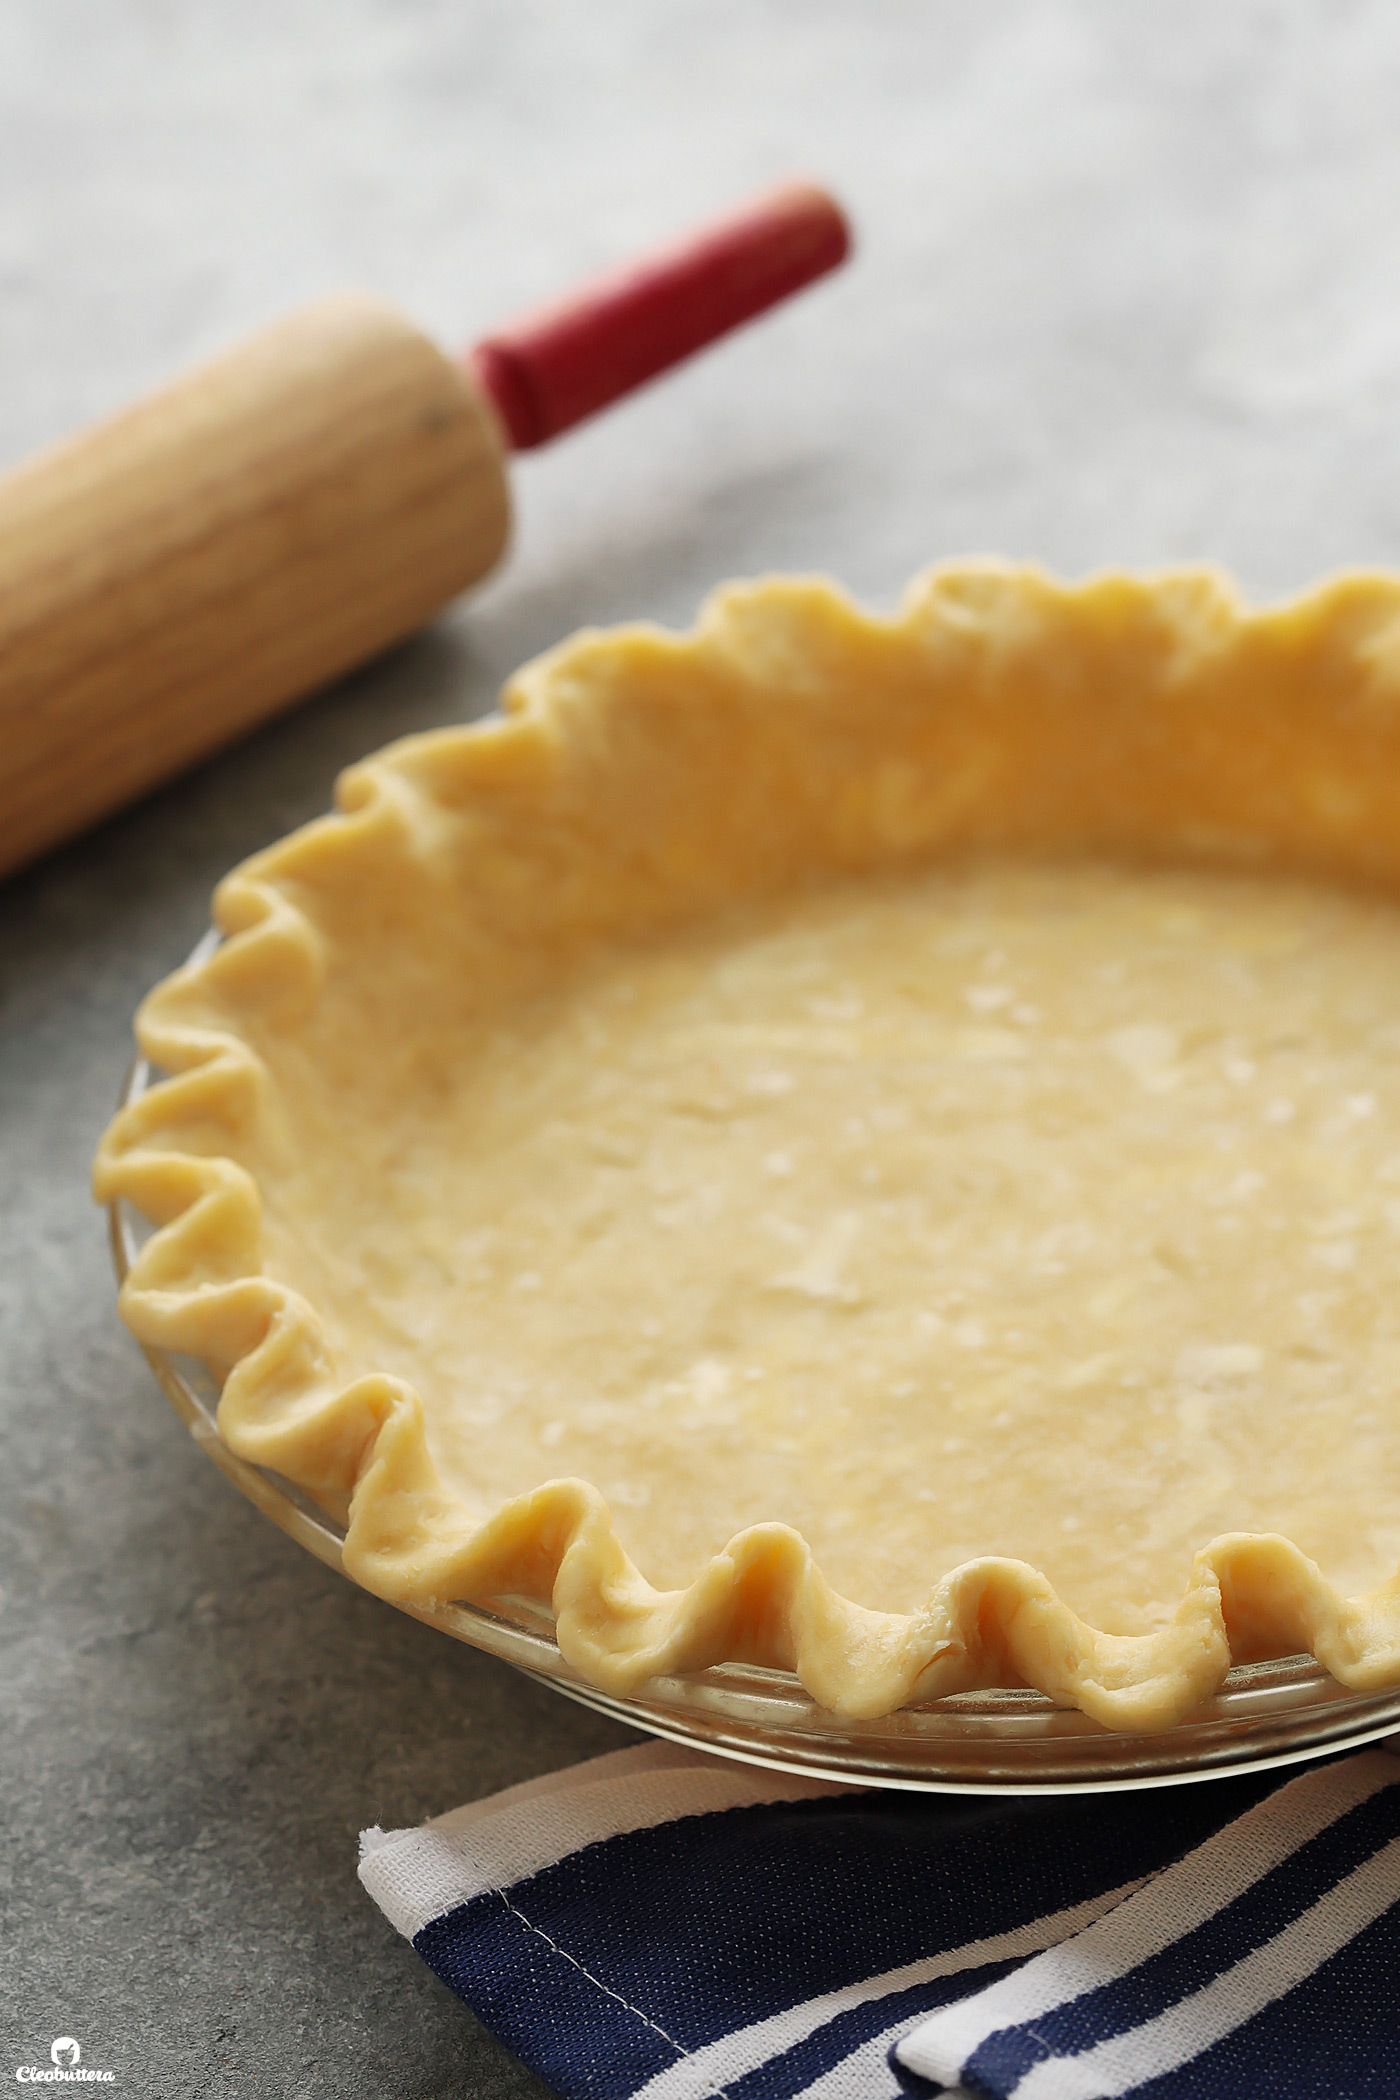
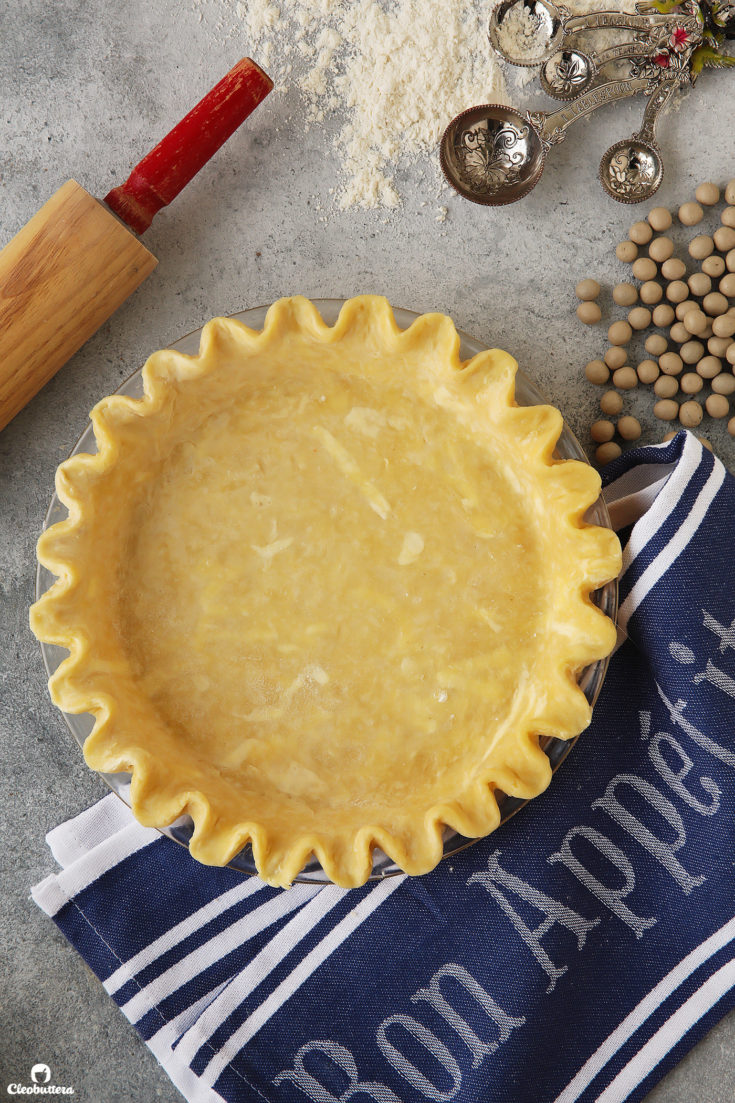
Let the chilled dough sit on the counter to soften slightly, about 5 to 10 minutes, then over a floured surface, roll into a 12-inch circle.
To transfer it to the pie dish, roll the dough loosely around the rolling pin and unroll it onto 9-inch pie dish, leaving at least 1-inch overhang around edge.
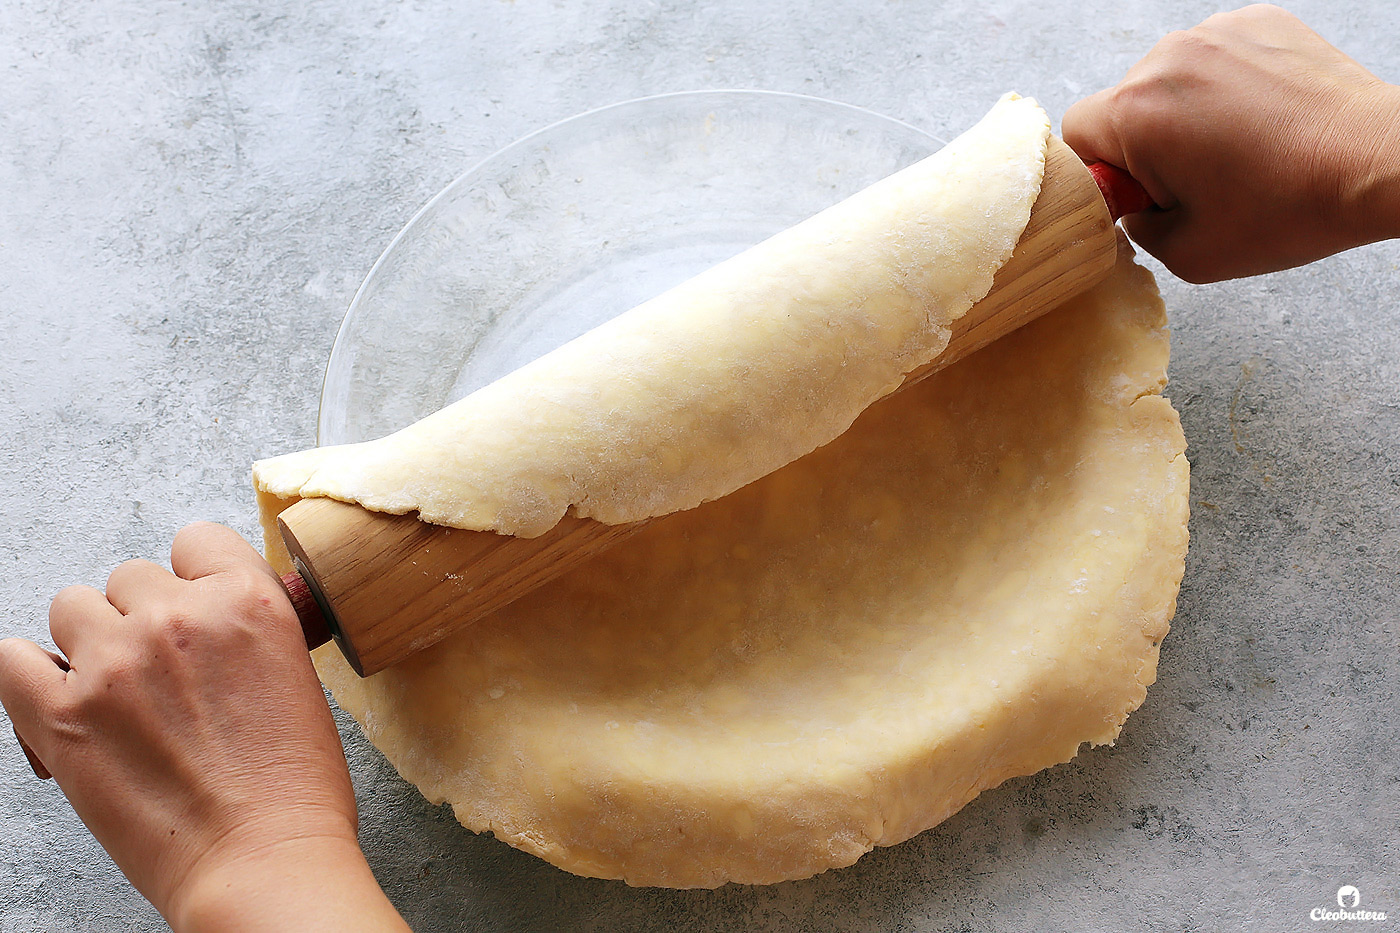
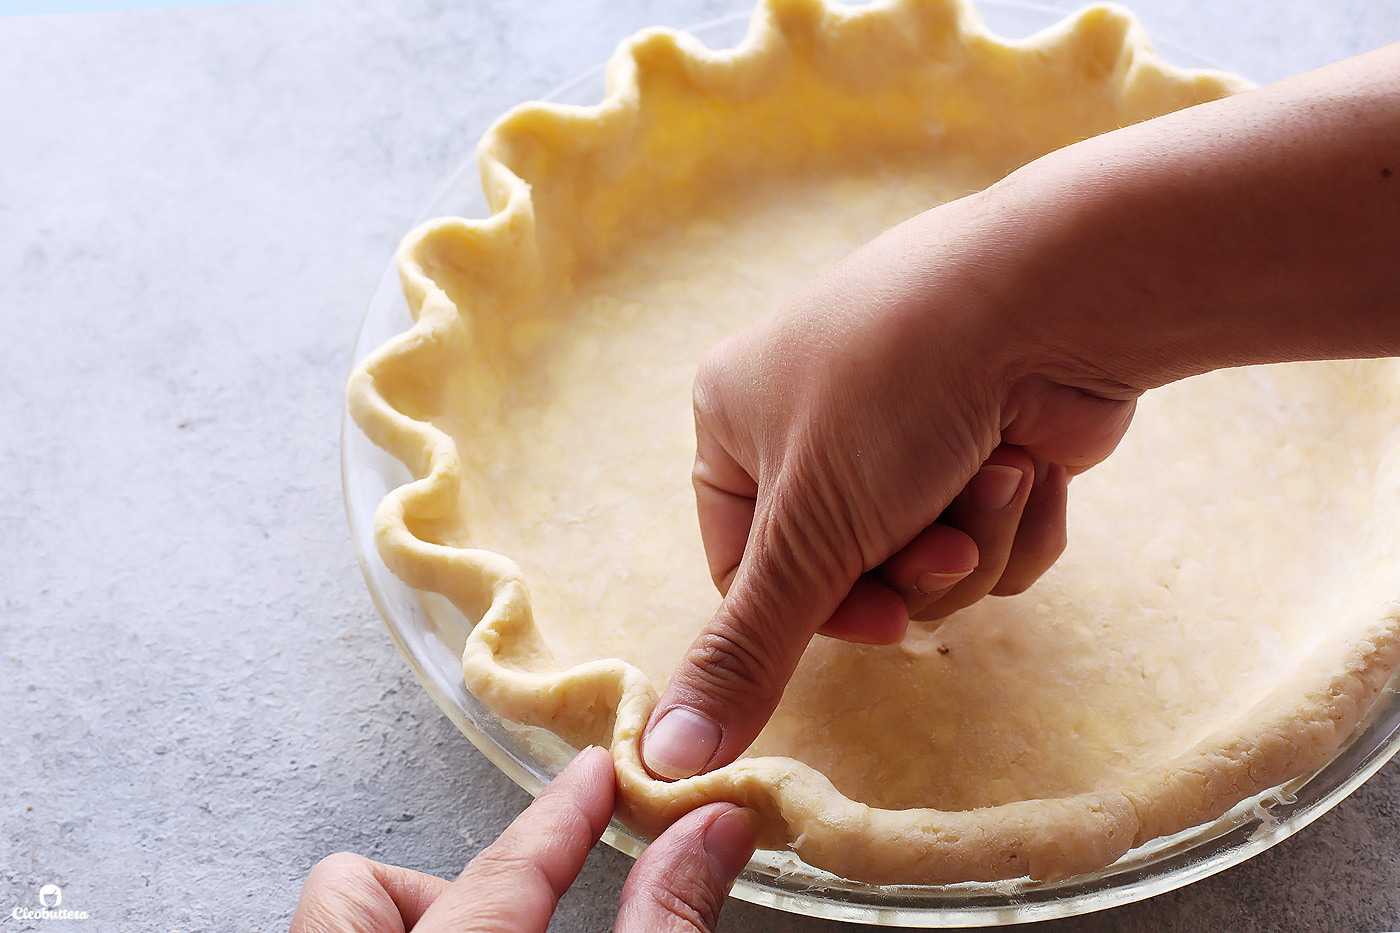
Ease the dough into the dish by gently lifting edge of dough with your hand while pressing into plate bottom with your other hand.
If needed, trim overhang to 1/2 inch beyond lip of the dish.
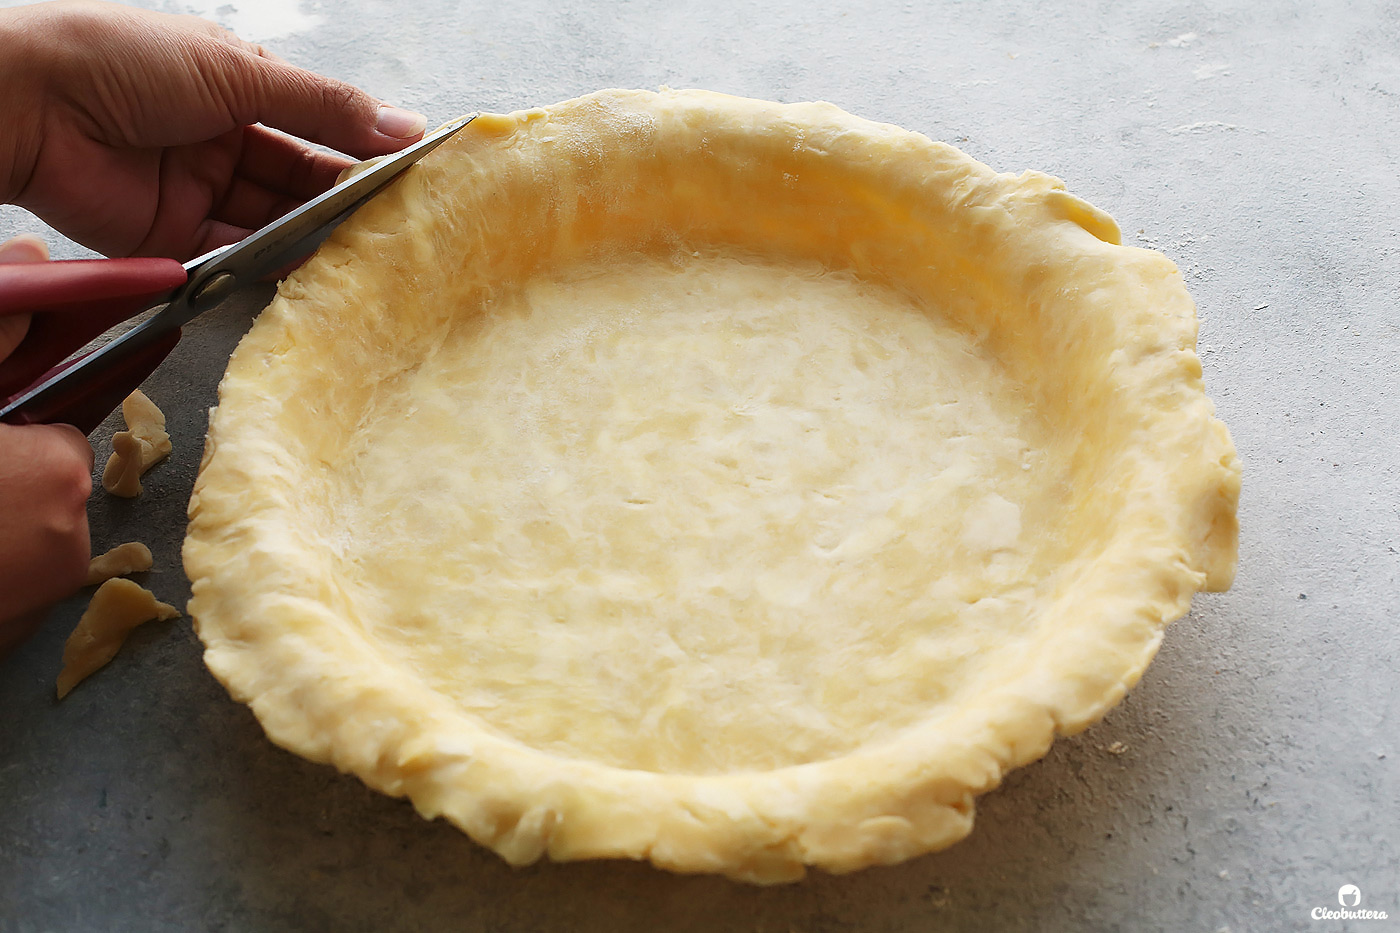
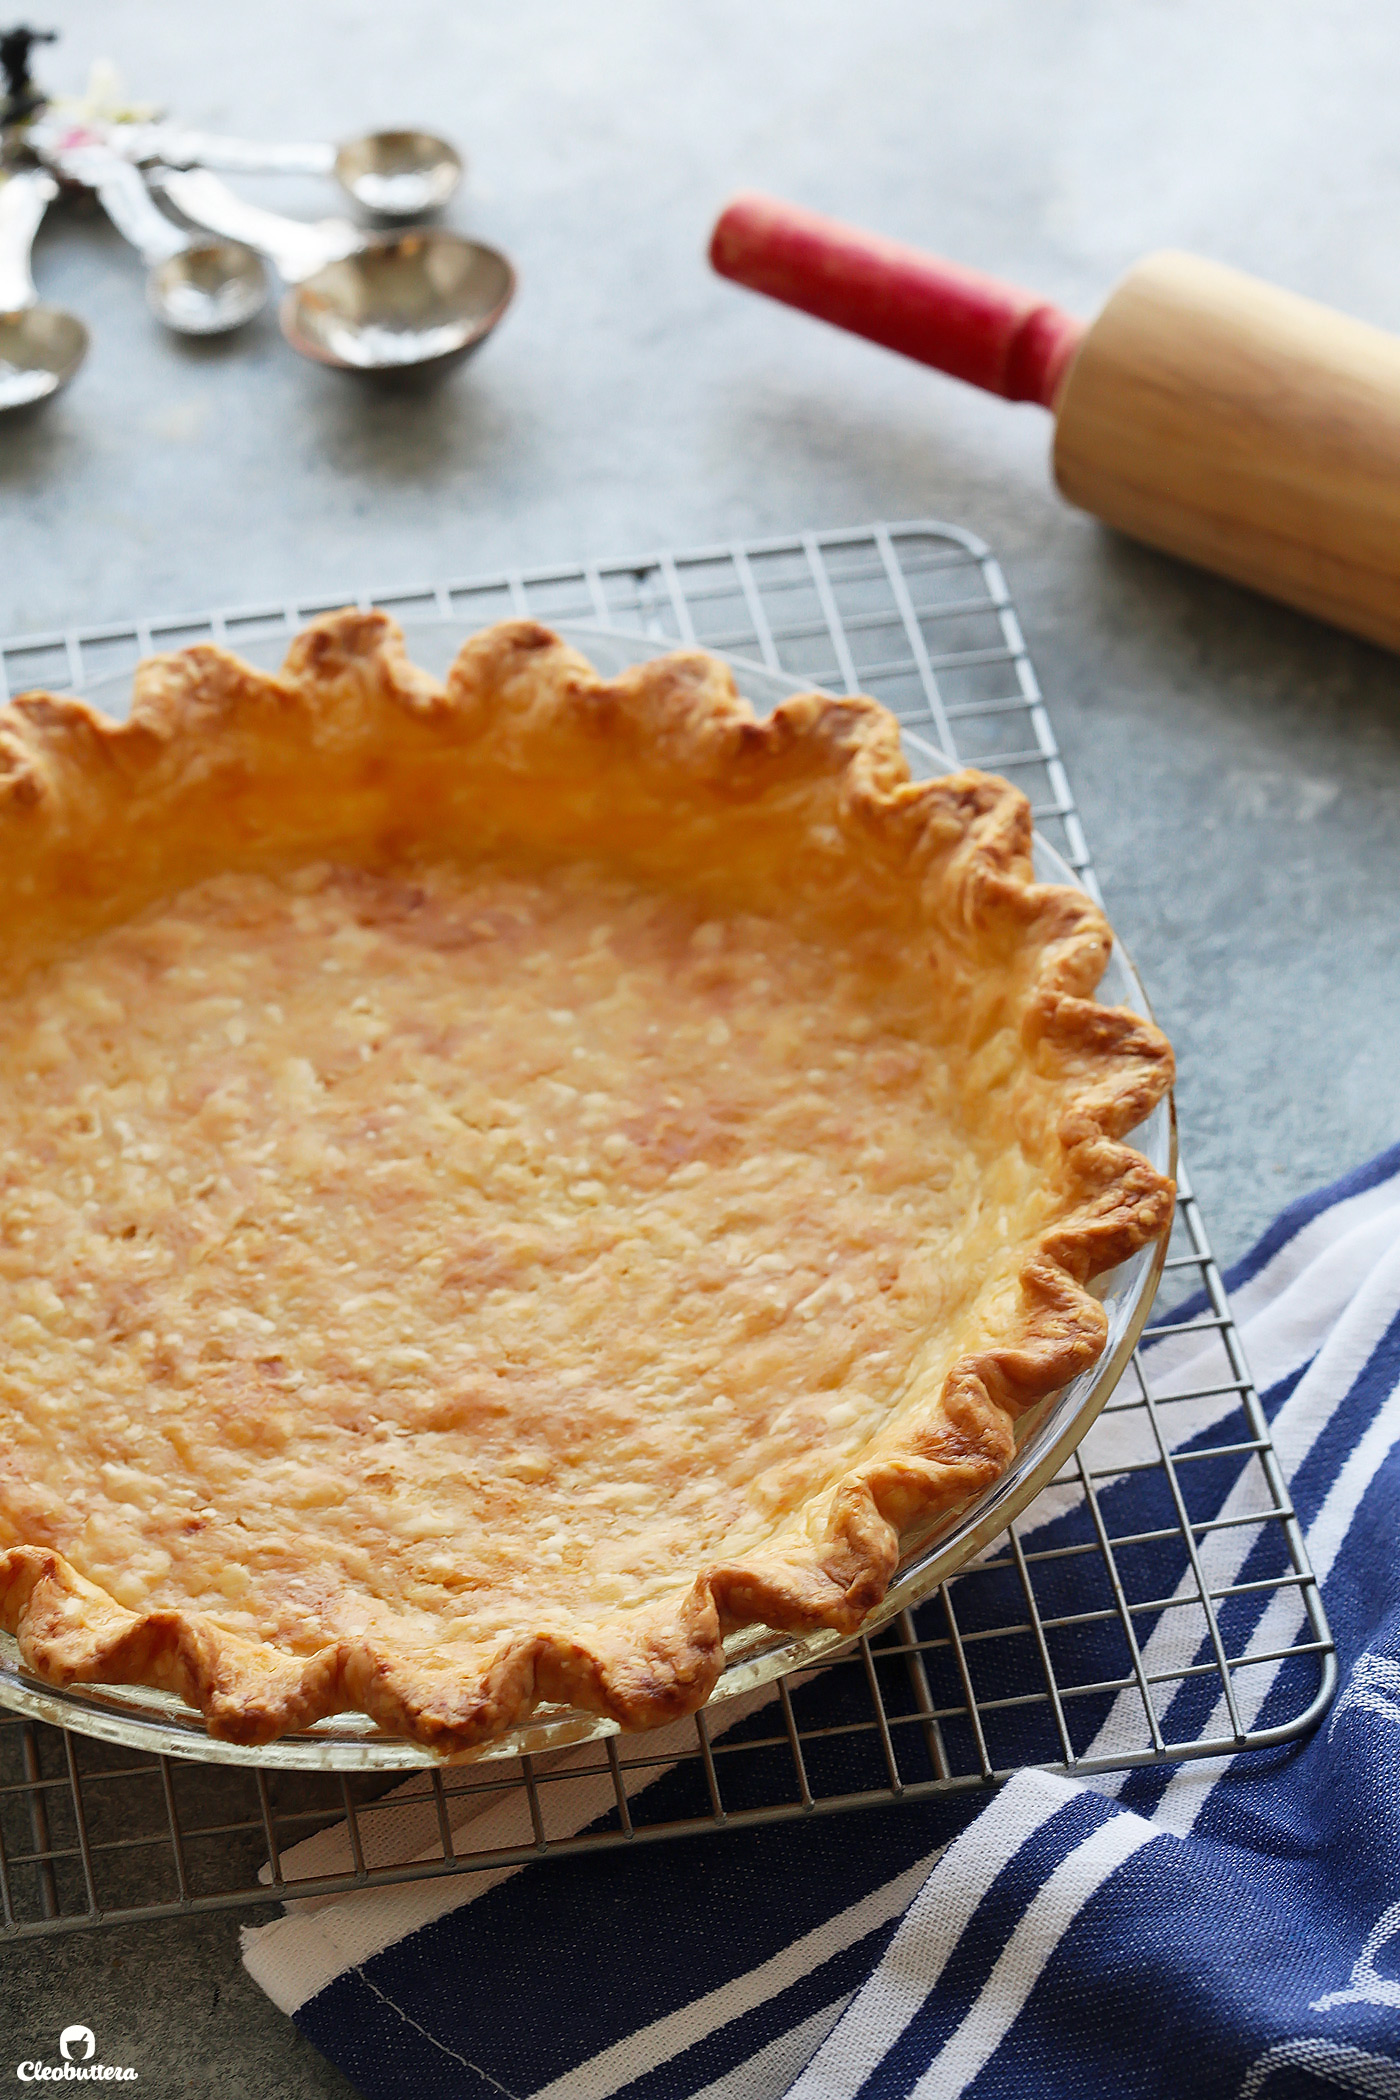
Tuck overhang under itself; folded edge should be flush with edge of the dish. This will support the structure of the crust as it bakes. Use your fingers to crimp the dough edges around the dish, but if that’s not your thing, pressing with the tines of the fork is perfectly fine, and don’t let anyone tell you tell you otherwise.
Refrigerate the dough‑lined dish until firm, at least 30 minutes. Again, chilling is a must here, to prevent the dough from shrinking as it bakes.
Now you can go ahead and fill the dough, then bake as per your special pie recipe.
Or you could pre-bake the crust! Depending on the length of time you leave the dough in the oven, pre-baking can either be partial (parbaking) or full bake (blind-baking).
Parbaking is when you partially bake the crust before filling it, to help ensure the crust is fully baked by the time the filling is cooked and comes out nice and crisp. It’s great for wet fillings, like pumpkin pie.
Blind-baking on the other hand, is when you fully bake the crust before filling it. This is ideal for pies with no-bake fillings, like banana cream pie.
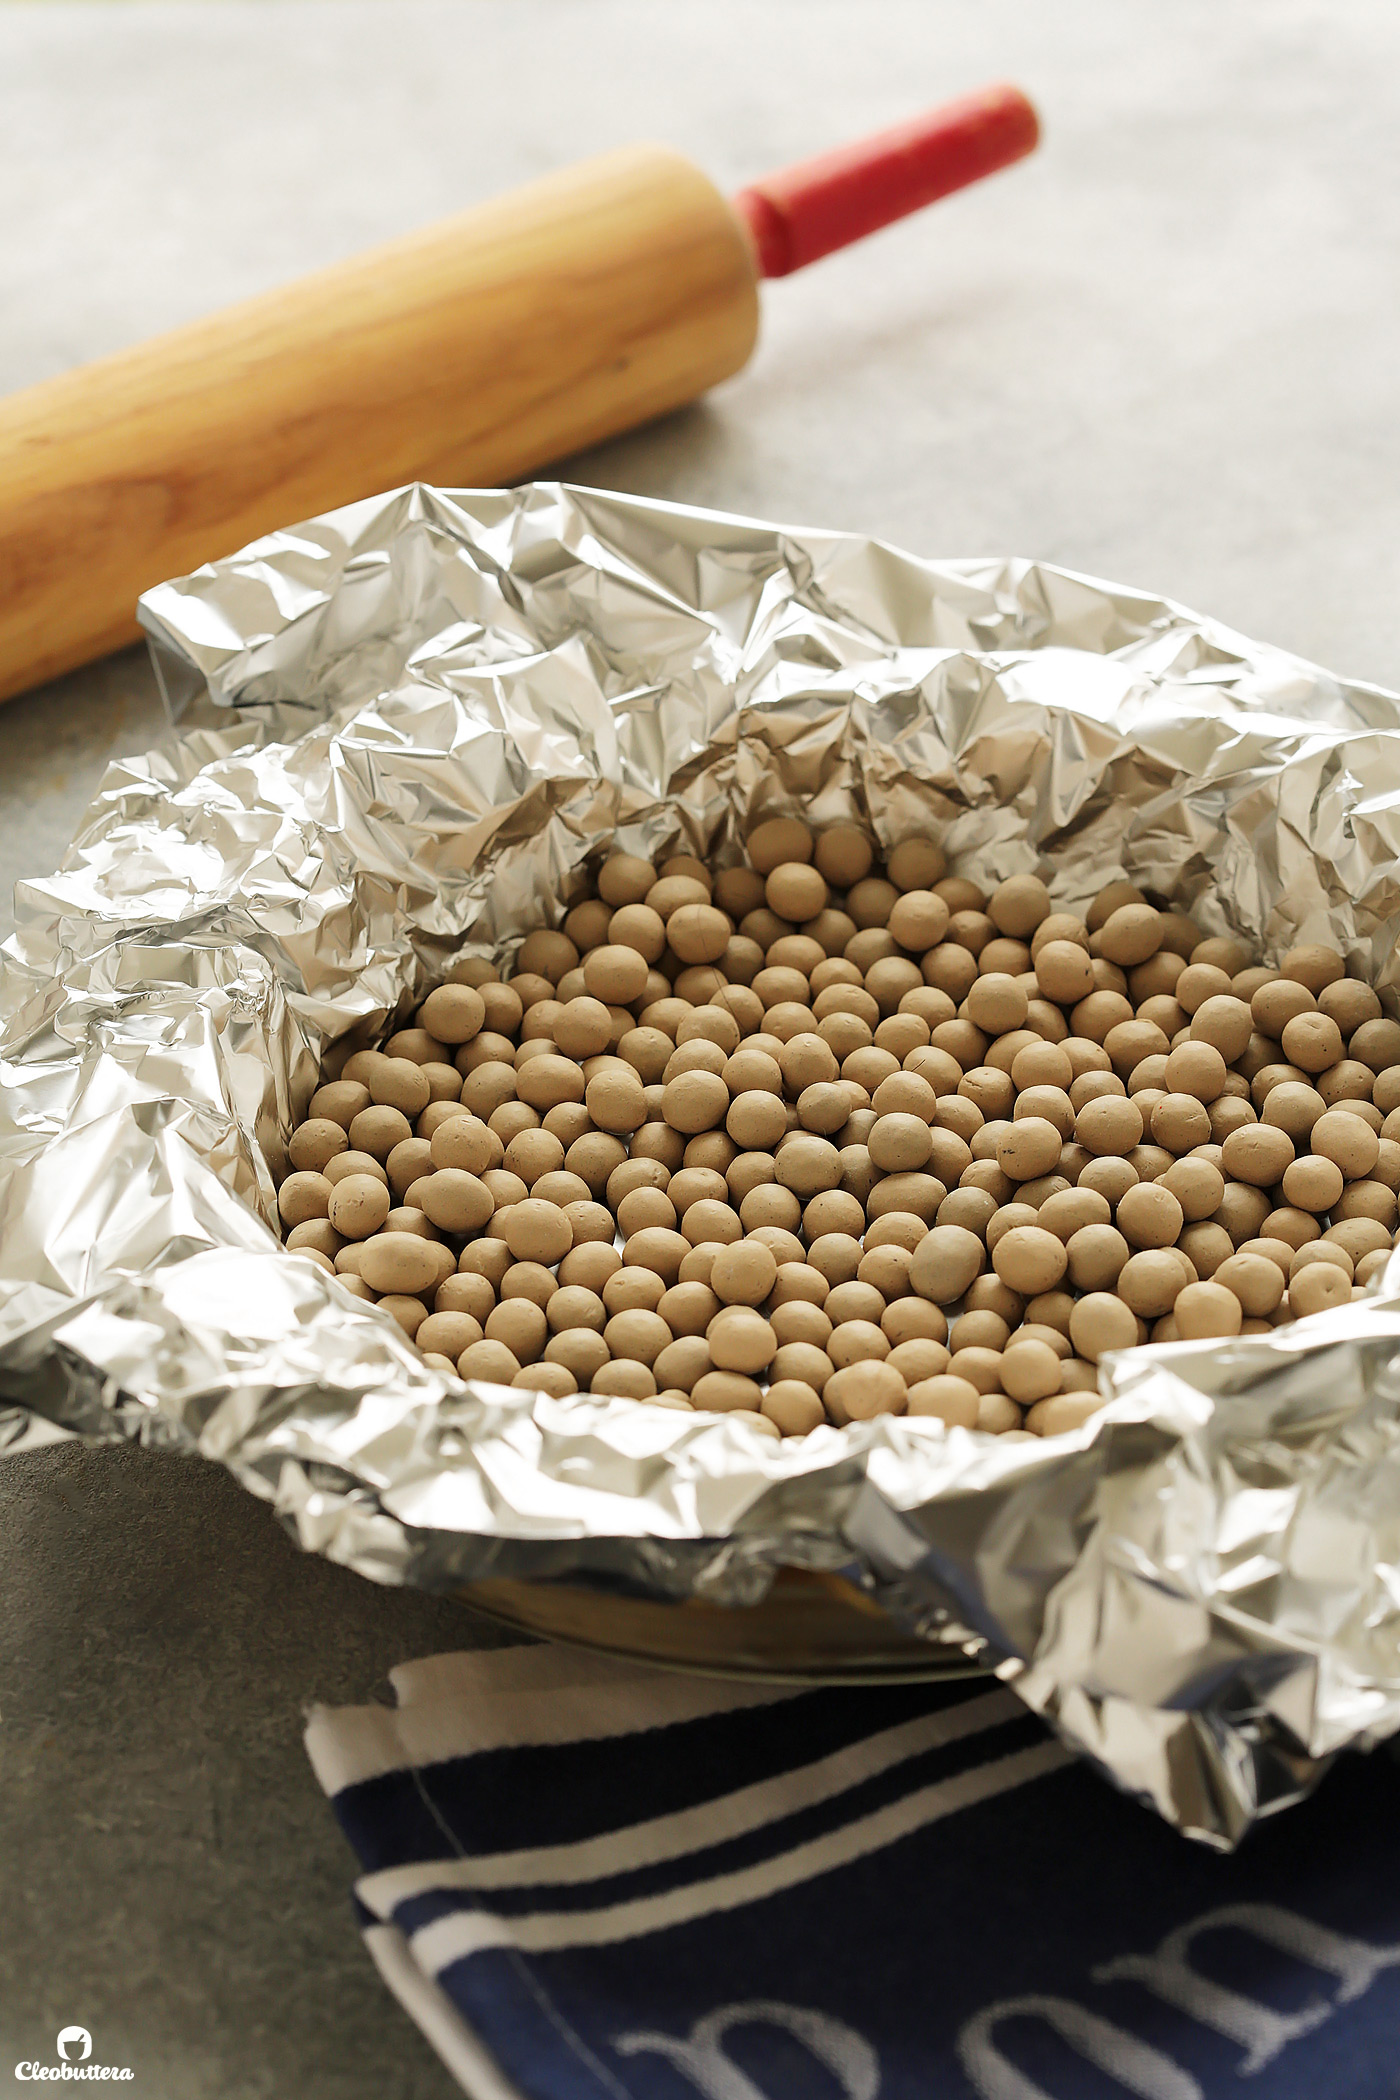
Either way, you’ll line the chilled pie shell with aluminum foil, covering edges to prevent burning, and fill with pie weights or beans or rice or sugar; really just anything that will keeping the dough from puffing up as it bakes.
Bake until edges are set and just beginning to turn golden, but the center will remain pale, 15 to 20 minutes.
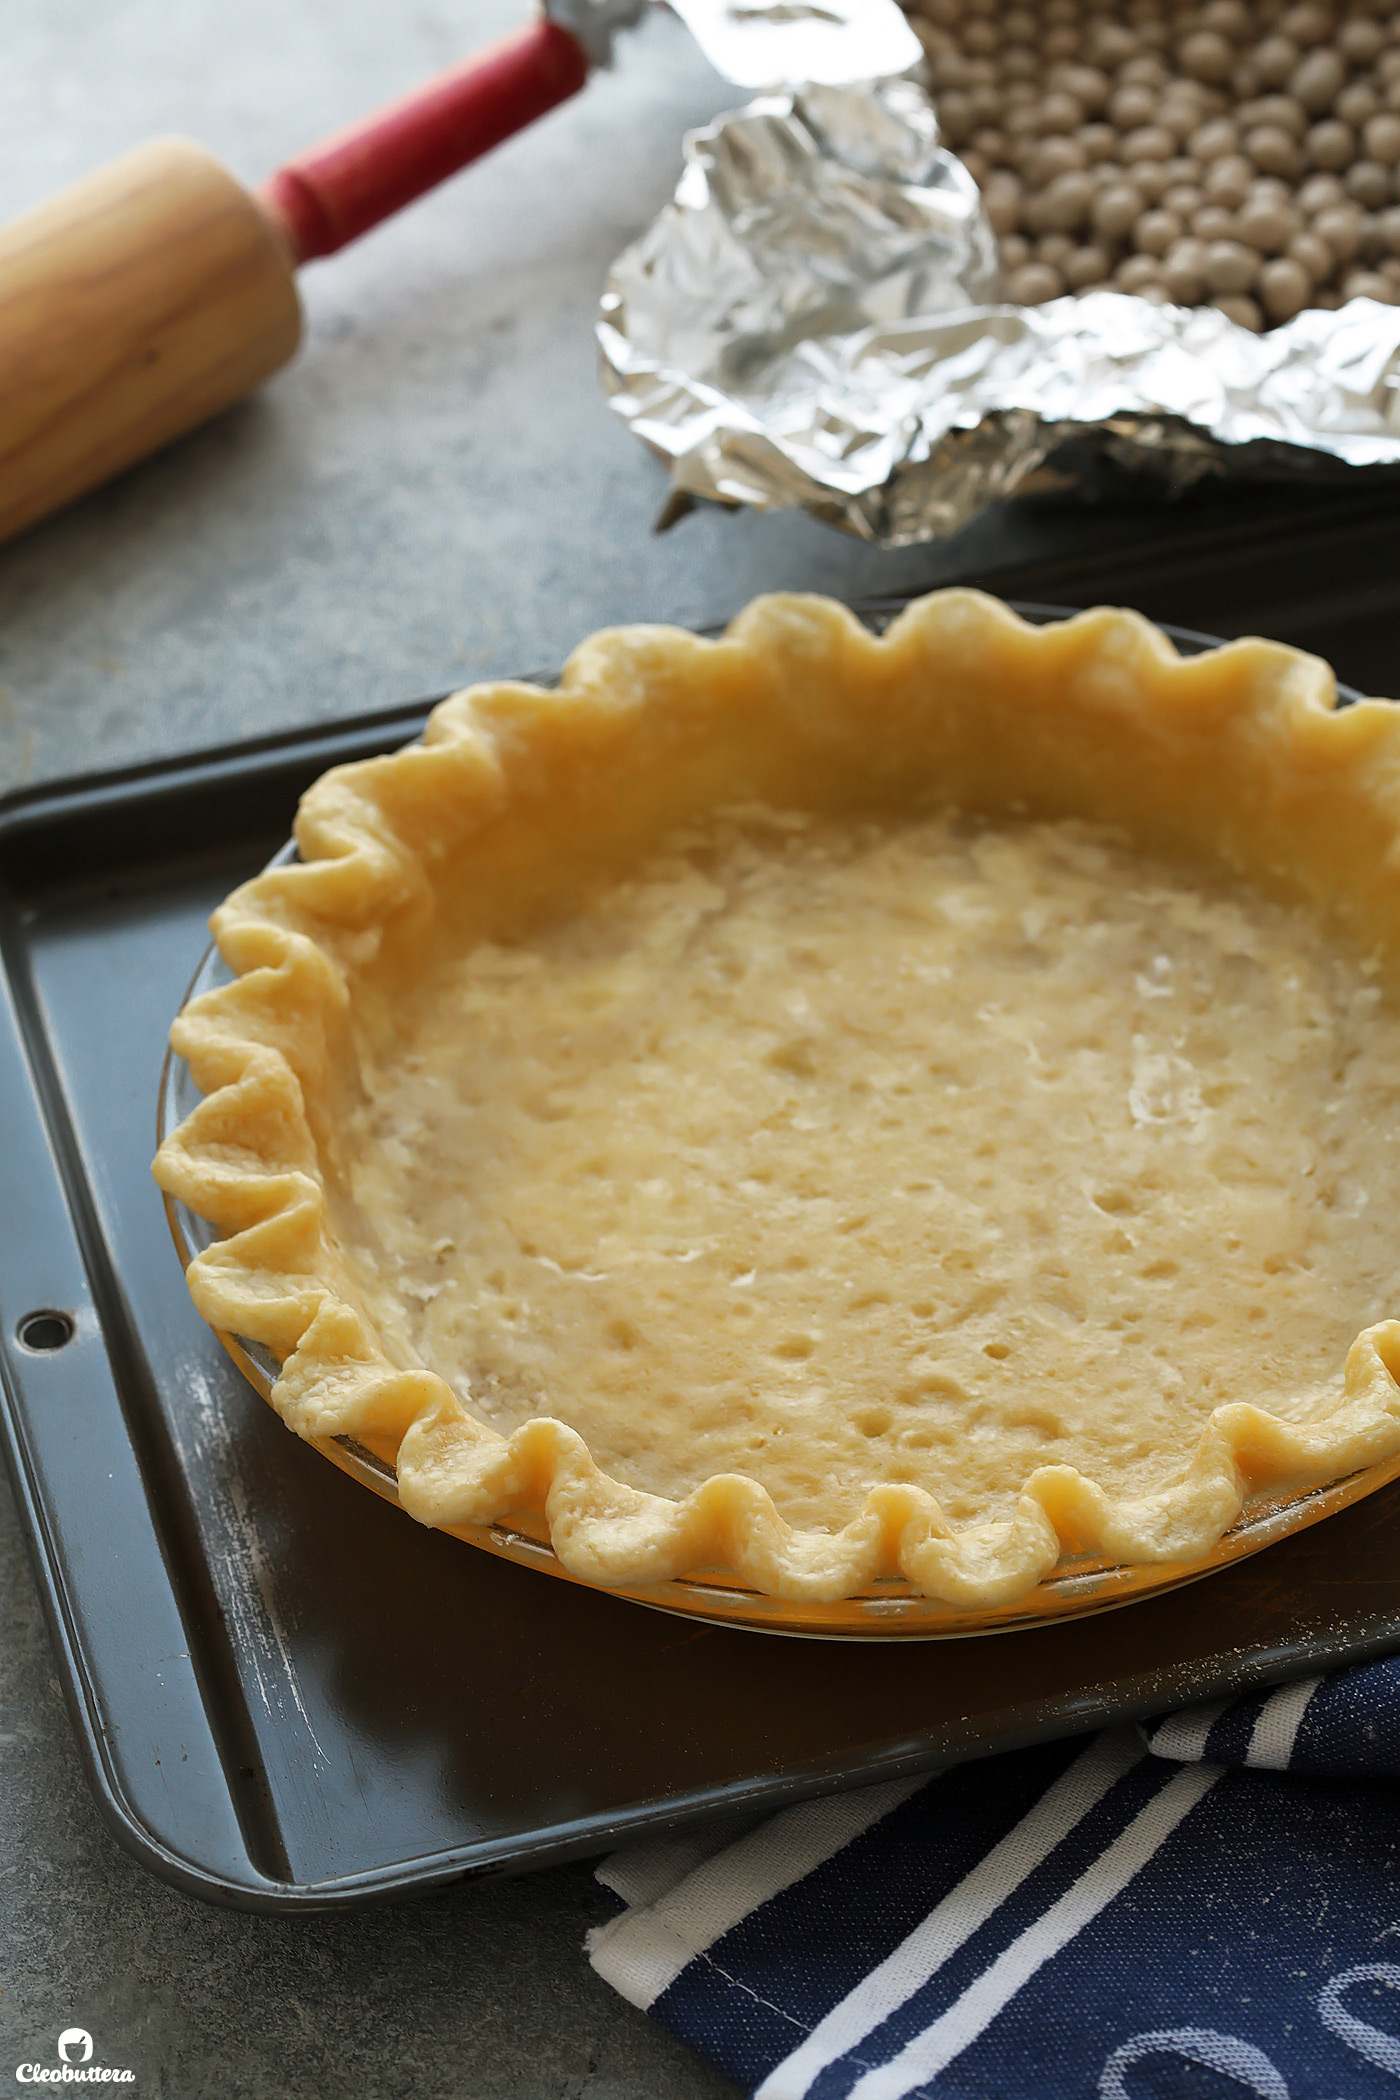
For a parbaked crust, remove the foil and weights and continue to bake until lightly golden, 10 minutes longer. At this point, you can proceed with pouring in the filling and continue baking the shell with the filling inside. (Stay tuned for this one ?)
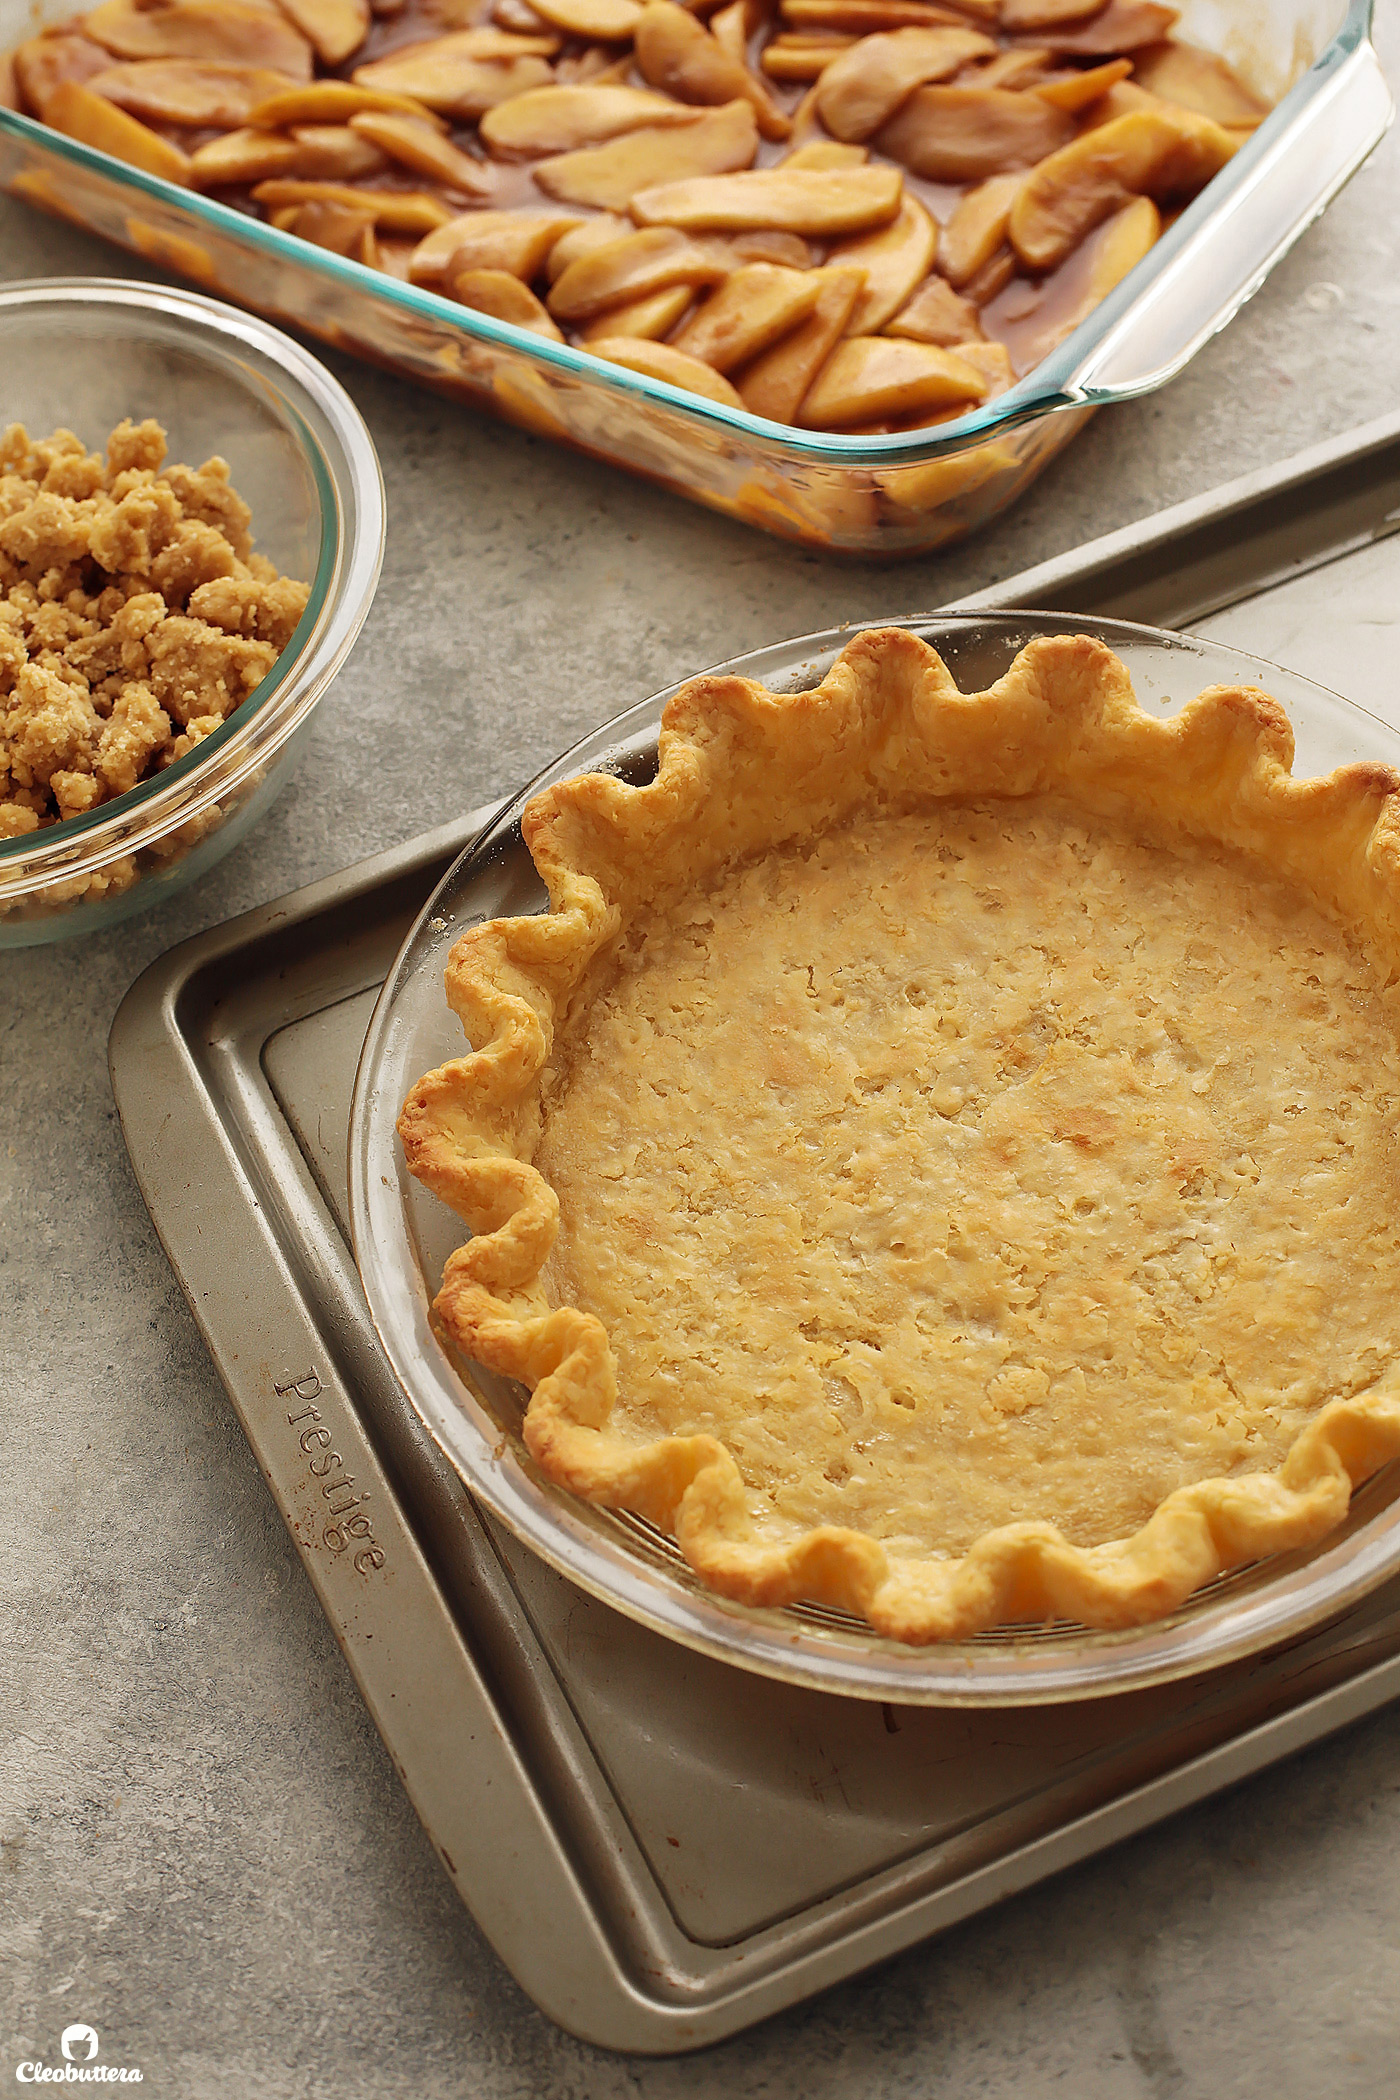
However, if you want a fully baked crust, continue baking until deep golden brown and crisp,15 to 20 minutes longer.
And there you have it friends, a beautifully baked, wonderfully flakey crust, waiting for your own spin on it!
Tips for Success:
- Weigh your ingredients. I know I’m starting to sound like a broken record here, but I can’t stress enough the importance of weighing your ingredients, especially the flour, for this recipe. Many factors affect the amount of flour each one of us packs into a measuring cup, so it’s really not reliable enough nor consistent. In this recipe, the exact amount of flour is crucial to the success of the dough. Too little flour and the baked dough will shrink, too much and it comes out tough and dense.
- Keep it COLD. Be sure to use very cold butter here and try your best to prevent the frozen grated butter from melting as you’re working it in. These pockets of cold butter create steam as the dough bakes, which forms those crisp, flaky layers that we’re after. If the grated butter isn’t cold enough, it will melt before the steam can be produced. Similarly, use ICE water; as in freezing cold water from a cup full of ice. Again, that helps maintain the dough’s cool temperature.
- Don’t overwork the dough. Handling the dough to much will warm the dough, which again, can cause the grated butter to melt into the dough. For this particular recipe, it’s not as important as the classic dough, but its still an extra insurance towards achieving the flaky pie shell we want.
- Chill. Chill. Chill. Don’t skimp on chilling the dough! Chill the dough after it comes together for at least 2 hours, and then again after lining it into the plate. If at any given time, you feel that the dough is softening on you and starting to feel greasy, pop it briefly in the fridge to chill. Bake the dough COLD.
- Keep your pie dish into consideration. The material of your pie dish can have an effect on how your pie bakes. I prefer glass because it bakes more gently and slowly, so you’re less likely to over-bake the crust, plus you can monitor how brown the bottom is getting. Similarly ceramic bakes nice and slow, and it sure is pretty, but you won’t be able to see through the bottom. Aluminum on the other hand, heats up and bakes quickly, so you may need to decrease the baking time. Avoid dark or coated aluminum dishes, since they’re likely to over-browned crusts.
I hope this post helps you achieve the same wonderful results that I’ve had by using this recipe.
Now let’s make some pie!
The Flakiest All-Butter Pie Crust
Forget everything you know about pie crust making! This recipe uses an unconventional mixing method, to create the flakiest, most flavorful all-butter pie crust, that is a breeze to roll out, without the use of unusual ingredients. It's a game-changer!
Ingredients
- 10 tablespoons (5oz/ 142g) unsalted butter, chilled
- 1 ¼ cups (6 1/4oz/ 177g) all-purpose flour (must be weighed*)
- 1 tablespoon (1/2oz/ 13g) granulated sugar
- ½ teaspoon salt
- ¼ cup (60ml) ice water
Instructions
TO MAKE PIE DOUGH:
- Grate 2 tablespoons (1oz/ 28g) of the butter on the large holes of a box grater and place in the freezer until solid. Cut remaining 8 tablespoons (4oz/ 114g) of butter into ½-inch cubes.
- In the work bowl of a food processor, combine together ¾ cup (3 3/4oz/ 106g) of the flour, sugar, and salt and pulse a few times to incorporate. Add the cubed butter and process until a homogeneous paste forms, about 30 seconds.
- Using your hands, carefully break the paste into 2-inch chunks and redistribute evenly around the processor blade. Add the remaining ½ cup (2 1/2oz/ 71g) of flour and pulse 4 to 5 times, until the mixture is broken into pieces that are no larger than 1-inch (most pieces will be much smaller).
- Transfer the mixture to a medium bowl. Add the frozen grated butter and toss until the butter pieces are separated and coated with the flour. Be sure to work quickly, as to not let the warmth of your hands melt the butter.
- Sprinkle 2 tablespoons of the ice water over the mixture. Using a rubber spatula, gently toss until the mixture is evenly moistened. Sprinkle remaining 2 tablespoons ice water over the mixture and toss to combine. Press dough with the spatula until dough sticks together. Dough will be sticky like cookie dough and much more moist than most pie doughs, but as it chills it will absorb a lot of excess moisture.
- Transfer dough to a sheet of plastic wrap and use it's edges to press firmly on the sides and top to form a neat 5-inch disk. Wrap well and refrigerate dough for at least 2 hours or up to 2 days. Let chilled dough sit on counter to soften slightly, about 5 to 10 minutes, before rolling. (Wrapped dough can be frozen for up to 1 month. If frozen, let dough thaw completely on counter before rolling.)
- On a well floured counter, use a rolling pin to roll the dough into a 12-inch circle. To transfer it to the pie dish, roll the dough loosely around the rolling pin and unroll it onto a 9-inch pie dish, leaving at least 1-inch overhang around the edges. Ease dough into the dish by gently lifting edge of the dough with your hand while pressing into plate bottom with your other hand.
- If needed, trim overhang to 1/2 inch beyond lip of the dish. Tuck overhang under itself; folded edge should be flush with edge of plate. Use your fingers to crimp dough edges around the dish. Refrigerate dough‑lined plate until firm, at least 30 minutes. Fill and bake as per individual recipes instructions or bake for a parbaked or fully baked crust as per instruction below.
TO BAKE DOUGH:
- Adjust oven rack to middle position and heat oven to 180C/ 350F.
- Line chilled pie shell with aluminum foil, covering edges to prevent burning, and fill with pie weights or beans/rice/sugar.
- Bake until edges are set and just beginning to turn golden, but the center will remain pale, 15 to 20 minutes. Remove foil and weights, rotate plate, and continue to bake about 10 to 15 minutes longer or until lightly golden for a partially baked crust. For a fully baked crust, bake until golden brown and crisp,15 to 20 minutes longer. If crust begins to puff, pierce gently with the tip of a paring knife.
- Proceed with specific pie recipe or let crust cool completely in the dish on wire rack, about 30 minutes.
Recipe Notes
- For a fail-proof dough, be sure to weigh your ingredients, especially the flour, using a kitchen scale. Due to the inaccuracy and inconsistency of measuring cups, I cannot guarantee the results that yields from using them. However, if you don't have a kitchen scale, the recommended method of measuring for this recipe is the 'Dip & Sweep'. When measuring the flour, dip a dry measuring cup into the flour, sweeping away excess with a flat edge.
- If you don't have a food processor, you can use an electric hand mixer to do step 2. It might be easier if the butter is not super cold. Mix the cubed butter into the dry ingredients using the mixer until a homogenous dough forms. In step 3, use your hands, to break up the large chunks of dough and get everything covered with flour. Then proceed with the recipe as written.
- Make ahead tip! Wrapped dough can be refrigerated for up to 2 days and frozen for up to 1 month. If frozen, let dough thaw completely on the counter before rolling.
Recipe adapted from Cook's Illustrated.
Measurements Note: All recipes of this site have been developed using weight measurements. Although US volume measurements have been included for your convenience, it is highly encouraged that you weigh your ingredients using a kitchen scale to get the best possible results. Due to the sensitive nature of baking, kitchen scales are proven to yield more accurate and consistent results than measuring cups. Enjoy!
Powered by ![]()
This post may contain affiliate links.
All images and content are owned by Cleobuttera® and are copyright protected. Please do not use my images without prior permission. If you would like to republish a recipe, please rewrite it in your own words and link back to the recipe page on my site. Original recipes and creations of this site are intended for personal and home use. Commercial replication or media consumption are only allowed with a written consent and agreement with Cleobuttera owners. Otherwise it is considered a violation of intellectual property. Thank you for respecting and appreciating the amount of time and effort that goes into creating free, unique recipes that make people happy.


Wondering if this will be good for my new york classic cheese cake 🙂
Hmmmm…interesting! I never though about using pie crust in cheesecake before, but I’m intrigued by the idea. This graham cracker/biscuit crust is my go-to- for cheesecake:
https://cleobuttera.com/cakes/perfect-classic-cheesecake-strawberry-meringue-topping/ It stays nice crunchy even after the long hours of baking.
If you plan to use pie crust for cheesecake, then I’d suggest baking it all the way through, and letting it cool completely before pouring the cheesecake crust in.
Best of luck!
Keep coming up with the outstanding recipes! I am trying the pie crust for the Thanksgiving pumpkin pie. Thank you!
I made it yesterday for Pumpkin pie. There are no words. It was tender, flaky, and absolutely outstanding. I am a very experienced cook who could NEVER make good pie pastry. I made some yesterday. Thank you for the wonderful recipe.
I’m so happy you loved this crust as much as I do Sheila! I know the feeling…I was never satisfied with any pie crust that I’d make, until I found this one. I hope this recipe takes your pie-making experience to another level of joy.
Thank you so much Sheila! I hope it turns out amazing. Wishing you a wonderful Thanksgiving!
Okay, thanks for printing their recipe. One thing – I see you have the recipe for ONE 9-INCH SINGLE CRUST repeated twice. Do you think you could change one to the ONE 9-INCH DOUBLE CRUST recipe that they have in the magazine?
And thanks for adding Tips for Success: Weigh your ingredients and for providing weights in ounces as well as metric. I’ve written to Cook’s Illustrated repeatedly, asking why do you print your recipes with stupid ingredient amounts like 20 tbl butter? Have to go and look up the weight every time – unless they expect someone to sit there and count out 20 tbl of butter. Putting 12 1/2 oz behind 2 1/2 cups of flour is a start, but for accuracy that should be given in grams. Again, thanks for doing the conversions.
I’m really happy you appreciate the weight measurements provided here Brian! I’m such a HUGE proponent of weighing ingredients for baking, and I hope all US websites start getting on board…but like you said, it’s at least a start.
When I first posted the recipe, I had both Single and Double Crust recipes on there, but as I recently launched my website’s new design and had to transfer all the recipes to a new recipe plugin, the Double Crust one seemed to have gotten deleted. I tried many times to rewritten it, but whatever text change I do to one recipe card, mirrors on the other. I just emailed the recipe plugin company’s technical support in hopes they’d help me fix it. So rest assured…I’m on it ?
I’m making a cherry pie with a bottom and lattice top crust. Have only made a few pie crusts over the years. The one I made with Mom (butter/shortening) when I was about 11 was flaky, every one since has been tough. Wish me luck.
Just double the ingredients for two crusts, that’s what I did.
thank you very much, i ve tried it today. Tart with cheese and sausages, creme and eggs!
thanks!!
Yum! That sounds like some fancy-pants quiche ? I’m really happy that this crust served as the perfect vehicle for your delicious filling Alex.
I’m tickled by your enthusiasm for the pie dough recipe, Tasbih! Your crusts look beautiful. Keep an eye out for America’s Test Kitchen’s upcoming book on pies; the book team took this recipe and really ran with it, developing interesting variations with whole grain flours, nuts, and herbs.
I could get lost in your blog. If you ever find yourself in the Boston area, I’d love to show you around our test kitchen. I think you’d find a lot of kindred spirits here.
Best,
Andrea Geary
Deputy Food Editor
Cook’s Illustrated Magazine
Please excuse me for a second as I pinch myself to make sure that I’m not dreaming. Oh my God…I can’t even describe my excitement right now! I’m seriously having a fangirl moment right here. The fact that I had just received such an amazing and welcoming comment for the great Andrea Geary of Cooks Illustrated, is a badge of honor that I will proudly wear forever. I’ve been a HUGE HUGE fan ATK/Cooks Illustrated for years and owe most of my cooking/baking knowledge and skills to them. Your pie crust is nothing short of genius and as mentioned in my post, warrants an award. Thank you and your incredible team for always presenting us with the most reliable and successful recipes. And I can’t even begin to tell you how touched I am by your kind invitation. It would be a dream to come visit the test kitchen. I live in Egypt, so Boston is half a world away, but if it means visiting ATK, then I’ll make it my mission to come in the very near future.
Soynds great, can I use it as puff pastry, for beef wellington?
Well you certainly can, and it will be delicious but keep in mind that the texture is not as airy and papery like as puff pastry.
You are too kind. And the world is getting smaller every day. I look forward to your visit!
i have been looking for a good butter crust recipe to replace my crisco recipe for years.
this one sounds like it has potential. have u tried it without food processor. and what would it look like at different steps. should i just aim for what it looks like at different stages with the food processor?
thanks
Ken
Hi Ken! I hope this one turns out everything you’re hoping for and more. I have not made this without a food processor myself, but Cook’s Illustrated, the source of this recipe, have provided tips for making it by hand. I’ve included them in point #2 of the Recipe Notes. Hope that helps and best of luck!
Hello. How was the process for this pie crus using a hand mixer? I also have no food processor. Thank you.
Do you have any update on the 2 crust version?
Hi Yvonne! Thanks for your interest. I’m still having technical issues with adding the double crust recipe, but I’m working along my recipe plugin company to fix it really soon. Meanwhile, if you simply double the quantities in the ingredients and in the instructions, that would work just perfectly well. Please let me know if you have any inquires and I’d be glad to help.
Hye tasbeeh! I was wondering if I don’t have a food processor, what do U recommend me to use?
Hi Jannah! Please refer to point number 2 in the ‘recipe notes’ under the recipe, for an alternative method. Enjoy ?
Interesting pie crust recipe – can’t wait to try it. Has anyone substituted lard for up to or more than half the butter to achieve a slightly less brown crust and if so, did it turn out the same? I generally make my own lard from pork fat and it makes wonderful pies when some butter is added to achieve a golden glow to the crust.
Pingback: Cocoa Cream Pie -
I weighed my ingredients and made sure I doubled each item properly. My butter is really cold. But there’s no paste texture. Just crumbly. I am not sure where I went wrong and ive only just begun…
Hi Madalynne! The heat produced by the quick movement of the food processor’s blade should slightly soften the butter just enough for it to coat the flour mixture and form a paste. If it’s not coming together, then you probably just need to continue processing it a bit longer until it does.
I’m making a pecan pie for my in-laws family Thanksgiving and am very nervous! I’ve never made a pecan pie, let alone with a homemade crust…should I poke holes in the bottom of the crust with a fork to keep it from bubbling? And should I baste it with butter? Thanks for the awesome in-depth directions 🙂
@ Anne-Elizabeth: I have made pecan pies every year – for at least 39 years. It is by far best to parbake the crusts (I misspoke in my other comment where I said “blind bake”. It is par-bake.) – Check Cooks Illustrated for instructions on parbaking. Also – I always add pure maple syrup in place of half or more of the corn syrup. Always amazing. I made this crust last year and I believe it was my flakiest crust ever! I’m using it again! Thank you Tasbih!
Ugh. Couldn’t get it to the paste stage. And dough is too sweet.
After 35 seconds in the food processor mine wasn’t in the paste stage either. So I took a spatula and moved everything around inside and then pulsed it about 7 or 8 times and it formed the paste.
@ Anne-Elizabeth: I have made pecan pies every year – for at least 39 years. It is by far best to blind bake the crusts – check cooks illustrated for instructions. I made this crust last year and I believe it was my flakiest crust ever! I’m using it again! Thank you Tasbih!
I’m hoping to use this crust for the top of tourtierre (meat pie). Any suggestions? Should I do an egg wash?
That would work beautifully Tricia! It’s such a versatile dough that would go really nicely with so much things. Just make sure to let your meat filling cool completely before draping the dough over it. Chill the pie in the freezer until firm, about 30 minutes, before baking it, and sure an egg wash would make it nice and shiny. Enjoy ?
This pie crust recipe is a game changer! The dough came together so easily. It never had that feeling that the flour was too dry and was slightly tacky when I put it in the refrigerator to rest. But after two hours in the fridge and then 15 minutes on the countertop to warm up it rolled out perfectly. I am making a quiche with it tomorrow and I can’t wait.
You mentioned par-baking the crust using aluminum foil and the pie weights but you never mentioned docking the dough first so I would like your recommendation if you would.
Thank you again x10
Hi Steve! So sorry for seeing your comment so late! I love hearing that you’re finding this pie crust so amazing! My mind is still blown by it till this day. For this recipe, you don’t need to dock the dough. I actually tried it once and felt no difference in results.
I made this pie crust while making your apple pie, but I had to make a separate review because it was really good!
I won’t lie. The whole time I was putting the items in the food processor- I felt like I was breaking a law. Thought my grandma was going to pop out of nowhere and say, “Well what in the WORLD are you doing there hun?”
HOWEVER, it turned out amazing. It was a million times easier than the traditional method. I will definitely make this again!
Hahaaaa! I know what you mean Shelby…everything about the process of this dough feels so wrong. It’s everything we’ve learned not to do with pie lol! So happy you loved it so much and thanks for leaving that sweet comment.
I’ve made this pie dough countless times now! It’s my favorite, it’s so easy to work with and toddler helper friendly. Thank you for the recipe!
I don’t have a scale so I scoop my flour with a spoon into the measuring cup and then sweep off the excess with a flat edge and I have never had a problem. Also if you put your grater in the freezer about 10 minutes before you grate your Butter it really helps prevent the butter from sticking to the inside of the grater.
I’m so happy to hear that you love this recipe as much as I do Erin! I love the freezing the grater tip! Thanks for sharing.
Tashih,
Thank you for this recipe via Cooks Illustrated!
I have just entered a butter tart contest. Will the dough work for butter tarts? Also, I am a novice baker and am about to purchase a food processor. Could you recommend one available in Canada (via Amazon) which is good for pastry?
Thank you! Jane Burbage, Canada
Hi Jane! Yum! I LOVE butter tarts ? Absolutely! This dough will work perfectly for them.
Cuisinart custom 14-cup food processor is one of the top rated food processors out there and is available on Amazon Ca. It’s also the winner in America’s Test Kitchen equipment testing.
A little less long winded explanations, I believe this is a great recipe, you don’t need to keep convincing me. It takes forever to get to the recipe.
I hope you like the recipe Merilyn. By the way, there’s a “jump to the recipe” button at the top of every post if you’d like to skip through the explanation and go straight to the recipe.
Attachment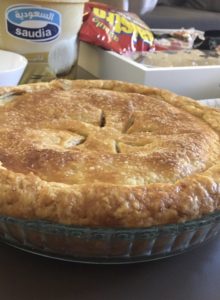
Soooo good! Thank you so much for this amazing recipe ❤️. It IS definitely the flakiest pie crust without a doubt ??
I hope you get well soon ?
Hi,
Could you add the recipe to make a double crust pie? Should I assume it is just twice the ingredients? The single crust pie recipe is posted twice.
Thanks in advance.
Hi Monica! I’m having a technical issue that is making it impossible for me to post the double-crusted recipe here; sorry about that. But yes…you are right…you basically double everything.
What temperature would you recommend cooking a double crusted apple pie? Normally I will bake it at 425 for 15 minutes and then reduce to 375 for another 20 minutes. Will that also work with this crust?
Did you ever try the double recipe? I’ve got my two crusts in the fridge now and trying to figure out when to put the top on. After the apples are cooled? And was thinking lattice top for visual appeal.
Great job. Your post is very informative.
Can this recipe stretch enough to make a crust for a 12 inch pie pan? To what diameter would you roll out? If not, could you publish a recipe for 12 inch?
I tried this recipe last night and didn’t have quite the success you did. I measured very, very carefully (using a scale), but somehow the first step that is supposed to result in a thick paste was much drier. It looked like a coarse meal, no matter how long I processed it. Finally I stopped and found that I could press the meal into sort of a paste in my hand, so I just continued with the recipe. The rest seemed to go fine, with the two additions of water in the end making approximately the consistency of what you have in your photos. In the end, however, my crust edges puffed up and did not keep their lovely crimped shape. I was extremely careful not to overwork the dough (I’ve been making great crust for 40 years, so I know how important that part is). I did everything else exactly as instructed. The baked texture was ok, but not as crisp as many I’ve made in the past the traditional way. I wish I knew what went wrong, because yours looks quite good in the photos.