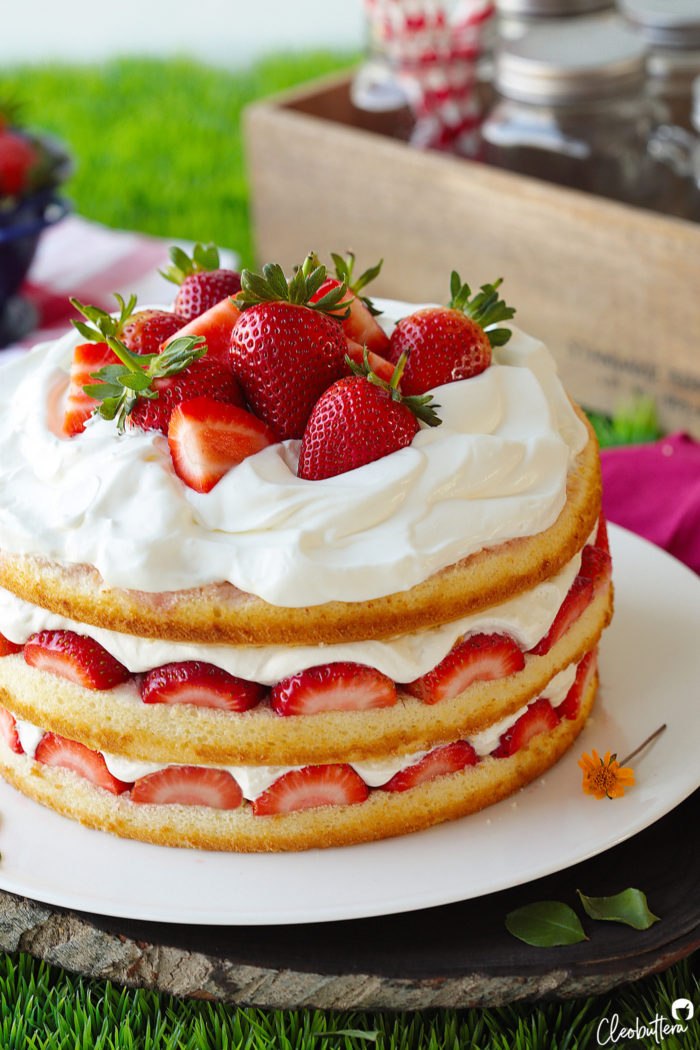
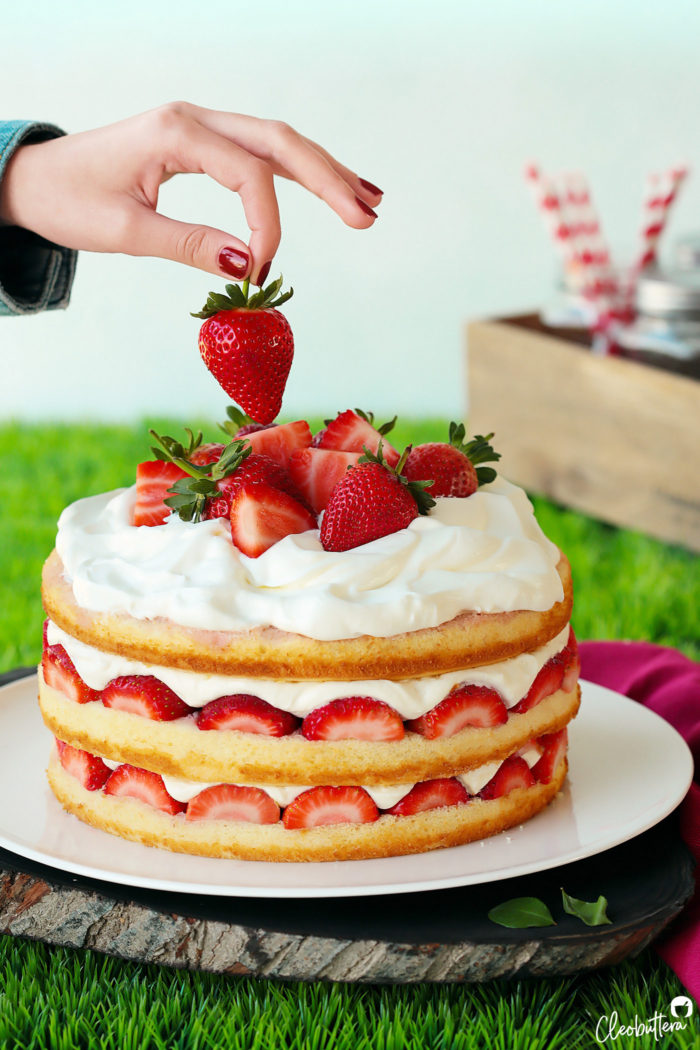
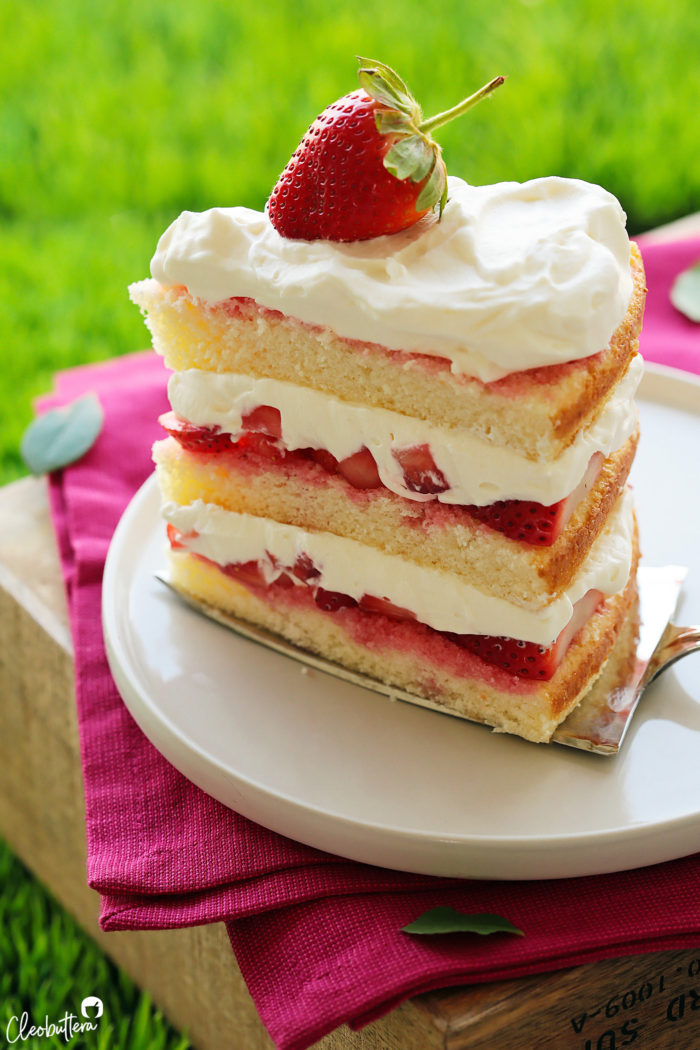
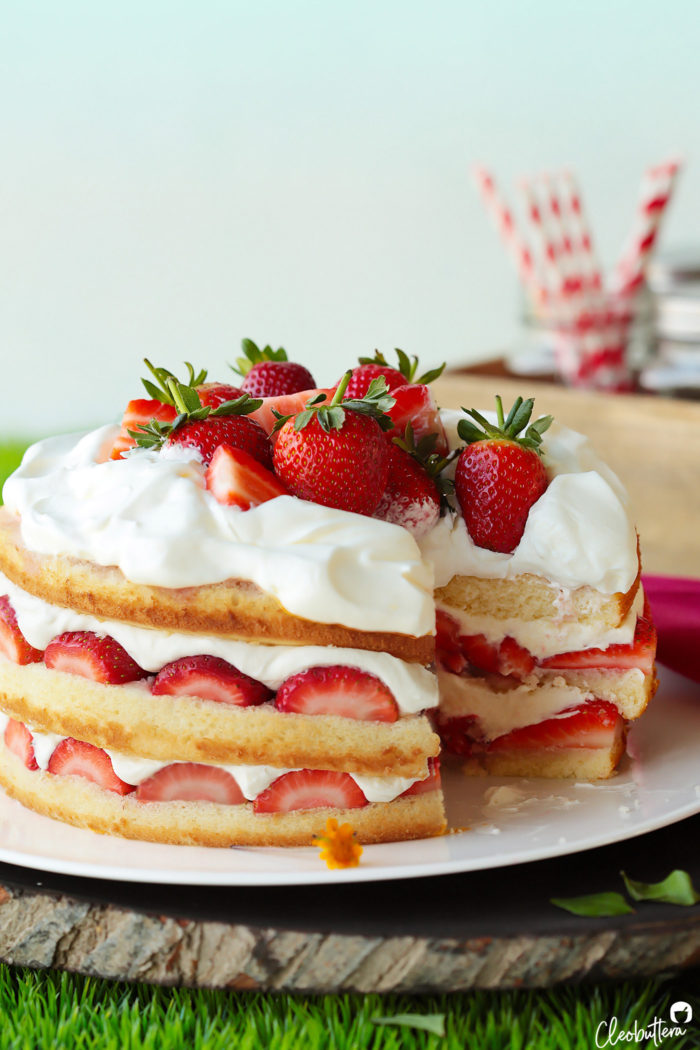
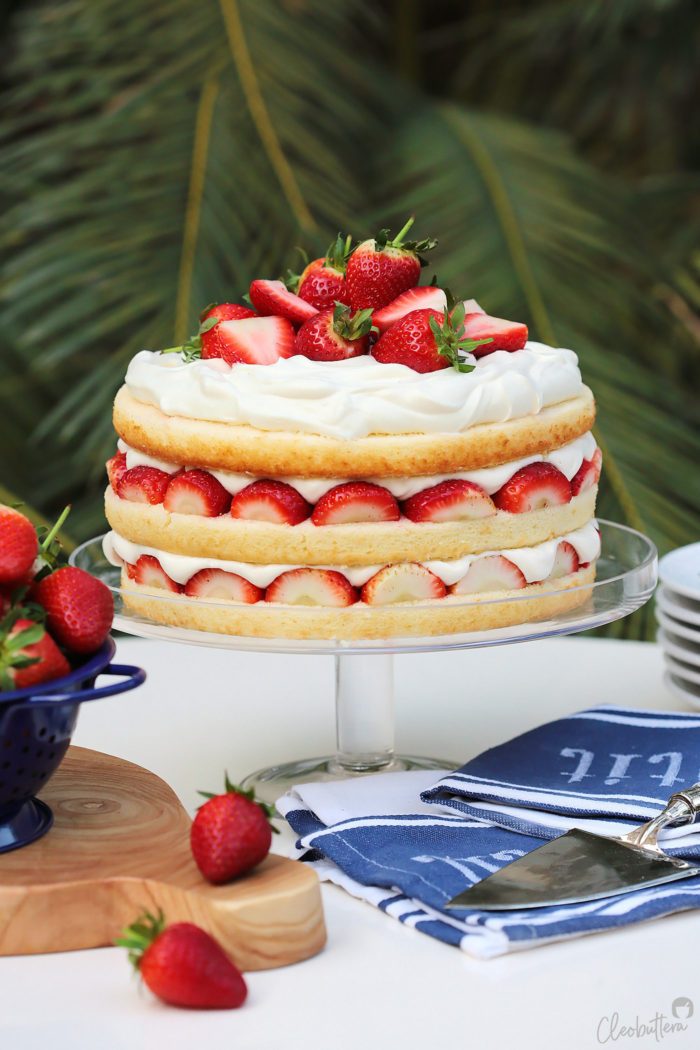
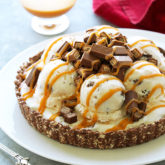
Strawberry Cream Cake
Three layers of plush, easy-to-make vanilla cake, infused with flavorful strawberry juice, topped with heaps of glazed fresh strawberries and swoops of stabilized whipped cream that won’t weep on you. This is one showstopping cake that is easier to make than it looks!
Every once in a far while, a mini baking miracle happens in my kitchen, and a recipe comes out the way I had imagined from the first try.
Just like that…no flaws to be nitpicked, no tweaks required, no side-by-side bake offs followed by a series of hair-pulling recipe testing needed. Just the sound of birds singing, happiness fluttering in the air and the sweet taste of easy triumph.
The day I made this Strawberry Cream Cake…was one of them.
It went something like this: cake made on a whim, family gone nuts, critique wasn’t uttered (even though I begged for it), and I came to the hard-to-believe realization, that it’s ready for the blog!
Not being able to get past the fact that it was too effortless to be true, I tried as I might to find something to improve on, but I just couldn’t. The cake was perfection…and I have a pretty good feeling that you’ll agree.
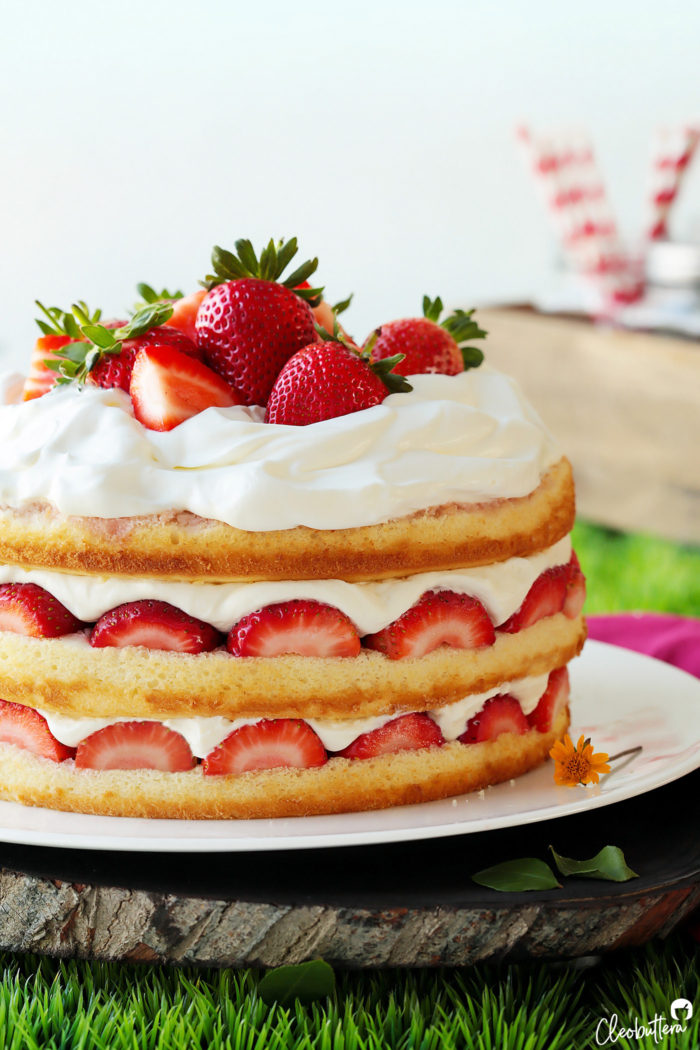
Three layers of soft and plush vanilla cake, infused with flavorful strawberry juice, topped with heaps of glazed fresh strawberries and swoops of thickened whipped cream that won’t weep on you.
It is a thing of simple beauty and a taste of everything good in this world.
Strawberry Cream Cake seems to be one of those common denominator desserts around the world. I have yet to find a culture that doesn’t make a variation or the other of it. I for one, grew up in Egypt on a glazed strawberry studded one that had always managed to show up on every birthday and dinner party till this very day. Ofcourse it always came from a bakery.
This one is more of the American-style with the naked sides and simple, yet elegant presentation. But the flavor is just as familiar as the one I’ve been eating since I was a kid (only better).
It’s also easier and quicker to make than most cakes of this kind, thanks to a secret shortcut that you’ll either love or hate.
It’s….ahem….
Cake Mix.
Gasp.
Wait don’t leave!
Will it help if I tell you that no one will be able to tell? Promise. My family knows a Betty Crocker when they eat one, but they were none the wiser with this one.
It is vastly improved on using quality ingredients like sour cream, real vanilla, flour, sugar, salt and eggs to make it taste more like homemade.
What’s the deal with the cake mix?
This doctored cake is based on the internet-famous WASC (White Almond Sour Cream Cake) recipe. It is a wildly popular one among professional bakers, because it tastes amazing, and the texture is soft and moist yet holds up really well to decorating and fondant.
If you’ve been following here for any length of time, you’ll know that from-scratch baking is my jam. So I’ll be the first to tell you that baking a cake from scratch is an incredibly rewarding and therapeutic experience, and the results are usually worth the extra labor of love. But I’m also not one to turn up her nose on a cake mix from time to time, if it means giving me the results I want. Remember this one? It’s THE BEST!
I have yet to recreate the excellence of this doctored vanilla cake from scratch (I blame it on not having proper cake flour in Egypt), so until that happens, I will take no qualms using this semi-homemade version when needed. And if that means a gorgeous cake in less time, then cut yourself some slack and go for it. You don’t always have to bake harder, bake smarter.
The great thing about this cake is that while it’s so soft and tender, it has a sturdy, sponge-like crumb that holds up really well to the oodles of saucy strawberries and clouds of whipped cream without crumbling or turning soggy. Not every cake can do that!
Typically a genoise sponge cake is the go-to here, for its ability to absorb the berry juices without breaking down. You can’t just swap a basic vanilla butter cake and pile it with all these goodies and expect it to work. The moisture from the fillings will wet the layers and possibly result in a mushy texture and a less than stable structure.
But this one…it works!
How to make strawberry cream cake?
Unlike sponge cake, it’s basically goof-proof! Mix everything together in a large mixing bowl until combined, and it comes out perfect every single time.
Not to mention that it is so open to flavor variations and can be adapted with different fillings. But today…we’re all about the strawberries!
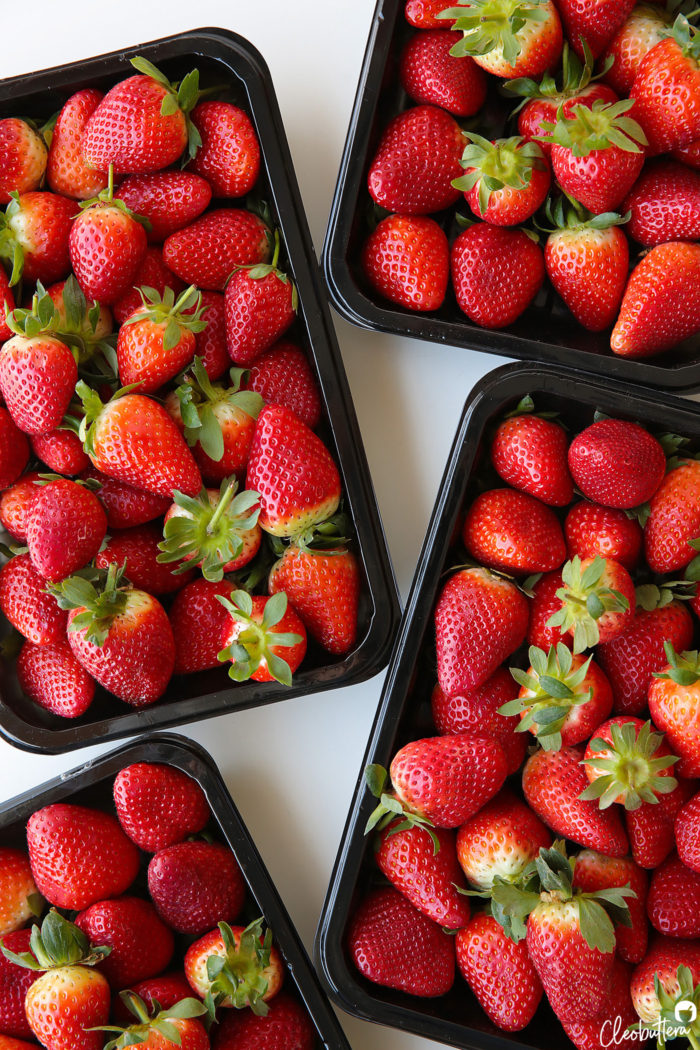
Fresh, plump, juicy, sweet yet tart strawberries.
How to prepare the strawberry filling?
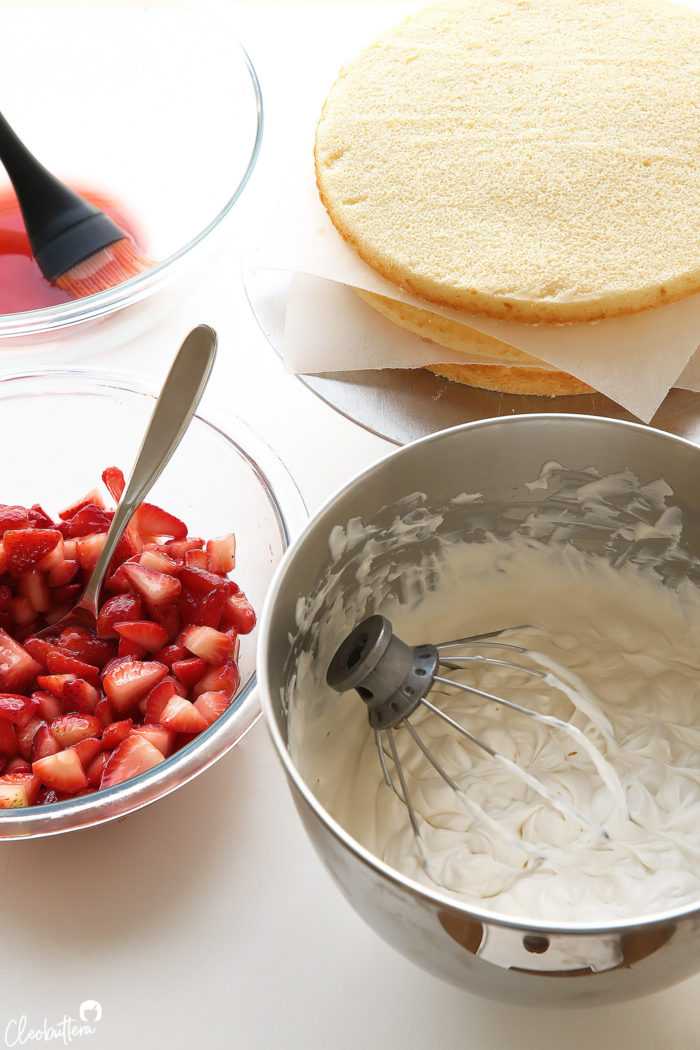
- To make our filling extra special, we’ll start by tossing diced strawberries with some sugar and leaving them to macerate for about 1 1/2 hours.
This serves 2 purposes:
1) Sweeten the strawberries which can sometimes be too tart.
2) Extract the berries’ natural juices, so we can later brush it over the cake, to infuse it with more strawberry flavor and a little extra moisture (yes…the cake can handle it).
- Then we’re going to take 2 tablespoons of that juice and microwave it with a little bit of cornstarch to create a thick glaze. Stirring the glaze into the berries gives them more cohesion, and an overall sweeter flavor and slightly saucier texture within the cake.

How to make stabilized whipped cream?
For a cake with a sturdy structure that can stand tall for hours without risking slippery layers, you need a firm filling. Basic whipped cream is too airy and fluffy to be able to withstand the weight of the cake and strawberries. So to stiffen the whipped cream and give it more body, we’re going to create what is known as Stabilized Whipped Cream.
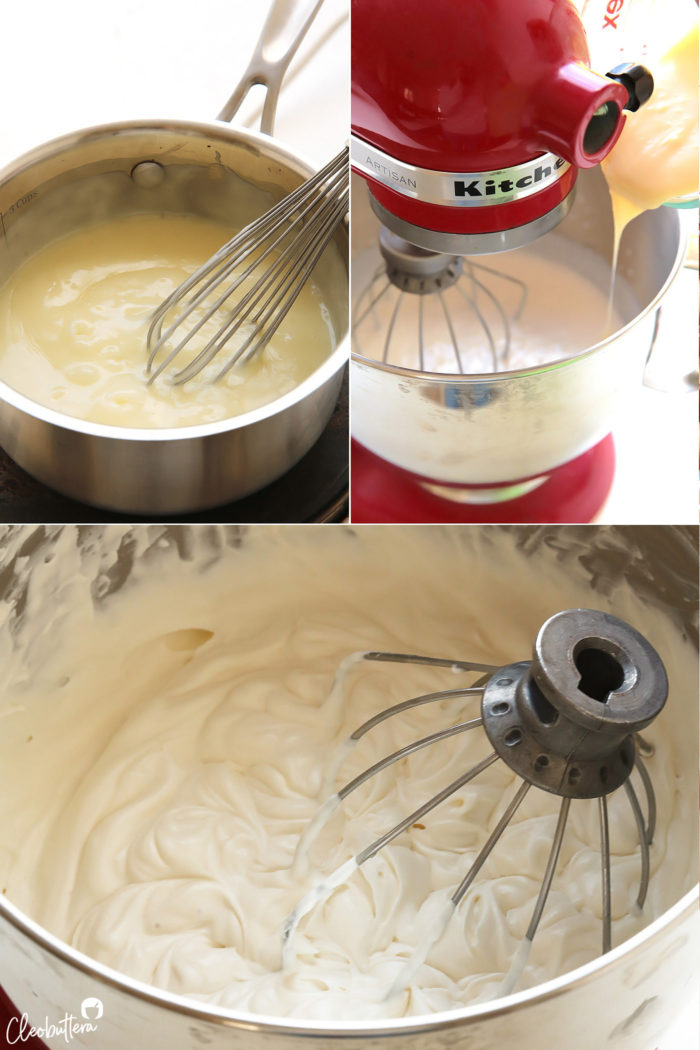
- It requires cooking some of the cream with cornstarch and powdered sugar until it thickens to a pudding-like consistency.
- Then after the mixture cools to room temperature, it gets added in a steady stream to the rest of the cold cream as it whips. This trick creates a whipped cream that has a thicker, almost frosting-like consistency, and lasts longer without deflating or watering. It’s amazing! If you’re looking for whipped cream stiff enough for piping, this is your guy.
Now that we have all our components ready to go, it’s time to assemble!
Plush cake layers ✔️
Gorgeous glazed strawberries ✔️
Flavor-packed strawberry juice ✔️
Pillows of stabilized whipped cream ✔️
Let’s do this!
How to assemble the Strawberry Cream Cake?
- Brush the first layer of cake with about a third of the unthickened strawberry juice.
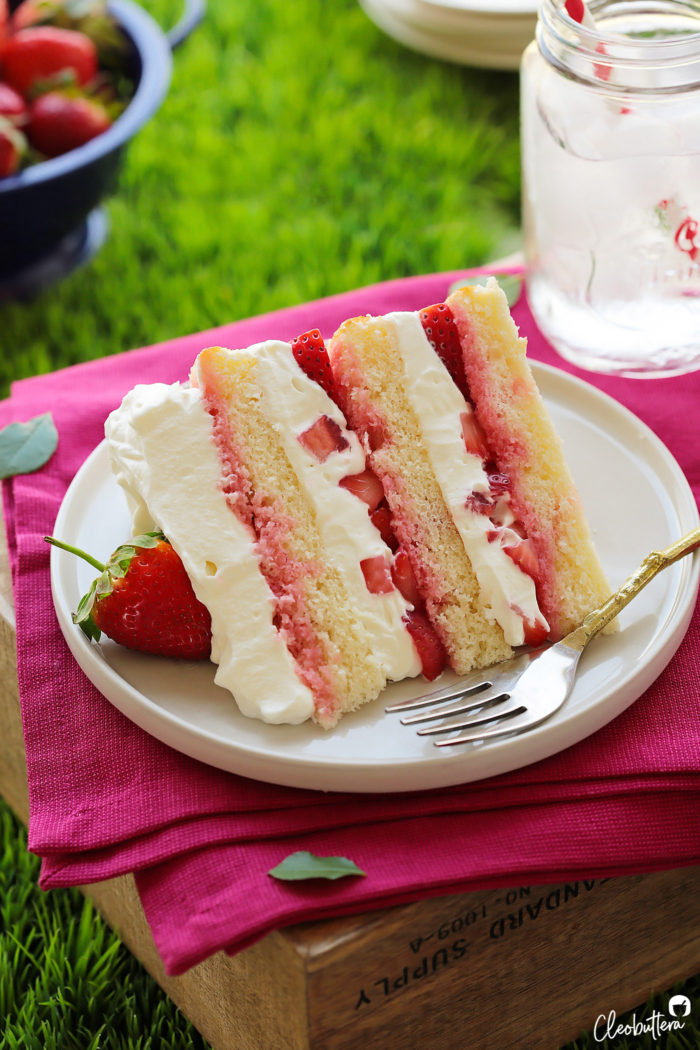
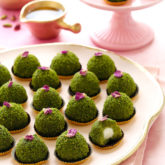
- Arrange a ring of about 16 strawberry halves, cut sides down and stem ends facing out, around the perimeter of the cake layer. This acts as a border, so the strawberry filling doesn’t fall out. It’s also pretty!
- Spread half of the glazed strawberries in the center of cake.
- Gently spread about one-third of the stabilized whipped cream over the strawberry layer, leaving a 1/2-inch border from the edge.
- Top with another cake layer, and repeat.
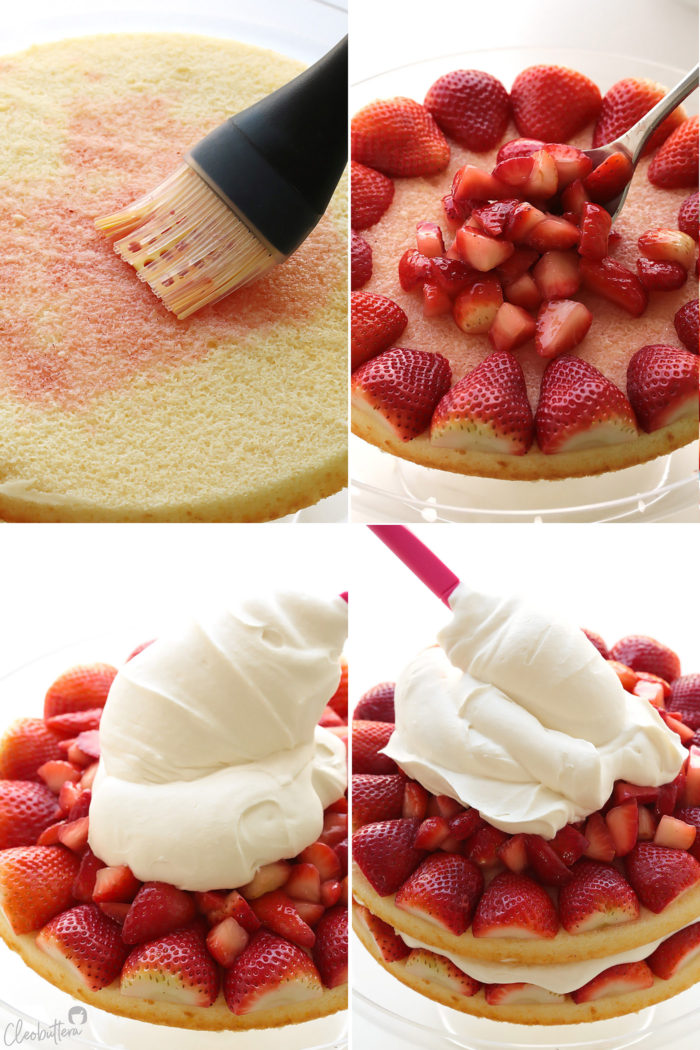
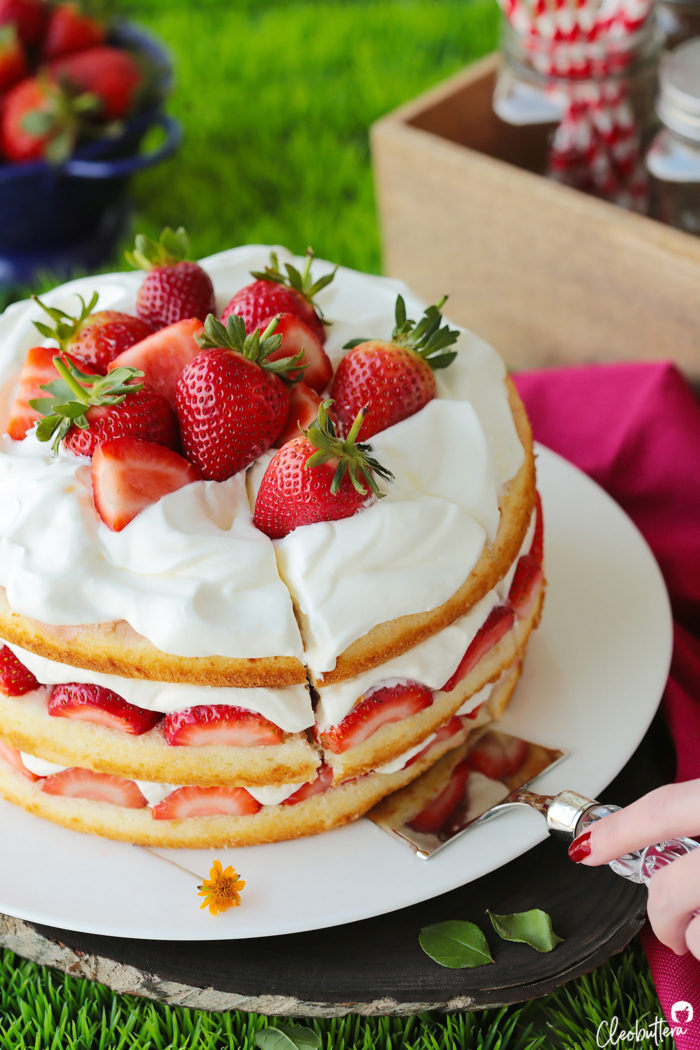
- Finally, gently press the last cake layer on top and brush with the remaining strawberry juice. Swoop and swirl the remaining whipped cream over the top and crown with a mixture of whole and halved strawberries.
- Then serve right away or refrigerate for up to 4 hours.
One bite and everyone will claim this the best strawberry cream cake they’re ever had.

Don’t be surprised if they praise the cake portion specifically. Speaking from experience here ?
So…are you gonna break the cake mix secret or keep it to your yourself?
Since we’re keeping it real, here’s a little a secret that I’m going to share with you. Actual cake slices won’t look as neat as the one you see here. I had to intricately build a slice, because the one that came out of the cake was messier than I would’ve liked. You can watch exactly how I styled the “slice” on my Instagram highlights labeled ‘Food Photo Tips.’
Tips for Success:
- Do not overbake. The enemy of moisture in cakes is overbaking. No matter how good and moist the recipe you’re starting with is, overbaking will cause it to dry out. So stay alert! Mine are done within 20 minutes, but each oven is different, so use this estimate as a rough guide. As soon as the cake springs back when lightly touched and a toothpick inserted in the center comes out with a few moist crumbs attached, then its done!
- Whip it good. A perfectly prepared whipped cream is the heart and soul of this cake. First, make sure the cooked cream mixture has completely cooled off to room temperature, before adding it to the remaining cold cream as it whips. Before you begin whipping, make sure the whipping cream is super cold. Room temperature cream won’t whip properly. Get all your equipment cold too! Chill the bowl and whisk attachment as long as you can in the fridge before using. Start streaming in the cooked cream, as soon as you start seeing whisk marks in the cream. When the cream forms soft peaks, stop the mixer and finish whipping by hand until you achieve stiff peaks. This lowers the chances of over-whipping the cream. Over-whipped cream, will split and curdle and basically turn into butter, so be careful not do that, or you’ll need to start over.
- Cool before assembling. Be sure that the cake layers have cooled completely before filling. The heat from the cakes will cause the whipped cream to melt if you add it before they cool.
- Assemble shortly before serving. While several of the cake components can be made in advance, it’s best to put them all together and finish off the cake within 4 hours before serving, so the strawberries and cream can taste their freshest best.
FAQs:
How far in advance can this cake be made?
The finished, assembled cake can be made up to 4 hours in advance and kept in the fridge until ready to serve. While several of the cake components can be made ahead of time (check recipe notes for details), it’s best to put them together as near serving time as possible, so the strawberries and cream can taste as fresh as can be.
How long will the stabilized whipped cream keep well on the cake?
In the refrigerator, it will stay well on the cake for 24 hours.
How do you store leftovers?
In an airtight container in the fridge. However, since the cake contains fresh, cut up fruit, bare in mind that it tastes best the same day its made.
Do you have a chocolate version of the doctored cake?
Yes! I make the best ever Nutella cake with it. However, still its crumblier and less sturdy than this one, I wouldn’t recommend it with fruits fillings and whipped cream.
The cake ingredients don’t contain any butter or oil. How can that be?
I was doubtful as well, but the fat in the sour cream is enough to keep the cake layers nice and moist. The absence of the butter and oil is in part, responsible for creating that sturdy, spongy cake texture that holds up so well to all the juices from the berries without turning into mush. There are WASC recipe versions that do contain 2 tablespoons of oil, and while you can most certainly add it in for another use, I don’t recommend it for this specific strawberry cream cake.
Will the stabilized whipped cream hold up to summer heat and humidity?
It’s much sturdier than regular whipped cream, but to be on the safe-side, it’s best to avoid exposing the cake to extreme weather conditions. On hot and humid days, try to keep the cake in the fridge until ready to serve. Generally, keep the cake at cool room temperature.
What from-scratch solution can I substitute the doctored cake mix with?
A genoise/sponge cake will work really well here, as well as chiffon cake. Unfortunately, I don’t have a tried and true recipe that I can recommend. Butter cakes are not recommended, as their tender crumb won’t likely hold up to all the moisture extracted from the berries and cream without breaking down.
Can I skip the doctoring of the cake mix, and just make it as directed on the box?
You certainly can, but I wouldn’t recommend it for this type of cake. It’s excessively soft and fluffy texture, won’t hold up to all the filling. It will most likely crumble apart.
The original WASC (White “Almond” Sour Cream Cake) calls for almond extract. Why did you leave it out?
Aside from not being the biggest fan of almond extract, I felt that it’s strong flavor will overpower the delicate flavors of the strawberries and cream. Feel free to add it back if you like. Go with 1/2 teaspoon. Enjoy ?
Strawberry Cream Cake
This cake requires a total of about 3 pounds/ 1.3 kilos of fresh strawberries. Weight is with the stems, before the strawberries get hulled. Amount is to be divided in the different components of the cake, in varying shapes and sizes.
Ingredients
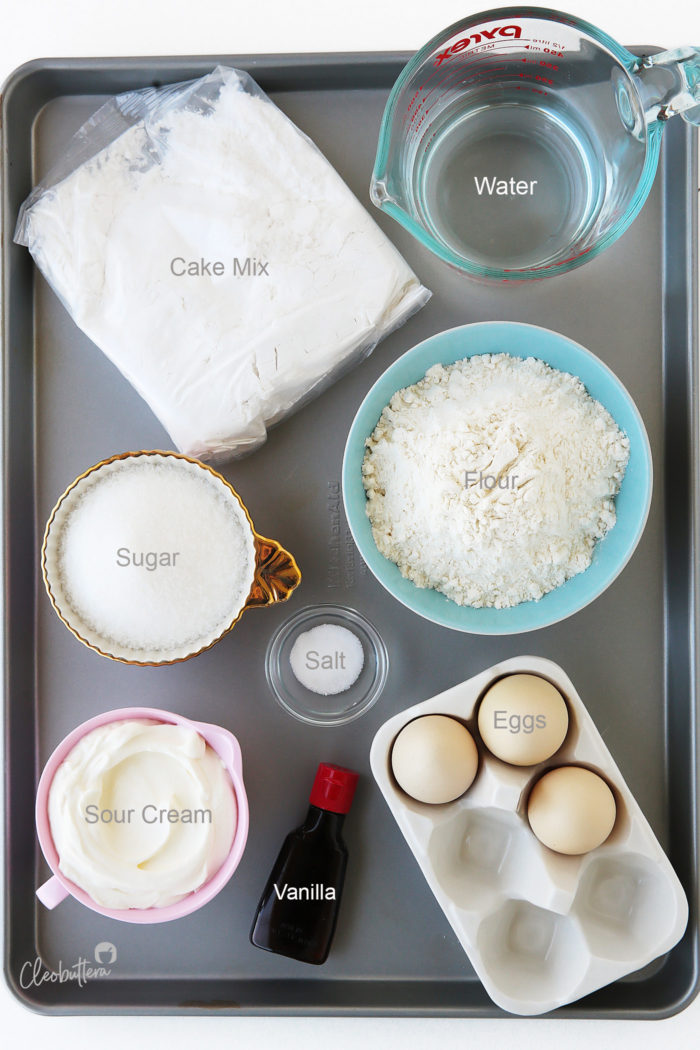
For the Cake:
- 1 (15 1/4oz/432g) vanilla cake mix (disregard instructions on the box)*
- 1 cup (125g) all purpose flour
- 1 cup (200g) granulated sugar
- 1/2 teaspoon salt
- 1 cup (242g) sour cream
- 1 cup (237ml) water
- 3 large eggs
- 1 teaspoon vanilla extract (or 2 teaspoons if using imitation vanilla flavoring)
For the strawberry filling: (You'll need a total of about 3lbs/ 1.3kg of strawberries, with the stems, for the entire cake. Amount to be divided later)
- 1 1/2 lbs (680g) fresh strawberries, stemmed & diced into 1/2 inch pieces (4 cups)*
- 3 to 4 tablespoons (38g to 50g) granulated sugar*
- 1 1/2 teaspoons water or lemon juice*
- 1/2 teaspoon cornstarch
- About 16 large fresh strawberries, stemmed & sliced in half vertically (1lb/ 450g)
For the stabilized whipped cream:
- 3 cups (700ml) very cold whipping cream, divided
- 1/2 cup (57g) powdered sugar
- 1 tablespoon (7g) cornstarch
- 1 teaspoon vanilla extract (or 2 teaspoons if using imitation vanilla flavoring)
For the topping:
- 8 whole fresh strawberries, with stems (8oz/ 227g)
Instructions
To make the cake:
- Start by preparing the cooked portion of the stabilized whipped cream (recipe below) as it needs time to cool.
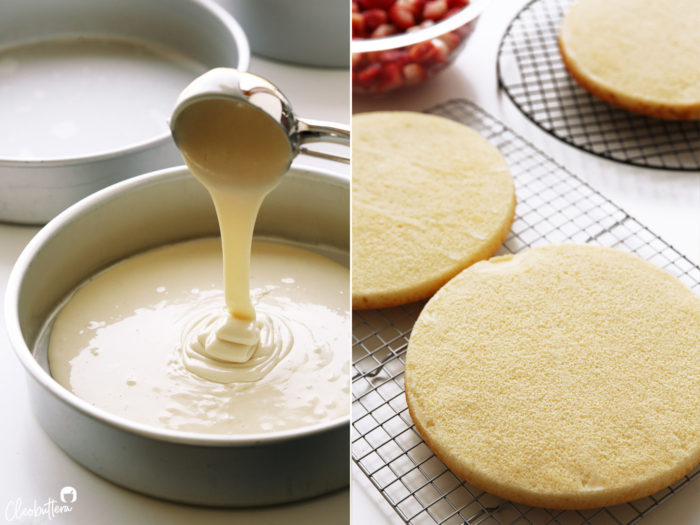
- Adjust oven rack to middle position and preheat oven to 350F/180C.
- Spray 3 (9-inch) round pans with nonstick cooking spray or lightly grease with oil. Line the bottom of the pans with parchment rounds and spray parchment or lightly grease again with oil then dust with flour, tapping out excess flour.
- In a large bowl, whisk together the cake mix, flour, sugar and salt to combine.
- Add in the sour cream, water, eggs and vanilla. Using an electric mixer on medium speed, beat everything together until well combined and a smooth batter forms.
- Give the batter a final stir to make sure it is thoroughly combined, then evenly divide batter into the prepared pans. I like to use an ice cream scoop to get an equal amount of batter into each pan, but you can also weigh them.
- Transfer the pans to the oven and bake until a toothpick inserted into center of the cake comes out clean or with a few cooked crumbs attached, 18 to 22 minutes. Meanwhile, prepare the strawberry filling; recipe below.
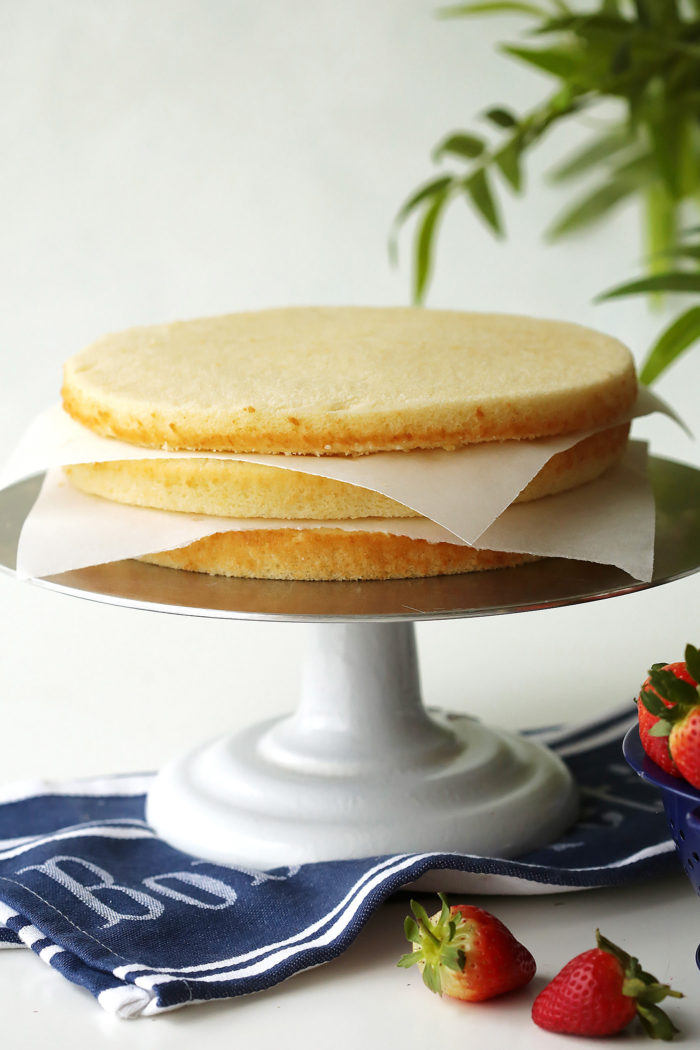
- Let the cakes cool in the pans for 10 minutes. Run a small knife around the edges of the cakes, then invert onto a wire rack, peel off parchment paper, and allow to cool completely before filling, 1 to 1 1/2 hours. When the cakes have cooled and are ready to be assembled, start whipping the cream (recipe below).
To make the strawberry filling:
- In a large bowl, toss the 4 cups (1 1/2lbs/ 680g) of diced strawberries with the 3 to 4 tablespoons of sugar (depending on the sweetness of the berries). Cover and set aside for at least 1 1/2 hours and up to 3 hours.
To make the stabilized whipped cream:
- In a small saucepan, off heat, whisk the powdered sugar and cornstarch to combine. Gradually stir in 3/4 cup of the cream.
- Place the saucepan over medium-high heat, and bring the mixture to a boil, stirring constantly until thickened to the consistency of warm pudding; it should still be pourable.
- Scrape the mixture to a measuring cup with a spout or small bowl and stir in the vanilla. Place plastic wrap directly over the surface of the thickened cream to avoid a skin from forming, then set aside to cool to just room temperature.
- In a chilled mixing bowl, beat the remaining 2 1/4 cups of cold cream just until traces of the beater marks start to appear. Add the cooled cornstarch mixture in a steady stream, whipping as you go. Continue to whip until stiff peaks form. Be careful not to over mix so the cream doesn't curdle. Keep chilled in the fridge until ready to use.
To assemble the cake:
- Drain the diced strawberries in a strainer set over a bowl. Measure out 2 tablespoons of the strawberry juice into a tiny bowl (reserving remaining juice in bowl for brushing the cake layers with later). Stir the cornstarch into the 2 tablespoons of juice, until well combined. Microwave, stirring every 10 seconds, until mixture is very thick and translucent, 30 to 45 seconds.
- Gently stir the thickened strawberry juice into the diced strawberries, to glaze. Set aside.
- If your cakes are domed, level them off by slicing away a thin layer from the top, so the cakes are as flat as possible.
- On a serving platter, place the first layer of cake and using a pastry brush, brush a third of the unthickened strawberry juice all over the surface.
- Arrange a ring of about 16 strawberry halves (more or less depending on the size of the strawberries), cut sides down and stem ends facing out, around the perimeter of the cake layer. Spoon half of the glazed, diced strawberries in the center, then spread to cover any exposed cake. Gently spread about one-third of the stabilized whipped cream over the strawberry layer, leaving a 1/2-inch border from the edge.
- Place the second cake layer over the whipped cream and gently press down. Repeat with brushing half of the remaining strawberry juice, 16 additional strawberry halves, remaining glazed strawberries, and half of remaining whipped cream.
- Gently press the last cake layer on top; brush with remaining strawberry juice. Spread remaining whipped cream over the top; decorate with a mixture of whole and halved strawberries. Serve right away, or chill for up to 4 hours. Cake best eaten on the same day its made.
Recipe Notes
- I prefer Betty Crocker French Vanilla cake mix, but any white or vanilla cake mix of your choice will work. Just be sure it's the correct weight. Depending on where you live and what brand you use, the contents of one cake mix may weight less than 15 1/4 oz. If so, empty from a second box, enough on the first to add up to the required weight.
- If you can't find sour cream, full fat Greek yogurt will work as a substitute.
- The weight of the 1 1/2lbs (680g) of diced strawberries called for the strawberry filling, is of them after the stems have been removed. So it is the net weight of the strawberries without the stems.
- Sweeten the diced strawberries according to their taste. For sweet strawberries, go with 3 tablespoons; for tart strawberries go with 4 tablespoons.
- Similarly, to macerate the strawberries, use water if you prefer a sweeter filling, and lemon juice if you like a zestier one.
- The cake layers can be made up to several days in advance. Wrap in a double layer of plastic wrap, place in a zipper-lock bag and keep at room temperature for one day or store in the freezer until needed. Thaw frozen cake, unwrapped, at room temperature for about one hour before proceeding with the recipe.
- The cooked portion of the cream can be prepared hours in advance. However, it is best to whip the stabilized whipped cream within an hour or less before assembling the cake. Keep chilled in the fridge until ready to use.
- You can macerate the strawberries up to 3 hours in advance. The glazed strawberries can be kept in the fridge for several hours until ready to use, but be sure to use within the same day..
Cake layers recipe adapted from WASC by Kakeladi on Cake Central.
Stabilized whipped cream adapted from Rose's Heavenly Cakes.
Strawberry filling adapted from Cook's Illustrated.
Measurements Note: All recipes of this site have been developed using weight measurements. Although US volume measurements have been included for your convenience, it is highly encouraged that you weigh your ingredients using a kitchen scale to get the best possible results. Due to the sensitive nature of baking, kitchen scales are proven to yield more accurate and consistent results than measuring cups. Enjoy!
Powered by ![]()
This post may contain affiliate links.
All images and content are owned by Cleobuttera® and are copyright protected. Please do not use my images without prior permission. If you would like to republish a recipe, please rewrite it in your own words and link back to the recipe page on my site. Original recipes and creations of this site are intended for personal and home use. Commercial replication or media consumption are only allowed with a written consent and agreement with Cleobuttera owners. Otherwise it is considered a violation of intellectual property. Thank you for respecting and appreciating the amount of time and effort that goes into creating free, unique recipes that make people happy.


Thank you Tasbih! I have been making a version of this myself for years (yes with cake mix!) and couldnt figure out a simple way to make the glaze..im simple like that lol..no need as once again youve informed and inspired me! Mine never looked as nice as yours but im defo going to try the design with the strawberry tops facing out round the edges, looks really nice!
Yay! Feels good to know that I’m not the only one who’s ok about using cake mix from time to time! I’m really happy to know that this post gave you some inspiration for future strawberry cream cakes. Thank you Kezra!
I have been waiting for you to post this recipe! Ever since I saw the trick on ig while photographing the slice of cake! I love love your photography tips too.. I can’t wait to get hold of good strawberries so I can make this.. is there a pistachio recipe you have perfected ? I want to try makin a pistachio cake with your basic yellow cake recipe , how would you go about adding in the flavors ? Thank you so much tasbih. For the recipes and the amazing photography that makes you really go and try your recipes !
I can’t believe the recipe is finally here too! It’s been ready for so many days, but things kept getting in the way of finishing it up. So relieved its finally live. I absolutely LOVE pistachios, which embarrasses me to say that I have never attempted Pistachio cake. Will definitely visit it really soon, but for now, I highly recommend checking Sally’s recipe. She’s awesome!
Hi Tasbih,
This is one of your most beautiful cakes
I love the photos you took. And it looks refreshing.
Ramadan is literally around the corner and I can’t wait to see what you might be posting. 🙂
Thank you so much Iram! I’m so excited about Ramadan too. I’m currently working on recipes for it and hope you love them as much as I loved making them.
Hi Tasbih ,
Thank you very much for this recipe looks delicious !! I m definetly going to make it soon but need to ask first if I can bake the 3 pans at the same time ?
Hi Rita! It’s my pleasure. Do you mean baking the entire batter in one pan at the same time time, instead of 3 different pans? If yes, then it could work if you have a pan with very high edges capable of containing the batter in without spilling as the cake rises.
Best of luck!
I cant wait to try this for my daughters bday. What would you recommend i do with mangoes simce its in season. Do i need to cool them the same way or just mashing them would be good enough
Mangoes would be amazing here! Since mangoes don’t have as much liquid in them as strawberries, I doubt they’d behave the same if you try to macerate them. I suggest using them as is (without any special treatment), adding smaller chunks in the center and larger slices around the rim of the cake. If the mangoes are not as sweet as you’d like them to be, then you can toss them in a bit of sugar 30 minutes before adding them to the cake. Best of luck!
Hi Tasbih,
What an amazing looking cake, I can’t wait to try it sooner than later. I have a question though; when in Egypt what’s the best whipping cream and heavy cream brand here, as I find dream powder to be a little bit stretchy i don’t know how hahaha and juhaina heavy cream breaks down very quickly or on the watery side.
And how about gelatin instead of cornstarch for the stabilized whipping cream?
Thank you Malak so much! I really love Almarai whipping cream; it’s perfection. Take care that Dream powder is not real “whipping cream,” so it cannot always be substituted in recipes that call for whipping cream. Gelatin is another great way to stabilize whipped cream, but I find the cornstarch method is much easier to work with. You can definitely use gelatin here if that’s what you prefer, but it requires a different preparation method.
Hello tasbih,thank you for sharing this recipe
I would like to ask if i can substitute the sour cream with the traditional full fat yogurt
Although my answer is so embarrassingly late…but yes ? Full fat Greek yogurt is the best substitute for sour cream.
I’m a student in egypt and currently baking some cakes and stuff. May i know what brands do you using for delicious fresh cream or whiping cream.? Because i tried few and it didn’t fit my taste As the texture not to good. It was like thicky-slippery texture.How can i describe that. Haha. I already tried few cakes from local bakery and the cream was super good. So back to the question.. Thank you
Hello Chang! I’m really sorry that I saw your message so late. I used Almarai whipping cream for this cake and it worked wonderfully.
My cake came out gorgeous and tasted great! The only thing was when I was making the cornstarch mixture for the stabilized whipped cream, I must have heated it too long. Once it was cooled it was extremely thick like jello. I didn’t end up adding it to my whipped cream because it wasn’t “pourable” and I couldn’t pour it into the whipped cream in a “steady stream” as the recipe states. Other than that, it was easy and delicious! Thank you for this recipe, will definitely make again!
Absolutely wonderful to hear that Amy! I’m really glad you loved it.
You’re right about the cornstarch mixture being overcooked. You’ll just need to cook it for less time the next time around, just until its thickened.
Hi,
I’m sorry to divert from the main recipe topic here, but do you think I could use this cake mix recipe but add 1/2 cup of peanut butter instead to make a butter cream filled snickers cake? Should I omit the sour cream or maybe halve it? Or leave the recipe as is and just add the peanut butter? Help! I’m looking for an easy less time consuming peanut butter cake recipe and your recipe above seemed perfect and sturdy enough to withhold the buttercream as well as the layers.
Thanks ?
Hi Arwa! So sorry for answering your comment so late, as I was going through some health issues the time you sent it. Honestly, it’s so difficult to give you a confident answer without having to try it first. I would recommend using a cake mix-based recipe that is specifically tailored to accommodate for the additional peanut butter, which I’m sure there are plenty of on the internet. If you’d still like to experiment with this one, I’d personally leave everything as is and just add the peanut butter. This recipe doesn’t have a lot of oil, so it can surely handle some additional fat. If you do try it, please let me know how it goes.
I just love with all your recipes and this cake looks so yummy, thank you so much for sharing this blog with us. the recipe you shared with all of us is really helpful. I will also try to make this cake this weekend. I hope that my cake looks the same as yours.
Thank you so much Ritika for your lovely words. I’m sure your cake will be even prettier!
Followed the exact recipe except used a little less sugar and the cake turned out perfect! Thanks a lot for this amazing recipe
I’m so happy to hear that it turned out so well for you Sana!
The recipe looks delicious I’m planning on making it today. But I don’t have 9inch pans, I only have 8 or 10 inch, which size do I use? Thank you
Hi Aya! 8 inch pans will work well here. Enjoy ?
Hi Tasbih, cake looks delish! I am thinking about a pineapple cream cake as I have canned pineapple at home, do you suggest any changes in the recipe? And could custard powder be substituted for cornstarch?
Pineapple cream cake sounds wonderful! With canned pineapples, you might not need to prepare them the way the strawberries do, since they’re already very sweet and juicy. I haven’t tried using custard powder instead of cornstarch, so I can’t tell for sure but it sounds like a good idea.
Hi, i absolutely love your recipes!
For this cake, I was hoping to make it with a custard filling instead of cream, any suggestions for a recipe for custard filling?
Thank you Fatma! That sounds delicious. I don’t have a plain custard recipe here, but I think this tiramisu filling would work beautifully. It’s a cross between a custard and whipped cream and very stable.
Hi thanks a lot for this great recipe
Can I bake all in one 23 cm pan
Hi Rita! I honestly doubt the batter will fit in one pan, without spilling as it bakes. You can bake in batches though. Bake one layer, remove from pan, bake the next, remove from pan, then bake the last.
Hi Tasbih, I did this cake and ut was a hit , thanks for sharing the recipe with all the details.
I baked it in one 23 cm pan and I cut it in 3 equal disc but I prefer to bake in 3 seperate pans .
Is it ok to bake one pan and let the batter wait in the pan in the fridge or on the counter ? And bake later?
Or leave in a dish wisk a bit again and than put in a pan and bake same for the third pan.
Or in this case divide the recipe in 3 and wisk ingredient for each pan and bake directly
Thsnk you for replying as it s always sn issue for me when doing layered bday cakes
Oh I’m really glad it worked out in the end! You can prepare the batter all in one go and bake in batches. The batter can sit at room temperature as the other layer bakes, unless your kitchen is really hot, then it’s better to refrigerate it.
Hi
Can this cake be baked and frozen
Yep! It freezes really well, but obviously without the whipped cream and fruits.
Those pics of the cake look dang tasty! Can I make it without egg?
Thank you! Though I haven’t tried it myself, but I think you can probably use an egg substitute. Here’s a good reference.
Attachment
I made it for my son’s birthday. It turned out just as advertised and it was easy and delicious!
After washing these photos of strawberry cream cake, I really want to make it at home. but I want to make it without eggs. is this possible?
Hi Tasbih,
I made this for my sister’s birthday and it was AMAAAZING! But the cooked cream part was challenging… I made it three times. All three times the cream would get thick all of a sudden and in a fraction of a second. For instance, it’d be thin (liquid) and in a second it’s a semi liquid (for solid than liquid) and I can’t repair it… The third time I took it off the stove still liquid-y and as I walked from the stove to the island it became a thick mess! My conclusion is that the pan I used (same all 3 times) didn’t conduct heat well and it was a delayed reaction where the pan got hot really fast and all of a sudden. Do you think that’s the issue? I’m sorry for the long question but I wanna try it again and this time with peaches.. I need to get this right!!!
If that’s not the issue please tell me where I went wrong. I was aiming for ‘warm pudding’. Oh and also, I think you missed mentioning the water/ lemon part while macerating. I just added it along with the sugar.
Thanks as ton! Huge fan and live your work ?
Hi Tasbih , thank you for the lovely recipe . I made it and it’s delicious , but the whipped cream was not that stabilized , I don’t know why , but be I under whipped it ?
Also I would to know if the cake recipe can be used for a fondant covered cake
Thanks
Your ebullience is refreshing!!