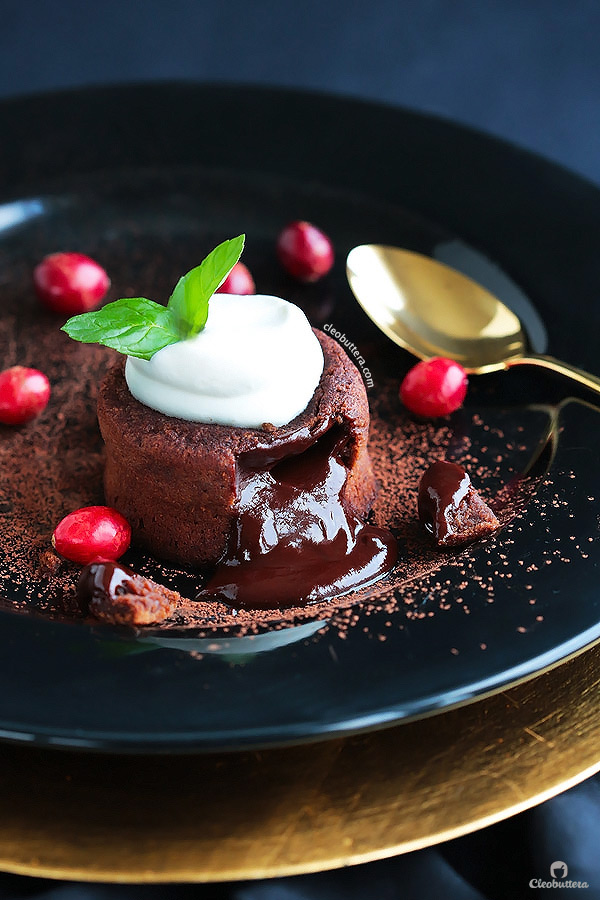
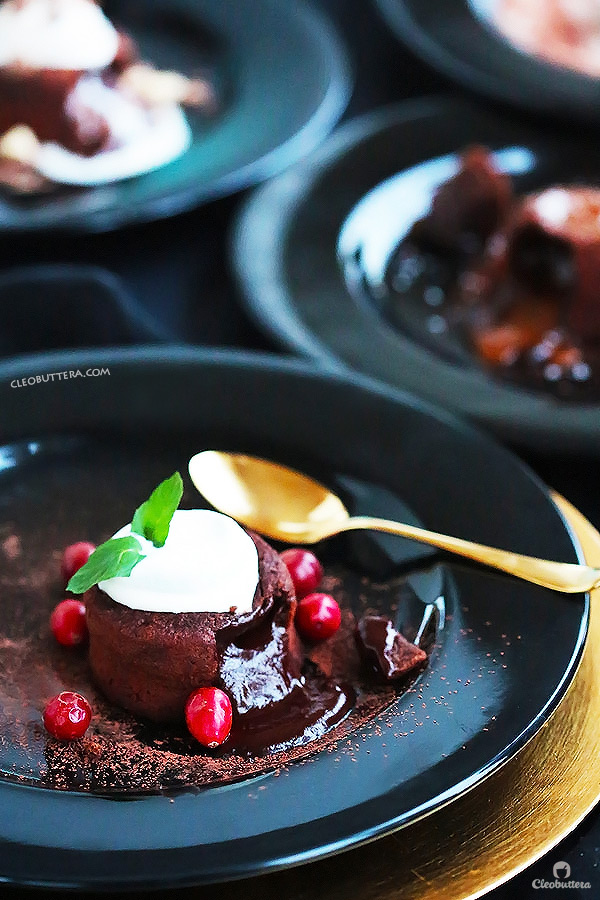
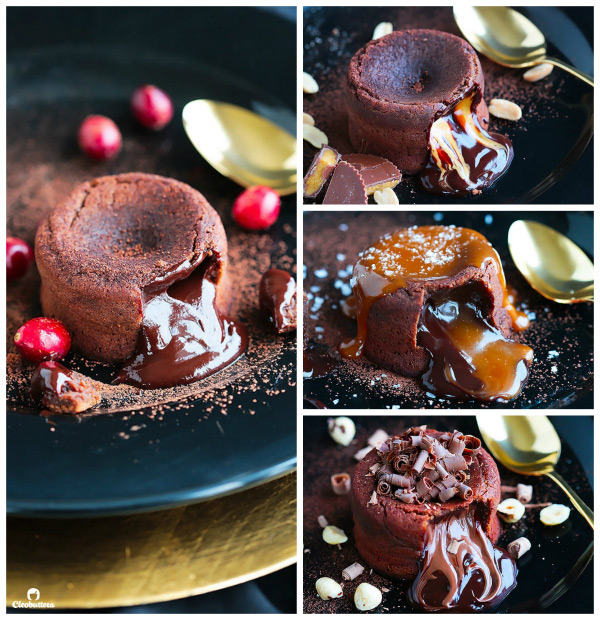
Decadent Molten Lava Cakes (4 surprise fillings)
These Decadent Molten Lava Cakes flowing with 4 different fillings, give the restaurant version a run for its money! Choose between peanut butter cup filling, salted caramel, Nutella, leave it plain for the classic OR make one of each. ONE bowl, NO mixer, so QUICK & EASY to make, and could be prepared a day ahead!
HEY THERE FRIENDS! I’ve missed YOU!!! I really do!
Still remember me?!
Your chocoholic blogger from Egypt who has a hankering sweet tooth and an obsession with stuffing sweets into other sweets, but has left you a month and a half with no new recipes?
NO?
Does this ring a bell? How about this? Then this for sure! No? This? Nothing?
Can’t blame you…I’m the one who got swallowed up by life’s daily grind, which turned a few days of a blogging break into an unintentional hiatus.
There were also some traveling involved, a whole lot of kids’ stuff, obsessively weighing food and counting Smart Points as my husband & I rejoin Weight Watchers (because Oprah convinced us) and testing literally 15 batches of Red Velvet Cupcakes. Recipe NOT coming soon. Unfortunately 🙁 Not giving up just yet though?
The thing is…I take recipe sharing very seriously, which makes me very selective of what I post here. So if a recipe doesn’t turn out the BEST it could possibly be, then I’d rather not share it all. Even if that’s at the expense of not updating the blog with a new post for a few weeks. I know how spending a lot of time, effort and money on a recipe, only to end up with something that is just “meh” feels, and I’d hate to be the cause of this type of frustration. I might not blog everyday (even though I wish I could), but when I do, it has to be worthwhile. A recipe you could trust. The BEST I could possibly offer you. So while non of the Red Velvet Cupcake recipes passed the test for perfection, these Molten Lava Cakes have. With flying colors!
They are super chocolatey, rich without being heavy and laden, with just enough sweetness to satisfy kids and adults alike. The outside is a cross between cake and a fudgy brownie and the inside is puddling with the best kind of lava.
Not only is this the most perfect and easiest Chocolate Lava Cake recipe I’ve tried over the years, but this version right here comes in four different flavors.
- THE CLASSIC.
You could never go wrong with the classic. Oozing with a river of silky chocolatey goodness, just like the one we go crazy over at fancy restaurants. If not better. Pure and unadulterated. JUST CHOCOLATE. Simple but splendid.
But for those times when you want to kick things up a bit, a dollop of your favorite spread or sauce can transform the classic cake we know and love, into an elevated experience.
Here, I’ve used my personal favorite flavors in the world; salted caramel, peanut butter and Nutella (duh!), but I’ve added other suggestions down in the recipe details, in hopes of satisfying most tastes.
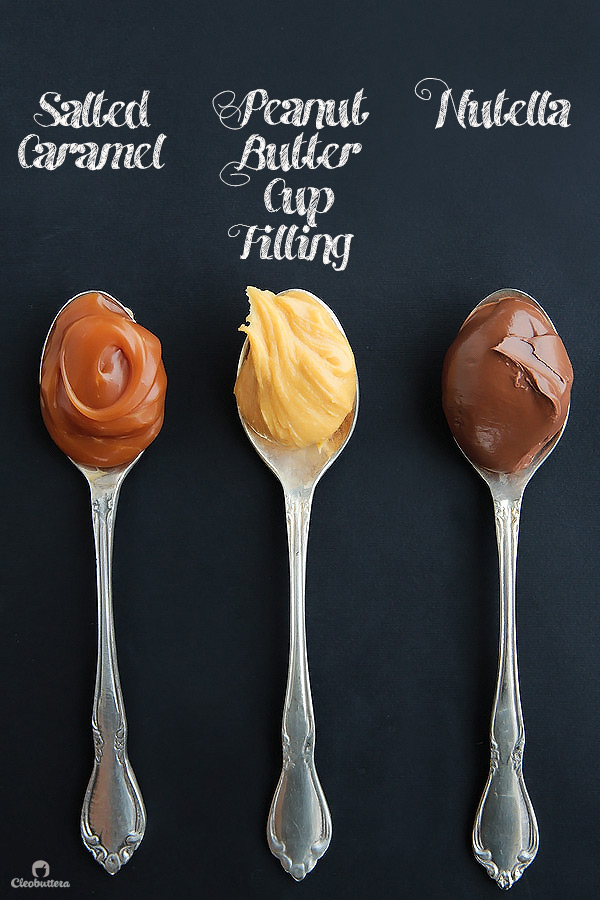
2. THE PEANUT BUTTER CUP.
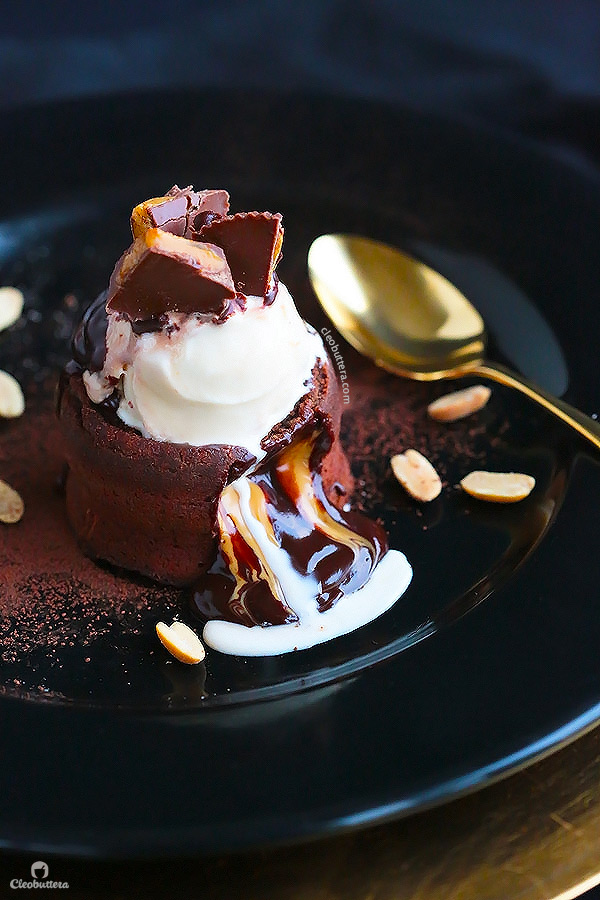
Peanut butter and chocolate? I mean…who could argue with that? But instead of simply adding pure peanut butter straight from the jar, which I’ve tried and found to be too heavy and lacking sweetness for my taste, I made a simple paste that tastes just like the inside of a peanut butter cup. Even better right? If you’re a peanut butter lover, this will easily become one of the best desserts you’ve ever had.
3. THE SALTED CARAMEL.
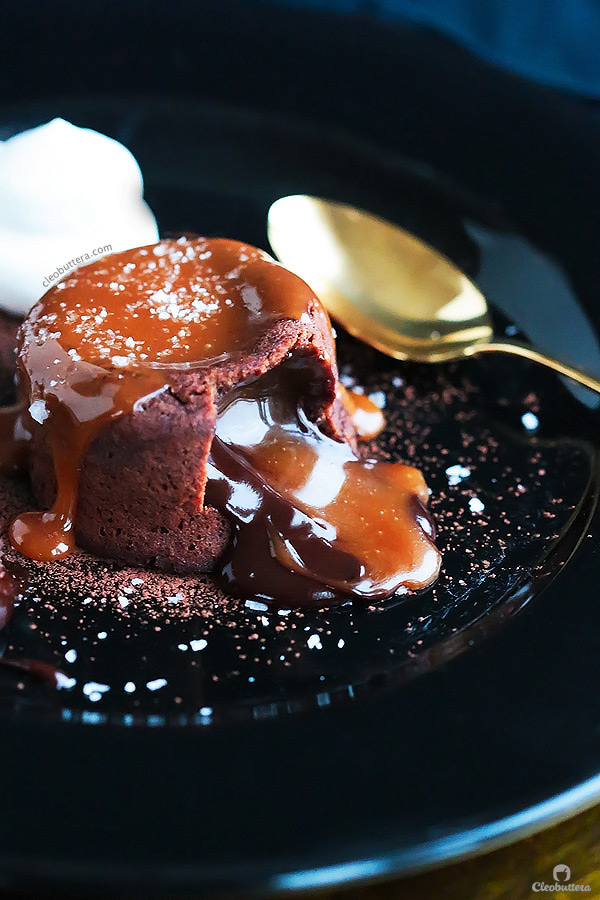
Homemade salted caramel adds savory notes, depth and extra yumminess to what is already a decadent treat. This might just be my favorite of the four flavors. I think. That is of course if you twist my arm to pick just one. You could use storebought salted caramel or make this one; its to die for! A sprinkling of sea salt flakes, cuts down the sweetness and tickles the tongue. AMAZING!
4. THE NUTELLA.
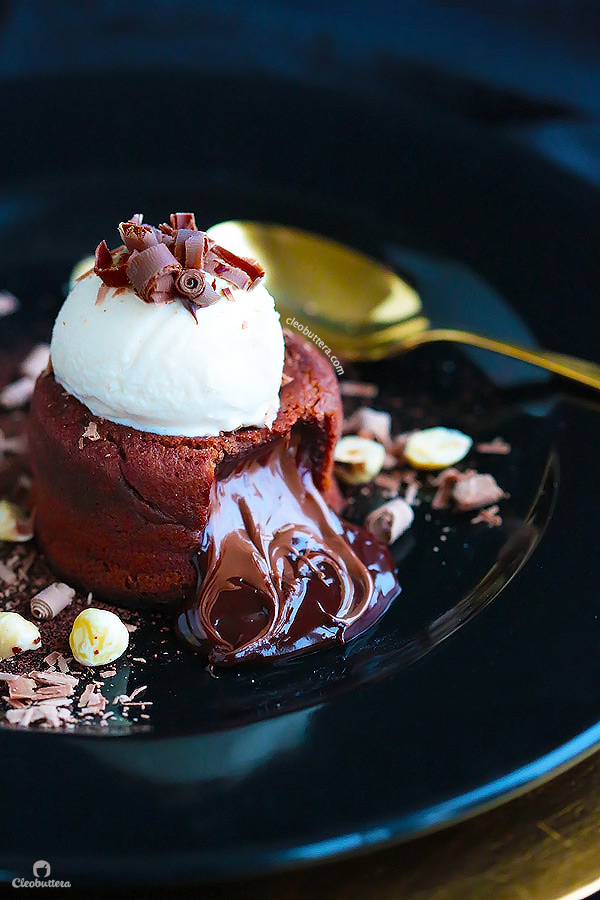
You didn’t think I’d let this one go without stuffing it with Nutella didn’t you? If you know me just a little, then you know I can’t leave much alone without smothering it in Nutella and this one is no exception. If you’re a sucker for the chocolate hazelnut goodness as I am, then do yourself a favor and make this one. Trust me.
Making these impressive cakes are a lot easier than you think. They come together in 10 minutes, in ONE bowl and don’t even need a mixer. They are one of these dump and stir kind of recipes, but the outcome will drop jaws.
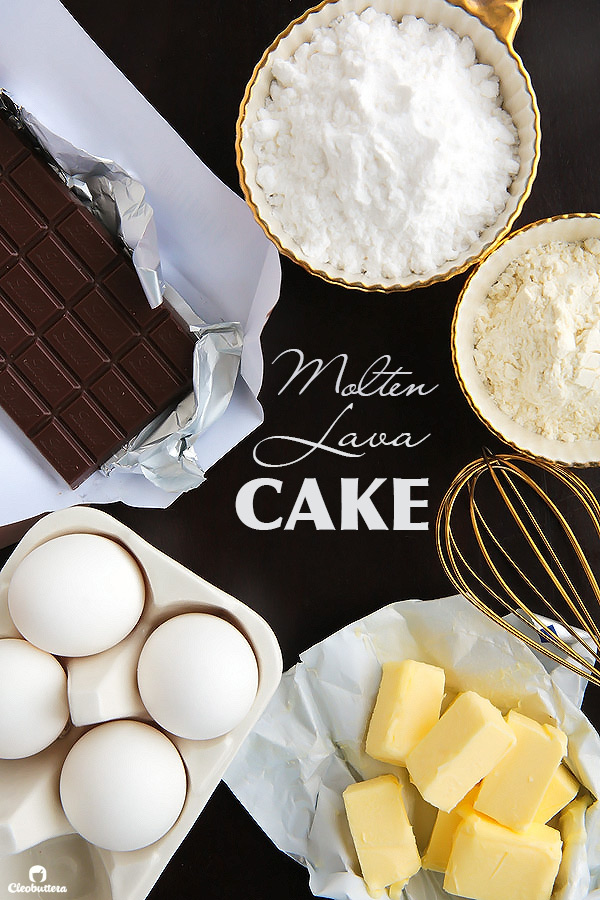
FIVE ingredients are all you need to make this restaurant specialty. Good quality dark (or bittersweet) chocolate, butter, powdered sugar, eggs and flour.
Good quality chocolate is key to this dessert, because it’s all you’re tasting. There’re nothing much to cover it up. Use dark chocolate with a cocoa content of at least 52% for a less dark, more kid-friendly version, but go as high as 75% or 80% if you prefer the flavor and bitterness of extra dark chocolate.
Chop the chocolate up then microwave it with some butter for about 1 minute.
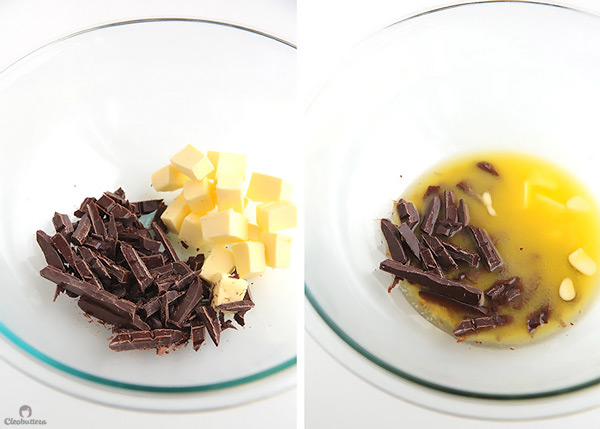
Whisk them together until everything melts and becomes smooth. Then add in the powdered sugar.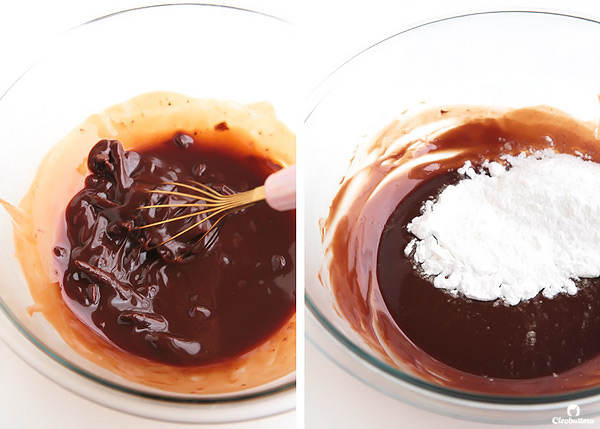
Whisk that in, then add 2 eggs plus 2 egg yolks. Mix these guys in.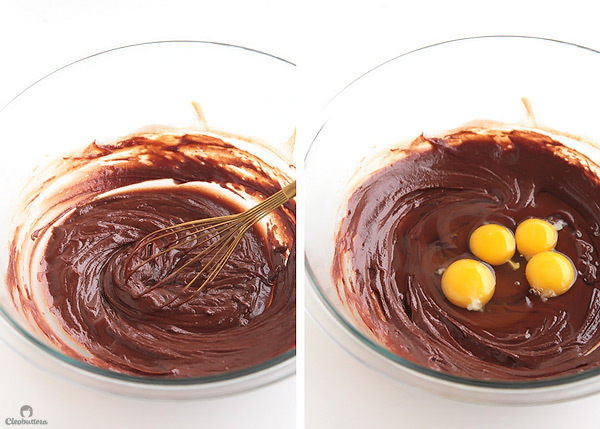
Then stir in the flour. That’s it! I told you that making the batter couldn’t be easier!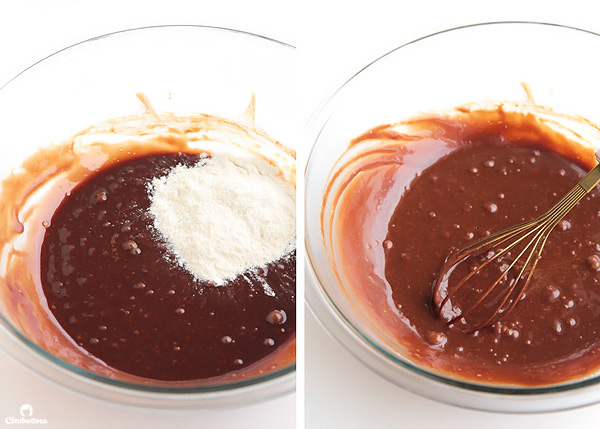
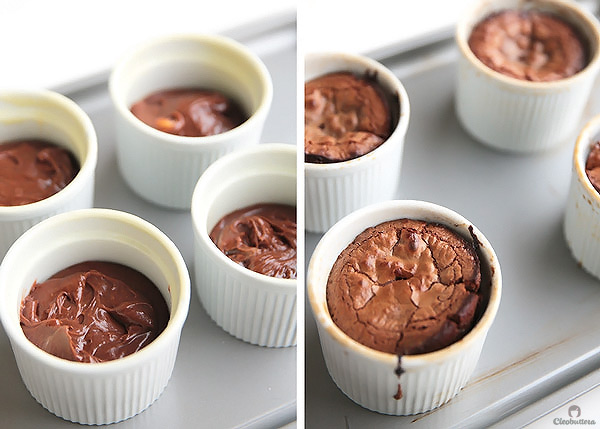
You’ll then divide the batter among 4 sprayed ramekins or custard cups. The disposal aluminum foil ones are OK too. Reserve some of the batter aside.
Then plop right in the center, 2 teaspoons of your preferred spread in each one. I made one of each! Because I’m indecisive when it comes to food.

Use the reserved batter to cover up the fillings.
Here’s the only tricky part of the recipe? The baking time! You’ll want to bake these babies for 12 to 14 minutes, until the edges are firm and spring back to the touch but the center is still soft, but not super jiggly. I bake mine for exactly 13 minutes, but baking time will vary based on ovens, ramekins, and climate variances. Do NOT overbake or you’ll lose that molten lava center. Don’t worry if you don’t get it perfect the first time, it might take a few tries till you find your MAGIC baking time but it will still taste great!
And when you do, you’ll be rewarded with a gourmet dessert kissed by your favorite spread or sauce. Or all 4 of them!
And no one needs to know that they were so quick and easy to make. Let them think you’re diva you truly are!
Watch a quick video of the making of these cakes on my Instagram account.
For a similar microwave version and readers’ favorite, be sure to check out this Molten Chocolate Mug Cake.
Decadent Molten Lava Cakes (4 surprise fillings)
These Decadent Molten Lava Cakes flowing with 4 different fillings, give the restaurant version a run for its money! Choose between peanut butter cup filling, salted caramel, Nutella, leave it plain for the classic OR make one of each. ONE bowl, NO mixer, so QUICK & EASY to make, and could be prepared a day ahead! Please see NOTES below for making ahead instructions.
Ingredients
- 4 oz/ 113.4 grams good quality dark or bittersweet chocolate, finely chopped (*see note for details)
- 1/2 cup (4 oz/ 113.4 g) unsalted butter
- 1 cup (4oz/ 113.4 g) powdered sugar
- 2 large eggs
- 2 egg yolks (discard whites or freeze for later use)
- 6 tablespoons (1 5/8oz/ 46g) all-purpose flour
For Filling Variations (each filling quantity is enough for ONE cake. Double, triple or quadruple to fill your desired amount of cakes):
- 2 teaspoons COLD salted caramel, store-bought or homemade
- 2 teaspoons Nutella or your favorite chocolate hazelnut spread
- 2 teaspoons WELL SET Peanut Butter Cup filling (recipe below), but creamy peanut butter straight from the jar may be substituted, but it will taste less sweet and much richer. Do NOT use natural-style peanut butter in both case
For the Peanut Butter Cup Filling (enough for ONE cake. Double, triple or quadruple to fill your desired amount of cakes):
- 1 teaspoon creamy peanut butter (Do NOT use natural-style)
- 1 teaspoon butter
- 1 teaspoon powdered sugar
Other Filling Ideas:
- Dulce de leche
- Cookie Butter, like Biscoff
- Milk, dark or white chocolate ganache
- Chocolate truffles
- Caramel filled chocolate, like Rolo
- Chilled hot fudge sauce
- Chilled butterscotch sauce
- Fruit preserves or puree
Serving and Garnish Suggestions:
- Ice cream, whipped cream, extra salted caramel sauce, sea salt, hot fudge sauce, chopped peanut butter cups, berries and mint Leaves.
Instructions
- Adjust oven rack to middle position and preheat oven to 425F/218C.
- Spray four (6-8 oz) ramekins or custard cups (glass or disposable aluminum foil) with non-stick cooking spray. Alternatively, butter the ramekins or custard cups, then dust with flour or unsweetened cocoa powder. Place them on a baking sheet, then set aside.
- In a medium microwave safe bowl, combine the chopped chocolate and butter and heat in the microwave for about 1 minute, stopping and stirring every 30 seconds, until the butter and chocolate are almost melted. Continue to stir, allowing the residual heat to completely melt the chocolate and the mixture is well combined and smooth. If needed, return the bowl to the microwave for a few more seconds, to completely melt the chocolate.
- Add in the powdered sugar and whisk until fully incorporated.
- Add in the eggs and egg yolks and whisk until well combined.
- Add in the flour and whisk until smooth.
- Divide the batter evenly among the 4 prepared ramekins/custard cups leaving less the quarter the amount of batter behind in the bowl. I like to use an ice cream scoop for evenly dividing the batter.
- Add 2 teaspoons of your desired filling in the center of the batter (or leave it plain), making sure that the filling doesn't touch the sides of the ramekins/custard cups.
- Pour the reserved cake batter evenly on top of each filling so its no longer visible.
- Transfer the baking sheet to the oven and bake for 12 to 14 minutes, until the edges are firm and spring back to the touch but the center is still soft, but not super jiggly. Note that the caramel filled cake takes a little longer than the rest to bake through. I bake my cakes for exactly 13 minutes and the caramel-filled one for 14, but baking time will vary based on ovens, ramekins, and climate variances. Do NOT overbake or you'll lose that molten lava center. Don't worry if you don't get it perfect the first time, it might take a few tries till you find your MAGIC baking time but it will still taste great!
- Let cool for 2 minutes, then gently run a knife around the edges of the cakes to loosen. Invert onto the serving plates. If desired, dust with cocoa powder or powdered sugar, then serve immediately while still very warm along side any of the serving and garnish suggestions listed above.
To Make the Peanut Butter Cup Filling:
- Place the butter in a small microwave safe bowl, and heat in the microwave for a few seconds until melted. Add in the peanut butter and a powdered sugar and stir until smooth and has no lumps. Cover and chill in the refrigerator to set until ready to use.
Recipe Notes
- I used Lindt dark chocolate, Carrefour baking chocolate and Gourmet Belgian dark chocolate buttons all with a cocoa content of at least 52% for this recipe. The result was so chocolatey but not dark, and sweet enough but not so much so, making it perfect for both kids and adults alike. If you prefer the darker taste of bittersweet chocolate and less sweetness, I recommend using chocolate with a higher cocoa percentage. The higher you go the more intensely chocolatey and darker it will taste. Good quality chocolate chips may be substituted.
- To make ahead, prepare batter as directed; pour into prepared ramekins or custard cups. Cover and refrigerate for up to 24 hours. Let stand at room temperature 1 hour before baking as directed.
Classic base recipe adapted from Averie Cooks, who adapted it from Kraft.
Measurements Note: All recipes of this site have been developed using weight measurements. Although US volume measurements have been included for your convenience, it is highly encouraged that you weigh your ingredients using a kitchen scale to get the best possible results. Due to the sensitive nature of baking, kitchen scales are proven to yield more accurate and consistent results than measuring cups. Enjoy!

Powered by ![]()
This post may contain affiliate links.
All images and content are owned by Cleobuttera® and are copyright protected. Please do not use my images without prior permission. If you would like to republish a recipe, please rewrite it in your own words and link back to the recipe page on my site. Original recipes and creations of this site are intended for personal and home use. Commercial replication or media consumption are only allowed with a written consent and agreement with Cleobuttera owners. Otherwise it is considered a violation of intellectual property. Thank you for respecting and appreciating the amount of time and effort that goes into creating free, unique recipes that make people happy.