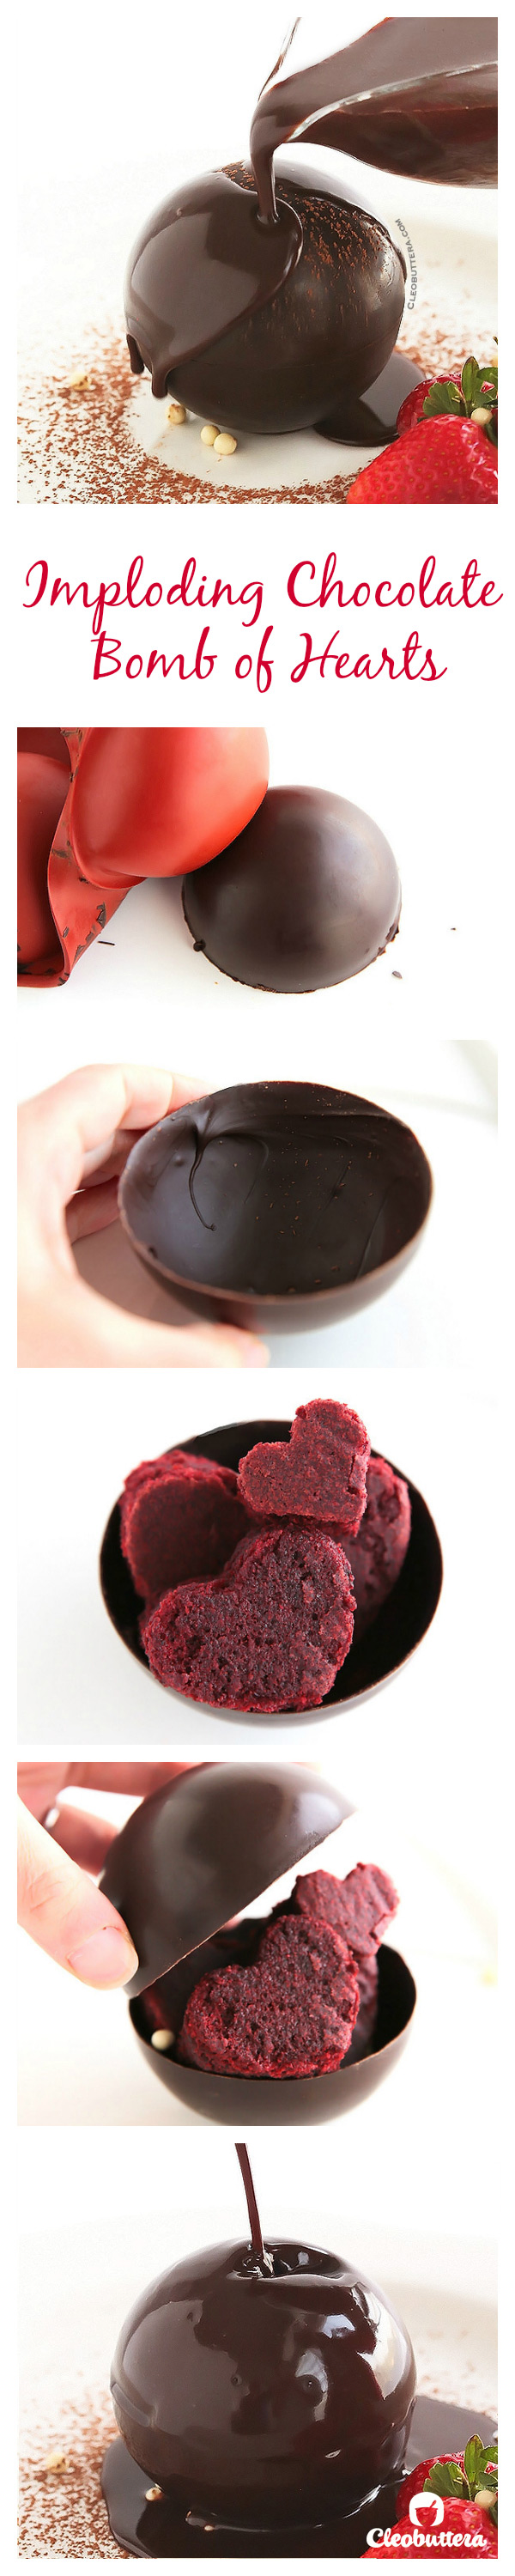
Imploding Chocolate Bomb of Hearts {with Nutella Sauce}
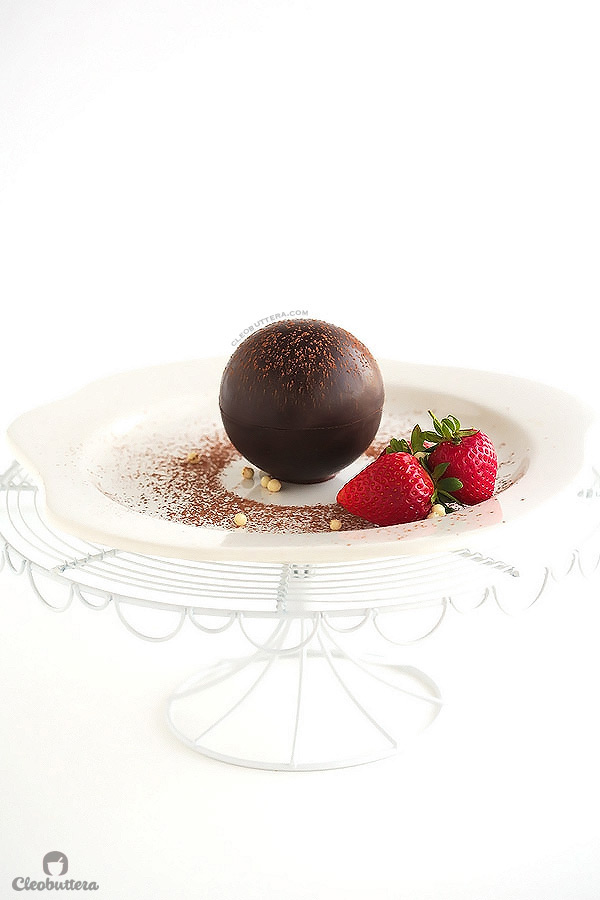
A show-stopping chocolate sphere, magically filled with mini red velvet cake hearts, beautifully collapses to the warm drizzle of Nutella sauce. This is one unforgettable dessert with a huge wow-factor!
We’re wrapping up the World Nutella Day palooza, with one grand finale.
A fancy restaurant dessert that has been causing jaws to drop, setting a new food trend on fire and going viral on social media.
It’s one of those things that makes people go gaga, leaving them in utter amazement, making you feel like a culinary genius.
And only you can know that it’s A LOT simpler than it really looks.
A chocolate ball that sits so innocently on a plate, will blow everyone away with its magical charm as soon as the warm drizzle of Nutella sauce tantalizingly lands on its smooth, round surface.
See? Told ya’. A real wowzah!!!
I’ve been there among the puzzled majority not too long ago, when I got tagged to see this beauty on Instagram. I was like…”say whaaaaat? How did that chocolate ball swallow that darn piece of cake?!!”
I got this epiphany; it must’ve been pregnant!
But then when I came out of my cartoon state of mind, I started to really try and solve the mystery.
Could there be a hole in the bottom where they stuffed the cake in? But then what type of chocolate mold would that look like? So many questions that led to nothingness.
And theeeeeeeeeen the stars aligned when a friend of mine sent me a video of the making out of nowhere. Score!!!!
Then it was all “aaaaaaaaaahhh” the whole time watching. “How did I not think of that?! I need an IQ recharge asap!”
It turned it out be totally doable you guys! And if I can do it, so can you.
Let me unveil the simple reality.
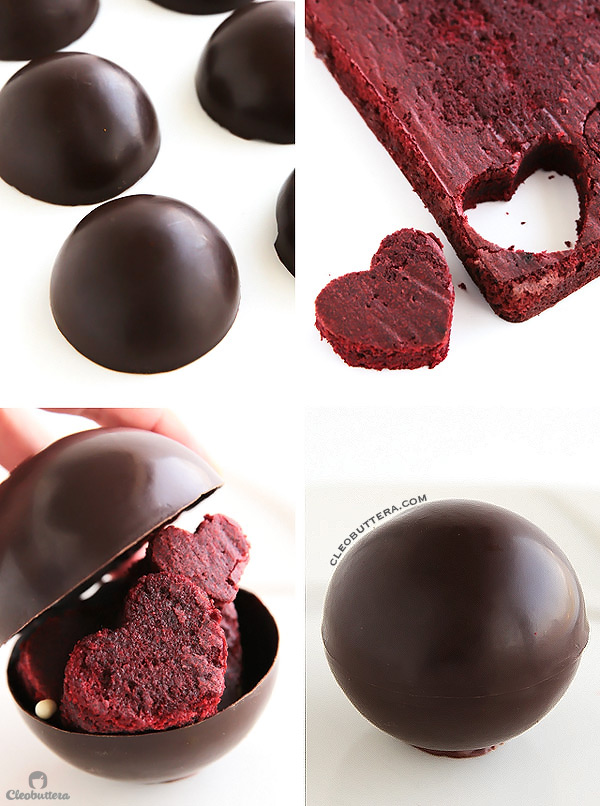
Two molded chocolate hemispheres, stuffed with cake, placed on top of one another. Done! And I think it goes without saying that the warmth of the sauce poured on it, is what melts it.
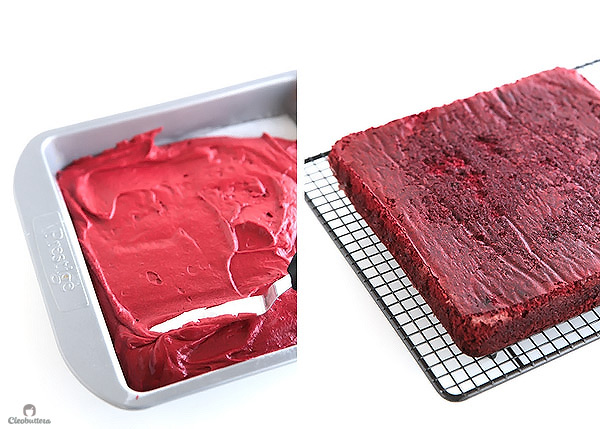
And since its February “month of love,” it was only fitting to fill it with red velvet cake. A really really good red velvet cake. I’m normally not a red velvet cake fan; all I could taste is food coloring. This one though, is something else. It actually has flavor. An insanely yummy one. It has more cocoa powder than most other recipes, so its more chocolatey than the classic red velvet, which in my opinion, equals yum! That also makes it go perfectly with the Nutella sauce. Speaking of Nutella sauce, it might look familiar from here. And can I talk about how moist it is? Yeah? That too. Soooo moist. It might just become your favorite red velvet cake recipe too.
So you bake some of that red velvet goodness in a square pan, or rectangular, and let it cool completely. While that’s happening, let’s start on the bombs!
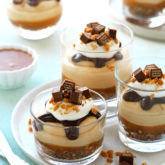
Here’s the thing. You’re gonna need a mold like this. One the has hemispheres. I happened to have this silicone one from a long time ago, but honestly, I didn’t love it here. It was too flimsy to work with. So if you’re gonna get out of your way to buy one, then I’d recommend you get the plastic, more professional mold.
If you don’t have a mold like this but still wanna make it, a small bowl would work too. It probably won’t turn out into a perfect sphere, but you’ll still get that wowing, imploding effect. You’ll need to line the bowl with plastic wrap, though, to be able to get the hardened chocolate out.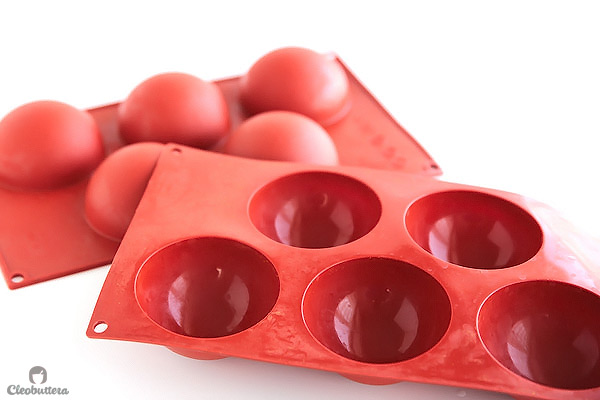
So…this is really really important, but you absolutely have to temper your chocolate before using. It sounds complicated and scary, but the method used here is so simple and works like a charm. Tempering chocolate means getting the chocolate to the ideal temperature for it to set into a smooth and glossy finish that snaps. If you simply melt the chocolate here without tempering, the spheres could end up with gray spots and streaks, but most importantly it will be too soft to stand up to the bomb shape and filling. It’ll probably just collapse on its own. No hot sauce required.
There are so many methods, but I think that this one just happens to be is the simplest. This video explains the process of this very method perfectly, so check it out. You’ll start by melting 3/4 of your chopped chocolate in the microwave. Stopping the microwave every 10 seconds and stirring until almost melted, about two-thirds of the way. The rest will melt on its own from the warmth of the chocolate as you keep stirring. You really don’t wanna get your chocolate too warm.
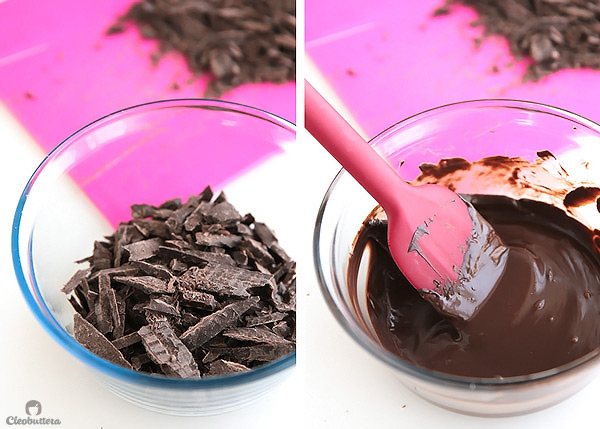
Then you’ll add in the rest of the chopped chocolate and stir it in to melt. 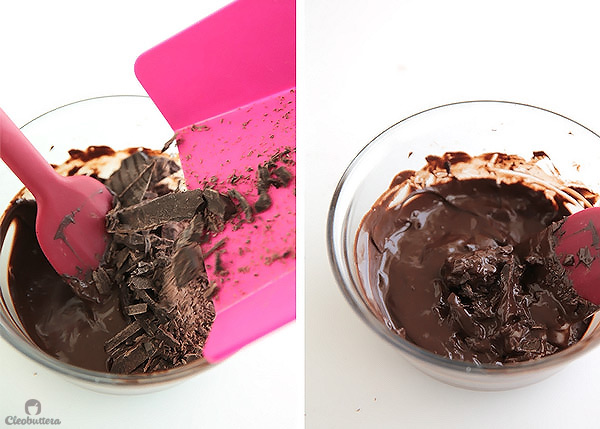
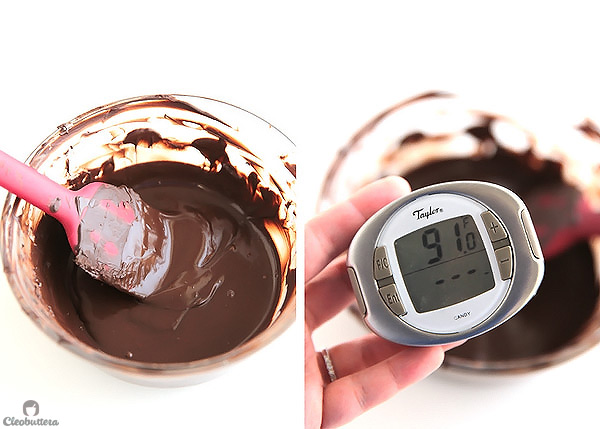
If a few lumps of chocolate remain, put it back in the microwave for no more than 5 seconds at a time, stirring in between. If you have a candy thermometer and just wanna make sure, the temperature should be between 88 and 91F. Now your chocolate is ready to use.
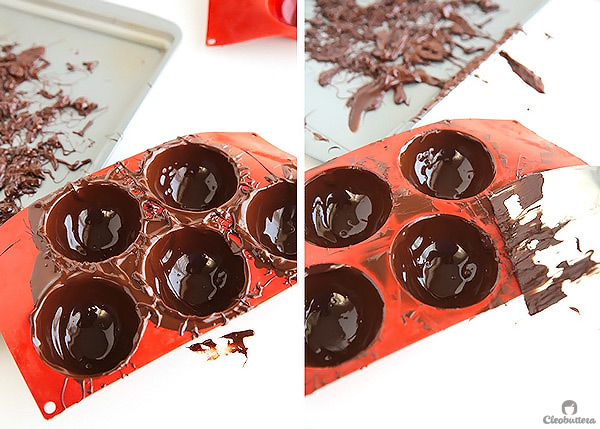
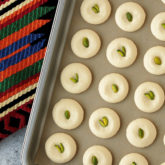
You’ll pour the chocolate into the mold cavities and swirl it around to cover. Use a spoon to help cover the cavities with the chocolate if you need to.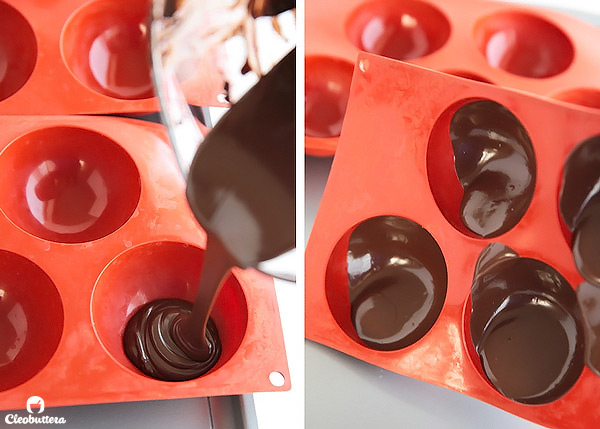
Turn the mold upside down, shake it really really hard on top of a baking sheet to let all the excess chocolate drip (not pictured). Flip it back again, and scrap away all the chocolate mess cluttering on the top. This will give the hemispheres sharp straight edges. Now put that in the freezer for about 5 minutes to set.
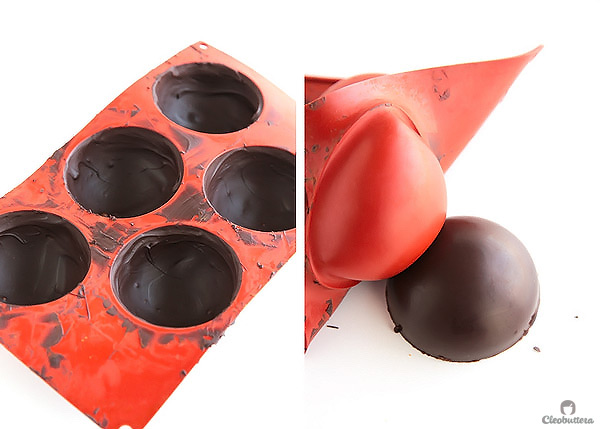
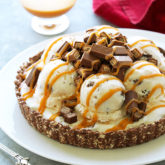
Let it rest a little at room temperature, then pop ’em out. If the hemispheres edges end up with little shards around the rim (like the one below on the right), smooth it carefully with a sharp knife.
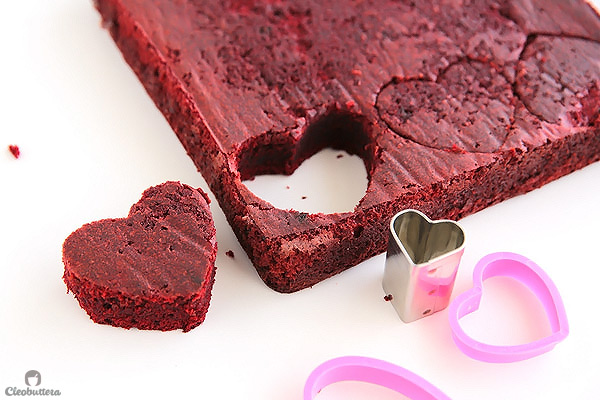
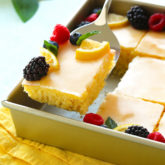
Now you’re ready to put everything together. Cut out heart shapes out of the red velvet cake using heart cookie cutters in assorted sizes.
To let the sphere stand up straight on the plate, use a little melted chocolate as glue. Dab a little of that in the center of the plate, then stick a hemisphere right on top of it.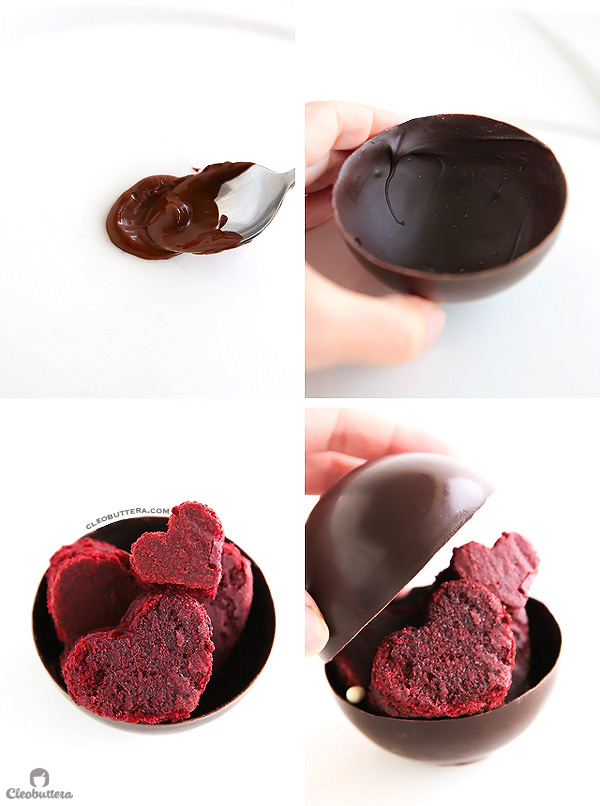
Fill it up with the hearts, then place another hemisphere on top.
Gently twist the top hemisphere until you find the perfect fit so there are minimal gaps.
See? No need to even stick them together. The line is so faint, no one’s going to pay attention to it when the show is on.
Now let’s get the show started! Heat that luscious Nutella sauce until very hot, because that’s what will melt the bomb.
Ooooooooohhhh yeaaaahhhh…..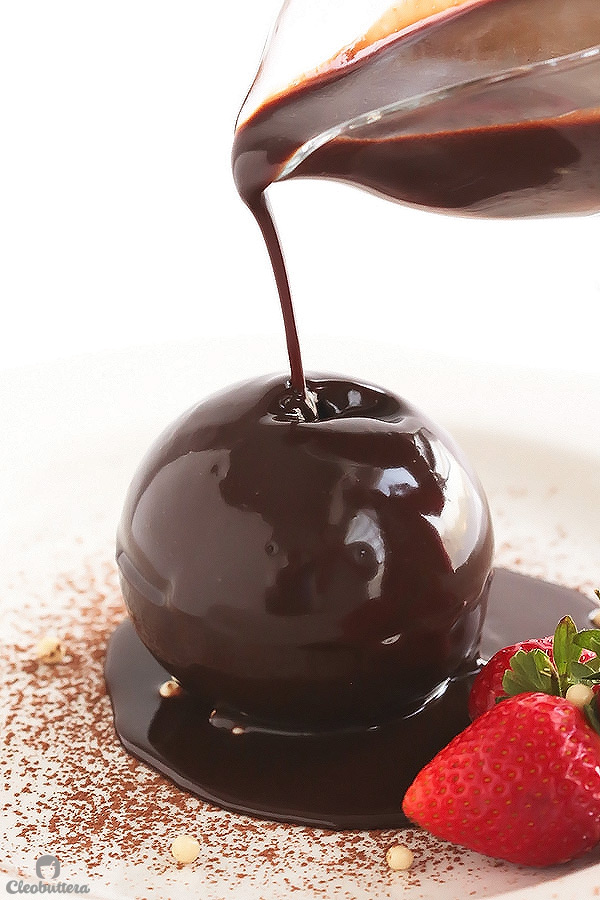
And when it collapses, it will look like the most beautiful mess.
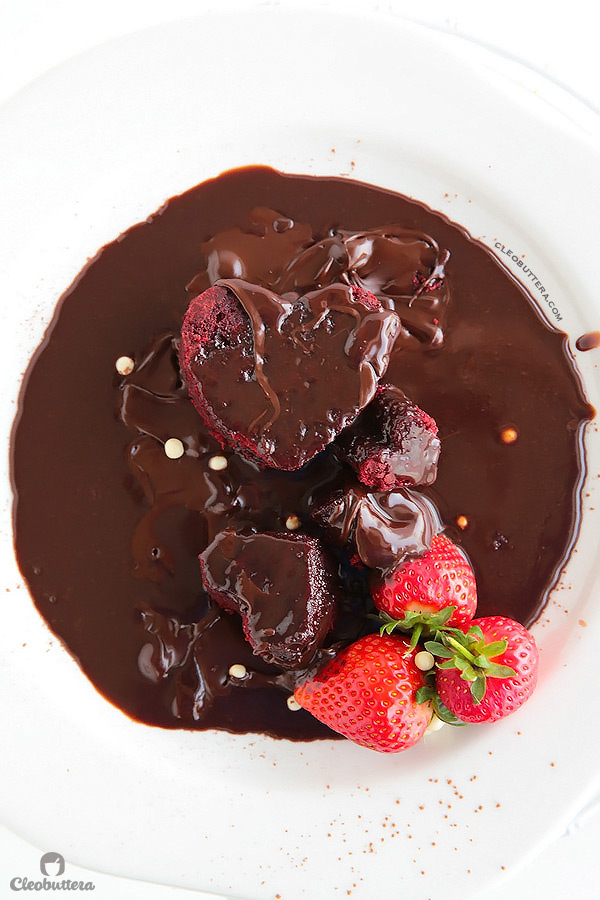
And if that sauce wasn’t enough for you, pour mooooooore.
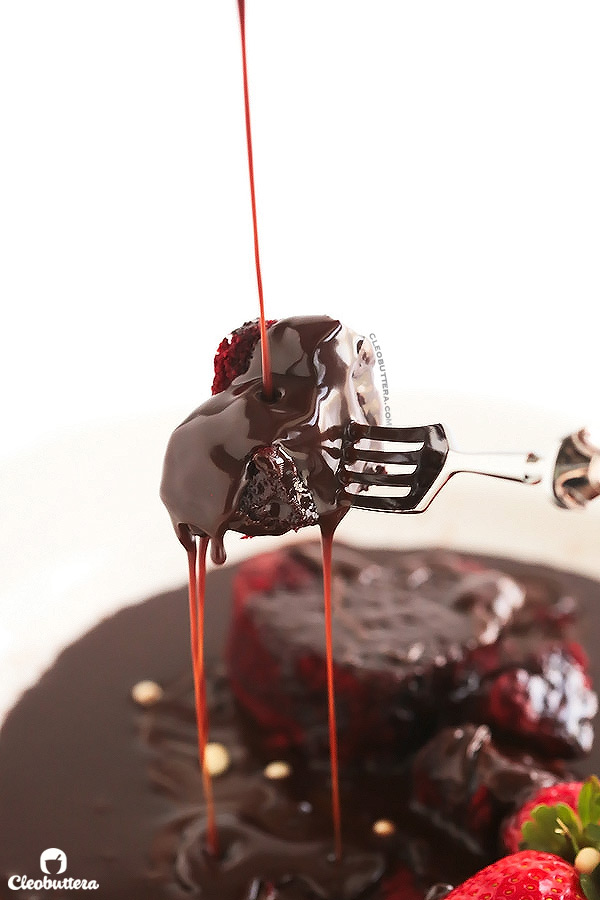
That’s it…I can speak no more. Nom nom nom.
I’ll leave you with this video.
Imploding Chocolate Bomb of Hearts {with Nutella Sauce}
A show-stopping chocolate sphere, magically filled with mini red velvet cake hearts, beautifully collapses to the drizzle of warm Nutella sauce. This is one unforgettable dessert with a huge wow-factor!
Ingredients
For the Red Velvet Mini Cake Hearts:
- 1 cup plus 2 tablespoons (135g) all-purpose flour
- 1/4 cup (21g) natural unsweetened cocoa powder
- 1/2 teaspoon baking soda
- 1/4 teaspoon salt
- 1/2 cup (4oz/ 114g) unsalted butter, softened to room temperature
- 1 cup plus 2 tablespoons (225g) granulated sugar
- 2 large eggs, at room temperature
- 1/2 cup (114g) sour cream, at room temperature
- 1/4 cup buttermilk, at room temperature
- 1 1/2 teaspoons gel red food coloring or 1/2 ounce red liquid food colouring (I used Americolor Super Red gel)
- 2 teaspoon vanilla extract
For the Chocolate Bombs:
- 8oz (227g) finely chopped good quality chocolate, dark, milk or white, (make sure it's specalized for baking use)
- Hemisphere mold(s) with 8 cavities, each cavity is about 3"/7cm in diameter, 1 1/2"/4cm in depth (I used silicon)* (see note)
For the Nutella Sauce:
- 3/4 cup (227g) Nutella
- 1/2 cup whole milk
Instructions
For the Red Velvet Mini Cake Hearts:
- Adjust oven rack to middle position. Preheat oven to 350F/180. Grease (or spray with non-stick cooking spray) the bottom and sides of an 8" or 9" square cake pan then line with parchment paper. Grease and flour the parchment paper or spray again.
- In a medium bowl, whisk together the flour, cocoa powder, baking soda and salt. Set aside.
- In the mixing bowl of a stand mixer fitted with paddle attachment (or in a large bowl, if using a hand mixer) beat the butter on medium speed until smooth and creamy; about 1 minute. Add the sugar and beat together until lightened in both color and texture and looks fluffy; about 5 minutes.
- Add in the eggs, one at a time, beating well and scraping the bowl after each addition.
- Add in the sour cream, buttermilk, red food coloring and vanilla, and beat until well combined.
- Turn down the mixer to lowest speed, and gradually mix in the flour mixture, until just combined. Do not overmix. Scrape down the sides and bottom of the bowl to make sure everything is well incorporated.
- Pour the batter into the prepared pan and bake for about 30 to 35 minutes or until a toothpick inserted in the center comes out clean or with a few cooked crumbs attached.
- Let the cake cool in the pan for about 10 minutes, then invert on to a wire rack and let cool completely.
- Using heart cookie cutters in assorted sizes (no bigger than 2 1/2 inches/7cm), cut out as many hearts as possible for the cake. Plug out the heart cutouts and set aside in an airtight container, to be filled into the chocolate bombs later. Use the scraps for nibbling or to make cake pops or freeze for later use.
For the Chocolate Bombs:
- To temper the chocolate (getting it to the perfect temperature for using), in a microwave-safe bowl, heat 6 ounces of the chocolate (3/4 of the total amount), stopping the microwave and stirring every 10 seconds until two-thirds of the way melted, 1 to 2 minutes. Remove from microwave and keep stirring until melted all the way. Add remaining 2 ounces of chocolate, and stir continuously until melted. Return to the microwave for no more than 5 seconds at a time to complete melting if necessary. The chocolate temperature should be between 88F to 91F/31C to 32.8C.
- Divide the melted, tempered chocolate equally among the 8 cavities of a hemispheres mold.
- Swirl the mold around to cover the cavities or use a spoon to make sure that every bit is covered.
- Turn the mold upside down on top of a baking sheet and shake it well, letting all excess chocolate drip on the baking sheet. Don't skip this step or you'll end up with thick spheres that won't melt during presentation.
- Turn the mold right side up, and use a spatula or scraper to scrap off any excess chocolate on the surface of the mold, and to straighten the edges of the half spheres.
- Place the molds in the freezer until set; about 5 minutes.
- Let the molds rest at room temperature for about 5 minutes, then turn the mold upside down and gently push down the chocolate hemisphere, while pulling on the edges of the mold to release.
- Take some of the excess chocolate and remelt in a small bowl. Dap a little bit of the melted chocolate in the center of the serving platter. (Make sure your hands aren't warm for this) Holding one chocolate hemisphere, right side up, carefully anchor it over the dap of chocolate. It should now stick and be stable for filling.
- Add in the mini red velvet cake hearts, and anything else you want in there, like chocolate pearls or sprinkles.
- Hold a second hemisphere upside down and gently place it on top of the filled hemisphere, making both ends meet. Gently rotate and twist it until you find the perfect fit, so you can barely see any gaps between the two.
- Repeat with the remaining of the hemispheres, or save in the refrigerator for later use.
- Using a sieve dust some cocoa powder right on top of the sphere and on to the plate.
- Decorate your plate with berries and any compliment of your choice. How about ice cream
- To serve, pour down the hot Nutella sauce (instructions below) right on top on the chocolate bomb, in a circular motion, finishing off in the center, until the chocolate bomb starts to melt and collapses.
- Serve immediately and enjoy.
For the Nutella Sauce:
- In a medium microwave-safe bowl, combine together the Nutella and milk and heat for about 30 seconds. Take out of the microwave and whisk together until completely smooth. Return to the microwave for about 1 minute or until just starting to boil. Transfer to a gravy boat and use will still hot. Reheat if necessary.
Recipe Notes
- Mold cavity size is up to you; adjust quantity of chocolate as necessary.
- If you don't have a mold, use the roundest small bowl you could find and line it smoothly with plastic wrap, to be able to pull the hardened chocolate out.
- Chocolate hemispheres can be made several days in advance, then assembled when needed.
Red Velvet Cake recipe adapted from Carrot Top Mom
Measurements Note: All recipes of this site have been developed using weight measurements. Although US volume measurements have been included for your convenience, it is highly encouraged that you weigh your ingredients using a kitchen scale to get the best possible results. Due to the sensitive nature of baking, kitchen scales are proven to yield more accurate and consistent results than measuring cups. Enjoy!
Powered by ![]()
This post may contain affiliate links.
All images and content are owned by Cleobuttera® and are copyright protected. Please do not use my images without prior permission. If you would like to republish a recipe, please rewrite it in your own words and link back to the recipe page on my site. Original recipes and creations of this site are intended for personal and home use. Commercial replication or media consumption are only allowed with a written consent and agreement with Cleobuttera owners. Otherwise it is considered a violation of intellectual property. Thank you for respecting and appreciating the amount of time and effort that goes into creating free, unique recipes that make people happy.


Girl you are killing it with Nutella! I’m dying looking at all of your beautiful photos and incredible recipes! So talented! It doesn’t looking like you’ve been blogging for 2 months. You’re so professional your blog looks at least 6 yrs in the making. A new fan over here from Australia!
What a HUGE compliment! Thank you so so much! This is getting me happy dancing’ right now:) BTW Australia is on top of my bucket list of countries to visit. Dying to see that beautiful place!
I’m so excited to try this!! Thank you for such a beautiful post. I’m loving all the Nutella on your blog. Gorgeous photos, gorgeous recipes, gorgeous everything 😉
It’s definitely been a Nutella overload around here. Could never get enough! So happy you like this. I really really encourage you to make it. Should be a breeze for you since you’re already an amazing baker:)
No, like for real.. adopt me! hahaha I’m the same person who asked you to adopt me before. It’s just that my mouth waters and a part of my brain explodes every time I open this blog and the pictures get more tempting every post! lol
Girl just pass on those adoption papers! LOL! You’re adorable and your comment makes me so happy! Thank you:)
Wow, that is amazing. Whoever came up with this idea…genius. I swear to god where do you learn this stuff, you just blow my mind! 😀
I fell in love with idea too as soon as I saw it! Apparently its all the rage right now at fancy restaurants. Turns out, it completely doable at home.
Madre mia mi niña!! que manos tienes…. con cada receta que pones me dejas más y más asombrada y con la boca abierta
Sigue “enamorandonos” con tus maravillosas recetas
Besos guapetona
Thank you so much for your kind words. It always makes me smile whenever I get your Spanish comments. Love it!
Ok so i read this, and watched it…and my jaw dropped in amazement! “Wow!” Was all I managed…and i am pretty sure my mouth stayed open in awe for the next few minutes…
What an amazing recipe and stunning photography. I completel agree with Karina…your blog doesn’t look like it’s 2 + months old. You obviously put a lot of effort and it shows!
You are truly inspiring. I wish you all the best for your blog and whenever you do choose to give classes…i will pack my bags and fly to Egypt…hehehe.
Aaawwwwwww everything you just said makes me feel all fuzzy inside. I’m so honored that you’d think of me as an inspiration and thank you for appreciating all the effort poured into it. Thank you so much for your thoughtful wishes. Girl, you are more than welcome in Egypt any time, be it classes or not!
That’s beautiful, absolutely beautiful! Well done!
Thank you Oana so much!
You just blow our minds over and over! This is honest-to-God the best blog in the history of blogs! You give a whole new meaning to the word “joy”
Hahaaaa! Now that’s waaaaaay overboard! There are so many blogs out there that blow my mind everyday and are my number 1 inspiration. I just hope that day I’ll measure up to get a little close to what these amazing bloggers are doing. Thank you so much Lilly for all the love and support.
This is literally the coolest recipe I have EVER seen! Love love love
Aaawww Thanks Tina!
I am lost for words, this blog is insane. Insanely awesome. I feel like I am in chocolate heaven.
I’m so happy you like my blog and that this recipe speaks to the chocolate lover in you:)) Thank you so much!
STOP THIS IS UNREAL. Part of me is salivating over all the chocolate/ted velvet/nutella love here, and the other half is just amazed at the creativity beyond belief. Wow!
Oh Medha, how I wish I could transport you some of this deliciousness. Thank you so for your sweet comment:)
Tasbih, you never fail to impress with your posts…they are always a visual feast…but really…this is over the top amazing! All I can say is “Wow!”
Ramona you always blow my mind with your delicious recipes too. You have a big fan right here! Thank you so much.
Girl you are on fire with the nutella flavored desserts! This is the perfect ending to a fancy home-cooked Valentine dinner – Pinned 🙂
Oh it would be perfect for Valentine’s! Thank you so much for your sweet comment & the pin.
What a cool idea! This is a perfect dessert for Valentine’s Day
Thank you and definitely yes! Valentine’s all the way!
Love love love it!!
Thank you thank you thank you!
Oh my goodness! I can’t believe you made these. They look like they are straight out of a fancy chocolate shop! Wow!
Hahahaaa!! U just made me feel like Willy Wonka! Thanks
How have I not seen your blog before?! This is incredible! The recipe, the concept, the gorgeous photographs…you are so amazing. I cannot wait to see what you come up with next!
Oh Gosh! Can’t believe you’re here! Ur like my blogging idol & pastry chef role model. So excited that you stopped by! I’m so honored that you like this.
So I want to hire you to do all the recipe for MY blog, because every single one of yours is killer! This is brilliant, girl!
Done deal if you take over MY photo editing and content writing:)))
You are a god!! This is amazing. Now I know their secret tricks; not sure that my tempering skills are up for the challenge though
Whooaaa! Thank you!! You know what? When I came to think about it, you could just use candy melts instead, which does not require tempering. Bingo!
Pingback: Imploding Chocolate Bomb Of Hearts | Trending News
I’ve been waiting to know the secret behind it.. It took me a couple of trials as I don’t have a mold.. But finally succeeded.. But I made the shell a little bit thick.. So it didn’t melt n break right away.. But when it did.. It was a massacre… The combination of the red velvet cakes with the Nutella sauce was just …… Well I don’t have any words to express…
So happy it worked for you in the end. Definitely part of the secret is making it just thick enough so it holds its shape yet thin enough that it melts easily. And yum! red velvet & Nutella sauce just work beautifully together.
This looks so divine! If you didn’t tell us, it would look right out of a fancy restaurant! Thanks so much for sharing. 🙂
http://www.thepetitepanettiere.com
That’s so sweet of you Victoria:) Thank you so much!
OMG this dessert is my new bae! ???
Thanks! If you love Nurella that much, that a lot of the recipes over here will become your bae too❤️
Pingback: Chocolate Spheres – The Blue Binder
Hmm is anyone else encountering problems with the
images on this blog loading? I’m trying to determine
if its a problem on my end or if it’s the blog.
Any feedback would be greatly appreciated.
Despite my concerns that a hot kitchen in the summer would surely spell disaster for a temperature-sensitive desert, they came out great! I made the chocolate sphere wall a little too thick, but it eventually caved in after a slightly extended pour haha. Thank you for the fun recipe!
Hi – I LOVE this! Quick question(s):
1) my chocolate had melted but wasn’t pouring consistency so I used a spoon to put in inside the molds. Can I heat it further to make it pouring consistency next time?
2) the sides were not as thick as I would have liked them – but how to manage this since the chocolate starts gravitating down?
Thank you again!
Hi Maheen! I’m happy you gave this recipe a try!
1) Yes you can heat it slightly to get it to a pourable consistency.
2) You can paint the inside with another layer of melted chocolate.
Enjoy ?
Pingback: How To Use Cake Pop Mold | Asik Masak
Pingback: Melting Chocolate Dessert | Asik Masak
WOW!! I feel like having it right now. Thanks for sharing, would like to give it a try.