Grandma’s Famous Boghasha
Classic Egyptian fritters with a blistered, bubbly exterior and an irresistible flakey crunch. Glistening with sugar syrup, these golden strips of joy will become an instant favorite! Plus…recipe VIDEO at the end of the post!
We all have one of those things.
That sentimental food that brings back so many memories and a stream of flashbacks.
The one that makes you feel all the feels, and warms your heart with nostalgia.
You know…the one that draws a gentle smile on your face and drifts you to a state of daydream, just by looking at it.
This one is mine. It’s my childhood on a plate.
There’s not a moment when I see or eat these crunchy fritters without remembering my late Grandma (may she rest in peace).
She used to make them for us every time we’d visit, because she knew they were our favorite.
I remember having very little control over them. Once I pop, I cannot be stopped! Ask my mom…she tried.
They are one of those things with an addictive nature; they warrant a warning label.
Grandma was an amazing cook and an avid baker. Her sweet tooth made her especially passionate about making dessert, which I’ve clearly inherited from her.
I’ve shared several of her treasured recipes over here, and by doing so, I feel like I’m keeping her memory alive.
There’s the Balah El Sham recipe that so many of you have loved, as well as the dreamiest of all rice puddings.
Her Creamy Yogurt Jello is the best of easy treats. These are all amazingly delicious and all, buy my oh my there’s nothing like Boghasha to me.
What is Boghasha?
“No dictionary has been able to translate this succulent sweet, extraordinary, fully Egyptian yet forgotten dessert.” Cairo Cooking says about it.
Growing up with Boghasha in my life, I was shocked to know that very few Egyptians in my circle actually know what it is! But that’s about to change, because a pastry that incredible deserves worldwide recognition.
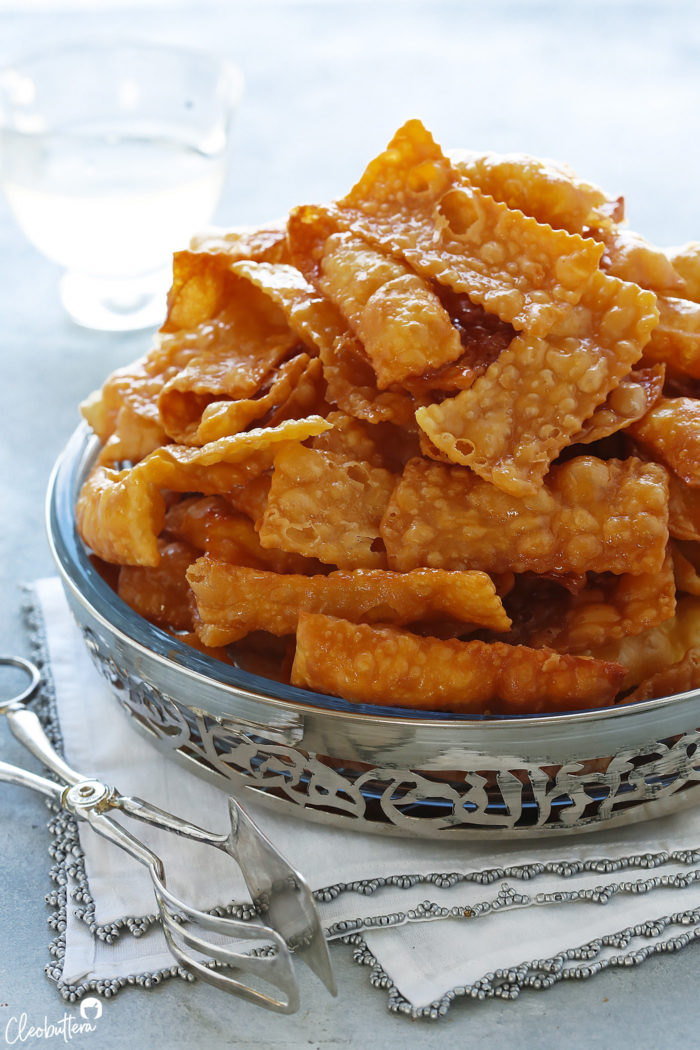
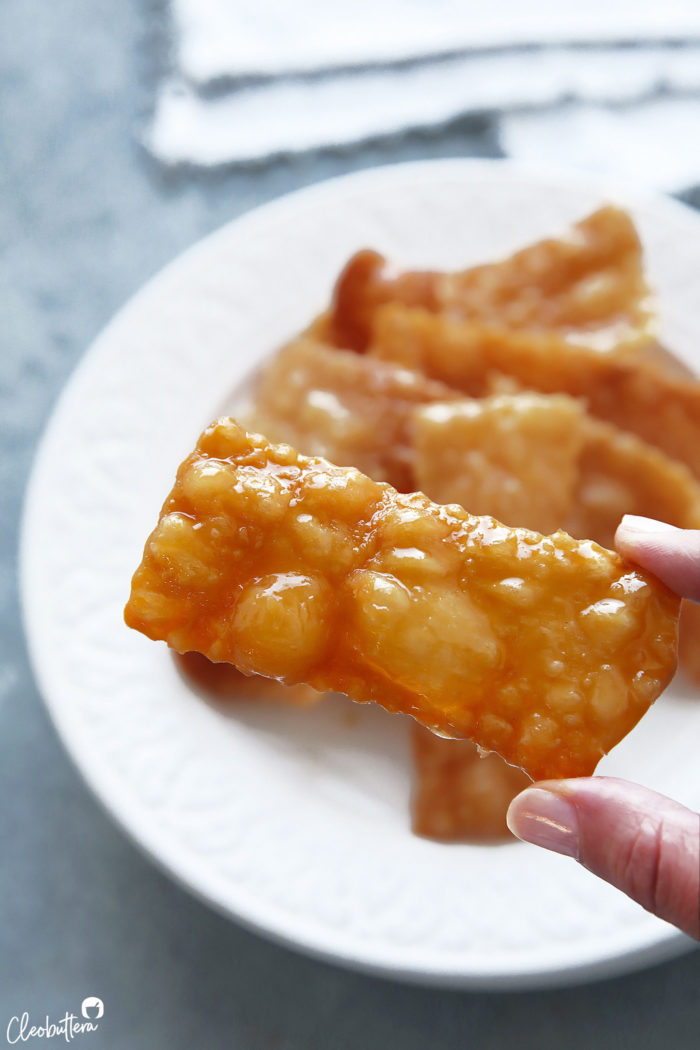
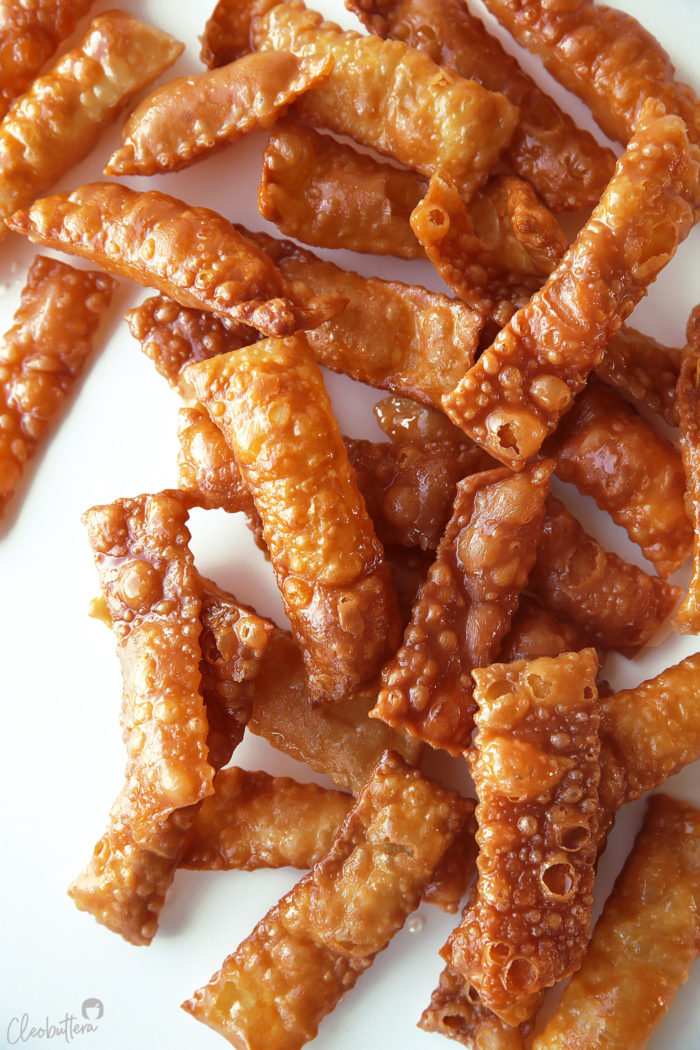
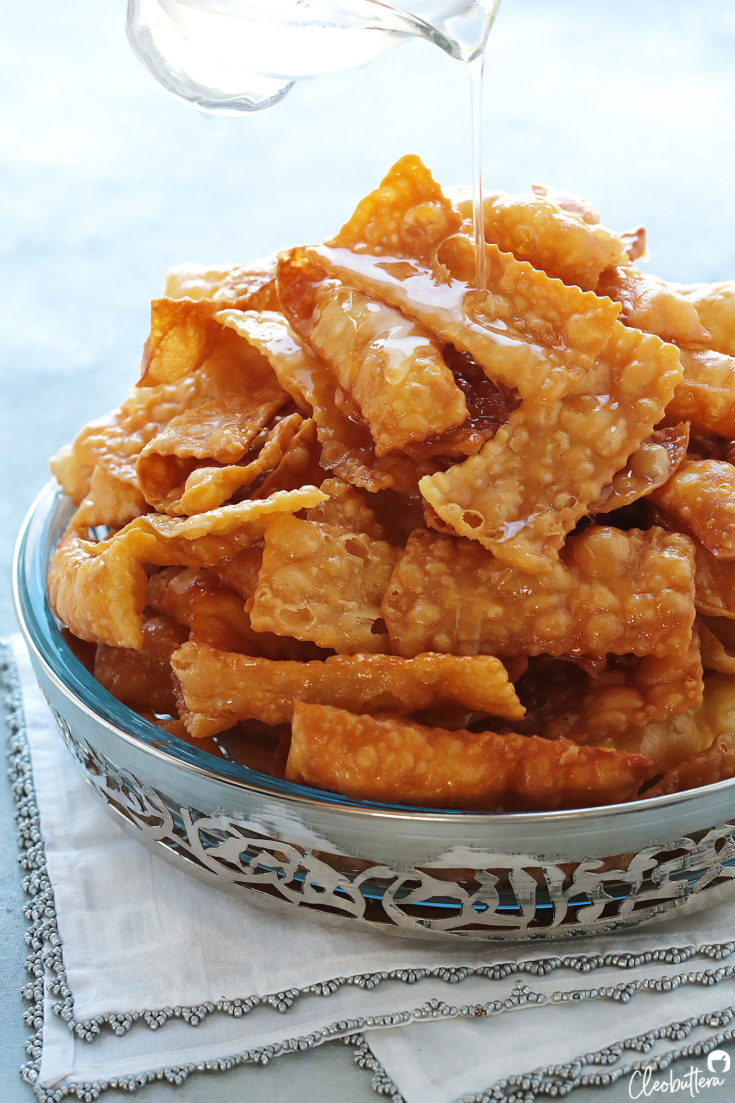
Boghasha is a classic Egyptian fritter with a blistered, bubbly exterior, a glisten from the sweet syrup and an irresistible flakey crunch.
The shape varies from long strips like how my grandma made them, to chubby squares and diamonds. Some recipes produce puffier, pillow-like Boghashas than others, but I’ve come favor this type the most.
Flavor-wise, the taste is reminiscent of Balah El Sham; choux pastry-like, with a welcomed sticky sweetness from the syrup (the good type of sweet; not cloyingly so).
Without the syrup, the fritter tastes like a cross between puff pastry and pie crust, so you know it’s gotta be good.
But as delicious the taste is, Boghasha is all about that incredible texture. It’s the real star! It’s crisp, tender, flakey, puffy and airy in areas, dense in others, and shatters effortlessly to the bite.

Call me bias, but I think my Grandma’s recipe produces the most perfect Boghasha. She was (and is) famous for them for a reason.
When comparing her recipe to some I’ve seen online, I got tempted and experimented with incorporating ingredients they called for in hopes of making it even more amazing! But greed is a bad thing friends. Additions like baking powder, cornstarch and vanilla made it worse.
Trust me…the recipe is flawless just the way it is. So let’s make some!
How to make Boghasha?
It’s actually a very simple recipe, that uses basic ingredients that you probably already have.
The dough is similar to making pasta dough, but it starts out with the pie crust technique of cutting butter into the dry ingredients, as well as using all cold ingredients.
Here’s how it goes…
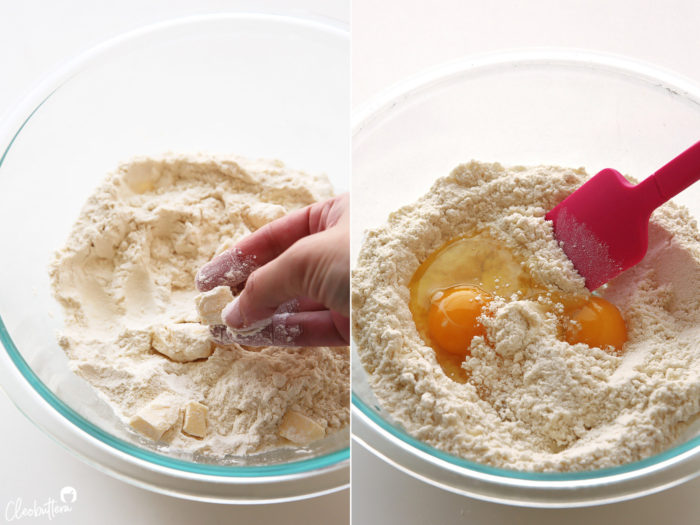
Using your fingers (or pastry blender), rub with your fingers squares of cold butter into the flour, until well blended and there are no large chunks of butter visible.
Then go in with the eggs, and stir with a spatula to combine.
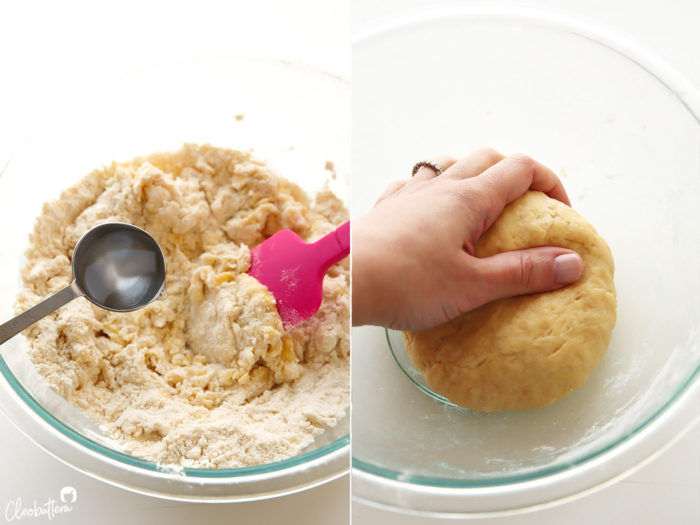
Add in 1 tablespoon of cold water, and knead with your hands until moistened and a cohesive dough forms. If the dough feels too dry, add in another 1/2 tablespoon of water at a time, kneading well between each addition. I use 1 1/2 tablespoons.
Now wrap the dough in plastic wrap and allow to rest in the fridge for at least 1 hour and up to 2 days.
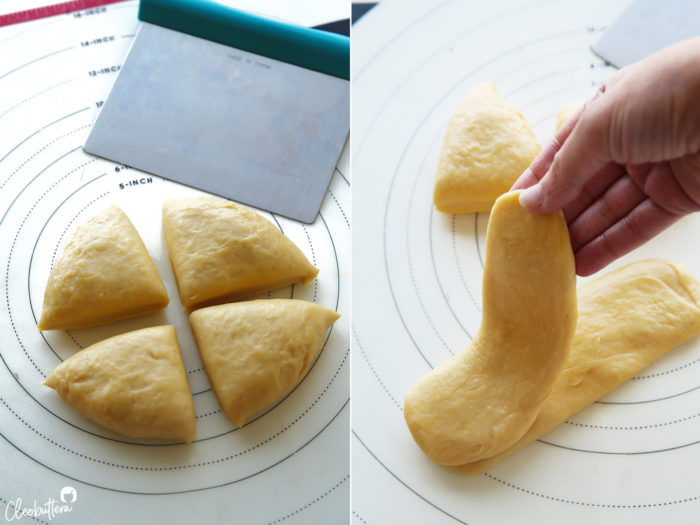
After that, divide the dough into 4 equal portions. Shape each portion into an oblong oval (about 15cm long). Then place one dough oval over another one and press with your hands to adhere and flatten. They should now become one thing. This step creates layers in the dough, to make it even flakier.
Repeat with the other two ovals. You should now have two ovals.
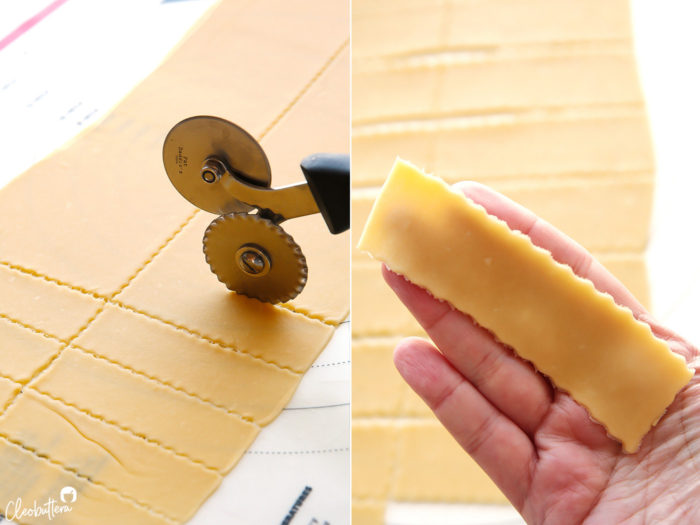
Now roll out one of the dough ovals into a very thin sheet measuring about 60cmX20cm. You can go the old fashioned route and use a rolling pin or if you have one, use a pasta machine; gets the job done in seconds.
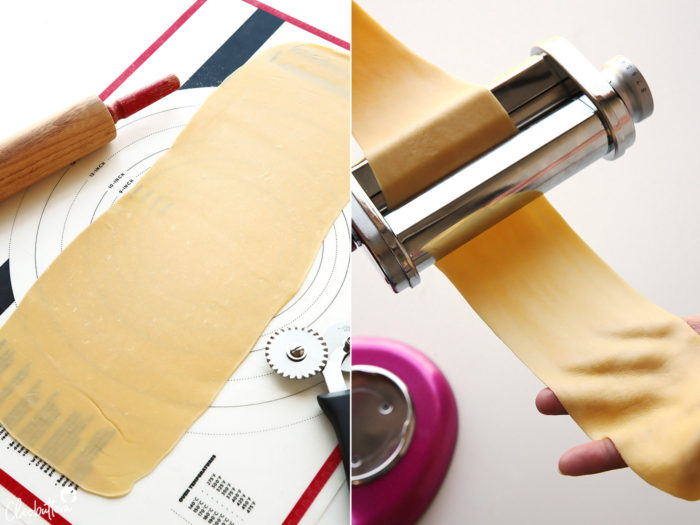
Then using a pizza cutter, fluted if available, slice the dough sheet in half lengthwise, then slice crosswise to create strips that measure around 10cmX3cm.
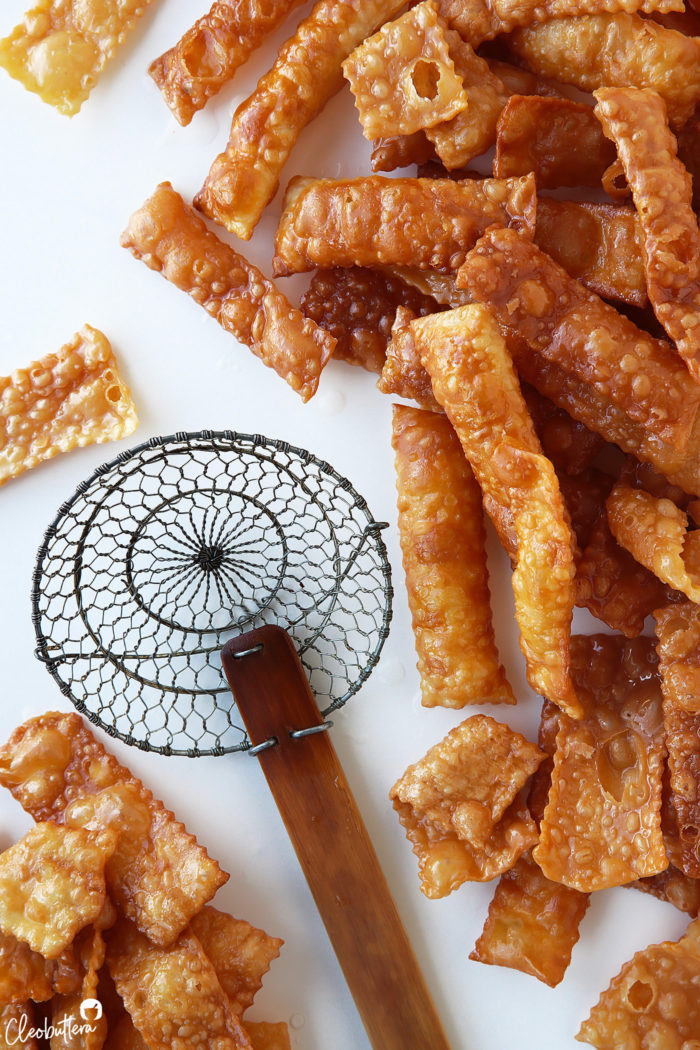
And get frying!
The strips will get puffy and bubbly right before your eyes! So satisfying to watch.
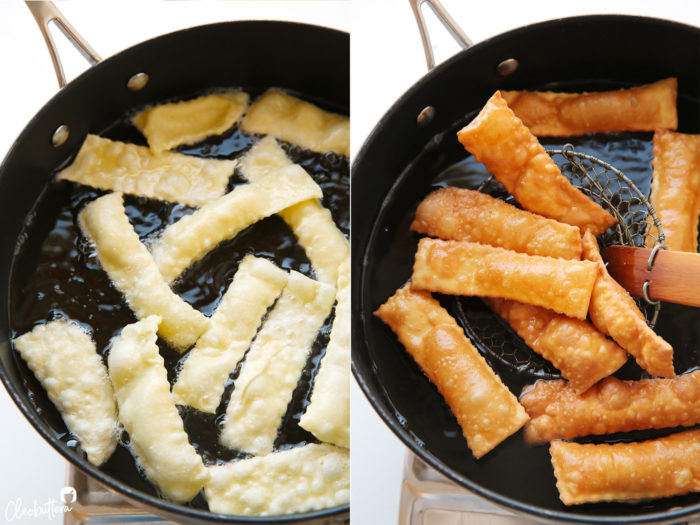
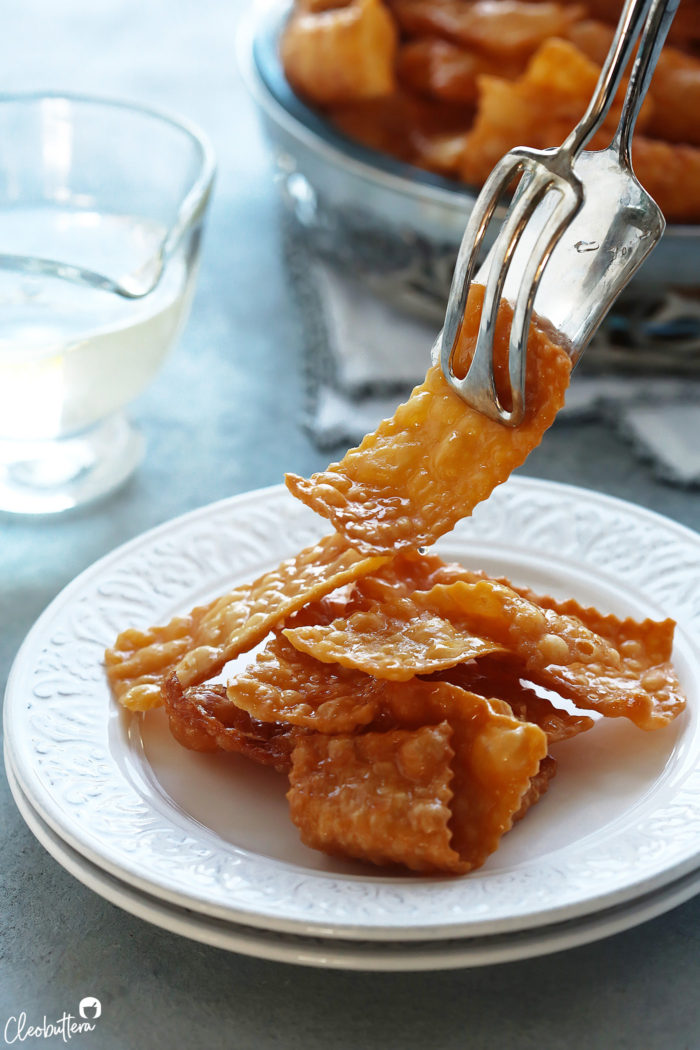
Once the fritters have taken on a beautiful golden brown color, remove from the oil, and place over paper towels to drain off excess. (Insider foodie hack! Leave some without any syrup, sprinkle with salt and eat like nacho chips. You can thank me later)
Then while still hot dip the fried strips into the cooled syrup, tossing and turning them to make sure they’re well coated.
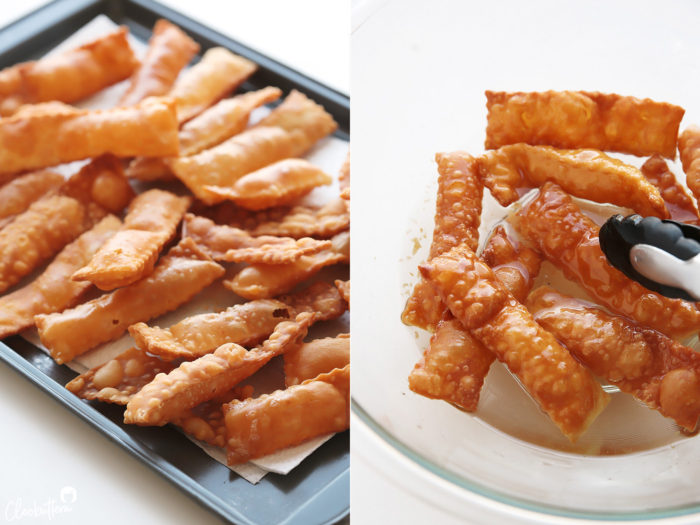
And voila! The most irresistible sweet chip you’ll ever have.
Take it from me…one is never EVER enough.
Grandma's Famous Boghasha
Classic Egyptian fritters with a blistered, bubbly exterior and an irresistible flakey crunch. Glistening with sugar syrup, these golden strips of joy will become an instant favorite!
Ingredients
For the Sugar Syrup:*
- 2 cups (400g) granulated sugar
- 1 cup water
- A squeeze of lemon juice (about 1 teaspoon)
For the Boghasha:
- 2 cups (240g) all purpose flour
- Pinch of salt
- 2 tablespoons (30g) unsalted butter, cold and cut into 1/2 inch squares
- 2 large eggs, cold
- 1 to 2 tablespoons water, cold
- Oil, for frying
Instructions
To make the Sugar Syrup: (may also be substituted with Big Batch Sugar Syrup)
- In a medium saucepan, combine together the sugar, water, and lemon juice. Set on a stovetop over high heat. Try to avoid stirring it as it heats to prevent crystallization from happening, but if the sugar is not dissolving as its nearing a boil, then help it out with a few stirs. Once it comes to a boil, STOP stirring.
- Bring to a rolling boil, then immediately reduce the heat to medium low and let it simmer gently for 10 minutes. Set a timer! The syrup will thicken slightly, and have a consistency similar to hot maple syrup.
- Remove from heat. Transfer to a large bowl and allow to cool to room temperature before using.
To make the Boghasha:
- In another large bowl, whisk together the flour and salt to combine.
- Add in the butter squares and rub with your fingers (or pastry blender) into the flour until well blended and there are no large chunks of butter visible.
- Add in the eggs, and using a spatula, stir to combine into the flour mixture.
- Add in 1 tablespoon of cold water, and knead with your hands until moistened and a cohesive dough forms. If the dough feels too dry, add in 1/2 tablespoon of water at a time, kneading well between each addition. I use 1 1/2 tablespoons. Wrap the dough in plastic wrap and allow to rest in the fridge for at least 1 hour and up to 2 days.
- When ready to cook, divide the dough into 4 equal portions. Shape each portion into an oblong oval measuring about 15cm long. Place one dough oval over a second one and press with your hands to adhere and flatten. They should now become one thing. Repeat with the other two ovals. You should now have two ovals.
- Light dust your counter with flour, or use a silicon pastry mat. Working with one dough oval at a time, keeping the other one covered, roll out the dough into a thin sheet measuring about 60cmX20cm. You can either use a rolling pin to roll out the dough or take the fast route and use a pasta machine. If using a pasta machine cut each oval in half, so you have 4 pieces. Then roll out each one separately on setting number 1, then 3, and ending with number 5.
- Using a pizza cutter, fluted if available, slice the dough sheet in half lengthwise, then slice crosswise to create strips that measure around 10cmX3cm.
To cook the Boghasha:
- Fill a frying pan with at least 1-inch of oil, then place over medium heat until the oil is shimmering.
- Place enough dough strips to fill the skillet without overcrowding it. Fry, stirring occasionally, until golden brown in color, bubbly and is very crisp. Transfer to paper towels to drain.
- Then while still hot, dip the fried strips into the cooled syrup, tossing and turning them to make sure they're well coated. Transfer the strips to a sieve that has been placed over a bowl, and allow excess syrup to drip.
- Arrange the Boghasha on a serving platter and serve warm or at room temperature. They are best eaten the same day they're made, but keep well for several hours, lightly covered with foil.
Recipe Notes
- Sugar syrup may be substituted with Big Batch Sugar Syrup and can be flavored to your liking.
- To make ahead: The dough can be prepared, covered and left in the fridge for up to 2 days. The Boghasha will stay crunchy all day long, so you can prepare it many hours in advance, but be sure to serve on the same day.
Recipe passed down to me by sweet Grandma.
Measurements Note: All recipes of this site have been developed using weight measurements. Although US volume measurements have been included for your convenience, it is highly encouraged that you weigh your ingredients using a kitchen scale to get the best possible results. Due to the sensitive nature of baking, kitchen scales are proven to yield more accurate and consistent results than measuring cups. Enjoy!
Powered by ![]()
This post may contain affiliate links.
All images and content are owned by Cleobuttera® and are copyright protected. Please do not use my images without prior permission. If you would like to republish a recipe, please rewrite it in your own words and link back to the recipe page on my site. Original recipes and creations of this site are intended for personal and home use. Commercial replication or media consumption are only allowed with a written consent and agreement with Cleobuttera owners. Otherwise it is considered a violation of intellectual property. Thank you for respecting and appreciating the amount of time and effort that goes into creating free, unique recipes that make people happy.


Attachment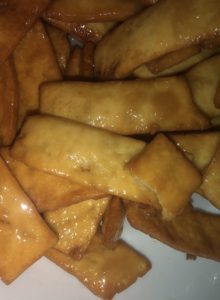
I followed the recipe exactly, with scale measurements; but it wouldn’t puff up or bubble nearly as much as the pictures 🙁 It tastes great but I want to know what to do to make it puffier.
Hi Alia! Thank you for trying the recipe. I’m glad you enjoyed the taste, but you’re right…this look too one-dimensional compared to what its supposed to look like. Did you make sure to use cold ingredients? Do you think you might’ve over-kneaded the dough? How about stacking the two layers of dough ovals on top of each other…did you do that? I’m also feeling that the oil might’ve not been hot enough.
Assalamu Alaikum, thank you for sharing dear tasbih. I will try this soon and send you a feedback.
Attachment
Hi! My name is Sarah and I’m from the Philippines. Made these Boghasha and my husband and son appreciated it much…thanks to you. You were right…these dessert aren’t as famous as kunafa and basbousa. Because I asked him if he knew what is Boghasha and he told heard the name but don’t know what it looks like considering he is Egyptian himself. Anyway, may Allah reward you for sharing your delicious recipes. RAMADHAN MUBARAK Tasbih!
They look beautiful! So true…a lot of people are familiar with the name but not the dessert itself. I’m so happy you enjoyed them and thank you so much for your kind prayers.
And yes…they were not as perfect as yours but the taste was superb. I didn’t use pasta machine to flatten the dough. I’ll try to make thinner sheets next time because my son is requesting me to make it again 🙂 🙂 🙂
Yes! The trick to getting the right texture is to get them as thin as possible without tearing. Enjoy ?
Attachment
Came out absolutely delicious
Looking so perfect Fathima! So happy yours came out nice and bubbly 🙂
Your photos are great but PLEASE add the name of the recipe with your name on them. The recipes are unique but I want to make sure I make your ‘s that I make!!
Hey!
I was wondering of I could reserve some amount of the sugar syrup made for this to add to your basbousa as heavy sugar syrup. Is it the same consistency?
Yep! It’s exactly the same ?
Great info!! Thanks for sharing this article.