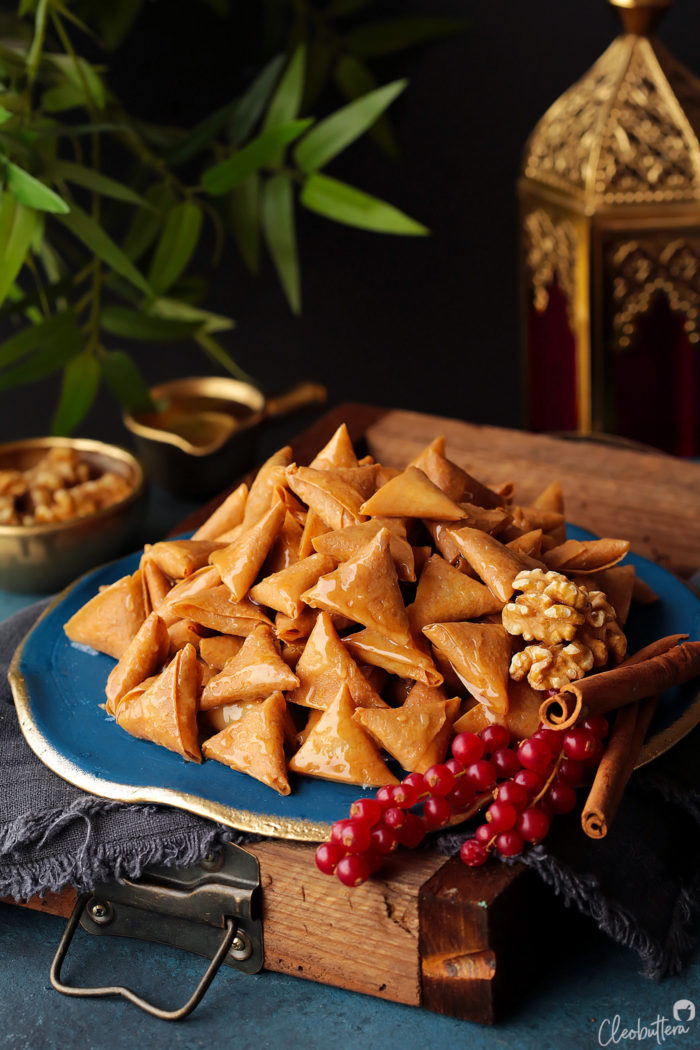
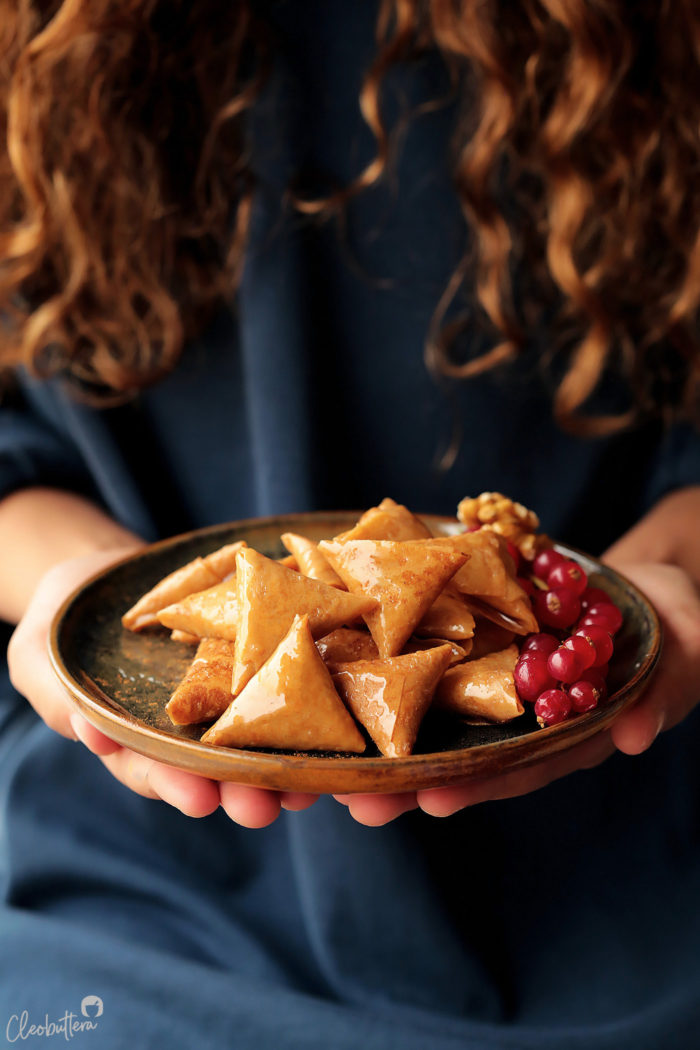
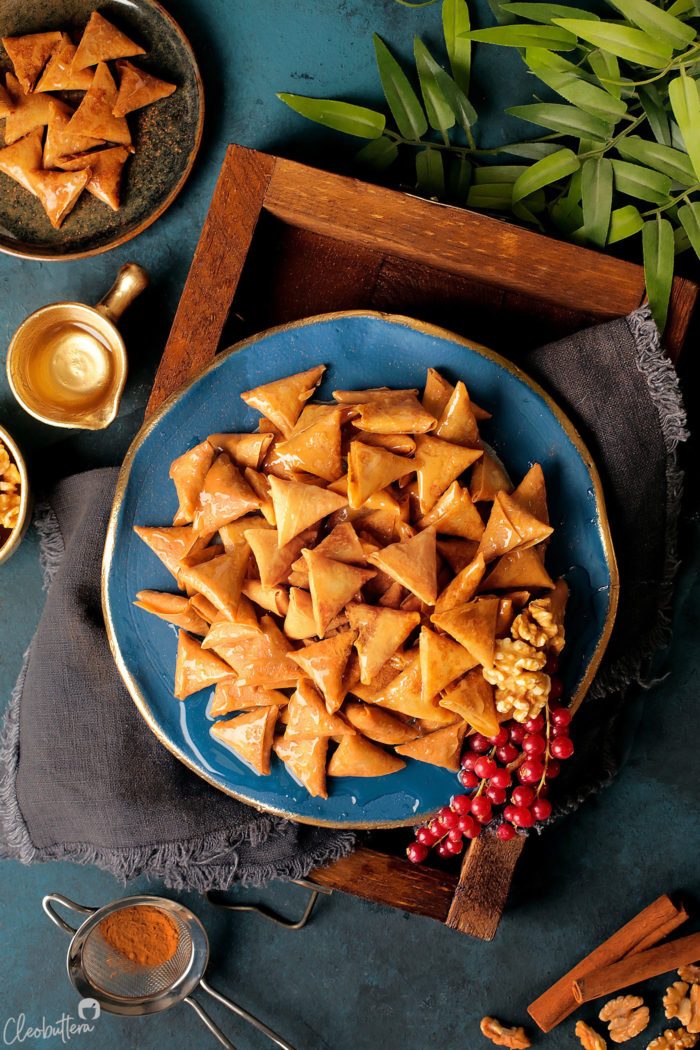
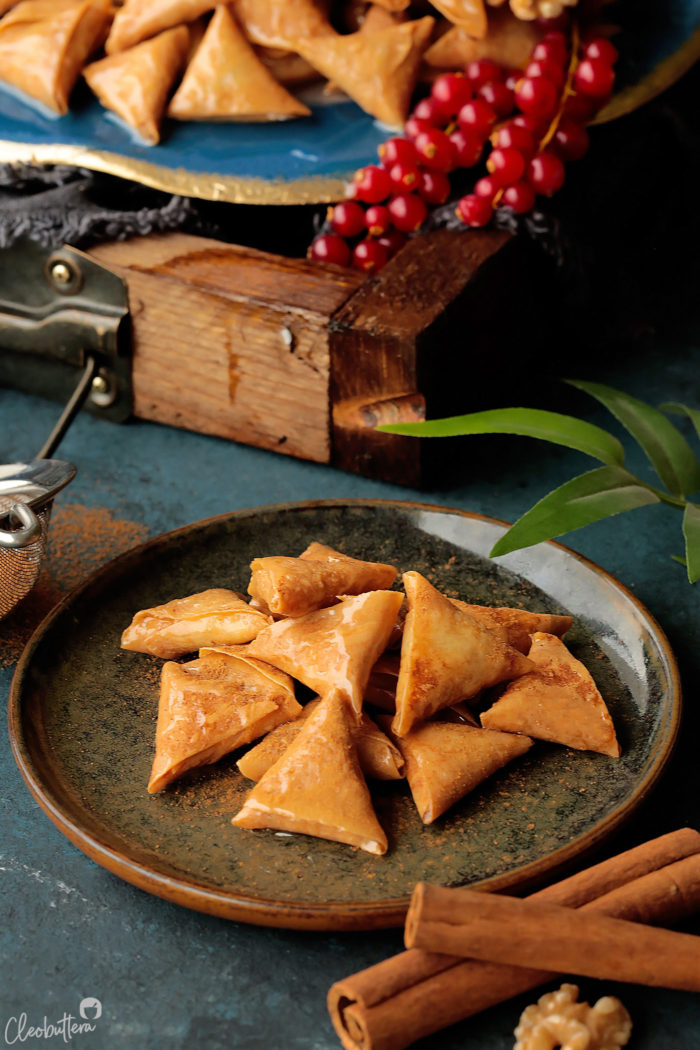
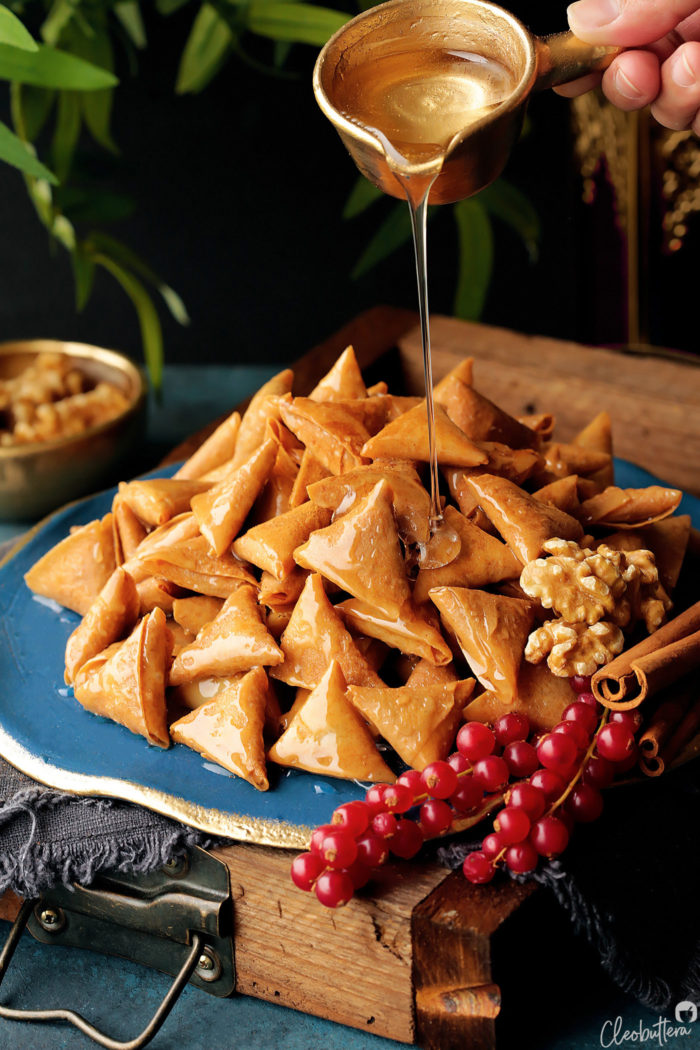
Mini Cinnamon Walnut Samosas (samboosak)
These sweet ‘lil treats will make everyone go nuts! Bite-size crispy samosa triangles filled with an aromatic mixture of walnuts and cinnamon, and sweetened with drizzles of spiced sugar syrup. Good luck stopping at one! Plus…recipe VIDEO at the end of the post!
Mini sweet samosas are without a doubt, one of our favorite treats in Ramadan.
We’ve been enjoying a cream cheese-filled variation for quite some time. And ever since sharing the recipe on the blog 3 years ago, they’ve become an instant hit with you guys too!
But just when we thought they couldn’t get any better, a nut variation shows up.
And that can only mean one thing…double trouble!
We now make a platter with half cream cheese and half cinnamon walnut, because we can’t decide which one we love more.
The cream cheese ones are sweet and savory, crunchy and creamy. The cinnamon walnuts are aromatic and nutty, and crunchy inside out.
Both…obscenely cute, downright addictive and disappear in a matter of minutes.
We’ve developed the habit of munching on them as a quick snack, the moment its time to break our fast, right next to dates and Arabic coffee, instead of having them for dessert. Don’t ask why…because I still can’t remember how it came to be.
Honestly though, I think they’re totally dessert material, especially these cinnamon walnut ones.
And if you twist my arm, I’ll pick these nutty ones over the cream cheese. But my kids beg to differ.
The tiny triangles of heaven remind me so much in taste and texture as the Cinnamon Baklava Rolls, which happen to be my kryptonite.
Each triangle packs so much warm flavor from the cinnamon, a big crunch from the walnuts, an irresistible shatter from the fried dough and squirt of sweetness from the sugar syrup. Basically, a party in the mouth.
Make them for your upcoming gathering, and people will go “nuts” over them! Something about their tiny size, that melts people’s hearts when they see them. Plus they’re so much more fun to eat when they’re bite-sized and pop-able in the mouth.
They’re 1/4 the size of their average samosa sibling, which makes them perfect for enjoying in one gulp.
What do we need to make them?
The ingredient list is short and cute, just like the mini samosas themselves…
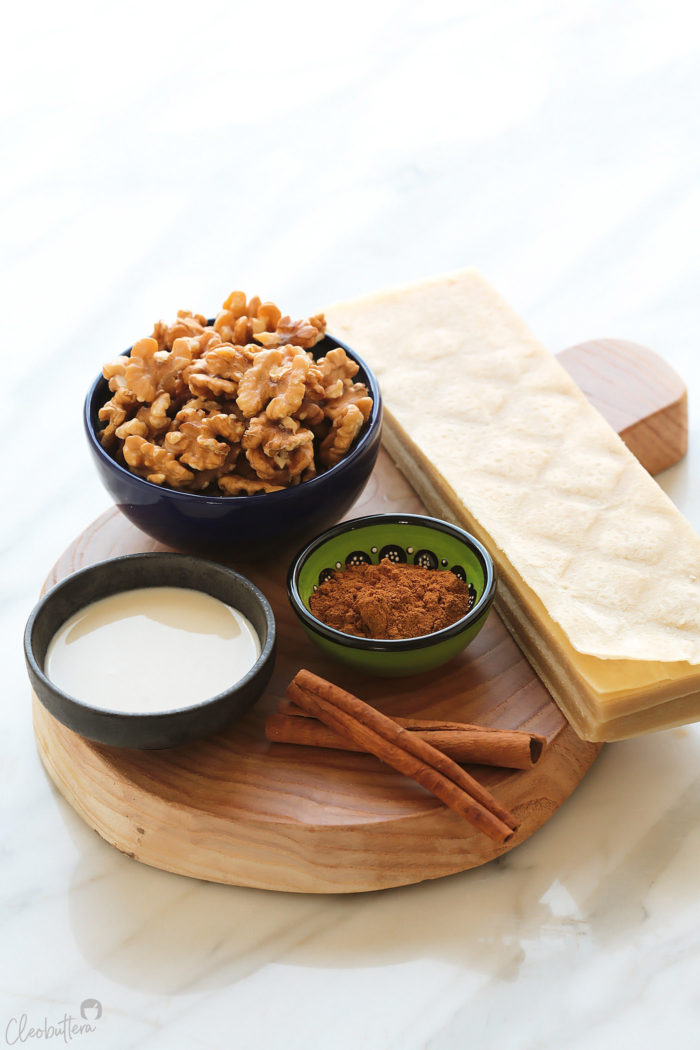
- Samosa (aka samboosak) wrappers. Ready-made sheets sold in the frozen section of Middle Eastern/Asian supermarkets.
- Raw walnuts. Make sure they’re untoasted, as they’ll get toasted once they hit the oil.
- Ground cinnamon. That cozy spice and its wafting aroma is really what makes the filling so special. Without it, the samosas can be bland.
- Flour paste. Made by stirring together flour and water, this paste acts as glue to seal the wrappers shut.
- Sugar syrup. If you have some Big Batch Sugar Syrup hanging around, then you’re good to go. Otherwise, you’ll need to make some for the samosas. I like to go overzealous with the spices and flavor mine with a cinnamon stick and cardamom pods, but the samosas will just be as delicious if you skip them.
I wish I could tell you that the time required to make them is as short as their ingredient list, but I’m can’t stand here and pretend that this is a quick and easy recipe, because you’ll hate me once you discover it yourself lol!
Well they might be easy, once you get the hang of the wrapping technique, at which point you might actually feel its therapeutic (or is just me?), but truth be told, they’re anything but quick.
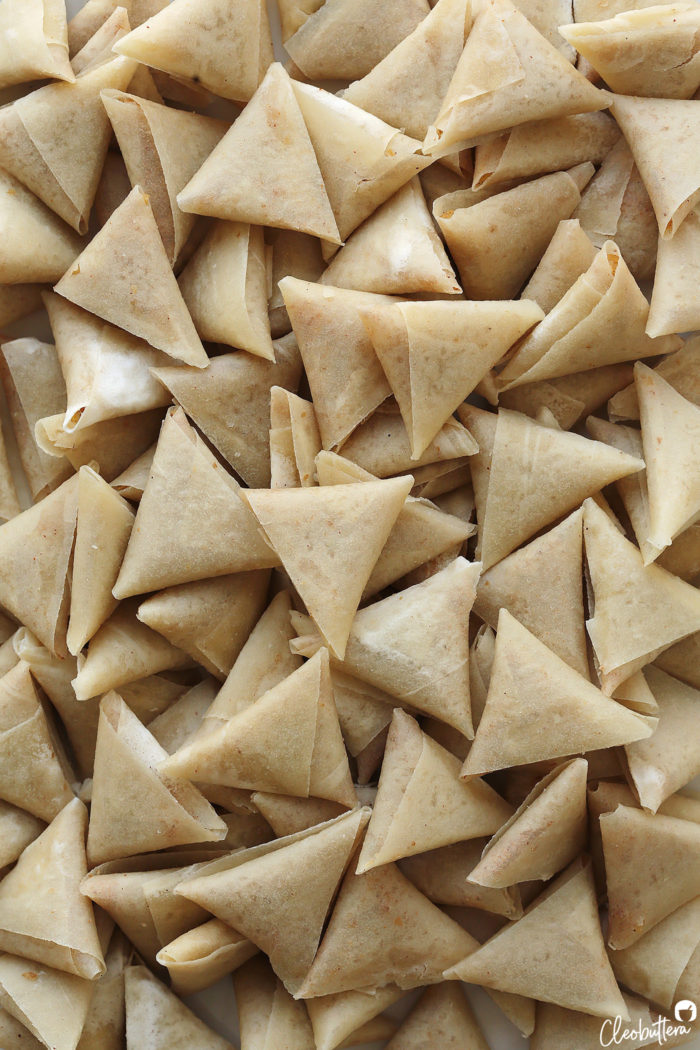
Not when you’re making over 160 stuffed triangles the size of your fingertip.
Is it worth it though?
Absolutely.
But I strongly recommend bringing along a good friend (or 10), who’s loves you enough to help. You’ll get the job done much quicker this way.
On the bright side, the wrapped, uncooked samosas freeze exceptionally well. So choose a day where you’re feeling bored, makes a ton, freeze them now, enjoy them later. They’ll ironically come in handy on days when you’re tight in time.
How do you make the mini samosas?
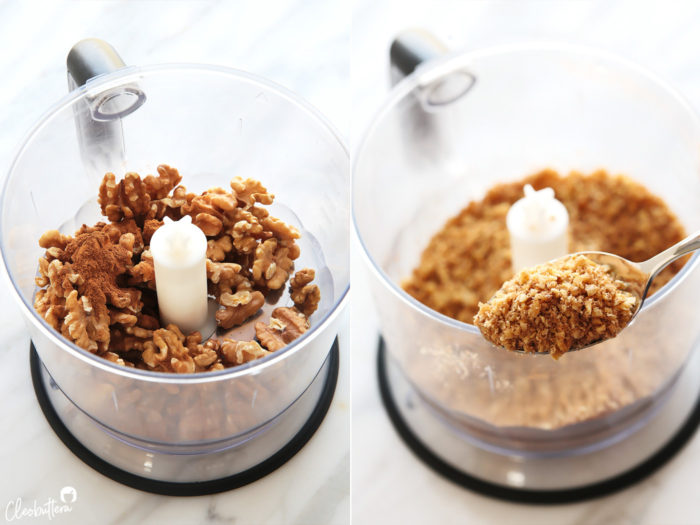
First, start with preparing the nut filling, by pulsing together the walnuts and cinnamon in a food processor until very finely chopped, but not ground.
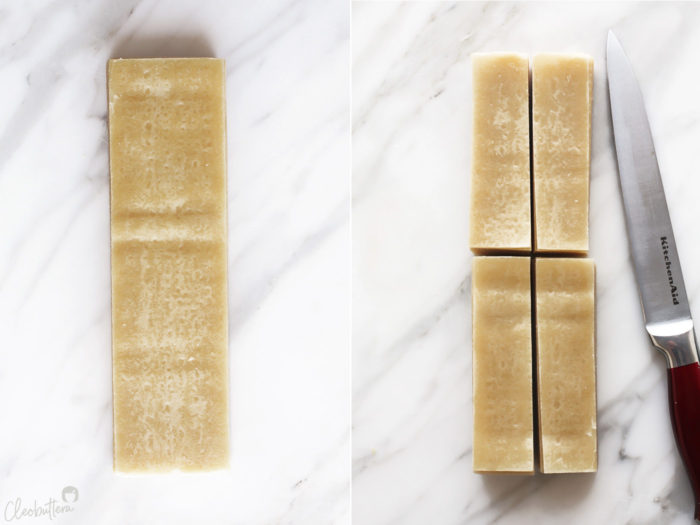
Now you’re gonna take a pack of samosa (samboosak) wrappers out of its packaging. Keeping all the sheets intact, you’ll then slice them in 4 equal stacks. So first cut in half vertically then once again horizontally.
Now here comes the tricky part. I promise its only confusing for the first couple times and then you’re gonna become a pro in no time! So hang in there!
Hold one sheet of wrapper with one hand, then using the other hand, pick the upper left corner of the wrapper, pull it down and form an inverted cone around your finger.
Now fill the cone with about 1/2 teaspoon of the walnut mixture, then press lightly on it to flatten.
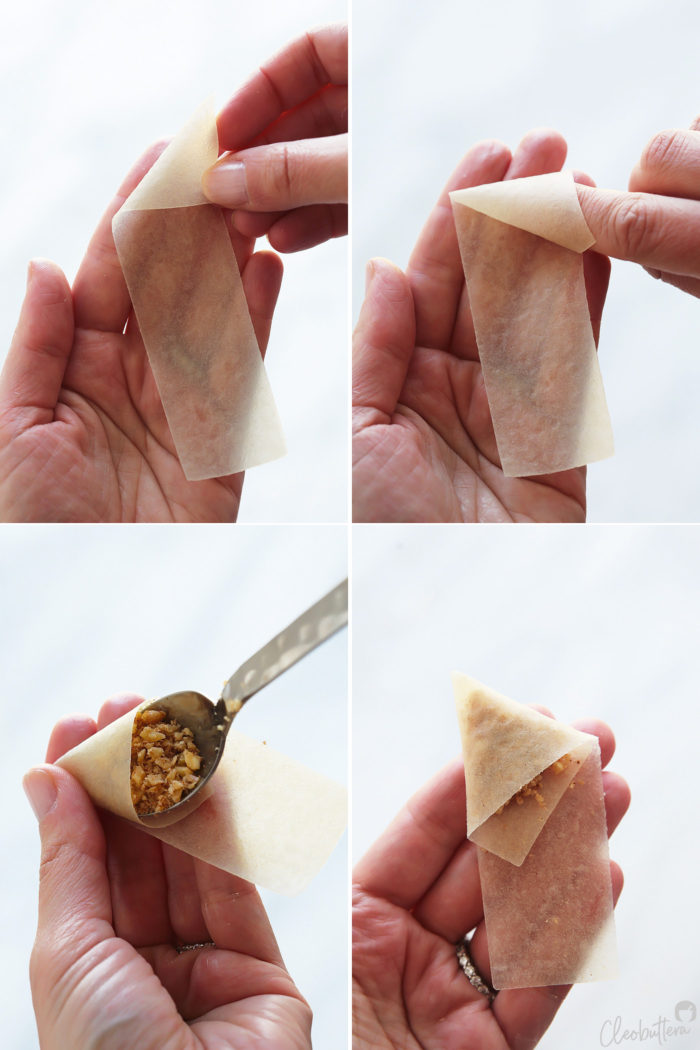
The folding part is easy. Just lift the long, dangling side of the sheet up to cover the exposed walnuts. From there, just continue wrapping the long side of the sheet around the cheese triangle. When you reach the end, you’ll be left with a tiny piece of sheet hanging out. Dab that little piece with a thin layer of the flour paste (this will act as a glue), then grab that piece and tuck it inside the pocket of the triangle to close it up. 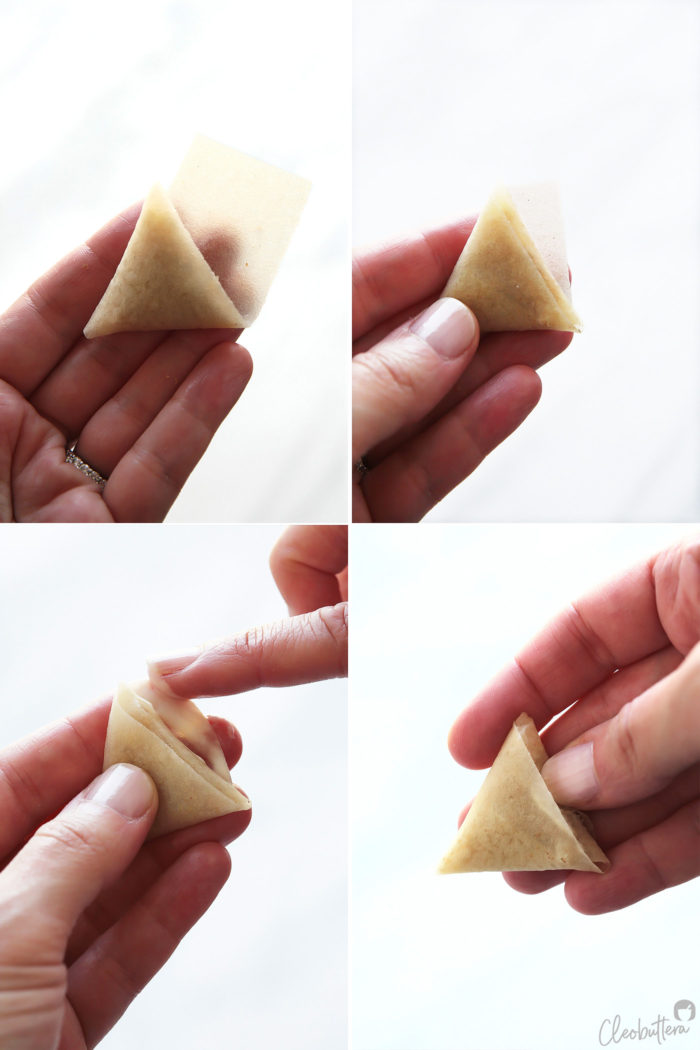
Ta-daaaaaaa! You did it!
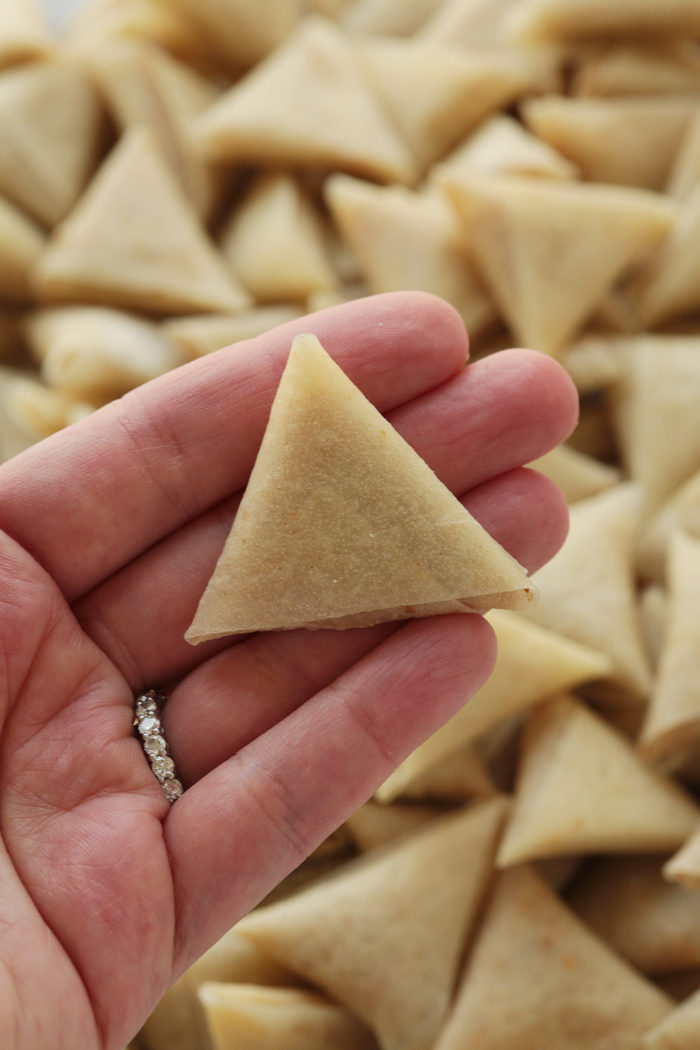
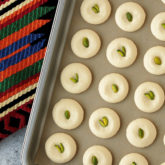
Once you finish wrapping all bajillion of them, freeze them for later, or fry these babies right away until golden brown in color.
You might notice that in the cream cheese variation, we shallow fry them, but here, the walnuts need to get in contact with the oil, in order for them to toast.
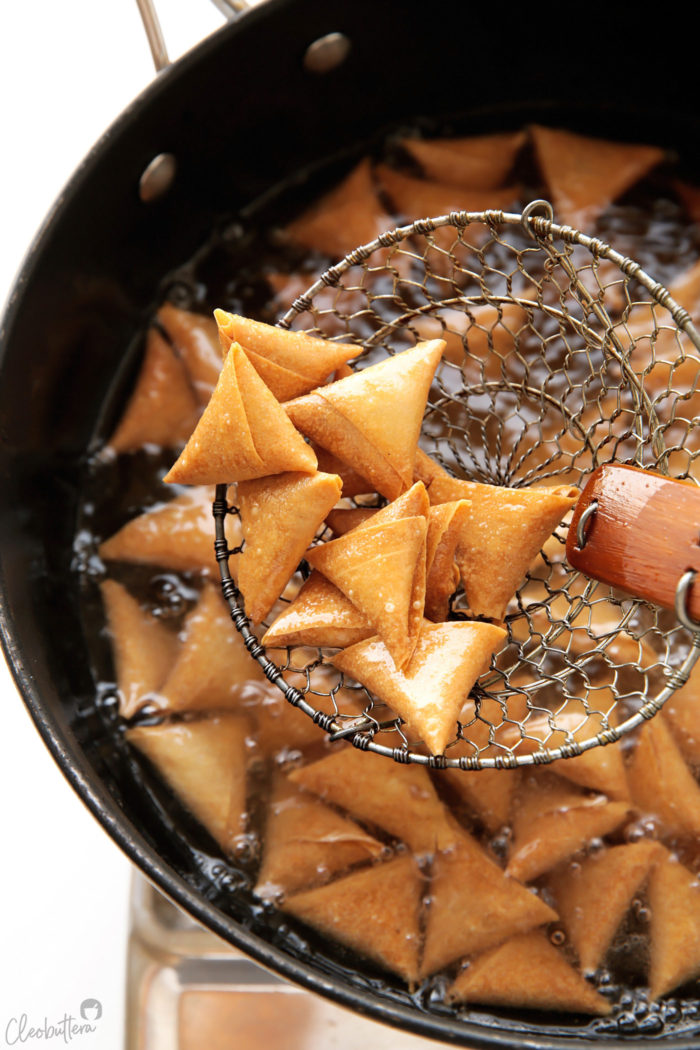
Then place them over some paper towels to drain off excess oil.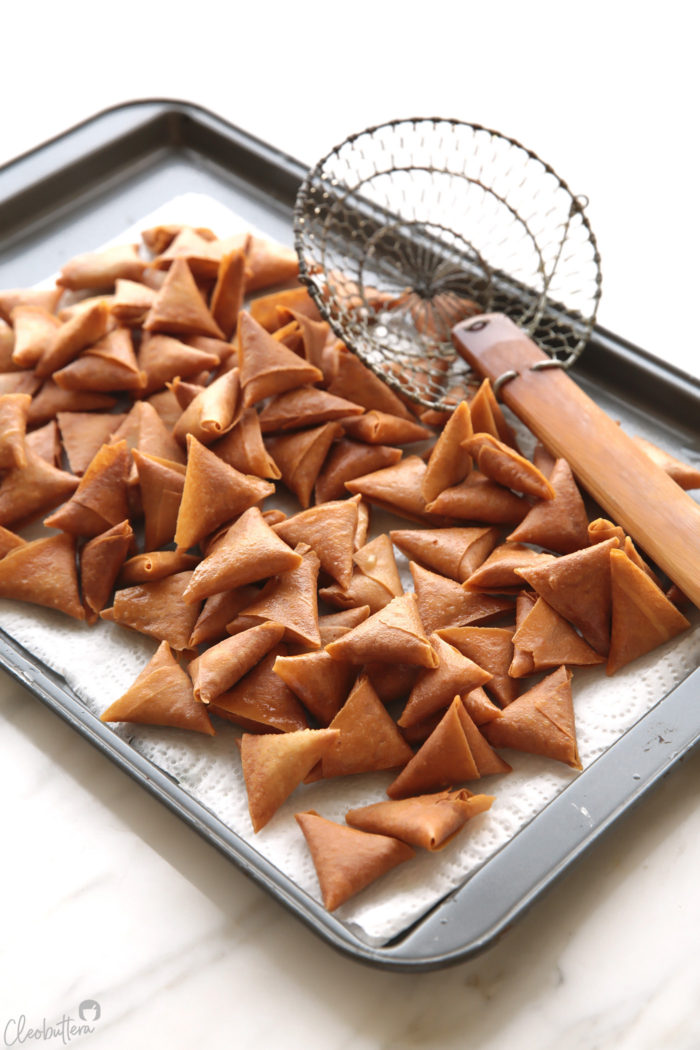
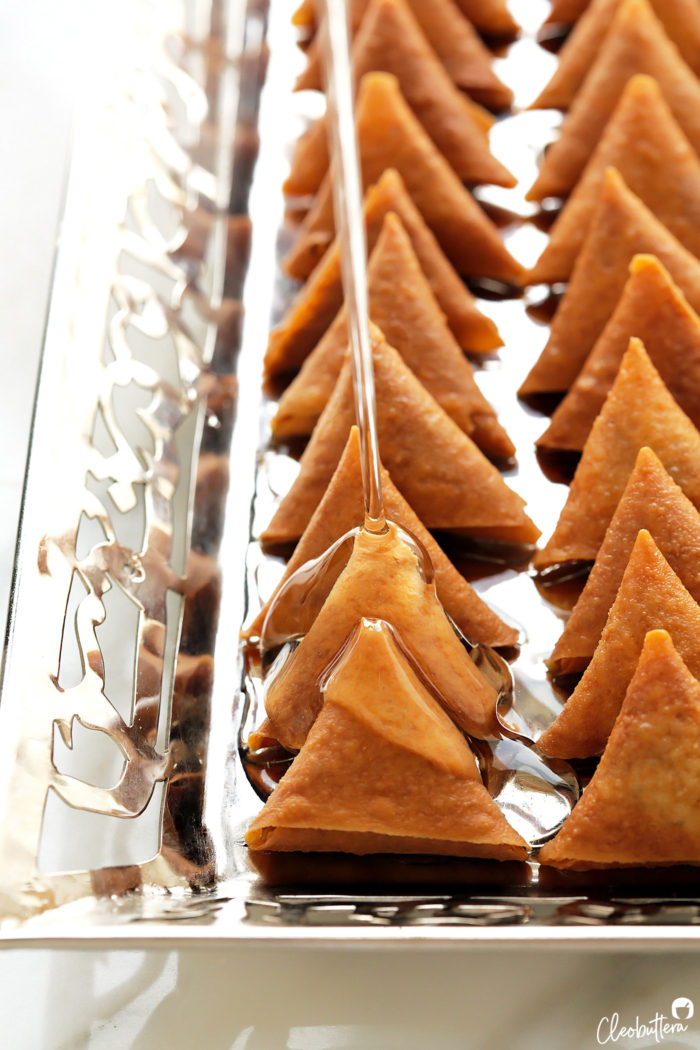
And while still super hot, drench them with syrup.
Note that for them to sufficiently absorb the syrup, the samosas need to be hot, while the syrup, at room temperature.
And that’s it!
Congrats! You just made the cutest-looking samosas in the world.
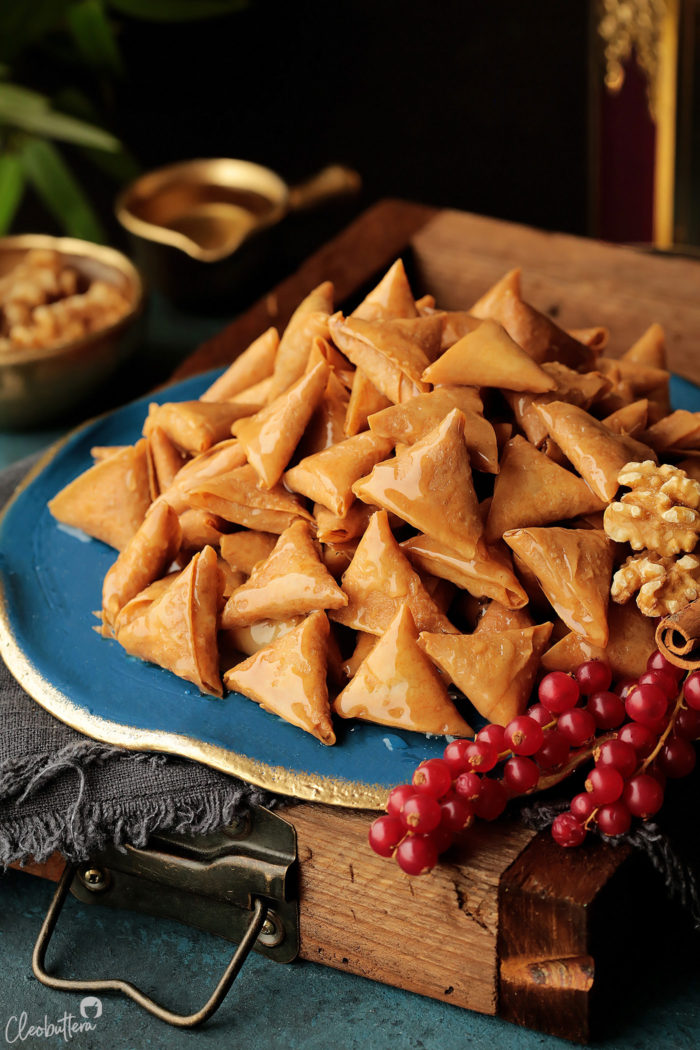
But the taste…is out of this world!
Need another look? Check out the video!
It shows you how to make both cream cheese and cinnamon walnut samosas! So you can make a bit of both ?
Mini Cinnamon Walnut Samosas (samboosak)
hese sweet 'lil treats will make everyone go nuts! Bite-size crispy samosa triangles filled with an aromatic mixture of walnuts and cinnamon, and sweetened with drizzles of spiced sugar syrup. Good luck stopping at one!
Ingredients
For the Sugar Syrup:*
- 1 1/2 cups (300g/ 10 1/2oz) granulated sugar
- 3/4 cup (177ml) water
- Small squeeze of fresh lemon juice (about 1/2 teaspoon)
- 1 cinnamon stick (optional)
- 3 cardamom pods, cracked open (optional)
For the Samosas (Samboosak):
- 1 (500g/ 1 lb) package samosa (samboosak) sheets (about 40 sheets)
- 250g (about 2 cups) raw walnuts
- 1 3/4 teaspoons ground cinnamon
For sealing the dough:
- 2 1/2 tablespoons (19g) all purpose flour
- 2 tablespoons water
For frying:
- Neutral tasting oil, such as vegetable, sunflower, corn or canola
Instructions
To make the Sugar Syrup: (may also be substituted with Big Batch Sugar Syrup)
- In a medium saucepan, combine together the sugar, water, lemon juice, cinnamon stick and cardamom (if using). Set on a stovetop over high heat. Try to avoid stirring it as it heats to prevent crystallization from happening, but if the sugar is not dissolving, then help it out with a few stirs. Once it comes to a boil, STOP stirring.
- Bring to a rolling boil, then immediately reduce the heat to medium and let it simmer for 10 minutes. Set a timer! The syrup will thicken, and have a consistency similar to corn syrup. It should be slightly thicker than the average simple syrup used for kunafa.
- Remove from heat. Transfer to a medium bowl, liquid measuring cup or gravy boat and allow to cool to room temperature before using.
To make the samosas (samboosak):
- Place the walnuts and cinnamon in a food processor, and pulse until the walnuts are very finely chopped but not fully ground.
- Unwrap the samosa wrappers from its packaging and place on a cutting board. Leave all the sheets intact and stacked on top of each other; do not separate the sheets. Using a sharp knife, cut the stack of wrappers from the middle, vertically into 2 equal stacks. Then cut each stack in half horizontally. You should now have 4 equal stacks. Cover the samosa sheets with a damp tea towel to avoid drying out.
- Peel one sheet of samosa wrapper to work with at time, keeping the rest covered.
- Hold one sheet of wrapper with one hand, then using the other hand, pick the upper left corner of the wrapper, pull it down and form an inverted cone around your finger. Please refer to the step-by-step photos in the post.
- Spoon about 1/2 teaspoon of the walnut mixture into the cone. Gently press down onto the cone to flatten. Lift the long, dangling side of the sheet up to cover the exposed walnuts. Continue wrapping the the long side of the sheet around the walnut triangle. When you reach the end, you should be left with a tiny piece of sheet hanging out. Dab that little piece with a thin layer of flour paste (this will act as a glue), then grab that piece and tuck it inside the pocket in the triangle to close it up. Repeat with the remaining sheets.
- At this point, the samosas can be fried right away or frozen for up to a month.
To cook the samosas:
- Fill a large skillet or frying pan with about 1-inch of oil, then place over medium heat until the oil is shimmering.
- Place enough samosas to fill the skillet without overcrowding it. Fry, stirring occasionally, until golden brown in color and feels crisp to the touch. Transfer to paper towels to drain.
- Transfer the hot samosas to a plate or bowl and while still hot, drizzle with the cooled syrup. Arrange the samosas on a serving platter and serve warm or at room temperature. They are best eaten the same day they're made.
Recipe Notes
- Sugar syrup may be substituted with Big Batch Sugar Syrup.
- Avoid the reduced-fat kind of samosa wrapper, as the sheets tend to break while wrapping.
- To make ahead, filled (not fried) samosas keep really well in the freezer, for up to 1 month. You could double (or quadruple) the quantity and store in the freezer in zipper lock bags until needed. Just allow to thaw a little, for about 10 minutes, until you heat the oil, before frying.
Recipe idea given to me by a sweet lady who follows me on Instagram. Unfortunately I cannot recall her name, but I owe her a BIG thank you.
Measurements Note: All recipes of this site have been developed using weight measurements. Although US volume measurements have been included for your convenience, it is highly encouraged that you weigh your ingredients using a kitchen scale to get the best possible results. Due to the sensitive nature of baking, kitchen scales are proven to yield more accurate and consistent results than measuring cups. Enjoy!
Powered by ![]()
This post may contain affiliate links.
All images and content are owned by Cleobuttera® and are copyright protected. Please do not use my images without prior permission. If you would like to republish a recipe, please rewrite it in your own words and link back to the recipe page on my site. Original recipes and creations of this site are intended for personal and home use. Commercial replication or media consumption are only allowed with a written consent and agreement with Cleobuttera owners. Otherwise it is considered a violation of intellectual property. Thank you for respecting and appreciating the amount of time and effort that goes into creating free, unique recipes that make people happy.


this looks amazing! makes me want to enter the computer screen and devour it all
also your posts are torture because i’m fasting now ?
Thank you Asma! I know how you feel; imagine editing all those pics while fasting ?
Thanks for sharing such a beauty.
Can we grill them instead?
It’s my pleasure Mariam. You can brush them lightly with oil and bake them in the oven. Enjoy ?
Attachment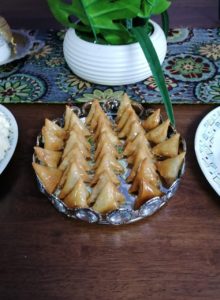
Hi Tasbih
Greetings from Mauritius. I tried your walnut/cinnamon samoussa for Eid and it was simply delicious!!! A great success and well appreciated by my guests.
Thank you for sharing these fabulous recipes, i will surely try more.
Fariha
These are so pretty Fariha! So happy to hear that they were so well received. Hope you had a wonderful Eid ?
Lovely work!! Charming one
These sound awesome. Keep up your great work.