Knafeh Na’ameh
A perfected homemade version of the Levant specialty! Delicately crunchy smooth knafeh crust, cradling a molten layer of ooegy gooey cheese. A drizzle of scented sugar syrup, adds the finishing sweet touch to the classic favorite! Plus…recipe VIDEO included!
Welcome back to another deceptively simple Middle Eastern recipe that drove me to the brink of hopelessness!
If you’d recall, Basbousa had me pulling my hair out for 3 years until I got it just right. As for this Knafeh…oh that didn’t take that long…only about 2 years or so ?
But I’m finally happy to report back, that it was worth the struggle.
Knafeh Na’ameh (which literally translates to Smooth Knafeh) is very different from its frizzer, coarser, shaggy-looking sister, that seems to be more known to the world.
Even in Egypt, where I live, and where kunafa/knafeh is wildly popular, this type of knafeh, is barely heard of. Thanks to the recent welcomed immigration of Syrians to Egypt, it’s just paving its way to popularity. This type of Knafeh is Palestinian in origin, blooming specifically from the city of Nablus. It then spread among other Levant countries like Syria, Lebanon, Jordan, as well as Turkey; so it comes to no surprise that it’s a specialty of that region. It’s known by Palestinians and Syrians as Knafeh Nabulsia, but named Knafeh Na’ameh in Lebanon and Jordan. I was so torn between which name to give it on the blog, that I even ran a poll on Instagram, which gave me 50/50 results (very helpful I must say ?), until I finally settled upon Knafeh Na’ameh, as Nabulsia is more commonly associated with the orange dyed, coarse one. One thing I knew for sure, is that I wanted to pronounce it ‘knafeh’ not ‘kunafa’ as it is in the Levant dialect. Whatever name you decide to call it though, it’s one of the most delicious things that could enter your mouth.
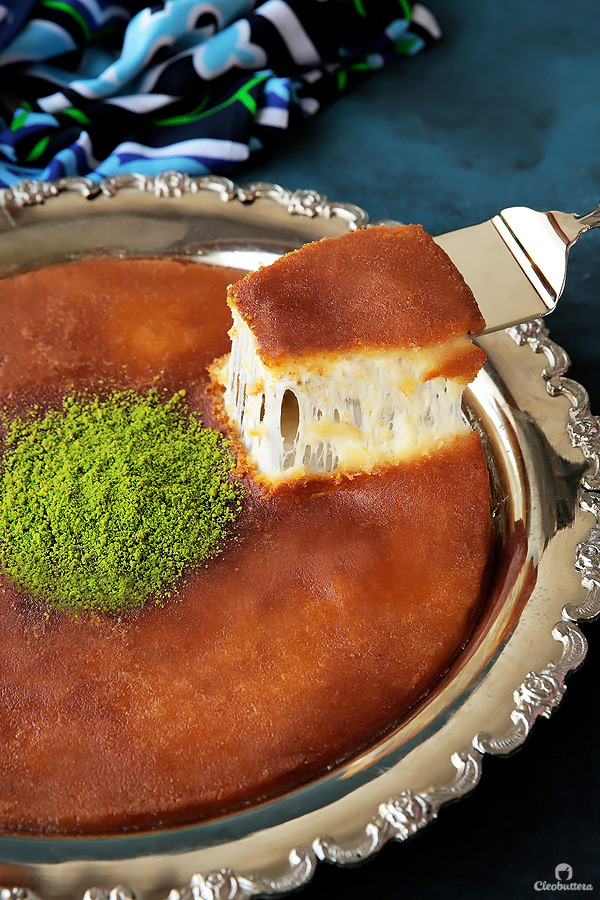
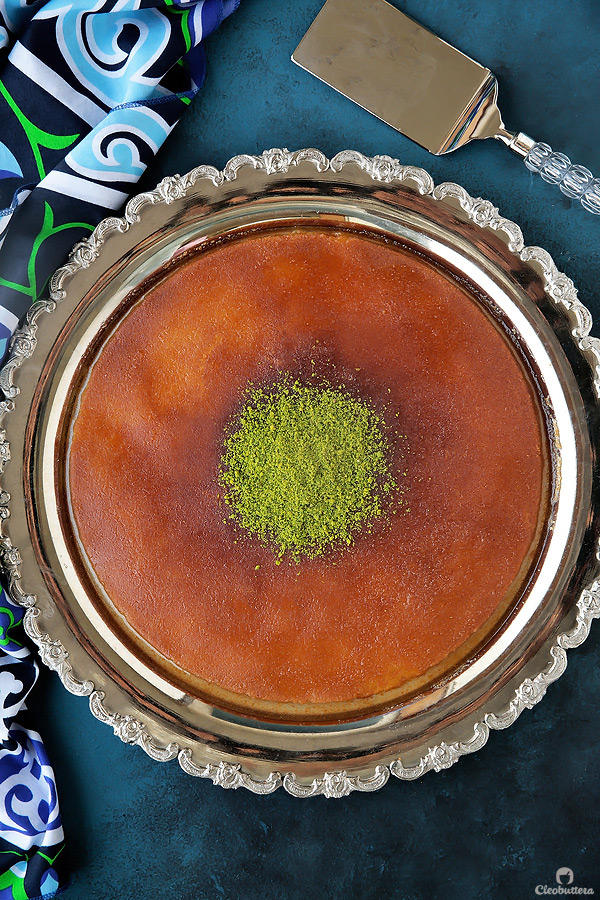
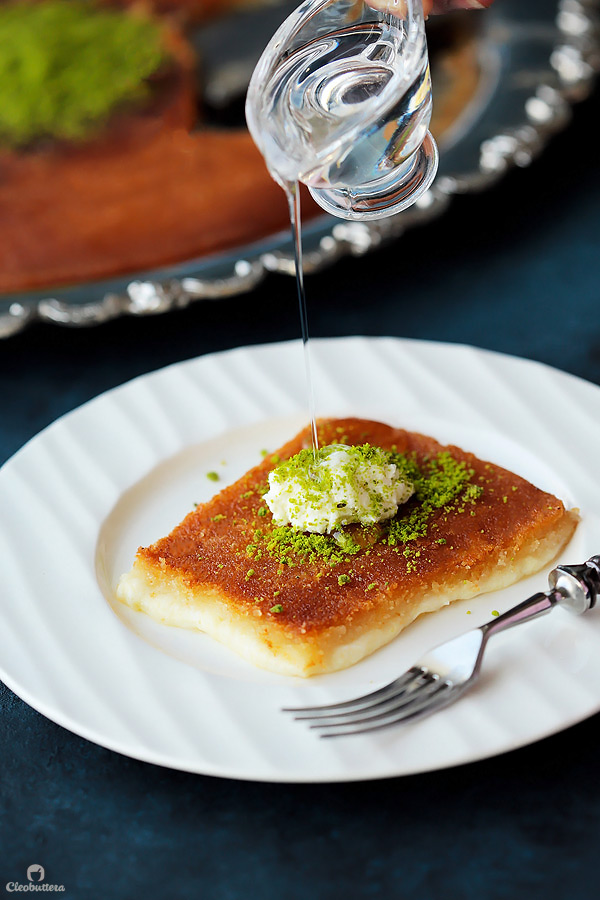
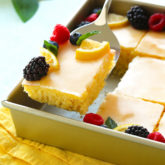
 It is characterized by its slightly crunchy, smooth yet sandy crust reminiscent of basbousa. Unlike the other type of coarse knafeh/kunafa which is typically violently crunchy, and has a top and bottom crust, this one has only one layer of crust on top. Underneath that delicate crust is an irresistible layer of molten, ooey, gooey unsalted cheese. The whole thing is sweetened with scented sugar syrup and optionally topped with a dollop of eshta (Arabic-style clotted cream) and a sprinkling of ground pistachios. Heaven.
The first time I had Knafeh Na’ameh was during a trip to Beirut, Lebanon about 10 years ago, and have been obsessed ever since. I then had it a few times at Lebanese restaurants in Cairo and Toronto, but it wasn’t nearly as magical. That’s when I knew it was high time to recreate it at home.
There were 3 things to tackle here: the crust, the cheese and the baking method.
People living in the Levant have it easier than the rest of us, as the crust mixture is sold already prepared and ready to use. They also have the right kind of cheeses that ensures the prefect flavor and gooey texture. Since we’re not as lucky with easy accessibility to that stuff, I had to experiment A LOT to get it as close as possible to the unforgettable one I had in Beirut. It took me a long time to discover what worked and what did not work for me, but in the end, I did it!
Before I bore you with all the juicy details of the journey…here’s a quick look to get you excited!
I. The Cheese.
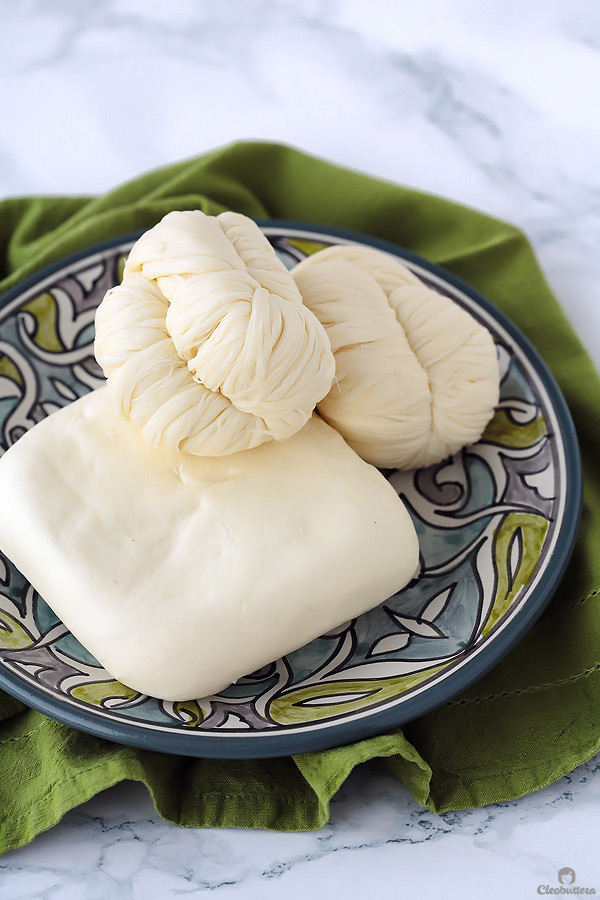
Authentic Knafeh Na’ameh is typically made with Arabic cheeses like Akkawi or Nabulsia. And after some digging around, I also found out that Shelel and Majdoula, are also commonly used. These types of cheeses have an elasticity similar to mozzarella, but a unique flavor profile of their own.
So in true geeky Cleobuttera fashion, I tried them all, both alone and in different combinations with each other. Akkawi alone tasted great but was rather rubbery and did not give me that ridiculous stretchiness I was hoping for. I had the same issue with Nabulsia too. I found that to be mind boggling, since almost every ooey gooey YouTube knafeh tutorial I’ve watched uses Akkawi with super stretchy results. I came to the conclusion that perhaps the Akkawi we have in Egypt is different from what is available in the Levant. My hypothesis was confirmed when I watched several videos that explain that there are 2 types of Akkawi: Baladya or generic unspecified akkawi (which tastes great, but does not stretch well) and Tchiki (which is not as flavorful but has good elasticity). Though Tchiki was a lot harder to find, I finally did and it really is something else. I wasn’t as lucky with finding good quality Nabulsia cheese though.
Through all the testing, my favorite cheese mix proved to be a combination of Tchiki Akkawi and Shelal. Shelal is a Syrian braided cheese with an incredible elasticity that can be mistaken with melted marshmallows. Insane! It was a revelation! The flavor though is a bit flat, so I found it neccessary to enhance it with Akkawi to get the best of both worlds; shelal for that to-die for stretchiness and Akkawi for flavor. After experimenting with different ratios, my family and I agreed that a little less that 2:1 ratio of shelela to akkawi is the winner. However, if you can’t find Tchiki Akkawi, the more typical Baladya Akkawi can be used with a 3:1 ratio of Shelal to Akkawi to compensate for the loss of elasticity. I’ve also included other cheese options and ratios in the detailed recipe below, depending on what cheese you might or might not find.
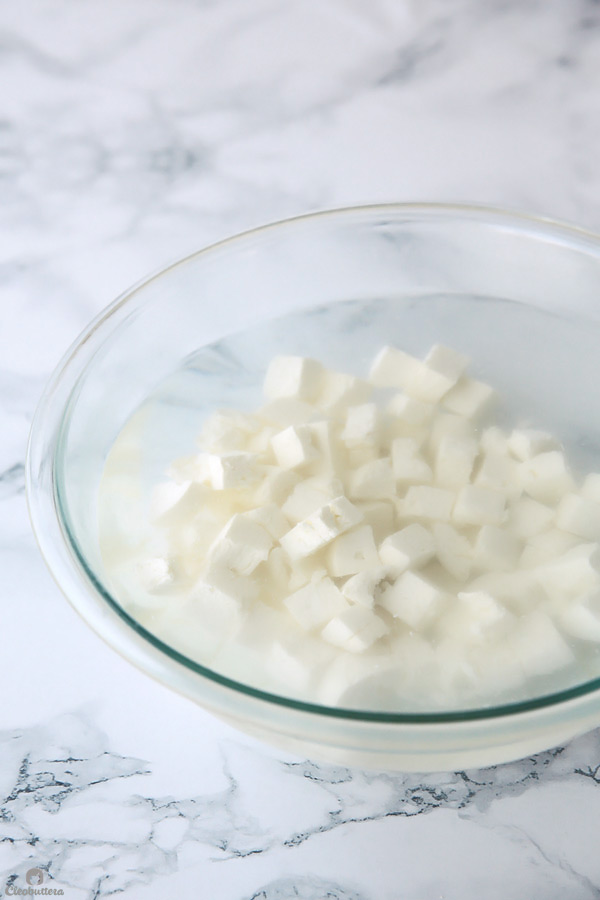
The thing about these types of cheeses though, is that they’re loaded with salt for preservation. So they must be soaked in water, changing it every 1/2 hour, to remove all the saltiness, before using them in the knafeh. Depending on the salt content of the cheese and how small you slice it, this process can take from 2 to 6 hours. I like to do this the night before and slice the cheese as thin as possible. I also prefer to soak each type of cheese in a separate bowl, because they can desalt at different rates.
II. The Crust.
While that’s happening, you can prepare the crust, better known as ‘Farkeh.’ Knafeh Na’ameh crust (farkeh) can be done in two different ways. The first one is using a semolina flour based dough that you bake, then grind into a fine powder, and the second is using kunafa/kataifi dough as your base. I tried several recipes for the semolina one but failed miserably. It would turn out so greasy and too gritty; not a pleasant experience at all. So I turned to the kunafa dough method and used this video as my guide, but improvised on it to make it home equipment-friendly, and using mainstream kunafa/katiafi that can be easily found.
The really nice baker in the video, uses a meat grinder to make the dough. Since I don’t have a meat grinder, I used my handy dandy spice grinder instead and reworked the order of the method. Rest assured, I’ve included both the meat and spice grinder methods in the recipe details, so you could use whichever one you have.
First, you grind semi-frozen strands of kunafa in a spice grinder until super fine and powdery. A regular food processor won’t work here because it’s unable to grind it as fine.
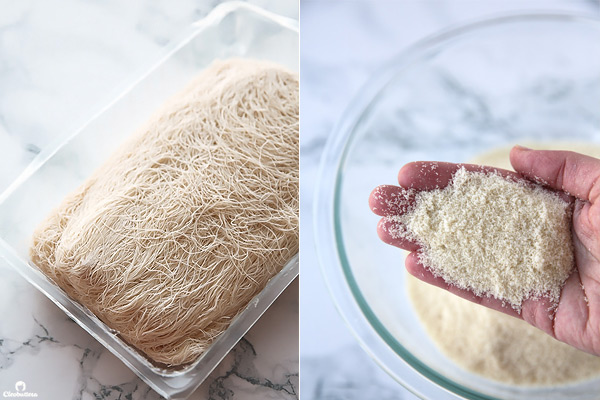
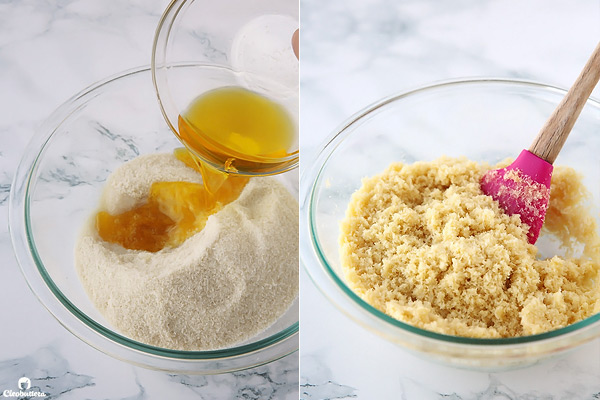
You then mix the ground kunafa with melted ghee, water and sugar syrup. It will look like couscous at this point, and will be very damp and sticks to itself when squeezed between the palm of your hands.
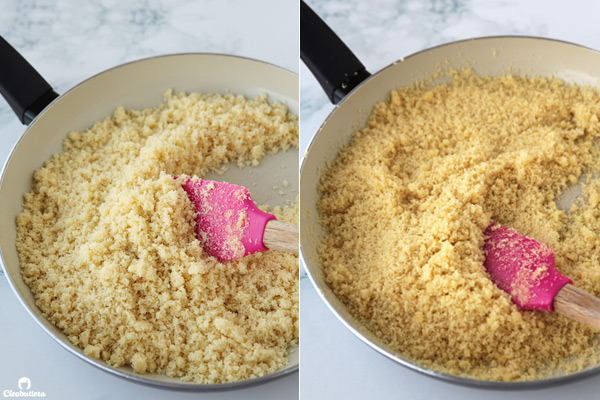
So you’re gonna take it to a skillet and toast it until it dries out and feels dry and sandy and no longer sticks to itself. You want to be careful not brown it, but the color will become about one shade darker. At this point, you could freeze the farkeh (crust mixture) for months!
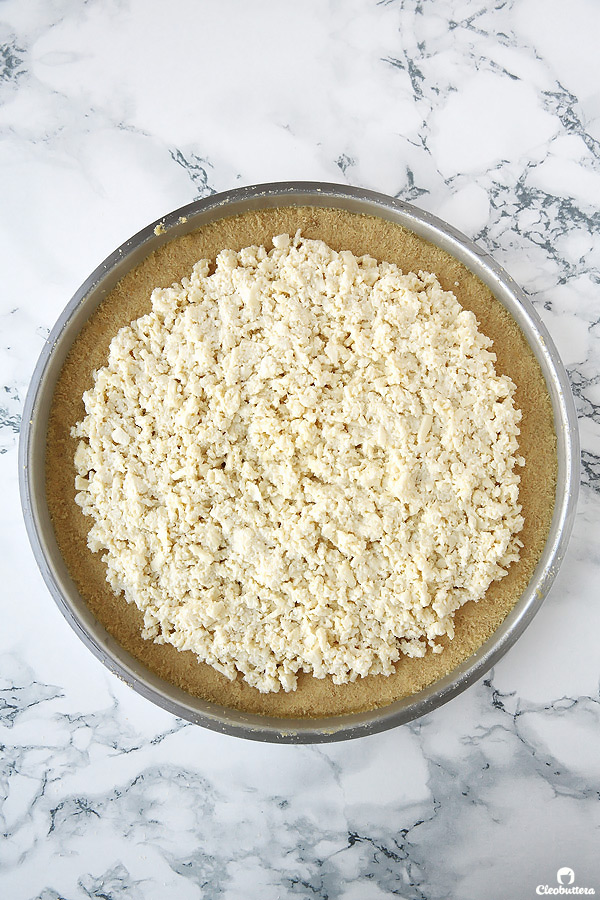
When ready to use, remove 3 tablespoons of the farkeh and set aside, then evenly press the remaining farkeh over a ghee greased aluminum or copper pan. The type of pan is really important here, as the knafeh will be cooked over the stove not in the oven, so any other material will not handle the heat of the stove.

After draining the cheese, squeezing all the liquid out and mixing the 2 well together, you spread it over the knafeh crust, leaving a 2cm border around the edge uncovered. You don’t want to go all the way to the edges, or the cheese will burn and stick to the pan. Plus…when it starts melting, its gonna spread on it own anyway.
III. Baking Method:
Now…baking time! Or more accurately…cooking time since it’s done over the stove. Believe you me, I wanted this to work in the oven so badly, so I can set it and forget it, but unfortunately the results were very disappointing. The crust would barely brown even after 1 hour in the oven, the texture was just off and the cheese hardened. So trust me, and I say this with a heavy heart since I love the oven more than anything else, but the stove is the only way to go here. Plus it only takes about 15 minutes, if not less.
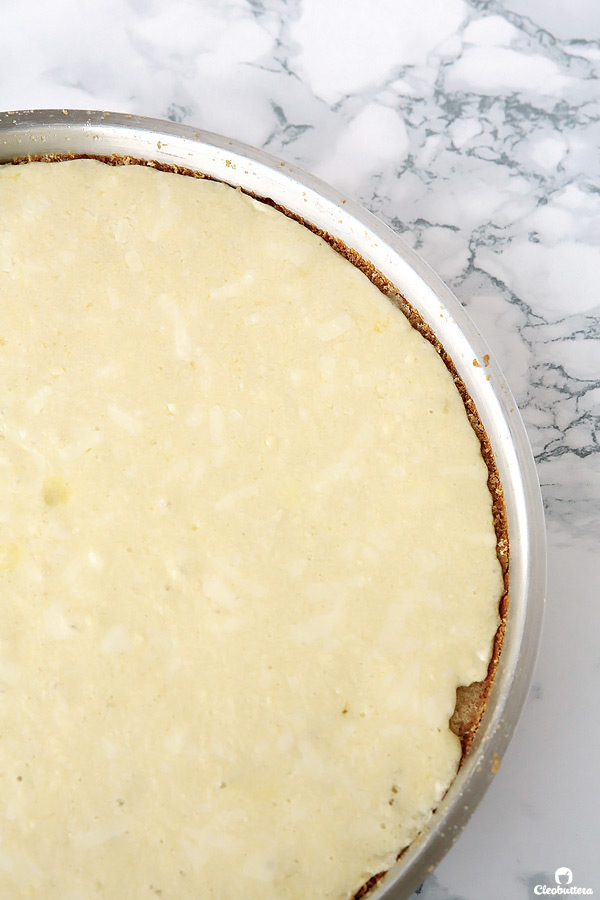
So…set the pan over one side of the stove top, making sure the flame is covering only half the pan’s bottom. If the pan is centered over the stove top, the center of the knafeh will burn, before the sides get a chance to cook. Using tongs in one hand and wearing oven mitts in the other, rotate the pan continuously for even baking. As the crust starts to cook, the cheese will start to melt and exude moisture. So you’ll need to pat the cheese with a clean cloth or kitchen towels to absorb any released moisture, as this can make for a make for a soggy crust.
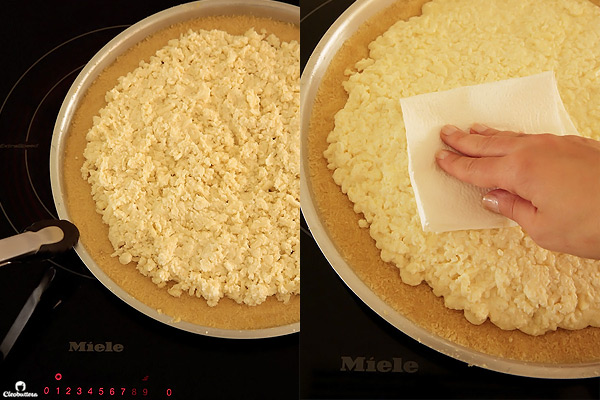
Continue rotating the pan until the very edge of the crust turns deep golden brown and the cheese is almost melted; 10 to 15 minutes. The edge of the crust is your indicator; whatever color it is, is the actual color of the knafeh’s bottom.
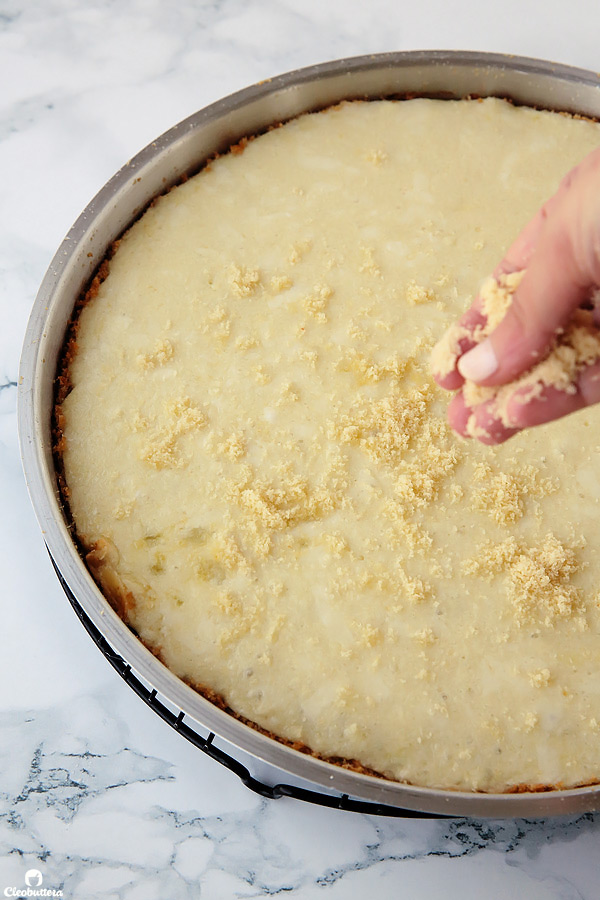
Time to flip! Remember those 3 tablespoons of farkeh that we had saved aside. Now sprinkle those on top of the cheese. They will absorb any excess moisture, plus prevent the cheese from sticking to the serving platter.
Moment of truth…Whoops! The center of mine got slightly burnt and it was due to the pan’s bottom being warped. So lesson learnt…only perfectly level pans from now on!
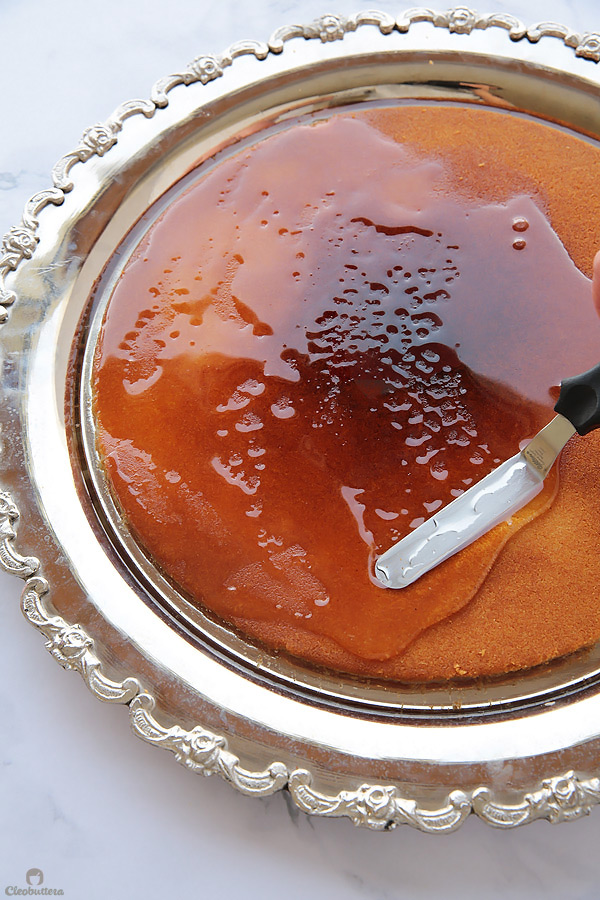
After getting over the burnt center, wiping a teardrop or two…syrup goes over the knafeh…
…and ground pistachios come to the rescue to hide the burn. Shhhhhh…no one needs to know.
Now this is a dessert that must be served warm, while the cheese is still all ooey and gooey. So you either serve it right away or reheat over a steaming water bath…that shall do the trick and will keep the cheese all nice and molten for hours.
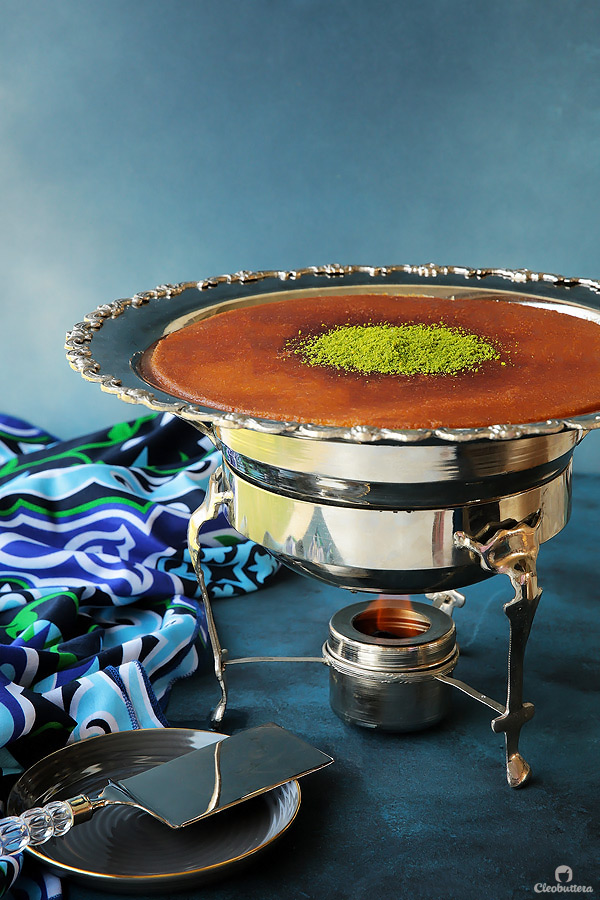
Like sooooo….
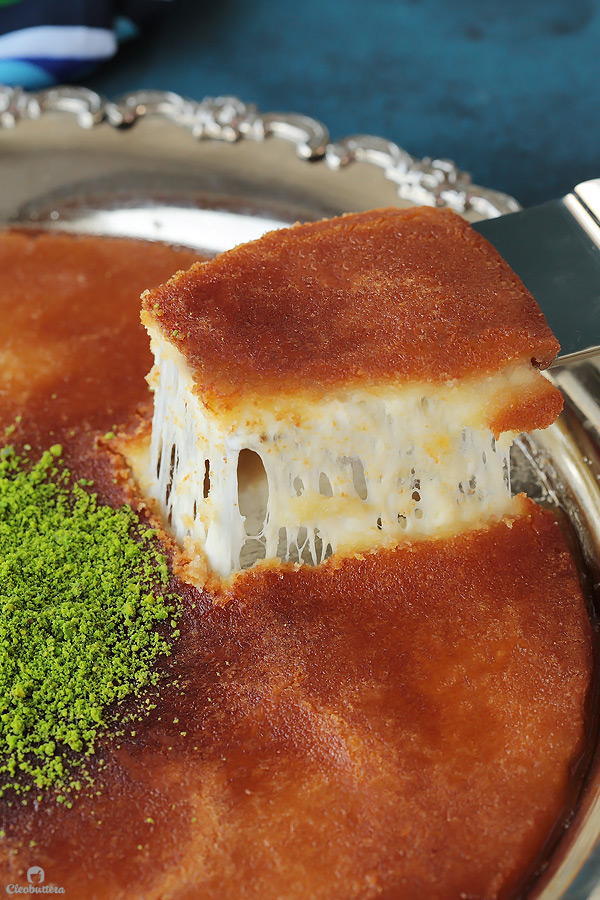
Hubba hubba hubbaaaa ?
Knafeh Na'ameh
Though not difficult to make, this Knafeh does require some time to prepare, a lot of which is hands off. Once you have all components set and prepared, the baking process takes very little time. It is advised to space your work over several days, as not to stress yourself on the day of. You can make Big Batch Sugar Syrup months in advance or the regular one a couple of days ahead. The Farkeh too, can also be prepared in advance, toasted, sifted then stored in zipper lock bag, then frozen for months, and ready to go when needed. It's also a good idea to soak the cheese the night before. With everything all prepared, all that's left to do on the day of serving, is drain the cheese, grease the pan, press in the farkeh, top with cheese, then cook of the stove.
Ingredients
For the Scented Sugar Syrup:
- 2 cups (400g) granulated sugar
- 1 cup (230g) water
- Squeeze of lemon
- 2 teaspoons orange blossom water (more or less to taste)
- 1/2 teaspoon rose water (more or less to taste)
For the Cheese Filling:
- 500g Shelal (or Shellala/Meshalela) cheese (preferably without black sesame)
- 300g Akkawi Tchiki Cheese
For the Knafeh Crust (Farkeh):
- 375g kunafa (aka kataifi dough), fresh or frozen
- 1/3 cup plus 2 tablespoons (94g) melted ghee (or clarified butter *instructions below)
- 3 tablespoons (60g) scented sugar syrup
- 3 tablespoons (45g) water
- 2 tablespoons (30g) ghee or clarified butter, at room temperature, for cooking the knafeh
- Ground pistachios, for garnish (optional)
Instructions
To make the scented simple syrup:
- In a medium saucepan, combine together the sugar, water and squeeze of lemon juice. Set on the stove top over medium high heat. Try to avoid stirring it as it heats to prevent crystallization from happening, but if the sugar is not dissolving, then help it out with a few stirs. Once it comes to a boil, STOP stirring.
- Bring to a boil, then immediately reduce the heat to low and let it simmer for no longer than 10 minutes. Set a timer! The syrup will thicken slightly, and have a consistency similar to warm pancake syrup. If it simmers for longer it could thicken too much and become candy-like and not pourable. Stir in the orange blossom and rose waters.
- Transfer to a medium bowl or gravy boat and allow to cool to room temperature before using.
To make the Cheese Filling:
- Using a sharp knife, thinly slice both the shelal and akkawi cheese. Place each kind of cheese in a separate bowl and cover with lukewarm tap water to remove the saltiness. Allow the cheese to soak for 2 to 6 hours, changing the water every 1/2 hour, until the cheese is no longer salty to the taste. Amount of soaking time will vary depending on the cheese's salt content, which is why they are placed in separate bowl. This step can be done overnight, but in that case, keep the cheese bowls in the refrigerator.
- Drain both cheeses through a colander, squeezing them with your hand or back of a spoon to remove any excess liquid. Crumble both cheeses together with your hands or in food processor to evenly combine. Set aside in the colander to release any excess moisture, as you prepare the knafeh crust (farkeh).
To make the Knafeh Crust (Farket El Knafeh):
(can be made in advance & frozen)
Spice Grinder Method:
- In a spice grinder, process the kunafa in batches until very finely ground and powdery. It should have the texture of fine bread crumbs. Transfer to a medium bowl and stir in the ghee, 3 tablespoons of scented sugar syrup and water until well combined and homogenous. It will look like cooked couscous and should feel very damp and sticks to itself when squeezed between the palm of your hands.
Meat Grinder Method:
- In a medium bowl, combine together shredded kunafa strands with the ghee, 3 tablespoons of scented sugar syrup and water until the kunafa is well coated. Pass through a meat grinder until a clumpy mixture comes out of the other side.
To make the Knafeh:
- Transfer the kunafa mixture to a large skillet set over medium heat. Toast the kunafa mixture, stirring continuously, taking care not to brown it, until it feels dry and sandy and no longer sticks to itself. The color should become one shade darker. While still hot, transfer to a food processor and process to smooth out any lumps, or strain through a large mesh sieve. At this point, the farkeh can be frozen in a zipper lock bag for months.
- Brush a 34cm aluminum or copper pan ONLY with the 2 tablespoons of room temperature ghee. Remove 3 tablespoons of the farkeh and set aside. Evenly sprinkle the remaining farkeh over the bottom of the pan, compressing it with your hand into a compact, even layer that is about 3/4cm thick.
- Spread the cheese mix over the knafeh crust, leaving a 2cm border around the edge uncovered.
- Set the pan over one side of the stove top, making sure the flame is covering only half the pan's bottom. If the pan is centered over the stove top, the center of the knafeh will burn, before the sides get a chance to cook. If using an electric stove, set the heat to medium high; if using a gas stove, set it to medium. Using tongs in one hand and wearing oven mitts in the other, rotate the pan continuously for even baking, patting the cheese with a clean cloth or kitchen towels to absorb any released moisture. Continue rotating the pan until the the very edge of the crust turns deep golden brown and the cheese is mostly melted; 10 to 15 minutes. The edge of the crust is your indicator; whatever color it is, is the actual color of the knafeh's bottom. Remove pan from over the heat.
- Cover the pan and let rest for a few minutes to allow the cheese to melt all the way through. Sprinkle the reserved 3 tablespoons of farkeh over the cheese layer to absorb any excess moisture and to prevent the cheese from sticking to the serving platter.
- Grease serving platter with ghee, then invert the knafeh on it, so that the cheese layer is on the bottom and the crust is on the top. Pour enough cooled scented sugar syrup over the knafeh's surface to cover it, about 3/4 cup. Spread the syrup with a spatula to even out the saturation. Garnish the surface with ground pistachios if desired. Cut into squares and serve right away while still warm and the cheese is still gooey. Dollop with fresh eshta, and drizzle with extra syrup, if desired. If serving later, reheat the knafeh by placing the serving platter over a simmering water bath. The steam from the hot water with remelt the cheese and keep it gooey for a long time. Knafeh is best eaten the same day its made.
Recipe Notes
- I was lucky to find Tchiki Akkawi cheese which has a much better elasticity and softer texture than Baladeya Akkawi at Gourmet Egypt. If you can't find Tchiki, substitute with the Baladeya (which is usually just generic unspecified akkawi), using 200g Akkawi, 600g Shelal. If you can't find Shelal, use can use 550g Akkawi Tchiki with 250g Majdoula (also available at gourmet), or 250g Akkawi Baladeya plus 550g Majdoula. If you can't find any of these Arabic cheeses, you can substitute with 800g mozzarella cheese (not need to soak if not salty), however, the taste will not be as authentic. Feel free to play around with the cheese mix of your preference; as long as you use around a total of 800g of cheese.
- I get the Shelal cheese from Syrian specialty shops across Cairo, including Daria in El Hegaz Mall in Obour City and Fosdoq Halab in Rehab. Most of them contain black sesame seeds, which can be picked out during soaking.
- To clarify butter, melt 150g butter slowly over medium low heat until the milk solids have separated from the butterfat. and collected on the bottom of the saucepan. Remove the pan from heat, let the butter settle for 10 minutes, then carefully skim the foam from the surface with a spoon. Slowly pour the clear butterfat into a bowl, leaving all the milk solids behind in the saucepan. You should end up with about 110g clarified butter.
Farkeh recipe adapted from Al Chef Feras with changes.
Measurements Note: All recipes of this site have been developed using weight measurements. Although US volume measurements have been included for your convenience, it is highly encouraged that you weigh your ingredients using a kitchen scale to get the best possible results. Due to the sensitive nature of baking, kitchen scales are proven to yield more accurate and consistent results than measuring cups. Enjoy!
Powered by ![]()
This post may contain affiliate links.
All images and content are owned by Cleobuttera® and are copyright protected. Please do not use my images without prior permission. If you would like to republish a recipe, please rewrite it in your own words and link back to the recipe page on my site. Original recipes and creations of this site are intended for personal and home use. Commercial replication or media consumption are only allowed with a written consent and agreement with Cleobuttera owners. Otherwise it is considered a violation of intellectual property. Thank you for respecting and appreciating the amount of time and effort that goes into creating free, unique recipes that make people happy.


The amount of work and dedication that goes into every recipe you have on this website is amazing, and I am always in awe. Looking forward to a day when I can have this. <3 <3 Thank you for all that you do!
Thank you A so much for your appreciation and encouragement. Your kindness and support means so much to me & what drives me to keep going.
Thank you,
🙂 I can’t wait to try this recipe!!! My family loves knafeh and I prefer knafeh nabelsyeh/na’ameh over the kheshneh.
Question: what’s your pan measurements?
It’s so hard for me to pick a favorite kind of kanafeh…they’re just all so good right?! But this one has a special place in my heart. I hope you love it as much as I do. My pan size is 34cm…just be sure that its either aluminum or copper.
Oh.My.Goodness!! You are seriously my hero! My husbands absolute favorite food in the word is Knafeh Na’ameh and I’ve been trying for months to find a recipe… SO glad I found ur page!! I don’t have a meat grinder so I figured I’d try my Ninja blender and it actually worked really well!! Probably not 100% as smooth as yours but pretty close! Thanks so much for sharing this recipe, you are awesome! I’m never using a different recipe again!!
Woooohooooo! You have no idea how happy it makes me to know that you guys enjoyed this recipe! I share the same obsession as your husband for knafeh na’ameh; your hubby has good taste ? So glad this one hit the spot and even happier that the Ninja worked. Thank you so much for taking that time to share your feedback; always makes my day.
I see that you used an induction device what setting do you put for the induction stove?
Hi Ray! My stove is actually not induction. I know Miele carries an induction variety, but this one is a regular electric one. I set it over medium high (number 7). In the video, I use a hot plate, which was also set over medium high.
I wanted to know if you used the sweet cheese by Dana? Will that work? I also have access to the akkawi and shelal but wanted to know if I can substitute with only the sweet cheese.
Hi Ray! I’m honestly unfamiliar with the sweet cheese by Dana. I think that if it melts nicely and has a stretchy and stingy consistency like mozzarella, then it should work just fine. Best of luck!
Simply awesome work!!
A very well written and thought out post!
Thanks for sharing!!
Thank you so much Basim! I really appreciate your kind feedback ?
تسلم ايديك فعلا شكلها وهمي و هجربها بإذن الله.
بس هو انا احط على الشربات ماء ورد و لا ماء زهر؟
ميرسي جدا لوصفاتك الخطيره الكتيره?
Thank you so much Nana for your kind words. I’m so happy to hear that you’re enjoying the recipes of the blog. I apologize for answering in English, as my laptop doesn’t have Arabic keys. To answer you question regarding rose and orange blossom water, I like to use a bit of both. I use more orange blossom water (mazahr) than rose water (maward) but that’s my personal preference, but feel free to use whichever you like more.
Wow, looks great. So you don’t use food coloring and you only cook on one side?
Hi George! I don’t use any food coloring here. Yep! It’s only cooked on one side ?
Hi! do you have to use rose water and orange blossom? I have everything except those.
Hi Jana! You don’t have to at all; they’re completely optional. They’re just here to add that authentic flavor, so you can easily omit them if you need to.
I am so pleased to have discovered your site via Pinterest. Love your detailed description and your sharing of your experimental journey to perfect the recipe. In addition your videos are so beautifully executed, short to watch and to the point.
Can not wait to make this recipe of stove top
Thanks!
I’m so grateful for Pinterest for leading you here! Welcome aboard! So happy that you’re enjoying the blog. Thank you for taking that time to let me know that; makes my day 🙂
sallam there tasbih!
the first time I made this it was closest to the real thing i’ve made! so hats of to you for that. but the farkeh was not as fine as i liked it to be so i experimented a little and found out if you actually toast the knafeh noodles first with less ghee, let it cool down and then grind, it would come out perfect! but without your recipe I would still be trying out the semolina dough farkeh every sunday and tossing it out? so thank you soooo much?
Hello!!! Can we use a non stick fry pan as well?
Hi Amna! That could work, but you still need to keep rotating the pan so it cooks evenly. Also be sure that it’s the same size as the pan called for in the recipe. Enjoy ?
Hi I tried to use fresh mozzarella cheese mixed with karoun braided cheese it came out too rubbery. I can’t find akawi tchiki in Los Angeles Ca. What else do you recommend . I also tried karoun akawi but flavor. I would appreciate some cheese recommendations. Thanks
Hi Tasbih, this is fantastic! Just curious, which cooktop brand and model is that in the video? Thank you 🙂
Hi Sally! I honestly can’t remember at all because the video was shot at a video producers studio. If I can get this information from them, I’ll sure let you know.
Yes, please, would really appreciate that. Thank you so much!
Hello! I LOVE your site!
If I wanted to make this smaller round pan (but thicker say twice as thick) – would this still work? Thanks
Hi Tanya! I’d recommend cutting the recipe in half for a smaller pan, a very thick crust won’t cook all the way through.
Hi,
Have you tried making this with Semolina dough instead? If so, will you share a recipe?
Chef Feras has a video for the recipe with Semolina but doesn’t have exact measures.
Thank you,
Hi Fares! I have, several times actually, but non of them were successful unfortunately.
Pingback: Lebanese Knafeh Recipe | Asik Masak
Hi, I just realized it said not to cook in the oven, and I did unfortunately, and it did not stick together at all. My question is is it because I baked it in the oven, or I didn’t put enough butter? I’m not sure but the sandiness of it just stayed as is.. or did I cook it in the skillet for too long
Hi Lama! Baking in the oven may have to do with it not sticking well together, as it really ruins the texture and dries it out. If you followed the exact same amounts as mentioned in the recipe, then you really shouldn’t need more ghee. You mentioned using butter too, which I wouldn’t recommend in this recipe and might be another reason why it didn’t stick together.
Do you think this would work with a combination of desalted halloumi and fresh mozzarella? Also, ever make the crust from scratch with semolina? I live in an area with limited access to specialty groceries.
Thanks!
Hi Jesse! Yes…desalted halloumi and mozzarella would work well here.
I have tried semolina crust several times, but non of them were successful unfortunately. Check this one out! Although I haven’t tried this particular recipe, because it’s just recently released, it looks very promising and I trust Chef Feras blindly.
I can’t find kataifi dough anywhere.
Can I use fillo pastry and shred that?
Thank you
Hmmmm…intersting. I never actually thought about that before ? While I have absolutely no idea whether this will work or not, I think it makes sense. Unfortunately, I can’t encourage you to try it out, because I’m uncertain of the results, but the idea stands a good chance. If you do try it out, maybe you can experiment with just a very small quantity, so there’s not much waste if it doesn’t work out. There’s also a version of Knafeh Na’ameh that uses a semolina mixture instead of knafeh. Sadly I don’t have a good recipe of it, but there are lots of recipes online that you might want to check out.
Hi Tasbih, can I use كنافة خشنة for this recipe? Can I use liquid food coloring to get the orange color of Nabulsia?
Hi Wesam! Sure for both questions. Try dissolving the liquid food coloring in the ghee first for even distribution. Enjoy ?
Hello!
Can i mix mozzarella with akkawi baladyeh? And if yes, at which ratio?
Thank you!
Hi Reina! I’m not really familiar with akkawi baladeya. How different is from regular akkawi?
I mean it is not the tchiki kind since i couldnt find it here ? and i didnt know that until i tried to melt the akkawi i bought and realised it doesnt melt! ?
Oh yeah you’re right! I had so much trouble with that kind of akkawi when I was testing this recipe, I just forgot that it was called Baladya ? It doesn’t really melt and stretch too well or give that amazing cheese pull we all love. I guess a half and half ratio of akkawi to mozzarella will help with the melting issue.
What would you recommend doing for those who have an induction stove? Would it work better with any other pan?
Hi Manal! I don’t have experience with induction stoves, but as far as I know, it does require cooking vessels that contain ferrous metal like cast iron or stainless steel to conduct heat.
Attachment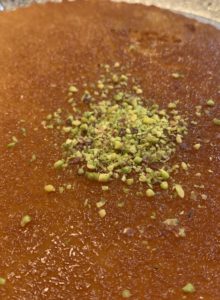
I’ve always been terrified to bake, but this Ramadan, after spending nights trying out different kanafas, including the one from a grocery chain, which my dad said was, “a total disaster and waste of time,” and hours reading about what it takes to make a good kanafa, I finally came across your page and said to myself, if I want this done, I’m going to have to do it myself.
The kanafa turned out wonderfully and has sparked a love for baking in me and an obsession for your blog. (Btw your detailed blog posts are the best part and make me feel like I’m not in this alone! <3)
Thank you for a lifetime worth of inspiration and joyful baking.
Love,
Hala
That golden beauty of a crust is all I need see to brighten my day. WOW! This looks flawless! I’m so happy that you loved this recipe so much. I pray your dad approval of this one ?
I’m so flattered and humbled by your kind words. I hope you love everything you try from here just as much.
Hello, i am happy to have discovered this beautiful website! Can we use fine semolina instead of kadaif? thanks
Welcome aboard Cherine! I have tried semolina crust recipes several times, but non of them were successful unfortunately. I don’t recommend substituting it here because it requires a different method entirely. However, may I suggest checking this video out. Although I haven’t tried this particular recipe, because it’s just been recently released, it looks very promising and I trust Chef Feras blindly.
Hello! I love your cheese recipe in your other post where you have to make a semolina pudding! So i was wondering if i could make this fine kanafa with that other cheese mixture instead?
Hi Nuwara! What a wonderful idea?! I believe that should work really nicely ?
Pingback: Knefe Topped With Kellogg’s Corn Flakes - Global News Wire
Pingback: Knefe Topped With Kellogg’s Corn Flakes - Indian News Time
Hello,
I cannot find shelal cheese anywhere. I have found Akkawi Beladayah and Nabulsi cheese. Since Nabulsi is also stretchy. Do you think 500 g of Nabulsi and 300 g of Akkawi cheese would work?
Hello Hufsah! Absolutely…Nabulsi would be great here ?
Can you please explain the difference in taste with regular unsalted butter and Ghee (which by the way I can’t find anywhere) is it a big difference if I just use regular unsalted butter?
Hi Hadeel! It’s really hard to explain the taste, but they’re pretty similar. However, the reason why ghee is used here instead of butter is not for the taste, more than it is for it’s fat content. Ghee is 100% fat whereas butter is around 80% and 20% milk solids and water. For this recipe, it’s best to use something with 100% fat for even baking and crispness. If you can’t find ghee where you live, you can easily make clarified butter at home and use that instead. When you clarify butter, you remove all the moisture, leaving you with 100% fat, which basically that same as ghee. Hope that helps.
Pingback: Lo "street food" che trovate per le strade di Israele - Israele 360
Pingback: QUARANTIMES – Dana Khalil
Pingback: Similarities & Differences between the Levant and North African Regions
Pingback: State of Palestine – eaternational
Hi Tasbih,
This was amazing, you have given me the courage to try this out, I’m so happy to have found your blog and have started following you on instagram 🙂
I have a question although, could you at all make the cheese filling in a saucepan separately? Then add the kunafa dough on top and put into the oven?
Im looking to make this for a party and it would be easy to make them in small party cups instead of a big pan.
Thank you!!
As a Lebanese person this hurt me. At leas the syrup recipe is accurate!
This recipe has become the stuff of legends in our household! I first tried it during Ramadan and now my husband invites everyone for Kunafa all the time, infact I just made anothet one today and it is delicious. Thanks Tasbih for your dedication and love into everything you put on this page.
Pingback: 7 uses of Akawi cheese | hqvideos - hqvideos
Hi Tasbih, I stumbled on your website yesterday while I was searching for a knafeh nabulsie recipe. I was really impressed with your website and the great effort you put into creating your recipes. I made your knafeh naameh today and it was AMAZING!!!! Shared the link with friends. Please don’t quit blogging.
Indeed one of the perfect work, I have ever came across!!