Kanafeh Cheesecake
New York cheesecake just got a Middle Eastern makeover! Sweet and crunchy kanafeh pastry, sandwiches rich and creamy keshta-topped cheesecake. A drizzle of a cinnamon and cardamom kissed sugar syrup ties the flavors together.
I admit it…I haven’t been living up to my Egyptian…ness? Egyptianality? Egyptianism? around here.
And although my language skills just proved it, my recipes have been far from it.
I’ve been blogging for 4 months now and the number of Egyptian/Middle Eastern recipes I’ve featured, boils down to…ZERO!
It’s high time I set things right and I’m starting with this, lo and behold…drumroll please…NEW YORK CHEESECAKE. LOL!!!
For realz though…I got it all dressed up in a very Middle Eastern fashion…Kanafeh guys!
Have you ever met the gloriousness that is Kanafeh?
My oh my, if I could eat one Middle Eastern dessert for the rest of my life, kanafeh will sure be IT!
Kanafeh, kenafeh, kunāfah, künefe, knafeh, kunafeh, knafeh, konafa, with its 101 spelling and pronunciation options, is a long thin noodle-like pastry commonly made from shredded phyllo. Unbaked and unadorned, it tastes like…well…nothing really. But mixed with butter, or more typically ghee, then baked and drenched in sugar syrup, transforms into sweet, crunchy golden strands of heaven.
It’s a specialty dessert of the Middle East, Turkey, and Greece where it’s called kadaïfi or kataïfi. Due to a big portion of the Middle East being under the Ottoman Empire rule in the past, we tend to share almost identical dishes with Turkey and Greece. Hello Baklava and Moussaka!
There are as many different ways to make Kanafeh as there are of spelling it. In Egypt, the most common way is to layer it with a creamy pudding-like filling in the middle and baked it off in a round cake pan. The end result is scrumpiously sweet and crunchy on the outside, creamy and dreamy on the inside. Nut fillings and cheese fillings are also typical, especially in neighboring countries.
Wait…Did someone say CHEESE?
I mean, if kanafeh can be made with ricotta, mozzarella, feta, goat and akkawi cheese, then why should cream cheese ever say no?!
I was determined to find the answer to that by stuffing it with the best way possible to eat cream cheese…Cheesecake baby! A big, fat, full sized-cheesecake, encased inside a foreign object…the kanafeh. I brainstormed and brainstormed till my brain hurt, and this is what I came up with:
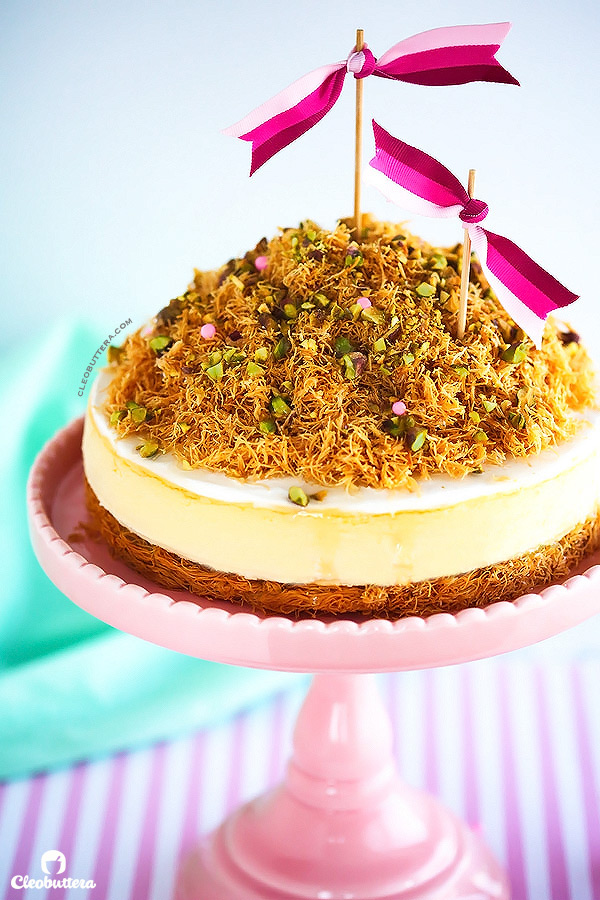
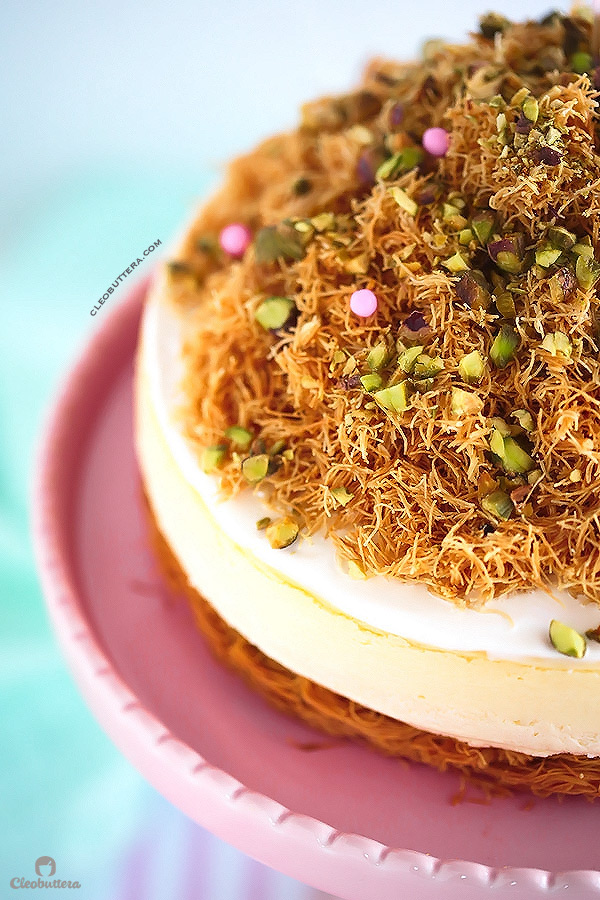
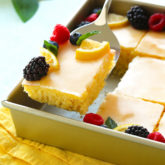
A cinnamon and cardamom scented sugar syrup soaked kanafeh bottom crust, takes place of the otherwise traditional graham cracker crust, followed by a baked New York style cheesecake, that gets slathered with Arabic cream (keshta), then topped with piles of more sugar-syrup soaked konafa shreds and a sprinkling of pistachios and pink edible pearls.
Kanafeh? Goood. Cheesecake? Goooooood? Was I worried? Yeeeeees. Why you may ask? Individually, each component is perfect in its own right. What I was worried about is if it was gonna work together and tie the knot.
The verdict? It worked! The contrast between the crunchiness of the kanafeh and the creaminess of the cheesecake is so good. I found it mandatory though, to add extra drizzles of syrup on the cheesecake layer on my plate…it just ties everything together. Adventurous eaters, foodies and those with a more refined taste palate, if you will, were delighted with the creation and kept going for seconds. Surpisingly, my very picky eater son loved it too and he never likes anything! For God’s sake, the little guy doesn’t like cookies…of any kind! But he loved this. Traditionalists on the other hand were more like…how about next time you make us a kanafeh and a cheesecake on separate plates?! Heartbreak aside, moral of the story: if you’re planning to make this, put your audience into consideration. It’s definitely not your run-off-the-mill cheesecake, so naturally its not for everyone.
Another thing I should tell you before we make this together, is that I wasn’t actually planning on sharing this on the blog just yet, because I wanted to test it out first before making the bloggable one. But then halfway through, I decided that I’ll have nothing to lose if I take photos anyway. Therefore, you’ll notice that the making of the cheesecake layer pictures are missing and that’s because I baked it the night before, with no previous intentions of sharing it here. Don’t worry though, the recipe is explained in the fussiest details below.
Plus…I just updated the recipe with a video! So hopefully that will make up for the lack of photos ?
So let’s pretend that we just made a crustless cheesecake batter, baked it, cooled it then froze it till its hard. We need the cheesecake layer to be completely frozen, so we could easily transfer it on top of the bottom kanafeh crust. So do that step a day ahead.
Also make the sugar syrup and let it cool completely.
Ok, now some pictures to save the day.
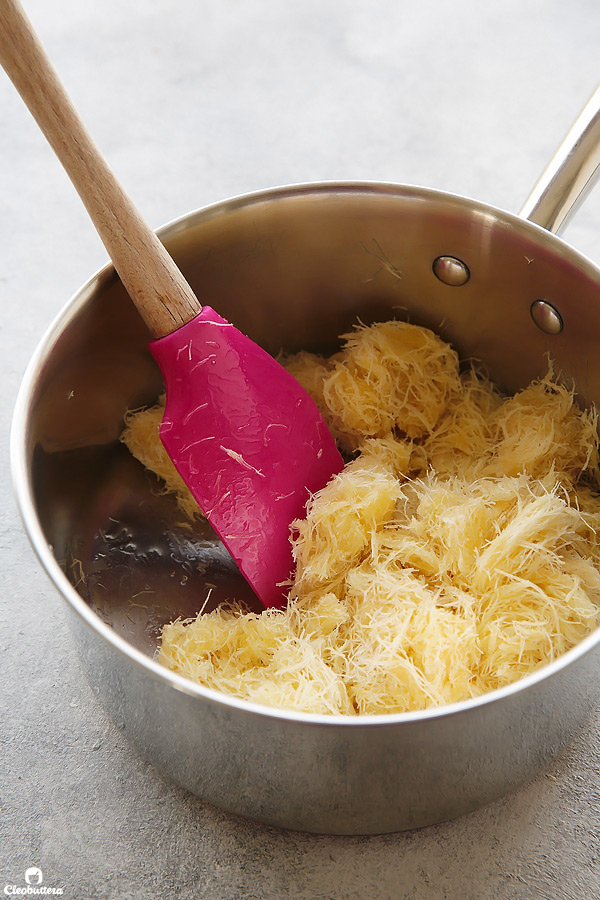
You’ll take half the amount of kanafeh dough that you’re gonna be using, and shred it into really small pieces. Then cook it with butter (or ghee) and sugar…
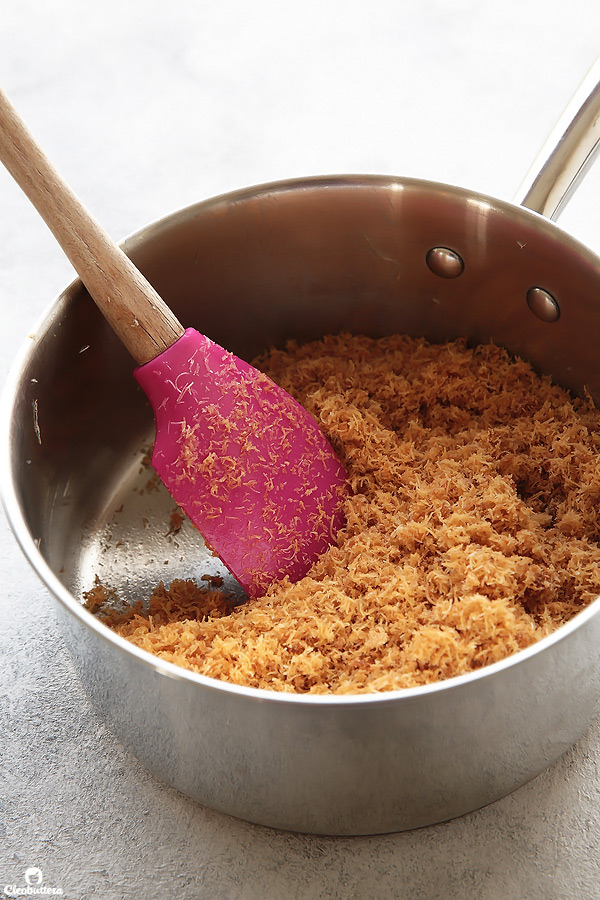
Till it has gorgeously toasted and wafting with buttery, caramelized aromas. The reason why I add the sugar during the cooking process and not after (which is the norm), is that I love how the sugar melts and coats the kanafeh shreds with caramelization. This gives the kunafa even more crunch, longer shelf life and extra special flavor.
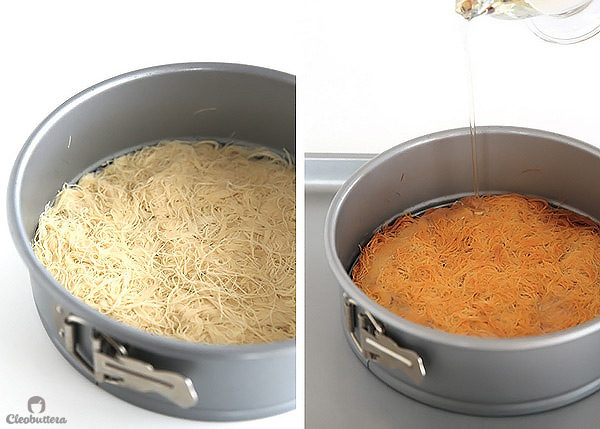
After that, you’ll move on to make your kanafeh bottom crust. This time, don’t shred it, just simply loosen the strands from each other. Then coat it well with some melted butter or ghee.
Now press it really firmly in the bottom of the springform pan. Bake until deep golden brown and again soak with the sugar syrup right away. Allow to cool, then get it out of the pan and slide it on to your serving platter or cake stand.
Get your frozen cheesecake from the freezer and simply place on top of the bottom kanafeh crust. Because the cheesecake is frozen, this step should be a breeze.

Now spread some kesha, clotted cream or creme fraiche for that authentic Arabic touch.
Pile on that kanafeh till your heart’s content.
Then sprinkle it happy with some pistachios and edible pearls…or sprinkles! Let the cheesecake layer defrost…
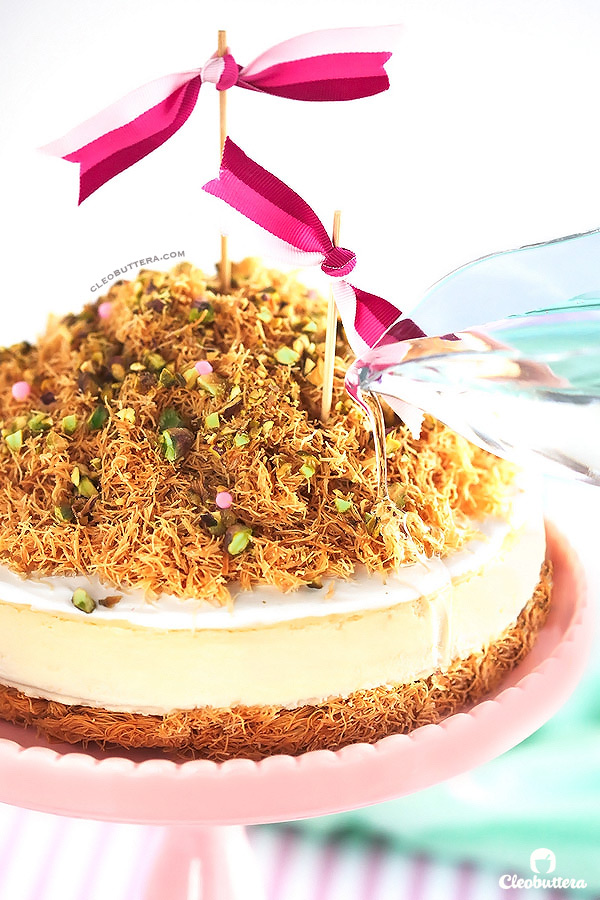
And voila…your Middle Eastern fusion dessert is now ready to be devoured. And oh…I highly recommend adding an extra drizzle of the syrup on the cheesecake layer of your slice. It just ties everything together.
All that’s left to say now is “Bel hana wel shefa”…or as they say in my country as you’re served food…”with bliss and healing.” Ok that just sounded weird.
Just…Enjoy y’all!!!
Bon appétit!
Update 9/6/2018: I updated the recipe from its original version to make the cheesecake layer creamier and the kanafeh components even crunchier. It’s now better than ever!
Kanafeh Cheesecake
The cheesecake layer needs about 3 hours to bake and cool, and at least 6 hours to freeze, so plan in advance; preferably make it a day ahead. The assembled kanafeh cheesecake, needs about 4 hours to defrost before serving, so plan to assemble it about 6 hours before you plan to serve it. If you prefer a thinner layer of cheesecake, for the kanafeh to take center stage, you could halve the cheesecake recipe. Baking time will need to be reduced to about 45 minutes. The syrup amount makes enough to soak the kanafeh, plus extra for drizzling on individual servings.
Ingredients
For the Cheesecake Layer: (see note above)
- 2 pounds (907 grams) cream cheese, softened to room temperature
- 1¼ cups (250 grams) granulated sugar
- ½ cup (130 grams) sour cream
- 1 teaspoon freshly squeezed lemon juice, optional
- 1½ teaspoons pure vanilla extract or 1 tablespoon imitation vanilla flavoring
- 4 large eggs
- Boiling water, for the water bath
For the Sugar Syrup:
- 2 cups (400g) granulated sugar
- 1 cup water
- A squeeze of lemon
- 1 cinnamon stick
- 2 cardamom pods, cracked
For the Kanafeh Topping:
- ⅓ cup plus 1 teaspoon (85g) unsalted butter (or ghee)
- ½ cup (100g) granulated sugar
- 170g kunafa, or kataifi/kadaifi pastry, fresh or frozen (If using fresh, freeze for an hour for easier cutting. If using frozen, thaw slightly)
For the kanafeh bottom crust:
- ⅓ cup plus 1 teaspoon (85g) unsalted butter (or ghee)
- 3 (37g) tablespoons cup (50g) granulated sugar
- 170g kunafa, or kataifi/kadaifi pastry, fresh or frozen (If using fresh, freeze for an hour for easier cutting. If using frozen, thaw slightly)
For Topping and Garnish:
- 1 cup (227g) keshta (Arabic cream), clotted cream or creme fraishe
- 1/4 cup pistachios or other preferred nuts, chopped
- pink or any other colored edible pearls or sprinkles or dried roses, optional
Instructions
For the Cheesecake Layer: (Could be prepared up to several days in advance)
- Adjust oven rack to lower-middle position and heat oven to 325F/160C. Keep a roasting pan or a baking dish big enough to hold the cheesecake pan nearby to use for water bath. Bring kettle or large saucepan of water to boil.
- Spray a 9 or 10-inch springform pan with a nonstick spray, then line the bottom with a round of parchment paper, then spray again. Wrap a triple layer of foil around the bottom and up the sides of the pan, to seal it well so the water from the water bath doesn't seep into the pan and ruin the cheesecake.
- In the bowl of a stand mixer fitted with the paddle attachment, or in a large bowl and a handheld mixer, beat the cream cheese until smooth and creamy.
- Add in the sugar and beat until well combined. Add in the sour cream, lemon juice (if using) and vanilla, and mix until incorporated.
- Add the eggs, one at a time, mixing well after each addition. Scrape down the sides and bottom of the bowl, then beat the mixture for a few more seconds until the batter is smooth. Be careful not to overmix. If the batter has lots of cream cheese lumps, pour it through a fine mesh strainer to smooth it a out.
- Pour the batter into the prepared pan. Transfer the pan into the roasting pan. Pour the boiling water into the roasting pan, taking care not to splash water into the cheesecake pan, until water reaches halfway through the height of the cheesecake batter.
- Bake the cheesecake for 55 to 70 minutes until the cheesecake's outer three inches look slightly puffed and set, but the inner circle still jiggles slightly when you gently shake the pan. Cheesecakes baked in a 10-inch pan will usually cook in 50 to 55 minutes, and those in a 9-inch pan will cook in 55 to 60 minutes. The internal temperature of the cheesecake's center should registers 165F/74C.
- Remove the roasting pan with the cheesecake pan from the oven. Take the cheesecake pan out of the roasting pan, and unwrap the foil. Return the cheesecake pan into the turned off oven and crack the oven door open to let it cool gradually. This prevents the cheesecake from collapsing and helps avoid cracks from happening. Let the cheesecake cool slowly for one hour.
- Take the cheesecake out of the oven and transfer to a wire rack. Run a thin-bladed knife around the edge of the cake to make sure it's not sticking to the sides. Let the cheesecake cool completely on the rack.
- When it has cooled, wrap the cheesecake pan in plastic wrap and transfer to the freezer until well frozen, at least 6 hours, or preferably overnight.
- Meanwhile prepare the rest of the cake components.
For the Sugar Syrup: (Could be prepared up to a week in advance)
- In a medium saucepan, over high heat, combine together the sugar, water, squeeze of lemon, cinnamon stick, and cardamom.
- Bring to a boil, then immediately reduce the heat to low and let it simmer for 10 minutes not more. Set a timer! The syrup will thicken slightly, and have a consistency similar to pancake syrup.
- Transfer to a bowl or gravy boat and set aside to cool completely before using.
For the Kanafeh Topping:
- While the kanafeh is still semi-frozen, break it between your hands to crumble into small pieces. Kanefeh shreds easiest when semi-frozen.
- In a large pan (the larger the better) over medium heat, melt the butter (or ghee). Add in the sugar and stir until it starts to dissolve; about 30 seconds.
- Add in the shredded kanafeh and stir well until evenly coated with the butter and sugar. It will be difficult to stir at first, but will loosen up as the kanafeh starts to toast. Continue stirring constantly, being careful not to get any burn marks, until the kanafeh is evenly golden brown in color and is very crunchy; about 10 minutes. Transfer the kanafeh crumbs to a bowl and allow to cool completely before using. Cooled caramelized kunafa will keep well, covered tightly with plastic wrap for about a week.
For the Kanafeh Bottom Crust:
- Remove the cheesecake from the freezer, take off the sides of the pan, turn the cheesecake upside down on a plate, slide a knife under the bottom to remove. Peel parchment round to remove. Cover cheesecake with plastic wrap and keep in the freezer until needed. Wash and dry the cheesecake pan and use to make the kanafeh bottom crust.
- Over a medium bowl, shred the kanafeh into small pieces then pour in the butter (or ghee), and sugar and using your hands, mix everything well together, rubbing the butter into the kanafeh until evenly coated.
- Transfer the kanafeh mixture to the pan and firmly press the buttered kanafeh into the cheesecake pan bottom and a little over the sides, because it will shrink as it bakes. Using the flat bottom of measuring cup or ramekin, firmly press to pack the mixture into a compact layer.
- Bake until deep golden brown, about 20 minutes. While still hot, pour enough sugar syrup to coat the surface, about 1/4cup. Let it cool completely before layering the cheesecake on top of it.
Assembling the Cake:
- Take off the sides on the springform pan with the kanafeh bottom crust, then gently slide the kanafeh on to a serving platter or cake stand.
- Take the cheesecake layer out of the freezer and place on top of the kanafeh bottom. This should be easily done, since the frozen cheesecake is firm enough to be carried without breakage.
- Spread the keshta, clotted cream or creme fraiche on top of the cheesecake.
- Top the cheesecake with the konafa shreds, piling it in a mountain-like fashion.
- Garnish with the chopped pistachios and edible pearls or sprinkles, if using.
- Let the cheesecake defrost to a cool room temperature for several hours before serving. This could take up to 4 hours.
- Cut into wedges and serve drizzling extra sugar syrup on the cheesecake layer.
- Due to the kanafeh's crunch short life span, the assembled cheesecake is best enjoyed the day its made. Leftovers will keep well in the fridge for several days, but some of the kanafeh crunch will be lost.
Recipe Notes
- I like Philadelphia brand block cream cheese, as well as Kiri Creamy from the tub.
- Sour cream gives a pleasant tangy flavor to the cheesecake, but heavy whipping cream could be substituted for a more mellow flavor. Half the amount of both, will give you the best of both worlds.
Cheesecake base adapted from The Perfect Classic Cheesecake.
Measurements Note: All recipes of this site have been developed using weight measurements. Although US volume measurements have been included for your convenience, it is highly encouraged that you weigh your ingredients using a kitchen scale to get the best possible results. Due to the sensitive nature of baking, kitchen scales are proven to yield more accurate and consistent results than measuring cups. Enjoy!
Powered by ![]()
This post may contain affiliate links.
All images and content are owned by Cleobuttera® and are copyright protected. Please do not use my images without prior permission. If you would like to republish a recipe, please rewrite it in your own words and link back to the recipe page on my site. Original recipes and creations of this site are intended for personal and home use. Commercial replication or media consumption are only allowed with a written consent and agreement with Cleobuttera owners. Otherwise it is considered a violation of intellectual property. Thank you for respecting and appreciating the amount of time and effort that goes into creating free, unique recipes that make people happy.


I second ur my oh my
I knew you would love this with all the crunch going on. It’s right up your alley.
Simply gorgeous. I love all the texture the kanafeh introduces to this cheesecake. I bet the crunchiness juxtaposed against the creaminess is heaven to the senses. I hope you continue to bring more Middle Eastern inspired dishes to your blog.
I love texture in my food and this one really delivers. The crunch of kanafeh is incomparable! I’m so happy that you’re liking the Middle Eastern twist. Will definitely be adding more of that. Thanks Lynn:))
Yum, I’ve never seen this spin on a cheesecake and I love it! Kanafeh goes great with anything. Reminds me of a baklava cheesecake I’ve been meaning to test out.
I think we’re on the same wavelength here. I’ve been eyeing that baklava cheesecake for years too. Just never got around making it. Must taste amazing too! Thanks Sarah for your comment:)
What a clever dessert. I never had kanafeh, but heard about it and its Oriental flavors. This cheesecake must be so so good. Beautiful pictures as well!
Thank you Oana:) You really owe yourself to try kanafeh; it’s incredible. I’m gonna have to share some classic kanafeh recipe over here as well.
I want kanafeh!!! where can this be purchased in the US. It looks delicious. Welldone.
Hi ChiO! I’m so glad you like it! I think you should find it either in the Greek aisle of the supermarket under the name Kadaifi dough or at Middle Eastern speciality stores. When I used to live in Canada, I got them from Walmart from the Greek section. Hope this helps:)
Yay for Egyptian treats! I’d love to see more Egyptian recipes, that sounds awesome 🙂 The combination of the shredded pastry and cheesecake sounds like texture heaven to me!
The textural contrast is indeed heavenly! I’m so happy you’re excited about treats from my part of the world! I’ll definitely be working on sharing more of these. Thanks June:))
Breezin thru your page. Everything looks sooo goooood!
I live in Dubai so loving all the Middle Eastern influences. <3
Aaawwww Naureen thank you so much! I love me some Dubai. I’m hoping to add more of that Middle Eastern vibe in future posts. So happy you like what’s already there.
Wow. You have me drooling.
Hahahaaa:) Enjoy!
I live in rural Australia, I’d love to make this, it looks divine, but the fanciest pastry I can seem to find here is filo pastry. Is there a way I could use it somehow? I’m Hoping to make it for a Boxing Day middle eastern backyard feast!
Oh you could use filo & turn it into a baklava cheesecake! It would be quite dreamy 🙂 Here’s a link to one that I’ve being dying to make; hope that helps 🙂
http://www.sprinklebakes.com/2013/05/baklava-cheesecake.html?m=1
This looks amazing, will have to try it! Question, why do you make the cheesecake separate from the kunafa bottom layer? Can’t you just toast it then add the cheesecake batter on top of it and let it bake, like the traditional New York cheesecake? Would the batter run through or would the crust burn? Never tried to freeze cheesecake before!
My thoughts exactly Lara when I was developing this recipe. But I figured that so many things could go wrong if I do that. Like you said the batter will definitely run into the Kunafa & make it soggy. Another problem is that the syrup in the Kunafa could ruin the texture of the cheesecake bottom. Making them separately ensures that the Kunafa stays nice & crunchy, while the cheesecake stats well…cheesecake-y.
You just need to freeze the cheesecake enough to make it firm enough to transfer unto the Kunafa bottom without breaking. So a few hours will do?
A friend of mine just made it to a gathering and added canned cherry topping to it & it was incredible. Everyone was swooning over it.
Thank you! Will give it a try, can’t wait!
Pingback: 10 Different & Easy Sweet Dessert Eid Recipes | Dekhlay.com
Made it this weekend as a trial run before an event and it turned out so beautiful and tasted great! Thank you so much for posting this! I need this for a large party, 30 people, maybe a little less, do you think it would be able to support being a tierd cake, with maybe a 7-inch layer on top?
Hi Nadia! Please accept my apologize for my embarrassingly late reply. I hope my response is not too late.
I’m so excited you loved this recipe! Cheesecakes don’t hold too well as tiers due to their very soft & creamy texture. Any added pressure & they’ll risk collapsing. However, if you carefully dowel the bottom layer & add a cake board on top of the dowels to support the top layer, you should be safe. Best of luck!
Dá um efeito super diferente, adorei as crianças devem adorar,ficou muito bonito , chama atenção pela apresentação e credito que o sabor seja incrível.
Pingback: 14 Saffron Colored Dishes for your Vaisakhi Menu | The South Asian Buzz
Sounds delicious! My only concern would be the bottom layer – is it easy to cut through the hard layer?
Thank you Nayaab! Sure! A sharp knife will cut easily into it. The “hardness” is similar to a classic cheesecake’s biscuit bottom.
Thanks Tasbih. Made this cheesecake this weekend and it was great! I personally thought that the base was a bit too hard. Any other way we can get the crunchiness in the base without baking it?
So lovely to hear to that you enjoyed this recipe Nayaab!. Unfortunately, for the bottom base, there’s no way around baking. The stove top method won’t work here, because it results in a crumblier kanafeh and you need a base that holds in one piece. Getting a “hard” texture is likely the result of overbaking, so you may want to reduce the baking time. Another thing that will help, is omitting the sugar added to the kanafeh mixture. The sugar caramelizes doing the baking processes and forms caramelized sugar crystals that you might find too hard. So omitting it, will do the trick.
I’m from the Uk, what can I use on place of Keshta cream? Or can I purchase it here in Arab stores? Is it Puck cream?
Hello Sameena! Clotted cream is as close as you can get to keshta. Clotted cream is slightly thicker in consistency though, so maybe thin it out with a few drops of milk. Mascarpone cheese is also very similar to fresh keshta too! Puck is cream, but its not fresh, so it won’t give you the desired taste and texture needed here.
I would like to make this recipe as mini cupcake sized cheesecakes. Any advice as to quantities and baking times?
Hi Faatimah! So sorry for my embarrassingly late reply. I’d assume this would make around 48 mini cupcakes if not more, but I’m honestly unsure as I’ve never tried it before. Baking time shouldn’t take longer than 20 minutes. Best of luck!
Hi Tasbih, hope you had a good Eid! Just wondering, how far in advance can I make the kanafeh base (and keeping it separate from the cheesecake), such that the crunch is retained? And how do you recommend storing it prior to assembly?
Hi Lou! Eid was great! Hope you had an amazing one too.
Kanafeh in general loses its crunch quickly, so I wouldn’t make it more than a couple of days in advance. You can either tightly cover it with plastic wrap or store it in a zipper lock bag. Freezing is always a good option too. In that case, you can definitely keep it in there for weeks, but I’m honestly unsure how that will affect the crunch.
Can you bake the cheesecake on top of the knafeh bottom crust? Like you would do a traditional cheesecake on a graham cracker crust. Or would it become soggy or burnt.
Thank you!
HI Lubna! I wouldn’t recommend that. Like you speculated, it will cause the crust to be soggy. Enjoy ?
I made this today, turned out delicious. I enjoyed following your recipe, thank you for sharing! Guests love it too! Will definitely make it again. I forgot to spread the qesht, just remembered now. And we didn’t feel the need of more syrup on top, just the drizzle for the bottom.. Layer was enough. Although i would have loved the added hint of cinnamon and cardamon. Maybe next time I may leave the sugar out of the top layer? Though they were so yumm too. Thanks again!
Glad to hear that it was such a hit Maheen! Really happy you all loved it ?
Salam! So I want to make this for a get-together I’m hosting. I’m planning to make and freeze the cheesecake a few days before, so I won’t have to worry about that the day of. I really want to minimize what I need to cook/prepare the day of, so I was wondering what about the kunafa bottom and topping? How far in advance can I make them before they start to lose their crunch? If I made it the day or night before and assembled the whole cheesecake and left it in the fridge overnight, would that be ok? I’m also worried about the kunafa bottom becoming too hard like someone else in the comments mentioned. Btw, I’m really excited to try this! I’ve made your mozzarella cheese kunafa and it’s simply the best! Love your blog!
Salam Ayesha! So happy you loved the mozzarella kunafa ? The kunafa bottom and top can be made up to a couple of days in advance without losing their crunch. However, I’d recommend putting the cheesecake together the same day you’re serving it, as the moisture from the cheesecake can soften the kunafa, as well as the condensation from the fridge. I’ve personally haven’t experienced a hard bottom, but that may be due to overbaking. Hopefully you wouldn’t have a problem with it, but if it worries you, you might want to reduce the amount of sugar in the bottom, as the extra caramelization from the sugar is what can cause the hardness. Best of luck!
Thank you so much for replying <3 Just another quick question- how should I store the kanafeh crust and topping so it won't lose that crunch? I'm thinking wrapping in cling wrap or some other air-tight container, yes? And should I keep it at room-temp or in the fridge?
A question- for the kanafeh bottom crust you list it’s written, “3 (37g) tablespoons cup (50g) granulated sugar”, what does that mean? 3 tablespoons and 1 cup?
Pingback: 10 Best Dessert Recipes - Delicious World and Travel
Good day everybody! If you have no one idea how to write your essays correctly and you need someone to do your hometask, then you should try to buy papers from this brilliant online writing company. I want to say, that after using their service it will make your studentship so much lighter than ever.
My cheesecake is currently in the freezer- is it possible to slice the cheesecake down the middle so I can make two desserts instead? Very very excited for the end result by the way! Thank you for posting such amazing recipes x
Sure!
It’s my pleasure. I hope you love the results ?
Hi there regarding the freezing of the cheesecake, can it frozen be overnight and completed on the day of serving?
Hi Sadiyya! Sure! Cheesecake freezes really well for days, if not longer.
Worth Appreciating. Great work.
Pingback: Obtaining Science-fiction Guides and Brief Stories – ШШГБ
Pingback: Kithchen Science Review - Just How Kithchen Science Could Allow You to - Double Check
Pingback: Discovering Sciencefiction Guides and Limited Stories – Duurzaam Drimmelen
Pingback: Naked Science Review – 2bus.co
What a fabulous post!! Very interesting.