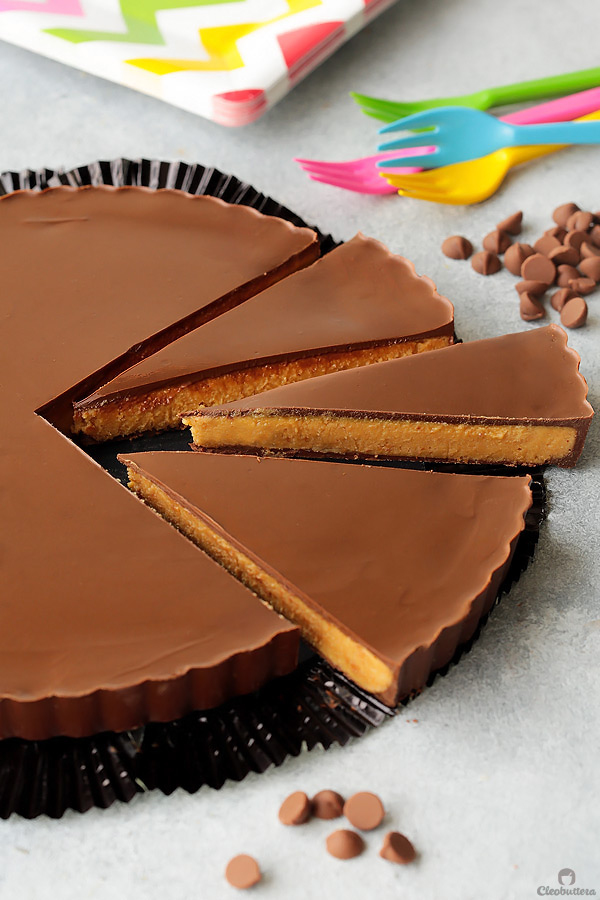
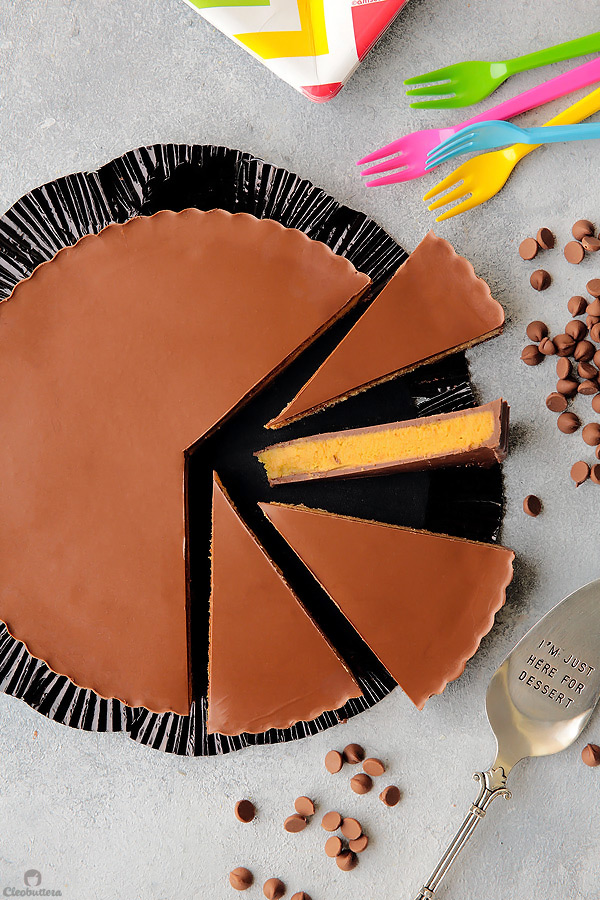
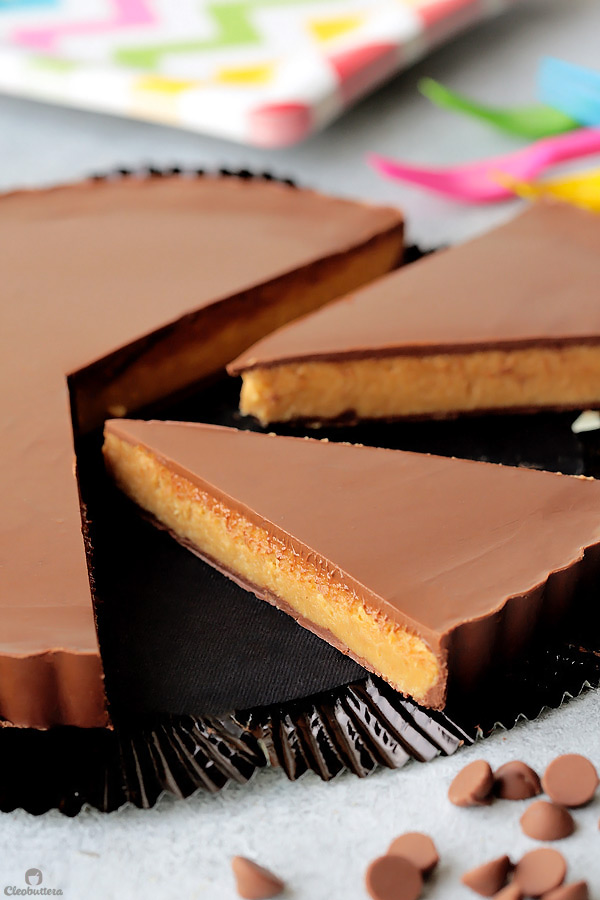
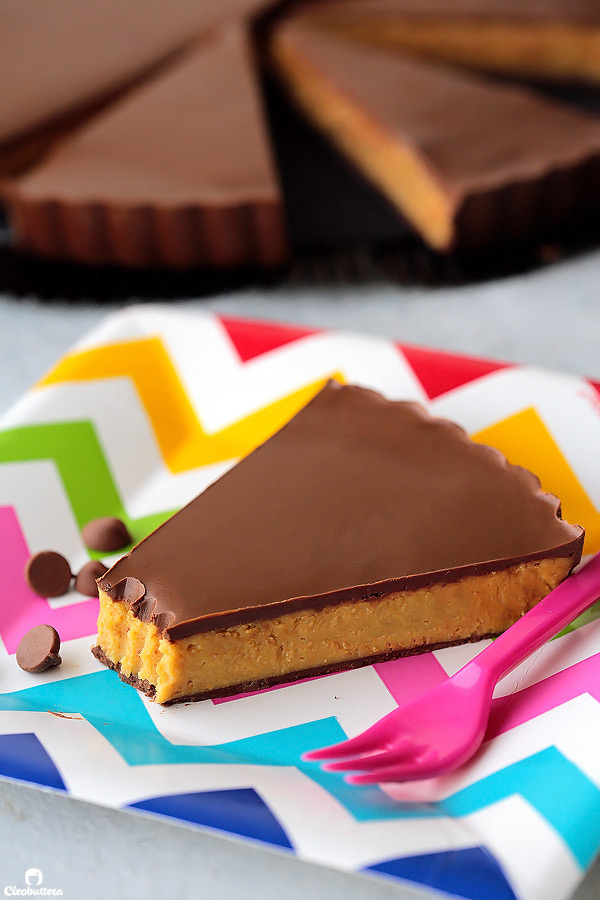
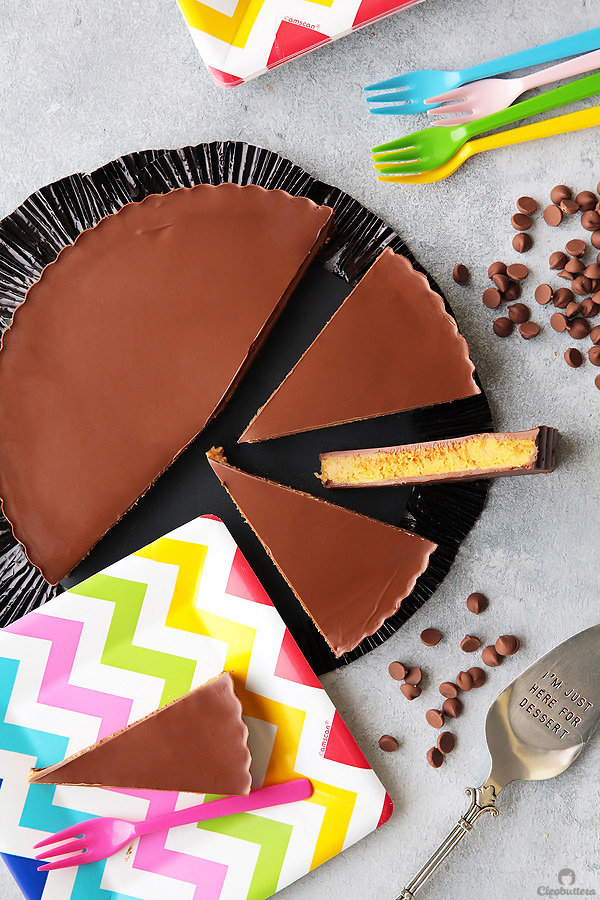
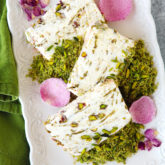
Giant Peanut Butter Cup
This blown up version of Reese’s is literally the BIGGEST treat for peanut butter cup lovers! It tastes so much like the real thing and it doesn’t hurt that its NO bake and so easy to make!
Raise your hand if Reese’s peanut butter cups rank high up there in your favorite candy category (cue me raising both hands and feet ?? ??). I know there are so many of us that we could easily form a big country.
There’s no denying that these addictive little cups have a cult following, and I’m not ashamed to admit that I’m part of it. And yet, I haven’t had one (by force, not choice) in so many months that I was starting to get peanut butter cup hallucinations!
Why you ask?
Egypt (where I live and love) hasn’t seen a Reese, among other things, in so long. You see, the Egyptian pound experienced a staggering devaluation last year, which led to the difficulty of importing products from aboard. Our government has been trying to limit the import of luxurious or trivial goods, Reese’s included, and support local products instead.
As much as I support the decision, ten months of peanut butter cup withdrawal led to a MEGA peanut butter cup craving, and the craving hit hard! Spoonfuls of peanut butter studded with chocolate chunks helped, but only to a certain extent.
So what does a Reese-deprived, die-hard lover do when such a craving strikes? Make an equally MEGA, GIANT peanut butter cup to make up for the lost time!
This oversized peanut butter cup tastes almost identical to Reese’s that you might never buy Reese’s again…not like I have a choice right now but still lol!
It’s incredibly delicious that I could almost swear it rivals the original…but won’t because y’all have your standards. It’s just that I feel it tastes more like a higher end peanut butter cup, if you will.
It’s also obviously bigger, way way BIGGER…so a “small” slice will give you more than what a package of 2 can.
I also have to love the fact that the ingredients are all easy to find; no supermarket treasure hunting required, and its so easy to make! You don’t even need to turn on the oven! And you certainly don’t need to have a shortage of Reese’s to make this.
Just like Reese’s, this knock-off, has that iconic sweet and salty, uniquely textured, creamy filling bursting with peanut butter goodness.
I’ve seen several versions of this creation floating over the internet…but I’m in favor with this one the most, because the texture is just like the real deal. I found that most recipes, use a filling more akin to a peanut butter frosting; using just butter, peanut butter, and confectioners sugar. Whereas this one has digestive biscuit (or graham cracker) crumbs in the filling, which adds textural interest and flavor dimension.
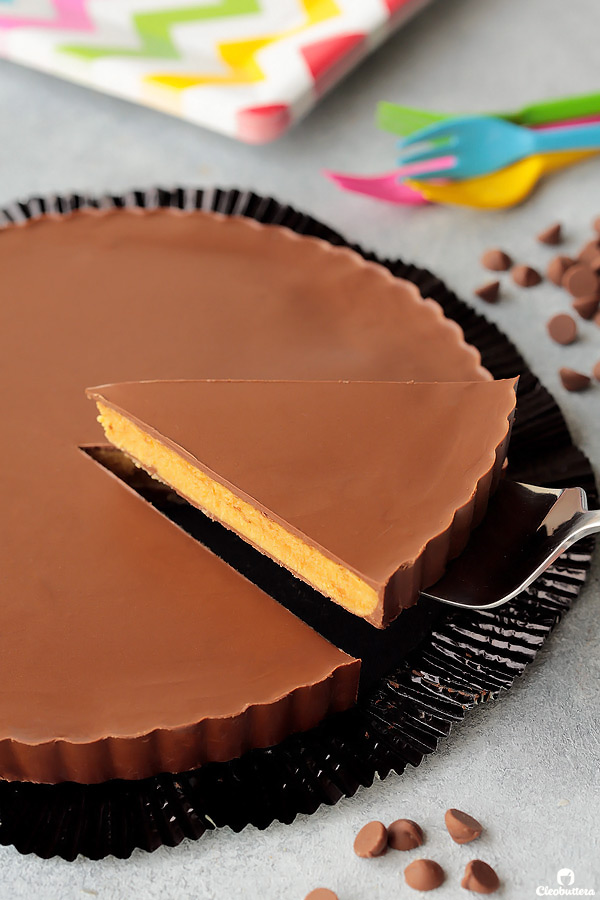
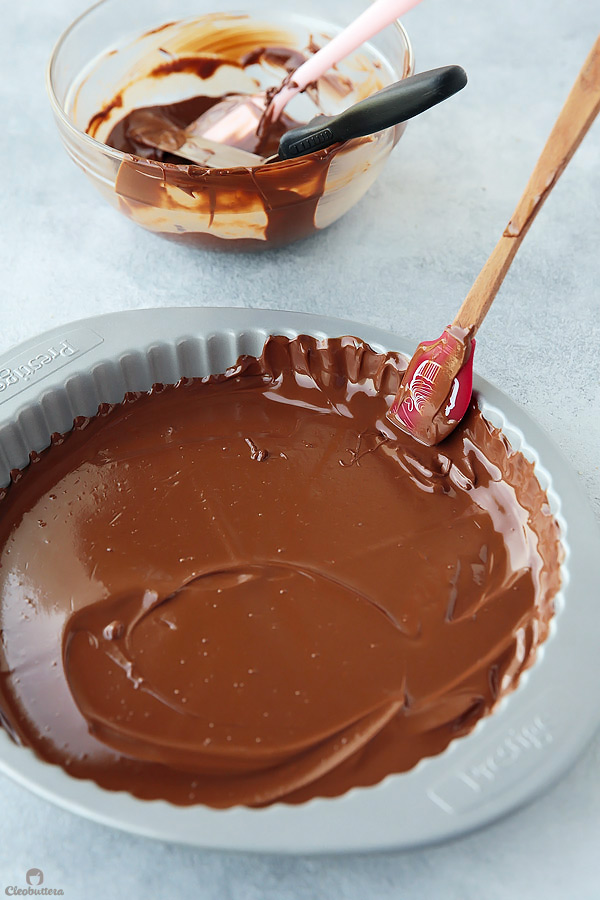
As for the chocolate shell, its soft yet sturdy, just the way it should be, so it won’t crack when you slice into it or break a tooth if eaten cold. The secret is melting the chocolate with a tiny bit of shortening (or oil). This not only keeps the chocolate nice and sliceable, but it also adds shine, and thins out the chocolate, so it much easier to spread smoothly into the tart pan.
This concoction is so much easier than it looks, so don’t let the fancy fluted tart pan intimidate you! It practically does the job for you by effortlessly adding in the side ridges and grooves that peanut butter cups are known for.
As you can see below, to get that peanut butter cup-like design, you’ll want to make sure to coat the entire tart pan, including the sides, with the melted chocolate/shortening mixture. Don’t worry about it being too neat at this point; its the bottom, and will get covered up anyway. You’ll then chill the pan in the freezer until its set.
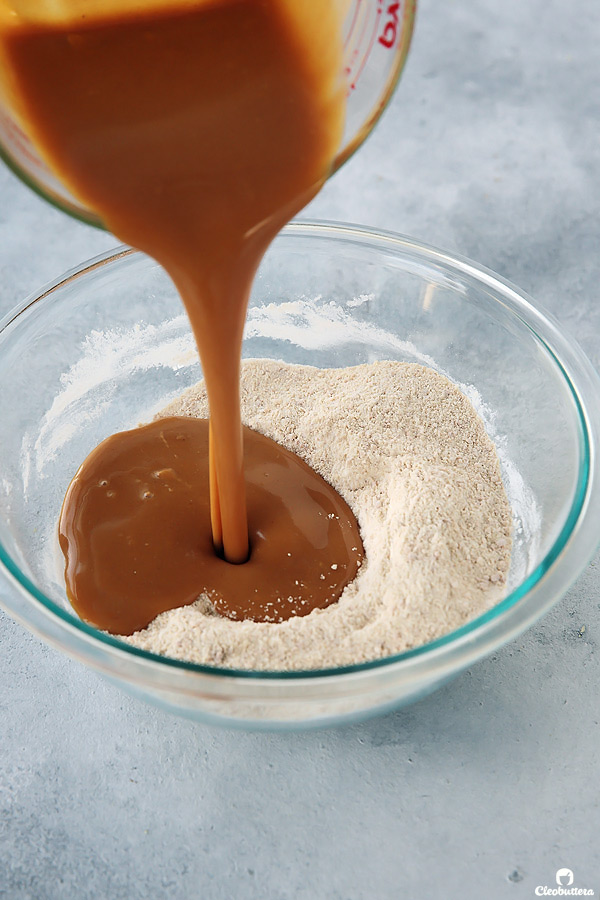
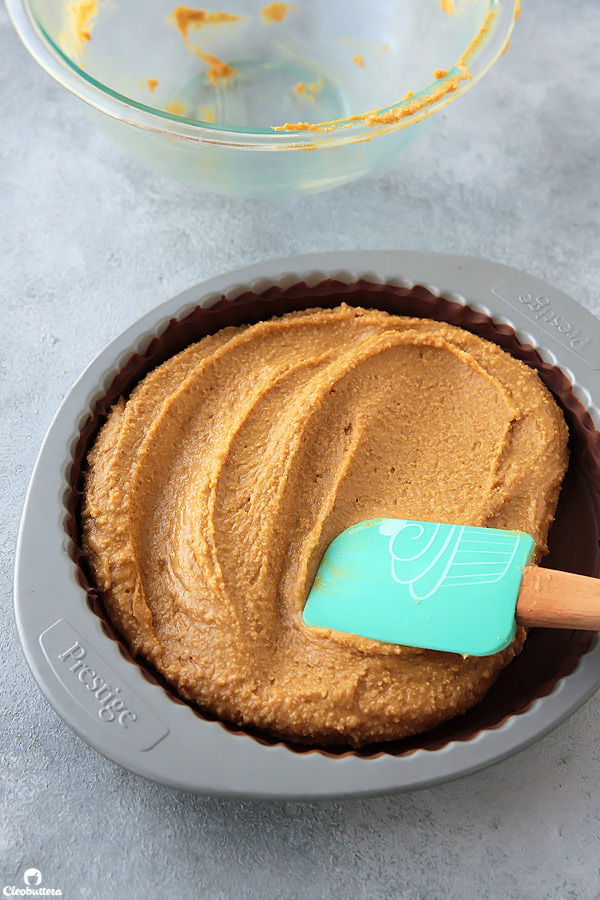
Meanwhile, you can make this dead easy filling by pouring a combination of melted butter and peanut butter into a bowl of biscuit/cracker crumbs and powdered sugar.
Stir it up…
Then bring over the chilled tart pan from the freezer…
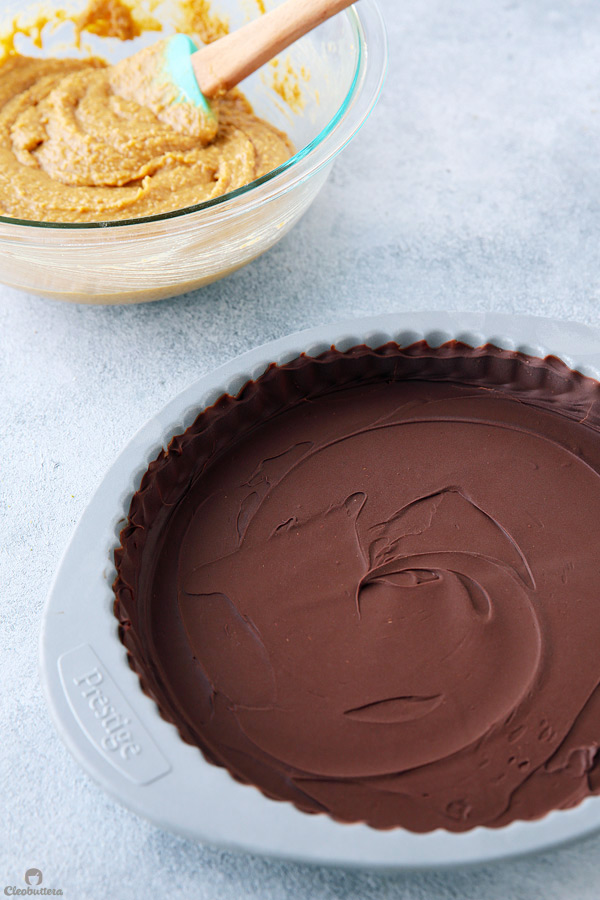
Spread in the filling…
Then cover with more chocolate. This time you’ll want to be super neat and work as quick as possible to achieve a smooth finish.
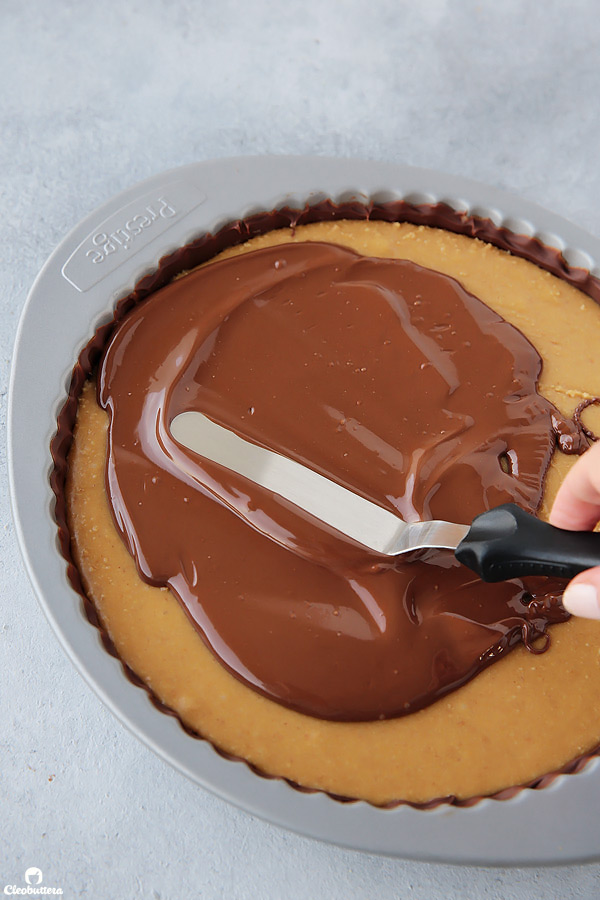
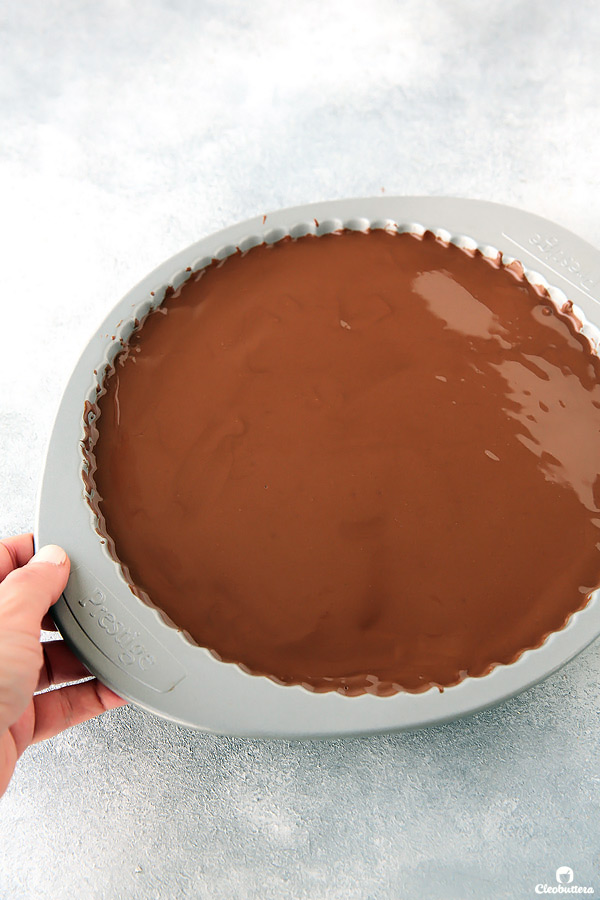
Shake and tap the tart pan over the counter to achieve a nice, smooth finish.
Non-Pro Tip: If you don’t get it smooth on the first go, you can totally use a blow dryer to rewarm clumpy areas, and smooth it out even further. I totally did that!
Then chill until completely set, inside out. This should take around 3 hours.
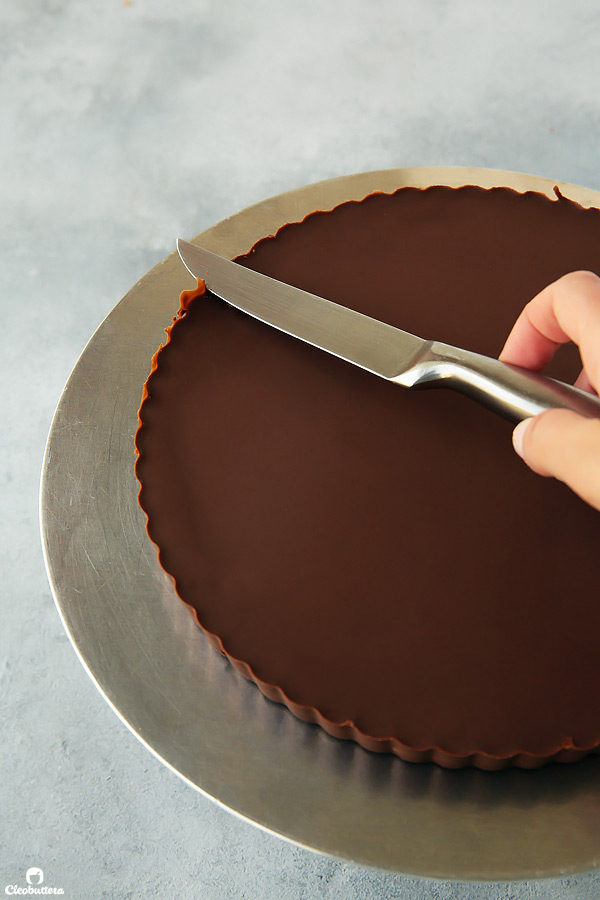
When you unmold the “tart” from the pan, you’ll most likely find some perfect imperfections around the edges. If they bother you, simply swipe a sharp knife to get rid of anything sticking out.
And that’s pretty much it!
A Giant Peanut Butter Cup guaranteed to take care of giant cravings.
It sure curbed mine.
Giant Peanut Butter Cup
This blown up version of Reese’s is literally the BIGGEST treat for peanut butter cup lovers! It tastes so much like the real thing and it doesn’t hurt that its NO bake and so easy to make!
Ingredients
For the Chocolate Shell:
- 1 cup (180 g) chopped milk chocolate or chocolate chips
- 1/2 cup (90 g) chopped semisweet chocolate or chocolate chips
- 1 tablespoon (13 g) vegetable shortening or flavorless oil
For the Peanut Butter Filling:
- 1 1/4 cup (140g) lightly packed digestive biscuit or graham cracker crumbs (9 biscuits/full sheets)
- 1 1/4 cup (150g) powdered sugar
- Tiniest pinch of salt
- 1/2 cup plus 2 tablespoons (144g) unsalted butter
- 1 cup plus 1 1/2 tablespoons (269g) creamy peanut butter (not natural-style)
Instructions
- Lightly grease a 9-inch fluted tart pan with a removable bottom, with a thin layer of oil or butter. Top the greased bottom with a circle of parchment paper.
- In a medium microwave-safe bowl, microwave the shortening or oil with the chocolate chips in 30 second intervals, stopping and stirring in between until mostly melted. Continue to stir the chocolate mixture, until it has completely melted and very smooth.
- Pour a little over half of the melted chocolate amount into the pan. Spread the chocolate all over the bottom, then use a small rubber spatula to bring up the chocolate over the sides. Make sure the entire pan is well coated. Chill in the freezer until set. Meanwhile, prepare the Peanut Butter Filling.
- In a large bowl, stir together the biscuit/cracker crumbs, powdered sugar and salt to combine. Set aside.
- In another small, microwave-safe bowl or liquid measuring cup, microwave together the butter and peanut butter until the butter has melted; about 1 minute. Stir well to combine. Pour over the dry crumb mixture and stir until well incorporated.
- Pour the peanut butter mixture over the chilled chocolate shell and smooth the surface. Shake and tap the tart pan over the counter to smooth out the top even further. Return the pan to the freezer for another 5 minutes to set the surface a little.
- Reheat the remaining chocolate mixture until melted once again and is silky smooth. Pour over the peanut butter filling and smooth out with an offset spatula to cover the surface completely. Shake and tap the tart pan over the counter to achieve a smooth finish. If you happen to get a messy area of chocolate that hardened before you got a chance to smooth out, gently heat it with a blow dryer to smooth. Not even kidding lol! It’s how I got mine looking so perfectly smooth 🙂
- Refrigerate the tart until completely firm, about 3 hours. Unmold the giant peanut butter cup out of the pan, and peel off the parchment paper from the bottom. Use a sharp knife to smooth out uneven edges.
- Cut into slices and serve either chilled, slightly cold or at room temperature. I personally prefer it slightly cold as it somehow tastes less sweet that way and the texture is at its best. The tart will keep well for 5-7 days stored in the refrigerator or frozen for up to 2 months. Thaw frozen slices overnight in the refrigerator.
Recipe Notes
Peanut Butter Filling recipe mostly adapted from Sally's Baking Addiction.
Measurements Note: All recipes of this site have been developed using weight measurements. Although US volume measurements have been included for your convenience, it is highly encouraged that you weigh your ingredients using a kitchen scale to get the best possible results. Due to the sensitive nature of baking, kitchen scales are proven to yield more accurate and consistent results than measuring cups. Enjoy!
Powered by ![]()
This post may contain affiliate links.
All images and content are owned by Cleobuttera® and are copyright protected. Please do not use my images without prior permission. If you would like to republish a recipe, please rewrite it in your own words and link back to the recipe page on my site. Original recipes and creations of this site are intended for personal and home use. Commercial replication or media consumption are only allowed with a written consent and agreement with Cleobuttera owners. Otherwise it is considered a violation of intellectual property. Thank you for respecting and appreciating the amount of time and effort that goes into creating free, unique recipes that make people happy.


OMG! this is amazing! your images alone are simply stunning, and the recipe itself is like a dream, I love peanut butter cups, but this super sized one is so cool! and easy to make! great stuff
Thank you so much Albert, you’re too kind. I’m glad the giant candy is right up your alley 🙂
I made this, using the exact recipe/instructions.
It came out pretty good. I didn’t have the right kind of pan, so I just used wax paper to line the inside of a 9inch pie tin, which worked well enough. I’m not experienced enough to have mine come out as visually “nice looking” but it tastes great and is very popular with my co-workers (with whom I’m sharing, as its a bit much for one person).
The end result is a VERY close match for taste. The texture of the filling is ever-so-slightly more granular than “the real thing” though that may have simply been my prep – I’m not especially experienced with desserts like this – but still came out amazing.
Total prep time was under 20 minutes, not including chilling the final result in the fridge, might even be faster still for an experienced cook.
Love hearing your amazing feedback Tim! Thank you so much for sharing your experience in great detail. I’m so glad you found it very similar in taste to the real thing. The texture issue could be improved by very finely pulverizing the crackers/biscuits. Enjoy 🙂
I just made for my husband’s birthday as he is addicted to Reeses’s cups. This recipe was so easy and tasty to made. I just couldn’t make it as pretty as yours but it was a big success withmy husband and boys.
Happy birthday to your husband! I hope he enjoyed it down to the last crumb ? So happy you guys loved it. I’m sure yours looked amazing, but in any case, I’m planning to shoot a video of the making soon, so hopefully that would help with the look either further ?
Pingback: Stumbling Over Chaos :: Linkity is all in on 60F weather this weekend!
Praise from Lebanon!!!???
Oh Lebanon how do I love thee. The country, the people, the food…have a special place in my heart.
Wow what perfection pities to eat and to fall apart. I loved it, congratulations.
Thank you! I’m so glad you like it.
Thank you!
Hey! From a fellow suffering Egyptian, thank you for the recipe.
Lololololol! This made me crack ? Only a fellow Egyptian will get the significance of this post. Hope it curbs the craving!
??
Pingback: Leticia Dagg
Hello Tasbih,
I am going to make the giant peanut butter cup but I am having a hard time finding a 9” tart. The one I have is 11”. Will that be too big for the amount of ingredients your have for the 9”?
If yes, could you help me figure out what the measurements should be. My daughter is turning 25 and she (like you) LOVES her Reese’s. I think she will be surprised.
Thanks for any help you can offer.
Terry
Hi Terry! Happy birthday to your peanut butter cup-loving daughter! I hope this blown up version makes her day. I think 1 1/4X the recipe should be enough to fill up those extra 2-inches.
Best of luck and enjoy!
Pingback: 35 Of the Best Ideas for Peanut butter Cup Cookies Real Simple - Best Round Up Recipe Collections
Pingback: 35 Ideas for Peanut butter Cup Cookies Real Simple - Best Round Up Recipe Collections
Hi Tasbih,
Thank you so much for all your delicious recipes! Can I adapt this recipe to make “individual cups instead of one big peanut butter pie? If so are there any changes aside from using a different mold?
Thanks so much,
Yvette
Whst did you use for the black wrspping around your giant reeses to make it loook so authentic?
Hi Debbie! I DIYed myself by cutting and pasting together several black cupcake liners ?
OMG I never tried this but it looks awesome!
OMG I never tried this but it looks awesome! Can’t wait to try it
Hi Tasbih,
I’m a peanut butter cup fan and can’t get them where I live, also. This looks amazing, but my husband can’t eat wheat. I was thinking to try crushed rice krispies in the filling, have you tried this? Or any ideas about amounts? Thank you!
Hi Tasbih,
I hope you and your family are good and coping with the current situation!!
I wanted to check with you regarding the use of a tart pan with a removable bottom. I have the standard tart pan, wherein you put the pan on an object and push down to release the tart. Is this what you used? Did the melted chocolate not seep out when poured in the pan?
Thank you!
Kris