The Most Amazing Russian Honey Cake
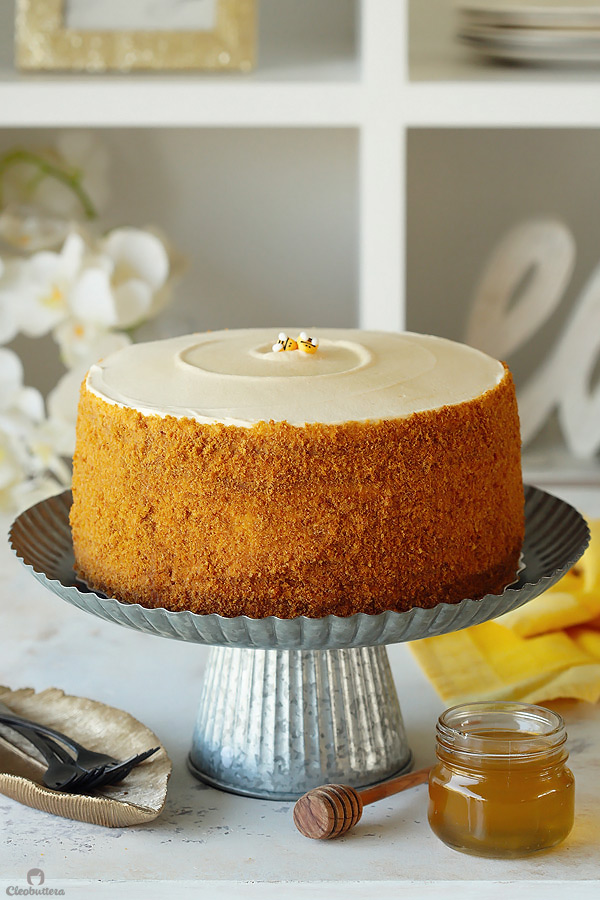
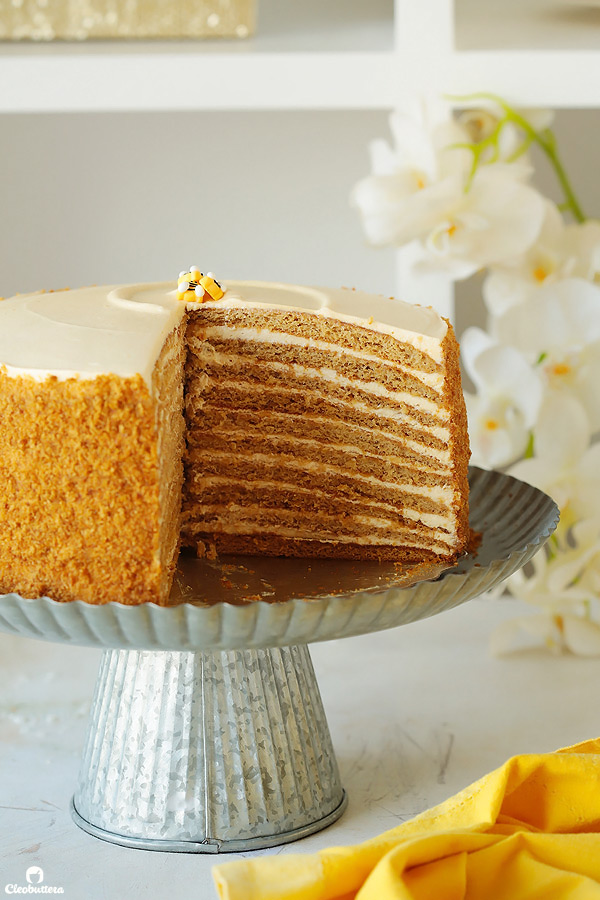
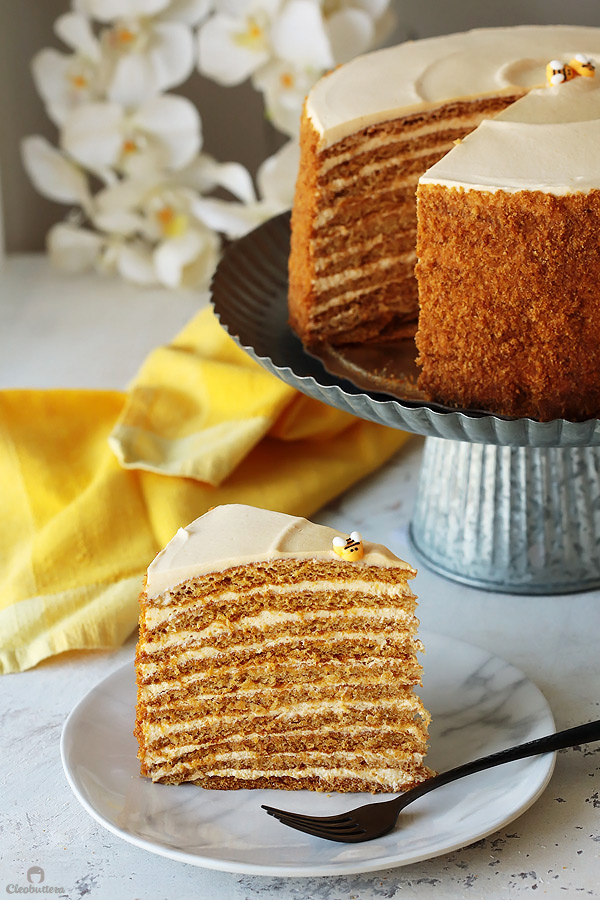
The ultimate recipe for Russia’s famous Honey Cake, that you’re likely to encounter. Ten layers of soft, caramelized honey cakes that taste like the fine marriage of Lotus biscuits, honey graham crackers and gingerbread cookies, sandwiched between a cloud-like burnt honey and dulce de leche whipped cream. Unbelievably delicious!
Let’s just start off by saying that I don’t normally throw around words like “The Best,” “Best Ever” or “The Most Amazing” at any of my recipe titles that easily. Not because I don’t think they are…because I certainly do, otherwise you wouldn’t see them here…but because the definition of what makes something “the best” is very subjective.
With that said, I couldn’t hold it back with this one. Because I truly, positively, deeply, sincerely believe that this is THE MOST AMAZING Russian Honey Cake to ever exist. And yes I haven’t tried all the Honey Cakes in the world; in fact I’ve only had 4 in my life, 3 of them were made by me…lol!
It’s just that it’s so incredibly good, that it’s hard to imagine how anything could ever top it.
This masterpiece of a recipe comes from Michelle Polzine, owner and pastry chef of San Francisco’s 20th Century Cafe, where this towering delicacy is the main attraction and the pièce de résistance. Her highly acclaimed Russian Honey Cake has captivated flocks of food writers, pastry chefs and tourists from around the world, who were infatuated by its amazingness.
So I guess I’m not alone on this one. But hey…you be the judge!
I first heard about the charm of Russian Honey Cake (Medovik Torte), which is also popular in other parts of Eastern Europe, a little over a year ago, and the idea had me instantly struck with obsession. The thought of a soft, multilayer cake that tastes like a cross between honey graham crackers, stroopwafels, and speculoos with a filling of ethereal, creamy frosting, tickled my inner foodie and painted my daydreams.
So as any cake enthusiast would do, I scoured the internet, looking for recipes that would replicate the taste I had envisioned. Most of them seemed to revolve around the concept of making the cake layers from a roll-out, honey flavored, soft cookie dough, and filled with a lightly sweetened sour cream frosting. Some variations called for pourable cake batters to make the layers, and a few had a dulce de leche based frosting.
I tried 3 different recipe variations, and while all pretty tasty, they fell short of my expectations. I’m mostly to blame, as I’m annoyingly picky. I later tried a slice at a restaurant in Cairo, and everyone who had tasted it was very underwhelmed by it. That’s when I came to the conclusion, that perhaps Russian Honey Cake wasn’t for me.
That is until a few months later, when I received my subscribed newsletter from Treat SF’s blog in my email, with a post that happened to be titled ‘Russian Honey Cake.’ It felt like telepathy. Not wanting to toss the idea of the raved-about cake altogether, because let’s be real…it does sound very promising, I read through the post. She mentioned how the cake is the “signature dessert” of 20th Century Cafe and waxed poetic about how dreamy it tasted. Further research also revealed that it took Polzine years of obsessive testing before nailing it, and that’s when I knew, that this could be the one I’m searching for.
And so I’m here today, to happily report back that it truly is. THE ONE! An absolute perfection.

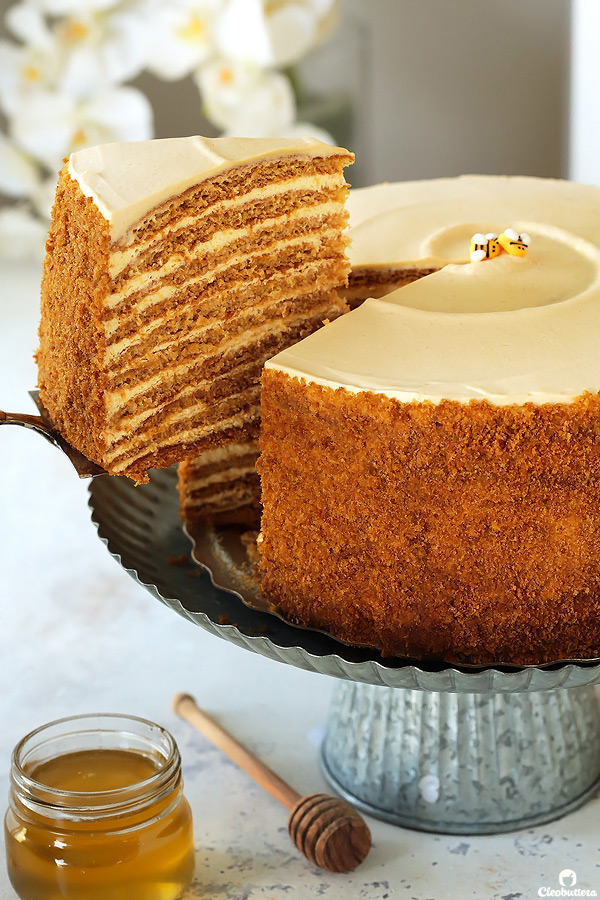
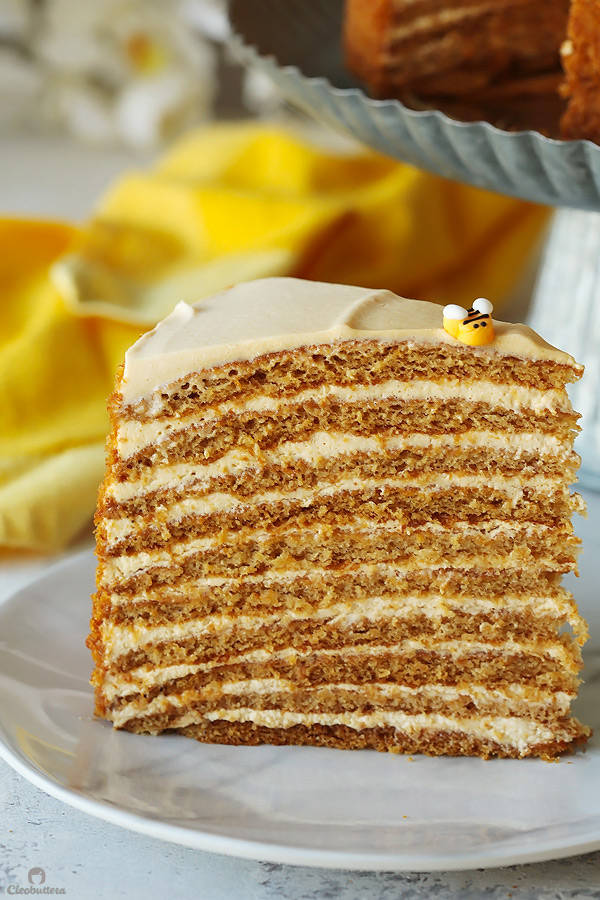
Ten thin layers of soft, airy cakes that taste like the fine marriage of Lotus biscuits, honey graham crackers and gingerbread cookies, sandwiched between a cloud-like burnt honey and dulce de leche whipped cream.
Though seemingly rich, it’s surprisingly light, with pleasant notes of slight saltiness, bitterness, and tanginess that perfectly balances out the caramel-y sweetness.
After finishing the cake, it’s left to chill in the fridge overnight, which allows the flavors to intertwine and the layers to soak in some of the frosting, which softens them up into melt-in-the-mouth bites. It’s a thing of dreams I tell you.
The secret that sets this cake apart from its counterparts lies in 2 brilliant twists rather than a special ingredient:
1) “Adding more butter to the batter, transforming the cookie-crisp layers into thin, spongy cakes.” -NY Times. That makes for a softer, lighter cake that slices like butter.
2) Burning the honey used in both the cake and frosting, to the point of caramelization!
This trick not only adds a more concentrated and pronounced honey flavor, but introduces toffee notes, bitterness and acidity, that was otherwise brought through the use of sour cream. This burnt sugar revelation, combined with glorious dulce de leche (thick caramel made from sweetened condensed milk), made for an incredible sweet and tangy whipped frosting, that eliminated that need for sour cream.
Now I’m not gonna lie…this cake is a project. It’s not hard and the process is pretty straightforward, but it is time-consuming and requires a lot of hands on work. The first time I made it, it took me 3 hours straight, with only 30 minutes of down time. That is of course excluding the mandatory overnight chill in the fridge, before you can dig in.
But trust me…the fruit of your labor, will be well worth the effort. It truly is a stunning, showstopping dessert, that is sure to create a buzzzzzzzz in any special occasion.
The second time I made this, which was for the pictures you see here, I divided the work over the course of 3 days and the results were every bit as delicious. I knew I wasn’t going to be able to both make and photograph every step, as well as , the beauty shots, all in one day, especially that I only shoot in natural daylight. So I took a stress-free approach, and made the cake layers in 1 day, and froze them. Then made the frosting and finished the cake on a second day, left it to marinate in the fridge for 2 days, then took the final shots on a 3rd day. I’m telling you this, just to assure you, that you can relax the process by making some of the components ahead of time, without sacrificing the outcome.
So! Are you ready to do this?! I most certainly am!
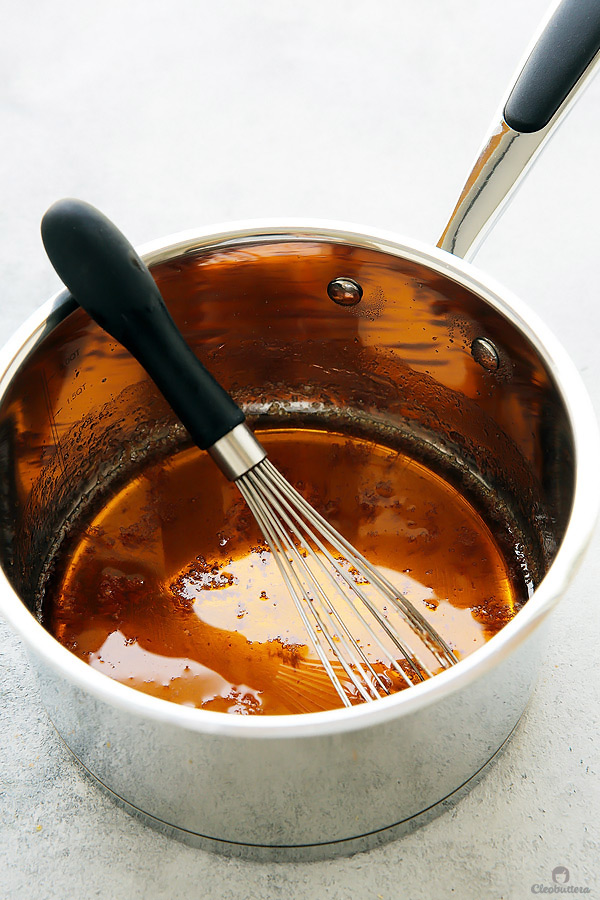
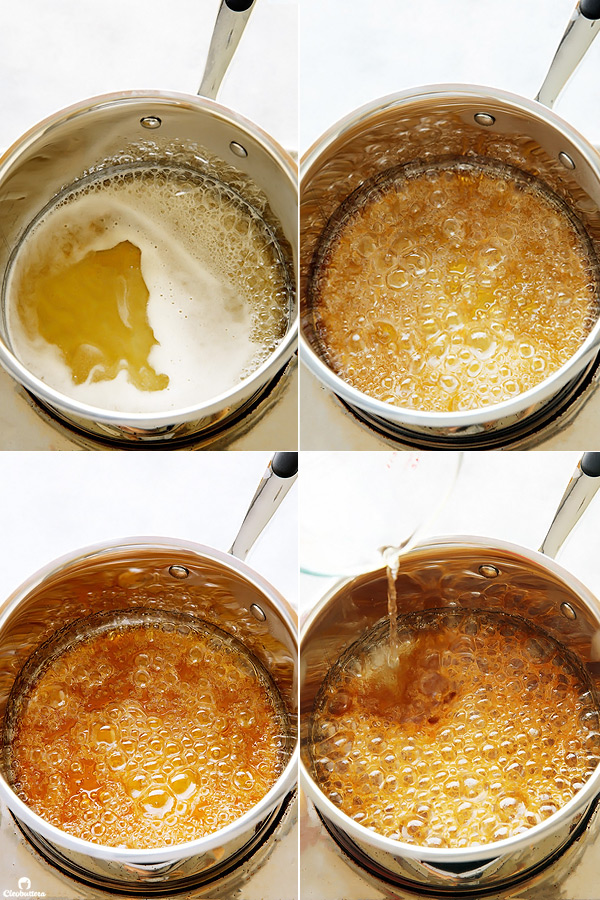
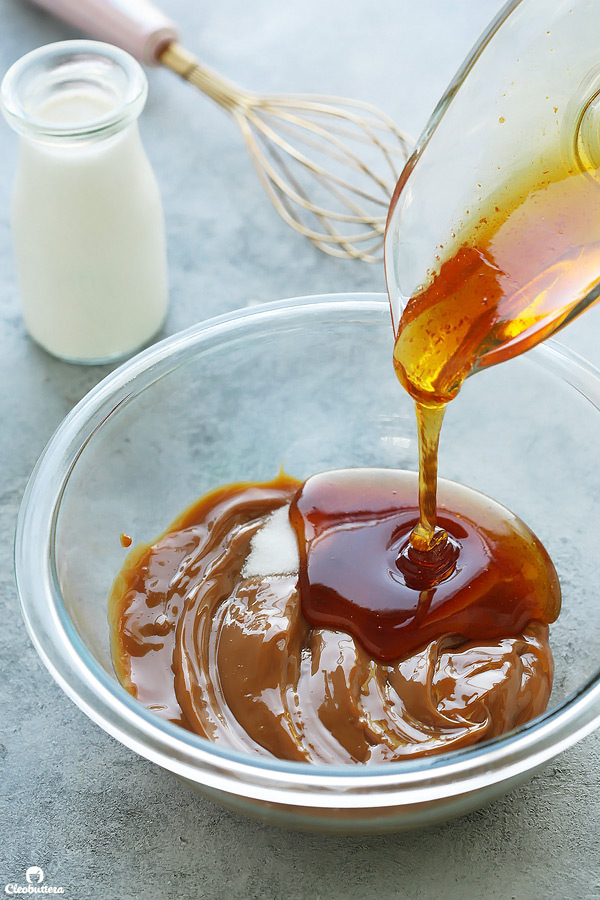
You first begin by “burning” the honey. And by burning, we mean more like “caramelizing,” so don’t worry, the honey won’t taste like ashes, and yet a beautifully caramelized honey. Speaking of honey, Polzine uses wildflower honey, which is supposed to taste more floral, but I wasn’t able to find it, so I used regular ol’ mainstream honey instead. So if you can find wildflower honey…go nuts! But if you can’t, don’t fret, honey from that commercial squeeze-bottle will still work!
You’ll want to cook the honey until it transforms from pale yellow, to deep amber. As soon as it reaches this point, remove the pan from the heat and whisk in 1/4 cup of water. So that’s your Burnt Honey all done.
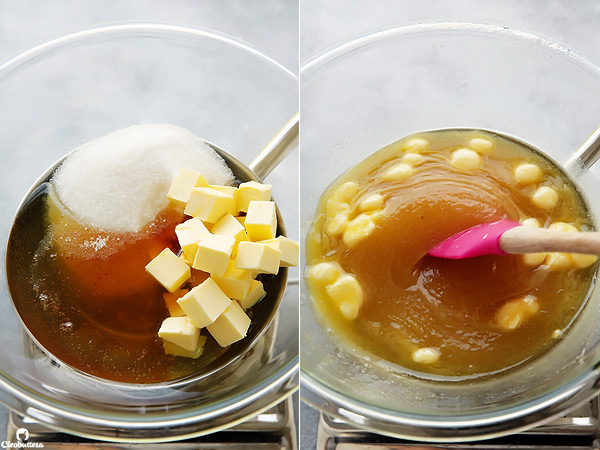
Now you’re going to take 1/4 cup of that glorious burnt honey and combine it with regular “unburnt” honey, sugar and butter and set over a pan of simmering water. Stir until the butter has completely melted.
The mixture should feel pleasantly warm at this stage, in which you’re going to whisk in the eggs. Continue whisking until the mixture becomes warm to the touch again. At that point, stir in a mixture of cinnamon, baking soda and salt. You’ll notice that the mixture will smell weird. That’s ok…you’re on the right track.

Now you can sift the flour over the batter in 3 parts, whisking well to combine after each addition. Batter should be very smooth.
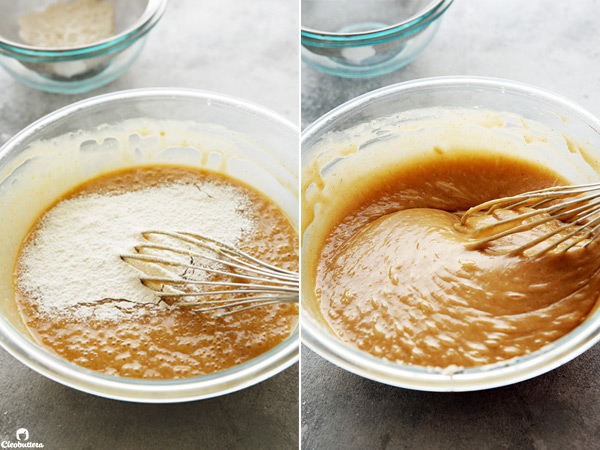
That wasn’t hard…wasn’t it?
Now if you have several silicon mats, I’d recommend using those over parchment paper, for 2 reasons. First, less waste of paper, and second, they release from the cake layers so much easier than parchment. But if all you have is parchment, then you’ll go ahead and trace 9-inch circles on 11 sheets of parchment and spread the cake batter on each sheet (tracing side down).
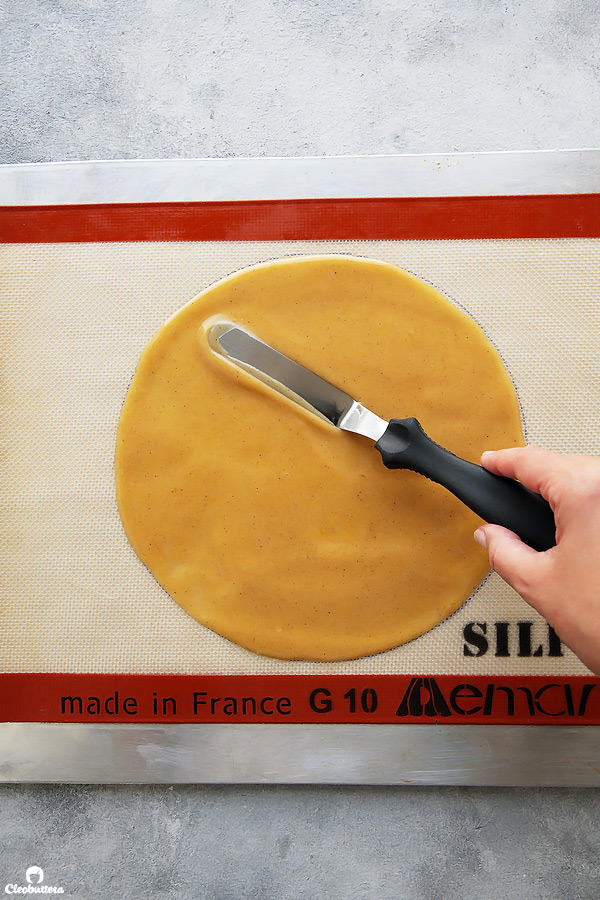
If you have silicon mats, you’ll just need to trace the 9-inch circle over only 1 sheet of paper. You’ll then place this paper underneath your silicon mat and get to work.
In both cases, you’ll spoon a heaping 1/3 cup of batter in the center of the circle, the spread it to the edges of the traced circle. Make sure to slide the piece of paper from under the silicon mat, if using one, before baking.
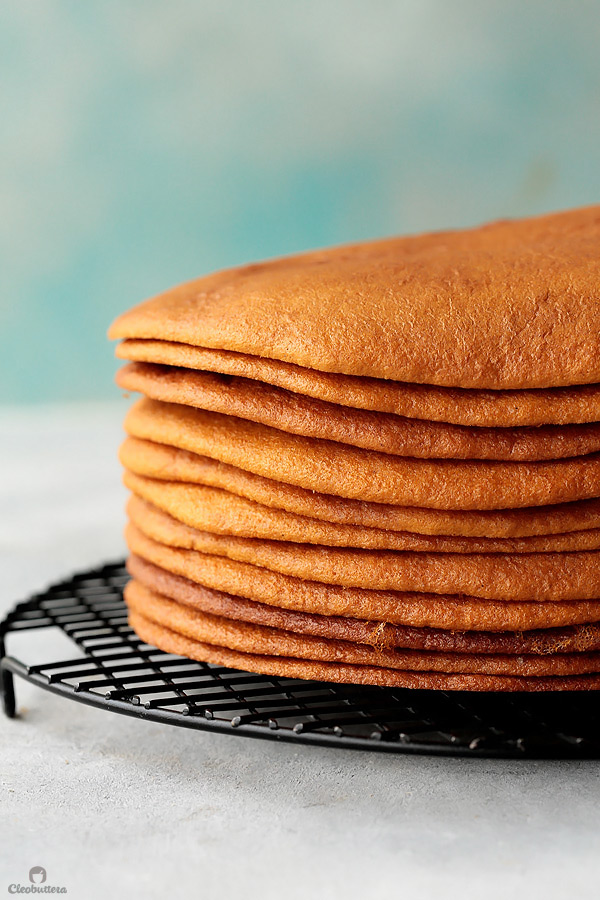
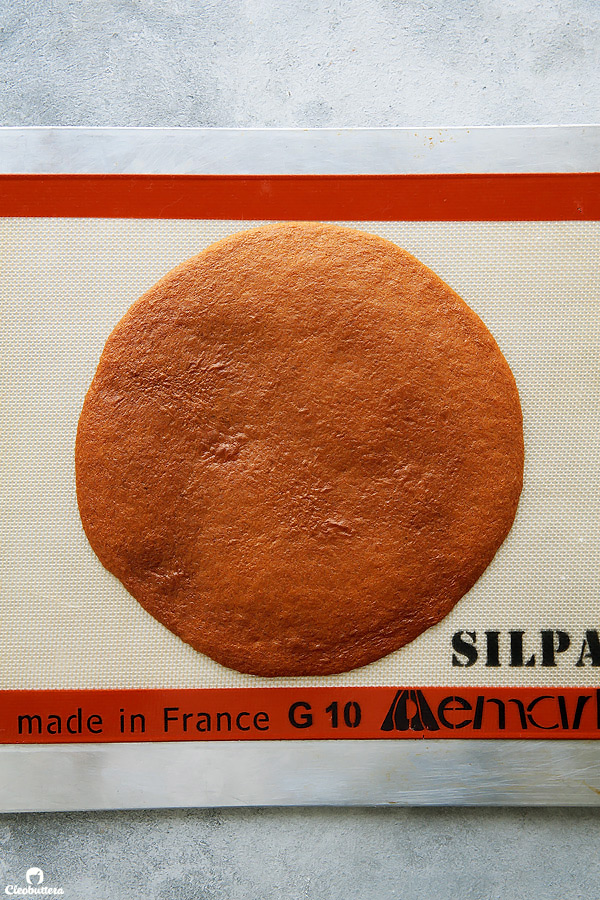
These guys bake very quickly, so stick around. They’ll bake in only 6 to 7 minutes, or until they turn deep caramel colored.
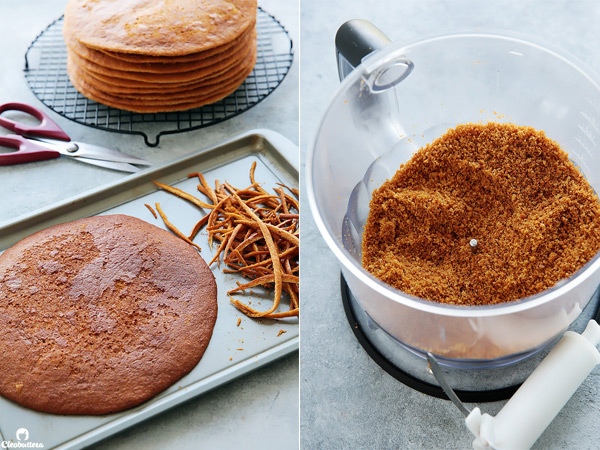
Continue with the rest of the batter until you have 11 layers of cake. If any of the layer’s edges look wonky, give it a trim using a pair of scissors. Then put these trimmings, along with your least attractive cake layer on a pan and toast them in the oven. Once cooled, grind them into fine crumbs in a food processor. Reserve those crumbs for decorating the cake. It’s ok…you could steal a taste; we’re human.
Now that the layers are all done, time to move to the frosting. Now grab a can of dulce de leche, and if you don’t readily have it where you live (I don’t!), you can make your own with sweetened condensed milk, as per this post. Just know that if you do make your own, they take 4 hours to cook, so plan ahead and make it as far as a month in advance.
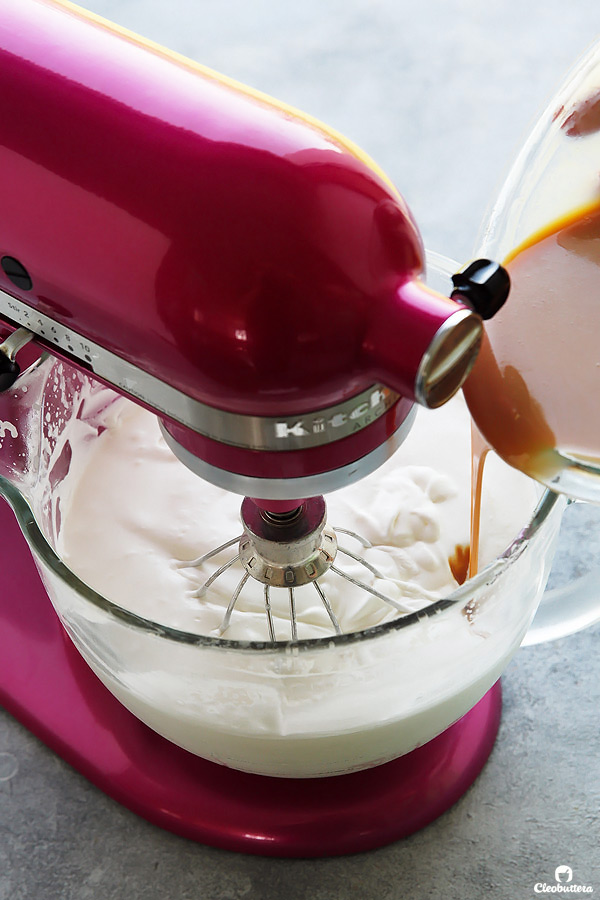
Back to the frosting. Combine that yummy dulce de leche with salt, the reserved burnt honey and then stir in heavy whipping cream. Chill for 30 minutes (that’s the down time I was talking about earlier…so now’s the time to catch your breath).
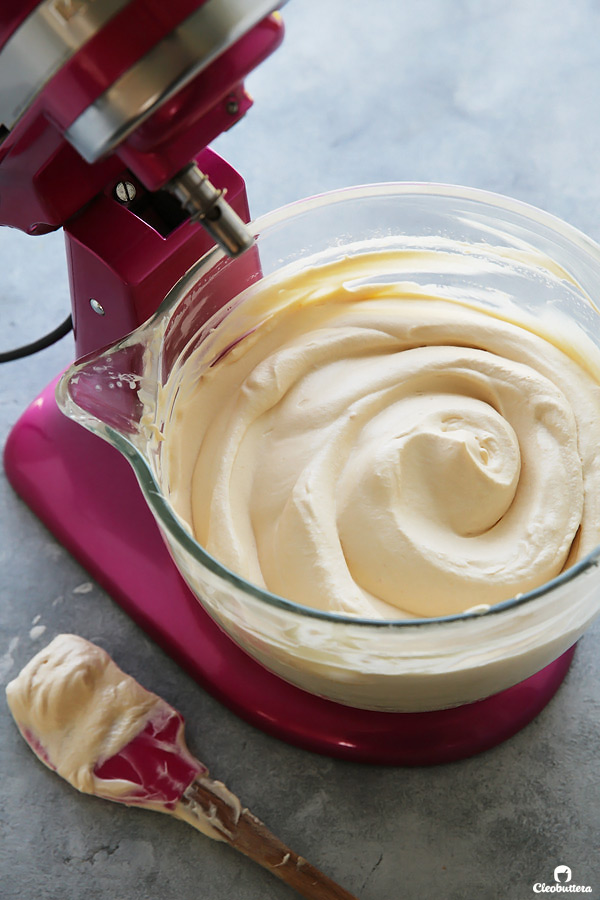
Phew! Now that 30 minutes have passed, you can whip the remaining heavy whipping cream until soft peaks. Then slowly drizzle in the cooled honey/dulce mixture.
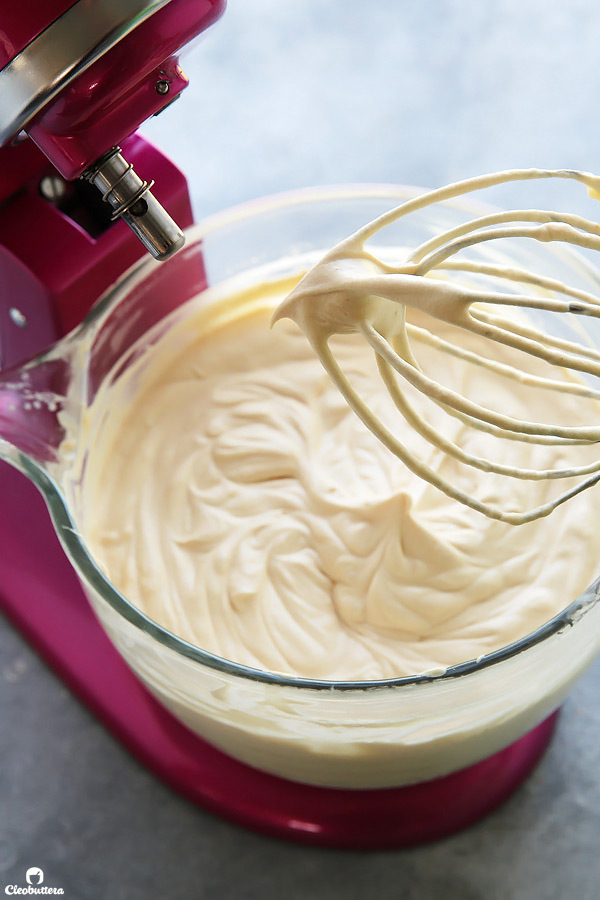
And whip until medium stiff peaks form. Now’s a good opportunity to steal a lick. So good right?!
Assembly time coming atchya!
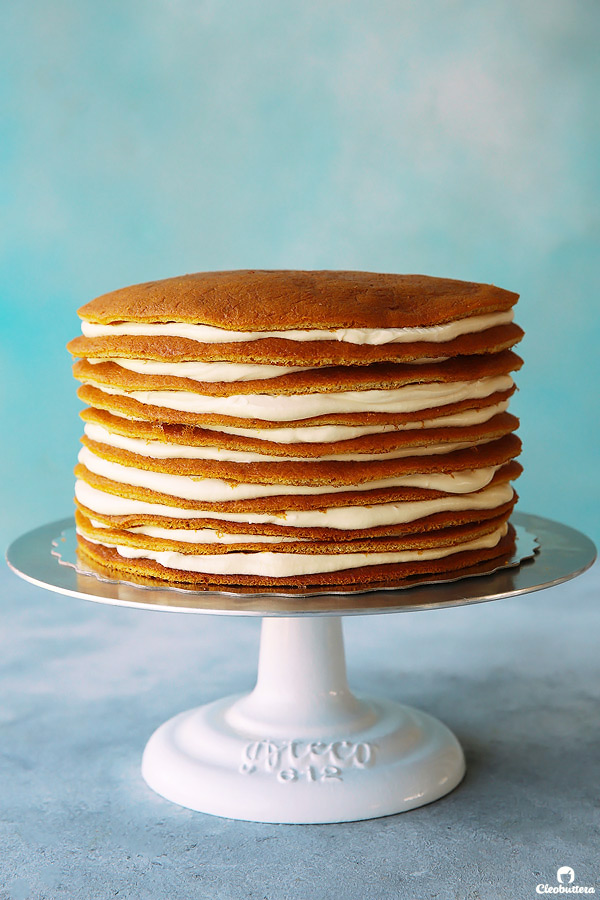
Spread a heaping cup of that amazing whipped frosting between each layer. It’s going to look like a lot, but trust me and go for it! Go for more than you think you need, because remember the cake will soak in some of it….so be generous.
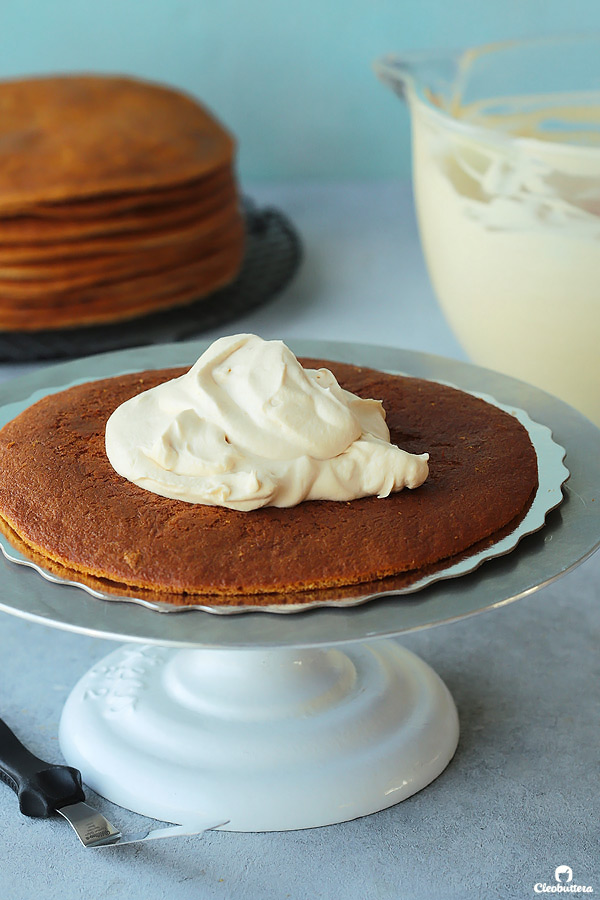
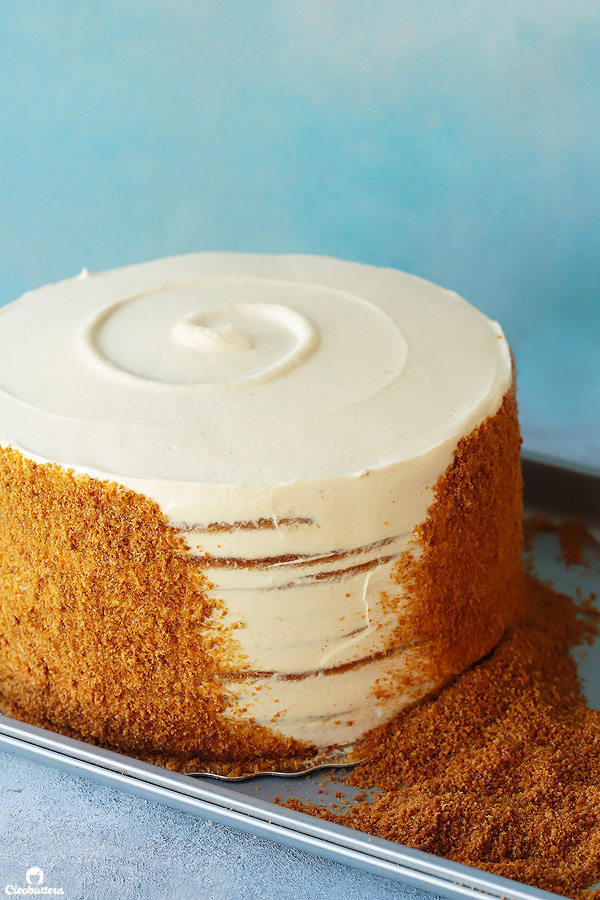
Now will you marvel at the beaut?! I know you’ll be tempted to leave the sides naked, but covering it up is essential in softening up all the layers.
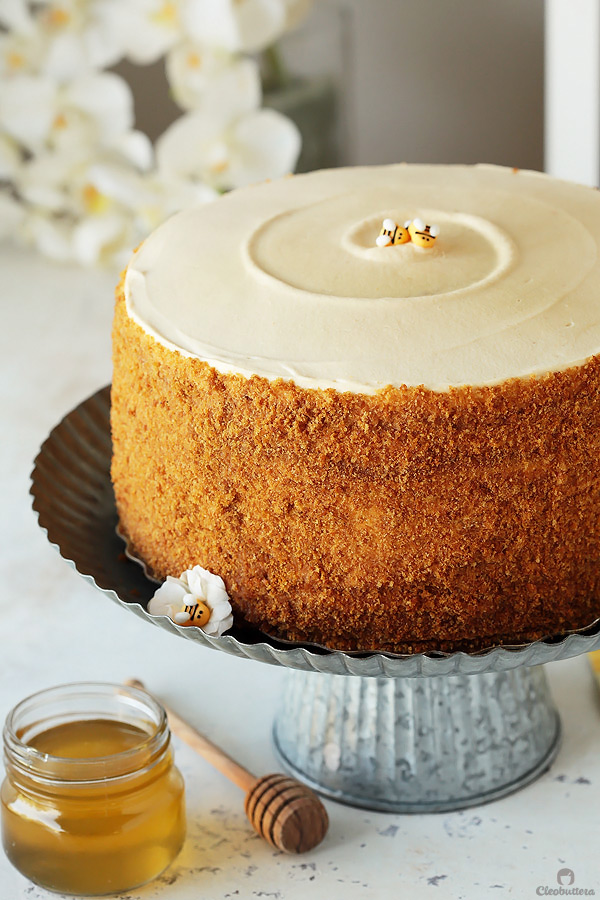
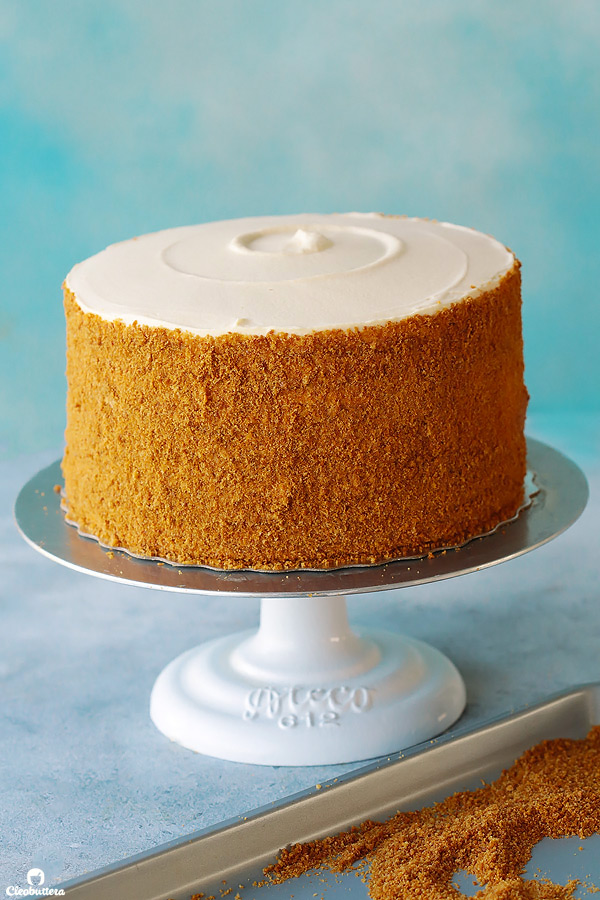
Remember those crumbs we had saved for a rainy day? Now’s the time to use them. So press them all over the sides, and if you want, over the top too.
Can we get a YAY! here because ladies a gentlemen…mission accomplished.
Not quite, but the rest of the work is the fridge’s duty, so you’re off the hook! Let the cake sleep in there for a day or two.
Top with those cute Bumblebee decorations, if you fancy!
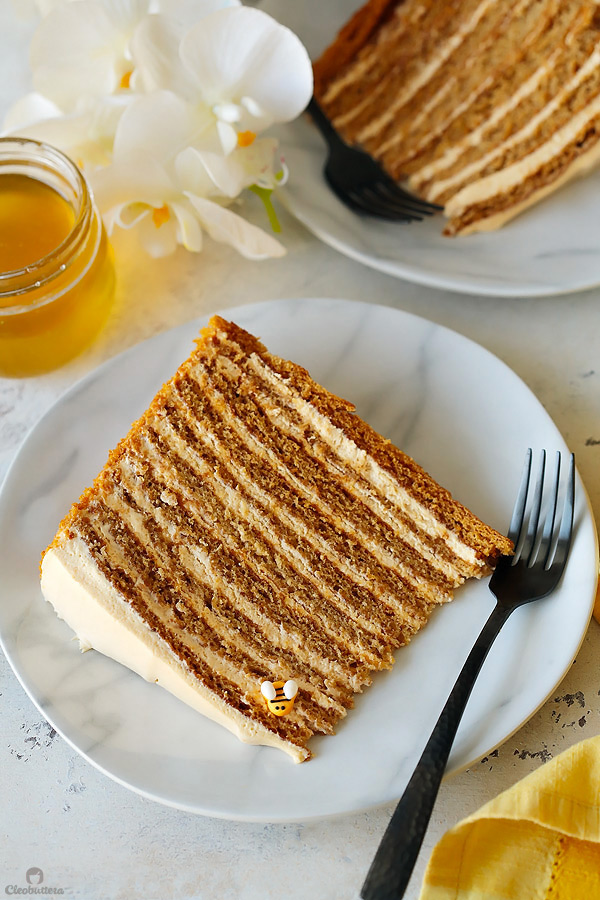
Then slice…lift…

plate…take a bite, then sigh…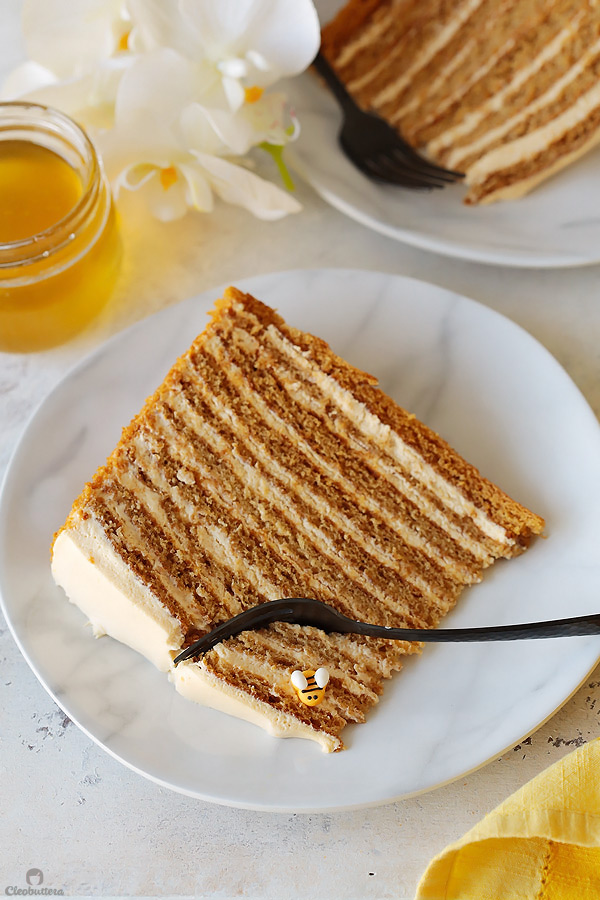
Now that’s a honey cake, any Queen Bee will approve of.
The Most Amazing Russian Honey Cake
While not difficult to make, this is a multi-step, highly involved cake that requires planning ahead. Please read through the instructions and the notes in the bottom of the recipe before starting. Note that the frosting calls for a can of Dulce De Leche, which is readily sold in some countries. If it's not available where you live, you can make your own with sweetened condensed milk. Just know that it takes 4 hours to cook, so plan ahead and make it as far as a month in advance. The finished cake, needs to chill overnight in the fridge before serving.
Ingredients
For the Burnt Honey:
- 3/4 cup (9oz/ 255g) honey (*see note below)
- 1/4 cup (2oz/ 57g) water
For the Cake Layers:
- 1/4 cup Burnt Honey (from recipe below)
- 3/4 cup (9oz/ 255g) honey (*see note below)
- 1 cup + 2 Tablespoons (8oz/ 227g) granulated sugar
- 14 Tablespoons (7oz/ 199g) unsalted butter, cut into 1/2-inch pieces
- 6 large eggs (300g without the shells)
- 2 1/2 teaspoons baking soda
- 3/4 teaspoons fine salt
- 1 teaspoon ground cinnamon
- 3 3/4 cups (16oz/ 454g) all-purpose flour
For the Frosting:
- 1/2 cup Burnt Honey (from recipe below)
- 1 1/4 cups (one 13.4oz/ 380g can) dulce de leche (storebought or prepared from 1 (14oz/ 397g) can of sweetened condensed milk as per recipe in this linkable post
- 1/2 teaspoon fine salt
- 4 3/4 cups (1.12 liters) heavy whipping cream, very cold and divided
Instructions
To prepare baking sheets:
- Adjust oven rack to middle position and preheat oven to 180C/375F.
- Line 2 or 3 (or more) baking sheets with see-through silicon mats. On a large piece of paper, trace a circle around a 9-inch pie or cake pan and place the paper underneath one of the silicon mats. If you don't have silicon mats, trace the 9-inch circles directly onto 11 baking-sheet-size pieces of parchment paper. Place a piece of parchment tracing-side-down on a baking sheet. Set aside.
To make the Burnt Honey:
- Place 3/4 cup of honey in a 2-quart saucepan, and set over high heat. Bring to a simmer, then reduce the heat to medium. Cook the honey, stirring occasionally with a heat-proof spatula, until it the color darkens and turns from pale yellow to dark amber; about 3 minutes. Turn off the heat and carefully add 1/4 cup water. Allow the honey to sputter until it stops bubbling, then whisk to combine. Transfer to a heatproof measuring cup with a spout, and set aside.
To make the Cake Layers:
- Fill a medium saucepan with 2 inches of water, and bring to a simmer. Combine 1/4 cup burned honey, 3/4 cup honey, sugar and butter in a large heat-proof bowl, and place over the pot of water, making sure the simmering water is not touching the bottom of the bowl.
- Crack eggs into a small bowl, and set aside. Stir together baking soda, salt and cinnamon in a separate small bowl.
- Gently stir the honey/butter mixture until the butter has melted, then whisk well to combine. Use your finger to test the temperature of the mixture. When it’s warm, add the eggs while whisking. When the mixture returns to the same temperature, add the cinnamon mixture, and continue whisking for another 30 seconds. The batter will begin to foam and emit a curious odor. Remove the bowl from the heat, and allow it to cool until it’s warm.
- Place the flour in a fine-mesh sieve, and sift over the batter in three batches, whisking to incorporate the flour completely with each addition, until completely smooth. The batter will spread more easily when it’s warm, so place the bowl in a warm spot, such as atop the preheating oven or over the pan of simmering water (off heat).
- Spoon a heaping 1/3 cup of batter over the prepared silicon mat or parchment paper. Use an offset spatula to evenly spread the batter to the edges of the traced circle. Make sure that the entire circle is well covered, otherwise, add a little more batter in patchy areas and smooth out.
- If using silicon mats, carefully slide the paper with the traced circle from underneath the silicon mat and place under another one. Repeat spooning and smoothing remaining batter until you’re out of baking sheets. Ultimately, you should end up with 11 layers.
- As you continue spreading the remaining batter on the baking sheets, bake as many layers at a time as possible, for 6 to 7 minutes, until the cake turns a deep caramel color, springs back at the touch and a toothpick inserted in the center comes out clean. Do not overbake!
- When each layer is done, slide the silicon mat or parchment off the baking sheet to prevent overbaking. If reusing baking sheets while they are still hot, reduce cooking time to 5 to 6 minutes.
- When the cake layers are cool enough to handle, examine them. If any spread outside the traced circles as they baked, use a sharp knife or pair of scissors to trim them. Don't throw away the trimmings. Before the cakes cool entirely, pull each one carefully from the silicon mat or parchment, then place back on the parchment or wire rack on a flat surface, and allow to cool completely.
- When all the layers are baked, reduce the oven temperature to 120C/250F, and return the least attractive layer (and trimmings) to a baking sheet, and place in the oven to toast until deep reddish brown and dry, about 15 minutes. Allow it to cool, then use a food processor to grind into fine crumbs. Cover and set aside.
To make the Frosting:
- Place 1/2 cup burned honey, dulce de leche and 1/2 teaspoon fine salt into a medium bowl. Whisk by hand until combined, then slowly pour in 3/4 cup cream and mix until homogeneous. Chill until completely cooled, about 30 minutes.
- Pour 4 cups heavy cream into the bowl (preferring chilled) of a stand mixer, with the whisk attachment. Whip at medium speed to soft peaks, about 6 minutes, then add honey mixture and whip to medium stiff peaks. If your mixer holds less than 5 quarts, make frosting in 2 batches and then combine in a large bowl, or use a large bowl and a hand mixer.
To assemble the cake:
- Assemble the cake on a 10-inch cardboard circle or flat serving plate. Place a cake layer in the center of the cardboard, then spoon a heaping cup of frosting onto the center. Use an offset spatula to spread the frosting evenly, leaving a 1/4-inch ring around the edge. Continue with alternating layers of cake and frosting, ending the last layer with frosting. Use any leftover frosting to smooth out the sides of the cake, but don’t worry if the edges of some cake layers poke through the frosting; they're gonna be covered up anyway. You should use up all the frosting.
- Place the frosted cake on a rimmed baking sheet and use your hands to press the sides with the reserved toasted cake crumbs. You could cover the top too if you prefer.
- Chill the cake in the fridge overnight to give the frosting time to meld into the cake layers and soften them. Slice into thin wedges and serve cold or at cool room temperature. Cake can be made up to two days in advance. Refrigerate leftovers for up to 3 days.
Recipe Notes
- Original recipe calls for wildflower honey, which has more floral notes. However, I used regular, mainstream honey, because I couldn't find it, and still ended up with stellar results.
- You can divide the work required to make this cake over the course of several days. If you're making your own dulce de leche, you can prepare it up to a month in advance. The cake layers can be baked and frozen for several weeks, then thawed when ready to use. Just be sure to cool the layers first, individually wrap each layer with plastic wrap, then store in freezer zipper lock bags in the freezer. Thaw completely before using. The finished, frosted cake can be made up to 2 days in advance.
- Here's a link for those 'Bumblebee' decoration on my cake.
Recipe adapted from Treats SF, who adapted it from New York Times.
Measurements Note: All recipes of this site have been developed using weight measurements. Although US volume measurements have been included for your convenience, it is highly encouraged that you weigh your ingredients using a kitchen scale to get the best possible results. Due to the sensitive nature of baking, kitchen scales are proven to yield more accurate and consistent results than measuring cups. Enjoy!
Powered by ![]()
This post may contain affiliate links.
All images and content are owned by Cleobuttera® and are copyright protected. Please do not use my images without prior permission. If you would like to republish a recipe, please rewrite it in your own words and link back to the recipe page on my site. Original recipes and creations of this site are intended for personal and home use. Commercial replication or media consumption are only allowed with a written consent and agreement with Cleobuttera owners. Otherwise it is considered a violation of intellectual property. Thank you for respecting and appreciating the amount of time and effort that goes into creating free, unique recipes that make people happy.


take a bite, then sigh…..
oh god ..until then i was on the edge of my seat.. that line of yours , that really made me take a deep breath and just marvel at the beauty you have created.. wooooooaahhhh
Hahahaaaa Shabna hope my words weren’t torturing ? Sometimes my words makes seem like I have a romantic relationship with food…which I think I do, but I’m happy a lot of people can relate.
do we get a video of this ???
Planning on it but still haven’t got around it. Until then, I hope the step-by-step pictures are helpful enough ?
Sorry but the flour should definitely be buckweat flour and there should walnuts as well too. At some point between the layers 🙂
Keep up, cheers
Oh really? That’s so interesting. I’ve never seen those additions in any of the Russian Honey Cake recipes I’ve ran into. Is it a different variation on it? Maybe from another part of Eastern Europe? They sound great though; definitely worth experimenting with ?
Can I half the recipe and make it?.
Yes sure! I’ve only ever made the full version, but I don’t see why 1/2 batch wouldn’t work. Pretty sure it be every bit as delicious ?
A M A Z I N G!
I baked the layers last night. Assembled it early this morning. I cut the recipe in half to make a 6 inch cake. I just had to try it after scrolling through foodgawker. It made a wonderful dessert for our wedding anniversary today. The recipe was perfect! I did see you repeated the assemble process on #1 and #3 but it wasn’t enough to make it confusing. I know we should have waited 24 hours before eating but I figured since it was small enough and I did it early in the day it would be ok. Look forward to eating it the way it was intended to be eaten tomorrow.
Never heard of Russian Honey cake until yesterday. It is a new favorite for my boys. Thanks!
Happiest Anniversary Marie! Wishing you so many more full of love and happiness. I’m so honored to hear that this cake was a special part of your celebration, and so happy that it did not disappoint. Thank you so much for your wonderful feedback; makes my day ?
Oh and thanks for the heads up on the instructions’ typo. And I thought I proofread multiple times already ?Sorry for the confusion. I’ll fix it once I get hold of my laptop, as I’m currently traveling & didn’t bring it along.
There you go again, never failing to amaze your readers, I just don’t how you manage to make everything look so elegant, extremely mouthwatering, simple, true inspiration!!
You’re so sweet! Thank you so much for your kind words. Hope you get a chance to give this cake a try 🙂
Wow tasbih…you just come up with wonderful twists to famous recipes..i hope you remember me from our email communication about our visit to Egypt…thanks once again for your help..my daughter loves the honey cake…planning to make it soon and also i had been thinking of making a pineapple upside down cake this week but looks like i will be trying your dates upside down..:). AMAZING
Ofcourse I remember you Sobiya! I’m so happy to hear that you had a great time in Egypt and that you had a chance to visit some of my suggestions.
I really hope you and your daughter love this honey cake…it’s really something. Upside down date cake would be a nice change from its pineapple cousin. Hope you enjoy that one too.
Pingback: Amazing Russian Honey Cake
Pingback: Russian Honey Cake ~ Gastronomy-Art | Food Art
Grt recipe as well as great narration.. Felt like reading a thriller…
Lol about the thriller! I’m taking that as a compliment ? Thank you!
That’s one crazy cake!!! I have always dreamed of trying a Russian honey cake from the peoples insane reviews about how good it is. But honestly this one is beyond ah-maaazing. The flavors are so complex. It just deepens everytime you take a new bite. It’s a must try cake.
I really gotta be honest while doing the cake i was very skeptical from the smell that I was going to throw away the whole batter. And then the steps made me feel okay that is to much for just a cake.
But after a week from eating a piece everyday. And after two kilos I gained in a week I am very glad to tell you that I have forgotten everything and I am so willing to make it again and again and again.
I made it to celebrate hubby’s birthday and it was a really special one. The cake is a mixture of a lotus biscuit flavor and a lot of other things one won’t find words to describe.
So THANQ for such a fool-proof recipe as usual. I can’t wait to try the pie and tell u how it works.
I couldn’t be happier that you found this cake well worth the effort! Thank you so much for taking the time to come back and let us how it turned out. I totally know what you mean with that funky odor that emits from the batter once you add the baking soda in…I had my doubts too lol! I hope you love the apple pie as much as you loved this cake 🙂
Hi – i got caramelised sweetened condensed milk. Can i use that instead of the Dulce De Leche?
Hi Azmeen! Absolutely. It’s what I use. They’re essentially the same thing 🙂
Awesome!! Trying this one for my husband’s birthday on the 2nd of Dec. I hope it comes out well!! *fingers crossed* 🙂
Hi that is one delicious looking cake…since u said I can make the cake in advance…can the burnt honey be stored as well for the frosting?
Thank you so much Nimmi! Sure! I have prepared the burnt honey 3 days in advance with great results. I’mm honestly unsure, how far it can be made in advance though.
I don’t know why my batter was super thick! The cake seems like it’s going to come out great but I couldn’t make 10 or 11 layers. What did I do wrong? Why is my batter so thick. I couldn’t spread it at all.
Hi Meri! Do you think the batter got cold as you were working with it? I always keep my batter bowl over the waterbath (off the stove) to keep it warm and spreadable. Also may I ask how you measured the flour? I always recommend measuring by weight because its much more accurate. So if you’ve measured by cups, then there might be a chance that the flour was over-measured, thus making the batter too thick.
I made this cake today for Christmas Eve dinner and ended up making it twice– The first time, I realized I completely forgot the sugar!! Anyway, all of the running around the kitchen was worth it because this cake is absolutely massive. Super tall and weighs a ton. Could honestly probably feed an army. And every single part is delicious! Great recipe.
Oh no Amy! So sorry you had to do it twice; I can imagine the hassle you had to go through. I’m so glad to hear that it was worth it in the end and graced the table of your Christmas Eve dinner. Have a great one and Happy Holidays to you and your family.
I made it and it came out amaaaazing. When i first read the recipe i thought i’d never do so many steps to make a cake. Now i‘m ready to repeat it a lot. I halved the recipe, made it into an 8 layer 7 inch cake. I burnt the layer that was supposed to be toasted so i replaced it with lotus cookie crumbs, it paired really well. Thank you so much for this recipe, everyone was really amazed even the hard to please eaters.
Hahahaaa Mariam I feel you…the recipe looks more like a reader’s manual; it’s scary to look at ? I’m so glad you summoned up the courage to make it, so you can see and taste how it’s sooooo worth it. So happy you loved it so much and that it was such a hit! And great call on those Lotus crumbs on the sides…YUM!
Pingback: Russian Honey Cake - Practice With Danielle
I made this over the weekend and ate some today and wow, it’s delicious!! No kidding on it being a project, but it was different than anything I’ve made before and lots of fun. The recipe was very well written and easy to follow.
Oh a project it is lol! So glad your work paid off in the end and you found that it was well worth your time. Really happy you enjoyed this recipe and found it easy to follow ?
That cake looks delicious and super cute with the bees in the middle.
Thank you so much Megan! I’m so tickled by the fact that you noticed the cuteness of the bees. It’s the “little things” right?
Made this and no hesitation at all to give 5 stars! Made a 1×4 layer cake and a 1x6layer cake instead of one huge cake. Everyone who tried it has loved it. A shame it’s so time consuming to make as that will make it a more rare treat in this house – but all the more special for that!
I’m really happy to hear that it was such a hit Anna! Thank you so much for the 5 stars; really appreciate it. I share your sentiment; I too, both love and hate the fact that its so time consuming. Love it…because its better for my waistline, hate it…because I want it everyday ?
I attempted this recipe last weekend and made too many mistakes. It was an epic fail! My layers were too thick and I over-whipped the frosting and it separated beyond hope. So I was very determined to try again and I am so happy I did. This is an amazing recipe. A lot of work but the result is so satisfying. To help me out this time I used a scale and measured out the ingredients by weight. I even measured each cake layer to about 4.1 ounces per layer which almost used every drop. I ended up with 12 layers and baked the 12th extra crispy to grind up for the crumbs. And using a chilled bowl, as suggested, for the frosting helped a lot, too. Thank you for the detailed photos!
I couldn’t be happier to hear that your second attempt was such a success! Sorry your first one was a disappointment, but if anything…its what lead you to nail the second time around so well. Thank you so much for taking the time to let us know of your feedback. Really love reading about the different experiences.
Pingback: A Winter Russian Fairy Tale
I have a passion for baking as well. Just came across your blog. Excited to try your recipes. Being Russian myself, never have I heard that Russian Honey Cake is made with buckwheat flour or walnuts ? Walnuts are usually added to another Russian popular Cake Napoleon, but not Honey cake.
I’m so glad you stopped by Lana! I hope this cake does the one you have in Russia justice. Thank you so much for clarifying the thing about buckwheat flour and walnuts…it’s so reassuring to hear it from a trusted source.
Hi Tasbih,
So glad I stumbled, across your most amazing Russian honey cake on Pinterest!, have seen some other recipes before, but there was just something about your recipe that grabbed my attention…oh my word what an amazing cake, I certainly have baked many a cake in my lifetime, but this is so exceptional and the flavour beyond description!!!
I baked it on Saturday, although I think it would be challenging for the average baker, I loved baking it and enjoyed the challenge.
The flavour was really at it best today, as it intensified over the past two days.
I love baking and pastry, I am the patisserie lecturer at a cookery school in Paarl, Cape Town, South Africa.
Keep up the good work
Warm regards
Pierre
Hi Pierre! It’s so wonderful to hear that you loved this cake so much. It really is something and I’m so happy you agree. All thanks goes to pastry chef, Michelle Polzine, the creator of this recipe, whose fruit of her labor is being enjoyed by all of us. Thank you so much for your amazing feedback and lovely comment.
Attachment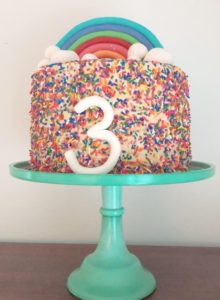
I made your Honey Cake for my daughters birthday party and everyone loved it! It turned out perfect! Thank you for a great recipe?
Whooooaaaaa! It’s so pretty! You took it to a whole level of cuteness with all the sprinkles and rainbow. I’m so happy to hear that it was well received and happiest birthday to your little princess ??
Pingback: What’s Cooking Wednesday 3/27/19 | Librariandoa 2.0
Thank you! 🙂
I have been searching for a honey cake recipe since I first tasted it in a tea shop in Prague over 15 years ago! I have been dreaming of it ever since! None of the recipes I’ve found are this detailed or highly reviewed. I had actually stopped searching and this just appeared in front of me this morning. I think it’s a sign I need to make it and I’m so excited!! Thank you so much for the photos and descriptions! You have made my day!
It’s my pleasure Dawn! I really hope this one ends your search and turns out everything you’re hoping for and more.
Attachment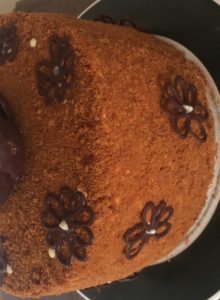
I made this last weekend. I swapped the flour for gluten free flour with a little xanthan gum as needed. Having tried a few Russian honey cake recipes, this is by far and away the most delicious ever. Silence around the table. Will most definitely make again. Thank you.
Natasha your cake looks wonderful! It’s so great to hear that it tasted as great as it looked. Really happy that it worked just as well with gluten free flour; I’m sure that would be a relief for so many people reading this.
This recipe sounds very good and I intend to try it, but with regard to your comment about eliminating the need for sour cream by caramelizing the honey, when I had this in Russia, it was never made with sour cream. Russians don’t use sour cream; they use smetana, which is always translated as “sour cream”, but that’s not what it is at all. It isn’t as thick or as sour. In fact, it’s much more like crème fraîche. When I make this, I intend to use crème fraîche, which whips up nicely, rather than heavy cream, which means I probably won’t burn my honey for the frosting. Or maybe I will; dulce de leche sounds like an interesting addition, but the sweetness might need to be countered with some acidity.
That’s really interesting to hear James! I did not know this. Thank you so much for sharing. Creme fraiche does in fact make a lot more sense than sour cream. I hope your twist on this cake turns out amazing!
Good day James. How did the cake came out with creme fraiche instead of whipped cream?
Hi; thank you for sharing this decadent recipe! i made the cake this morning, its still in the refrigerator chilling, but i tasted the filling after the cake was already assembled and noticed it was extremely sweet. In the past whenever i have had this cake, it was a very light sweet, not super rich by any measure. My family does not enjoy super sweet things, so i’m terribly worried i may have done something incorrectly. Will the sweetness decrease after a few days in the refrigerator? If not, i want to try making the cake again, but if you could kindly tell me what can be done so that the filling is not super sweet. thanks so much for your time!
Thanks for trying this recipe Mona! As much as I like dessert, I strongly dislike overly sweet frostings, and yet have never found this cake overly sweet. Personally, I think it’s just the right amount of sweet, but yet again, tolerance to sweetness is very subjective. Are you sure you didn’t forget to add the salt? It really helps cut the sweetness. Also sufficiently burning the honey, does the trick too. If the honey is not burnt well enough, it’s very likely than it would lend an increased level of sweetness.
Hii! I just came from pintrest for this cake that I’ve been thinking about for a long time.. I do have a different version in my mind but yours sounds amazing so I might base it from your recipe and change things up 😀 I looked around your blog and I love it! Looking forward to seeing your bakes on insta ^^
Thank you so much Dea! You have a beautiful blog too ? I can’t wait to see your take on this cake. Whatever you do to it, I’m sure it will be delicious.
Hi there,
Do you think I can pre – bake and freeze the cake layers only?
Thanks ☺️
Pingback: PotD 3 May 2018 – The Ben & Beth Blog
Hi! This looks amazing, thank you for sharing! When defrosting the layers, would you recommend to defrost it in the fridge the night before I plan to finish the cake? Also, I assumed the burnt honey could be stored in the frdge until I was ready to maketge frosting. Is that correct? Thank you again, Tasbih!
Hello Janel! You can surely do that, but because the cake layers are so incredibly thin, they take as little as 15 minutes to defrost. So you can just take them out of the freezer to defrost, as you’re preparing the frosting. They should thaw by the time you make the frosting.
As for the burnt honey, it keeps well at room temperature for several day; no need to refrigerate.
Best of luck!
Do you perhaps know the caramelisation temperature of honey? My wild flower honey is dark in colour…..
So sorry Lehana…I’m not sure about that. Next time I make it, I’ll be sure to take its temp and update that to the recipe ?
I’m so glad I found your blog and your wonderful and precise recipes and instructions. I’m sure I’m not the only one who has been attempting to find that elusive taste and perfect balance of textures in a Russian Honey Cake. I feel that I may have found it at last ! Thank you so much for posting this great recipe, I love all the detail you’ve included and can’t wait to try it.
You’re so sweet Susan! It’s really my pleasure to be sharing my delicious findings with you. I hope it turns out like everything you dreamed of and more ?
Is there a possibility that I can bake the cake layers inside a cake pan (loose bottomed and lined with parchment)? Is there a specific reason why it has to be done without cake pans?
Do you think using salted caramel sauce (home-made) instead of dulche de leche would affect the taste?
Sure! You can absolutely use a cake pan instead. Baking over baking sheets just seems a bit faster, since you can prepare so many layers on top of the parchment at the same time, and just slide them over the baking sheet when you’re ready to bake them. As for caramel sauce, I think flavor-wise, it will turn out very similar, but my concern is with the consistency of the frosting. Dulce de leche is so much thicker than caramel sauce, so it doesn’t thin out the frosting. I think caramel sauce will most likely produce a less stable, softer frosting.
I haven’t made this cake yet but I certainly will. I first tasted one of these nearly 15 years ago, made by a Russian lady and her husband would not give me the recipe! I have been looking for it ever since.
Thank yuu so much
I hope this one measures up to the one you had from the Russian couple. Would love to know your opinion once you try it out.
Enjoy ?
i made this cake, following the recipe exactly. And it really was a project! looked and tasted beautiful but my cake was significant;y taller that the one in the photo. So, what did i do wrong?
Glad to hear that you loved it Naomi! Oh this is a very tall cake; my photos doesn’t really do its height justice. It’s a monster in real life ? If you spread the cake batter in a 9-inch round, then I don’t think you did anything wrong. If you made smaller rounds, then maybe this could be the reason for the added height.
Pingback: PotD 3 May 2018 – Travel Day: Saint Petersburg, Russia to Home – The Ben & Beth Blog
I made this cake and found the cake batter very sticky and hard to spread, I left the batter on the stove on top of the warm water. The bowl wasn’t touching the bath water and the burner was off. The cake batter was warm but it turned rubbery on me? Any suggestions.
Hi Joanne! I was going to suggest warming it over the water bath, but looks like you’ve already done that. The batter is actually slightly tacky, but it shouldn’t be difficult to spread. Do you think that maybe something was mis-measured? If flour is over-measured, or the honey was under-measured then you might experience a tough batter. Were your eggs on the small side maybe? I’m just thinking out loud, so we can try and figure out how to save it.
Attachment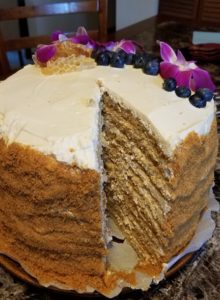
This is a gold medal winner with flying colors.
I made this cake for my boyfriend’s birthday last week and it just about brought him to tears (being the baked goods/honey lover he is!) I started the process on a Wednesday, baking the cake layers while I simmered the dulce de leche. I did it for 3 hours and it turned out just fine for my taste. As far as the cake goes, I began to run out of batter towards the end of the 11 layers, so for those of you who are trying this for the first time, make sure you’re using the correct amount!
I left the cake layers on the counter wrapped in plastic wrap, and in a plastic zip-lock bag overnight. The next day I made the whipped cream and assembled it – with a lot of difficulty with the crumbing and making the sides look even!
Overall, a great product for a fairly inexperienced baker with a lack of proper equipment. Bravo!
Pingback: THE MOST BEAUTIFUL RUSSIAN HONEY CAKE - STUDIO DESAIN
For a cake with a WOW factor, this one fits the bill. But, it comes with a price, and that is time, patience and perseverance. This delectable little number is without a doubt one of the most moist, flavorful and decadent cakes I have ever made, and I’ve made a ton of cakes. There is a great deal of skill involved with so many steps and you can’t rush it or take short cuts. By the time I had finished “building” this cake it was huge and starting to list to one side. Without a dowel to hold it up in the middle for support, I just let it lean and marveled that I had accomplished such a feat. Beyond a crowd pleaser , a little piece goes a long way.
Hey Tasbih !
First recipe I’m trying on your website !
Just got the layers out of the oven, some are too thin some are too thick but will work on that next time :p one thing is concerning me though, they have been out of the oven for like half an hour now and they’re still pretty soft ! Aren’t they suppose to harden ?
Also , why do other Russian honey cakes seem to have dough instead of batter ? Is there any real difference in the end result ? And what about the sour cream frosting ? I’m asking because a friend wants me to make Russian honey cake for her but I have never tasted it before so I want to know if this recipe tastes like the actual classic Russian honey cake she’s tried. Ok I’ll stop babbling now. 🙂
Okay soooo… i just read the entire post , was too busy earlier. The post answered my questions, thank you ! Amazing post, keep it up ! And I suppose it’s okay that my cake layers are soft ?
Pingback: The Most Amazing Russian Honey Cake | Cleobuttera - Crockpot Recipe
Attachment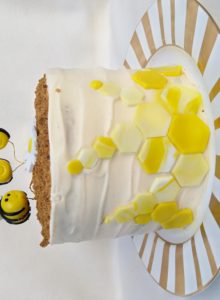
Hi Tasbih.
Tried half your recipe and baked it in a pan. My layers came too thick and it overall made the cake dry. I will keep the sugar in the frosting less next time. I had honey cake in Dubai and that was to die for. Tooo soft. I will definitely try it again with thin layers.
And guess what I made it all in one day ! ?
Hi,
So slightly off topic, and prefacing this comment by saying I’m not the most computer savvy person so I could be wrong.
But I believe this website may have been “hacked” (or there is some pre-existing malware on my computer, that my anti-virus software isn’t detecting).
I got a full page pop-up screen and a prompt to download a chrome browser update when initially visiting this site ( I didn’t download it). I couldn’t manage to bring it up again upon refreshing and revisiting this web page.
After a quick google search I came upon the following website:
https://www.extremetech.com/computing/267318-new-malware-spreads-through-hacked-websites-browser-update
And I think this or something similar may be what I came across, it only serves the fake update notification once per IP address and the background “update screen” looked exactly the same.
Again not the most computer savvy person, so not sure if this was the cause for the pop-up screen or something else on my end.
But wanted to let you just in case.
A nice recipe for Medovik, I’ll try the burnt honey trick. It is one of my favorite cakes (the other one is Napoleon). Usually I mix sour cream with sugar for frosting (it is classical), it makes the cake soft and adds sour taste. We sometimes mix dulce de leche with sour cream – not so heavy as whipped cream. And I also add different spices to the batter, crazy aroma.
Hi! I am interested in making this, but is it absolutely necessary that it be refrigerated after the baking process? (as in after part is eaten)
Hi Ivy! The refrigeration is for safety reasons. Whipped cream, in general, shouldn’t be kept at room temperature for many hours, or it risks spoiling. And since the frosting is basically whipped cream, it’s safest to refrigerate upon eating. Enjoy ?
Pingback: Bir Rus Lezzeti; Medovik Pasta Tarifi - Kadınım Mutluyum
Attachment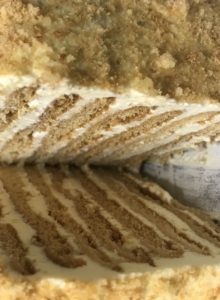
My daughter wanted to give her friend some Honey Cake for her birthday. I looked at what they were charging in the shops. A lot to pay for such a little piece of cake. The expense comes from the time it takes to make and put this cake together. We decided to try making it ourselves. Made this over a few days. End result was amazing. In my opinion so much better than the bought one and much more meaningful for a gift being home made.
I couldn’t agree more with you Ros. Nothing compares to a gift made with so much love with your own two hands. Your cake looks flawless and I’m sure it made the birthday girl very very happy.
Do you think this cake could support a 6 inch cake if properly doweled? I am going to be making a Winnie the Pooh cake and you can’t get better than a honey flavored cake for that!
Oh that would be so cute! It really doesn’t get any better than that ? Yes…I believe the cake should be hefty enough to support the 6 inch cake. The cake is soft but it’s pretty sturdy. Best of luck!
This cake tastes amazing!!!!! Unfortunately both times I’ve made it, I’ve had the same problem. My batter is way too liquid so it spreads all over the silmat and I’m not able to bake the “pancakes” in a pretty shape. Do you have any idea what am I doing wrong?
I’m so happy to hear that you loved this cake Andrea! It’s really hard to tell what might be causing this problem, but from the sounds of it, it seems that there’s either more liquid than should be or less flour. If you’re using measuring cups, then I highly recommend trying a kitchen scale the next time around to guarantee maximum accuracy. Also be sure that the eggs aren’y extra large either, as the excess liquid can yield a runnier batter. Eggs should weigh 50g without the shell. Also be sure that your batter isn’t too warm while using it.
Holymolly, finally I’ve made this cake again (this time my birthday) and it is AMAZING! I kept using the scale and almost did the same. Only thing I made different was to cook a little longer the honey so it was a little bit thicker but I did keep an eye on the eggs weight.
Thank you so much for the recipe and your kind reply 🙂
Oh my god this cake is spectacular and definitely worth it! I made this 3 days ago and I had halved the recipe. I ended up getting 6 layers. It was a hot dry day so the whipped cream didn’t behave well, glooping and it wasn’t decorated as nicely as I’d liked. I had a piece about 6 hours later and it was really good. But then I had a piece earlier today and it was even better! Whaaaa?? The cake layers were softer, the whipped cream was firmer. Thank you for the amazing recipe, definitely will keep and definitely will make again!
Wooohooooo! This makes me so happy to hear. You’re absolutely right…this cake only keeps getting better and better as it sits ?
This is my favorite cake and has been since I was a child. Try it with Orange blossom honey, you won’t regret it. I always use the raw version which just adds depth of flavor.
Ooooooh nice ? Will surely have to try it the next time I make this cake. I’m sure it will take it to a whole new level.
Hi Tasbih,
I was thinking of making this cake for a church potluck in a week. However, my parents don’t want to buy dulce de leche or sweetened condensed milk. I have the rest of the ingredients and was wondering if you have any recommendations for substitutes?
Thank you,
Ariadne
Hi Ariadne! My best recommendation would be to make the caramel whipped cream from this recipe. It flavors the whipped cream with an easy caramel sauce made with brown sugar. I think that once you add the burnt caramel to it, it will have a very similar flavor profile. You’ll need to triple the caramel whipped cream recipe though. Hope it works out smoothly ?
Yum, that sounds delicious! Thank you so much, that helps a lot. Hopefully it’ll go well!
Attachment
Just made the cake for our holiday,
It was such a success, amazing cake, so tasty, such compliments.
But a lot of work!!
Pingback: The Most Amazing Russian Honey Cake - Top Desserts
Pingback: The Most Amazing Russian Honey Cake | Cleobuttera - slowcooker
The (slightly late) final verdict: DELICIOUS. It was actually much easier to make than I expected, and the cake ended up looking pretty great too. I only got 9 layers, but this actually worked perfectly because, had it been any taller, it wouldn’t have fit in my cake carrier! The flavour was delicious and the frosting- oh my, the frosting. I think it might officially be one of my favourite recipes ever, because that is a little taste of heaven.
My only complaint is that, after about three layers, my batter got very tacky and hard to spread. This didn’t effect the baking process or taste, so no harm really done, but it was pretty hard to spread on my silicon mats. I kept it on the Bain Marie the entire time to try and keep it warm, but this didn’t seem to help much. Other than that, a resounding success!
Hii is the cake veeery sweet? Any way i can reduce the sugar?
Attachment
This was tough. I consider myself an amateur baker and this was ambitious to say the least. I halved the recipe and used a 7 inch cake pan as the template for my circle, I got 6 layers (of varying depths) and enough batter to spread and bake for crumbs. The crumbs were the bit that took me the longest, I dont have a food processor so I went the the good old method of ziplock bag and rolling pin. Getting the cake dry enough to crumble did take a while but I just kept breaking it up with my fingers into smaller and smaller pieces until it was done. Then I bashed the heck out of it ?
I can’t think of anything specific to say, I have all the required ingredients (well, half) and followed your recipe step by step. I faltered a couple of times; this is so much more than anything I’ve tried previously. I think it came out alright, and it tastes AMAZING! I’ve attempted to attached a pic but I tried that last time too and it didn’t work so ?.
Thanks again for fabulous recipe x.
Attachment
Great reviews!
Hello ma’am. I tried and the recipe was perfect and very good. Thank you. And more recipes of cake waiting ahead.
Can I make it with gluten free flour OR what other type of GF flour do you suggest?
Hi Marilyn! Thank you for your interest in the recipe. Unfortunately, I have no experience in gluten free baking, so I can’t know for sure if it will work. Sorry about that. Please let us know how it turns out if you do experiment with GF flour. Best of luck!
I just made the cake layers yesterday and put them in the freezer, super time consuming but they all came out great! Won’t be making the frosting and assembling until 2 days before Xmas… Question, when I let it “marinate” in the fridge for a day or two, should it be covered??
Hi can you freeze this cake with wiping cream
Hi can you freeze this cake with wiping cream on it??
First I want to thank you for the recipe! I’ve made it several times already, it’s one of my hubby’s favorite cakes.
some family members have mentioned to me that the cake is wayy to sweet… is there anything I can do to cut down the sweetness, is there anything I can do to make it a bit less sweet?
I’m so grateful to hear that you love this cake so much Nat! To make it less sweet, I’d recommend reducing the amount of dulce de leche in the frosting or omit the burnt honey. Enjoy ?
Attachment
Very good recipe, i subs the dulche de leche cream with cream cheese buttercream for each layer and use the dulche de leche only on top of the cake yo reduce the sweetness.. Everything was perfect
It looks delicious! I’m really happy you loved it! What a wonderful idea using cream cheese buttercream between the layers…sounds amazing!
Pingback: THE MOST AMAZING RUSSIAN HONEY CAKE – Food Trend Mag
Helpful one! Thank You so much.
This cake looks absolutely delicious! I want to use just the cake recipe and layer it with strawberry jam. Do you think it would work as two 8 inch layer cakes?
Hi,
Your cake looks amazing and your recipe instruction is one of the best I’ve seen for this cake.
I plan to bake the layers on saturday for an event on thursday. Would you recommend to put the layers in the fridge or the freezer?
Hi Yoona! The freezer is the way to go since the fridge tends to dry out cakes, while the freezer retains their moisture. Good luck!
Thank you for this recipe Tasbih! I am Russian and have tried my fair share of honey cake recipes, and this one is one of the few successful ones! I absolutely loved the fact that you don’t have to roll out the layers! Also, your direction on how to temper the eggs into the batter are spot on! Needless to say I will be making this again and again. Love your site, hope you will try making more Russian cakes in the future! (maybe Kiev cake:)
My daughter requested a Russian Honey Cake for her birthday because she saw it in some food show. I’ve never heard of it and found this recipe. Spent the day yesterday making it. It only chilled about 5 hours before we cut it. Thought it was very good, and she was happy. Fast forward to today… time did something magical to it because it went from very good to absolutely delicious!!! Like, crazy delicious!!! The frosting… who would have thought something so simple can be THAT amazing!!! And so beautiful when it’s cut. What an amazing recipe. So glad I found it. Defiantly will make again.
Pingback: A Winter Russian Fairy Tale
Omg I made it today and it was unbelievable!! But the frosting was too much! Can I freeze it ?
So happy you loved it Rabia! I haven’t tried freezing this particular frosting because I use it all up to be able to tell for sure, but frostings in general freeze well.
Attachment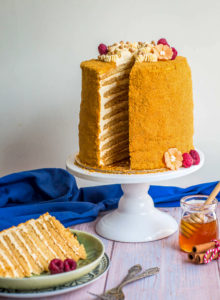
This really is the most amazing cake ever! Thank you so much Tasbih for sharing this recipe and taking the time to write down the details. If it wasn’t for your make-ahead tips, I don’t think I’d have the courage to make this as I have a toddler at my heels 24/7!
Everyone who has tried my cake said it’s my best yet. As I was scrolling through your comment section for feedback, I thought it’s only fair that I share what I think might be helpful.
I caramelized the honey on low heat for about 5 mins for a nice, deep honey flavor. And used around 1/4 cup less of the dulce de leche/ honey cream mixture when whipping up the filling. So best to add slowly to taste I think ?
Also despite the filling being a lovely thick texture, I found my layers dangerously slipping here and there as I got to 7th layer and so. My advice would be to somewhat stack and cover the cake quickly, don’t worry about it being a little bent, give it an hour in the fridge. It’ll be more stable and you can “straighten” it, the cake is quite sturdy and forgiving when it gets the chance to soak up the filling. Anyone who’s reading this, you really must make this cake, it’s SO SO good!
I hope you’re in good health Tasbih, sending lots of love and prayers your way.
Oh my goodness Farhana…this looks absolutely stunning! WOW! I’m in love with that towering beauty queen and I’m so happy you loved it so much. Thank you for sharing all your valuable tips with everyone ?
I have a bunch a honey in my cupboard that I’d like to use up, but it’s all light honey (you know, the creamy kind). Would that work? I’m asking because I’m not sure how it would go with burning the honey since it’s a different consistency than the usual golden honey.
Hmmmm…I’m honestly unsure Ash. How about experimenting with a very small amount and see how it reacts? Wishing you all the best.
Hey Tasbih. Hope you’re well
Is it possible to make this cake into cupcakes?
Hi Amatullah! I’m good thank you very much. Cupcakes might be really difficult to make with all these many layers, but mini cakes would be a better way to go at it.
Thanks a lot for this recipe!
I tried it when I visited Russia and I still have the test in my mouth! It is really unique.
can I know I’m which restaurant in Cairo you have tried it?
Hi Nanda! I think it was The White Owl in Maadi. It tastes quiet different from this one though.
Is it possible to bake this in thicker layers? In my case, I don’t think I’d have the time to bake all 11 layers, so do you think that 3-4 layers would suffice??
Thank you~
Hi Hannah! Hmmmm…honestly I don’t think it would work just as well. The layers don’t have a typical cake texture; they’re more like soft cookies, so I’d worry that it won’t bake the way a cake will. If you’d like to experiment, you can just try with one pan only, and if it bakes well, then continue with the rest of the batter. Please let us know how it turns out if you do give it a try.
It looks so delicious. My wife’s birthday is coming soon. I think If I make the honey cake myself, she would be happy. I will make it according to your recipe. Hopefully everything will be great. Thanks Tasbih !
Happy birthday to your wife Michael! I hope this cake makes her day. Please let me if you need any assistance along the way. Enjoy ?
Hello! Do u think I cud use dream whip in place of the whipping cream?
Hi Shemna! I think this might just work just fine. I’m not sure though how much Dream Whip you’ll need, because I do know how much whipped cream it yields. Best of luck ?
Hello! One more doubt, after I burnt my honey, and after adding the water- it’s a bit runny- like not the thickness of regular honey.. is that how it’s supposed to be?
Yes ?
Hi! Wanted to try the Russian recipe for so long.. will definitely try this one for my son’s birthday.. wanted to ask if there is any way I can replace eggs in this recipe.. usually I do it with curd or unsweetened applesauce.. but not sure how it’s gonna work here.. would love to try this recipe ?
Happy birthday to your prince Niharika! I’m so sorry but I personally don’t have experience with substituting eggs in baking. However, I think this article would really help you out to do so. Wishing you the best of luck and please let us know how it went, if you do give any of these substitutes a try.
Pingback: Need a Vacation? Explore Kazakhstan for a Day – The Dumpling Cart
Hi again
Thanks much? I did give it a trial run yesterday and replaced egg with yougurt. It turned out to be great even though I goofed up a bit.. I kept it for chilling in fridge (overnight).. will be having it today ????
Oh that’s amazing news! Thanks for the update ?
Hi, your cake looks delicious and I’ve been planning on trying it for a while now! Just wantesd to ask though, does it have to be heavy whipping cream? I could only find fresh whipping cream (35% fat) at my local grocery store. I don’t bake often, so I’m not sure how much of a difference there is between the two. And would you say the amount of dulce de leche should be exactly the amount you used, or can that be up to personal taste? Thank you!!
Hi Amy! 35% whipping cream is perfect to use here. You just need a cream with high enough fat, so it can whip.
You can adjust the amount of dulce de leche according to taste. Enjoy ?
What a fantastic cake. Awesome no words to praise. perfect layers
Thank you!
Lana, just to clarify: I also have never heard of making it with buckwheat flour. However, I remember my grandmother always made the cake with walnuts and….prunes! She was an amazing baker!
Russian Napoleon cake, traditionally, is made with pastry cream and NO nuts of any kind…
This is great idea for birth day my son. I will try to make it. thanks you!
Hope he loves it Roses ?
Hello. The first time i see your recipie im amazed on how your cake looks. I make yout honeycake recipe today but idk why my layers is not as dark as yours but i followed the 190c for 6 to 7 minutes.
Also my frosting become soft when i put the dulce de leche mixture in the mixed whip cream. Pls help me what should i adjuat next time.
Hi Francis! The light color may be due to using a lighter-colored honey or it may indicate that the cake layers needed a longer time in the oven. Also be sure that your baking soda is not old, since its activity also contributes to browning.
For the frosting, was you dulce de leche mixture warm by any chance? Be sure that it has cooled completely before adding it into the whipped cream.
Pingback: كيكة العسل الروسية المذهلة Medovik Torte والتي لن تتذوق مثلها أبدًا إستفادة - إستفادة
This cake looks absolutely stunning and I am so tempted to give it a go! I’m curious about the frosting, is it a bit runny and does it stay that way, or does it get a bit more solid when cooled? I saw someone use bubble wrap to make a honeycomb pattern on the top of the cake (by pressing the bubble wrap into the frosting) and would love to try it out because it looked gorgeous. Do you think the frosting would be solid enough to attempt this with your recipe?
Thank you Hanna! The frosting is not runny but it’s billowy soft like a stabilized whipped cream. So it’s not as stiff as buttercream nor soft as whipped cream; something in between. Very similar in consistency to diplomat cream if you’re familiar with it. Once you layer it between the cake layers, it holds so well and is pretty stable. The honeycomb wrap would work beautifully here. Best of luck ?
Attachment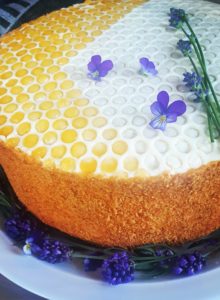
It turned out absolutely gorgeous. And not to mention delicious! Thanks for the tip about dividing the work up over a few days. I used your recipe for the filling and the sides, then made a frosting with caramelized honey, cream cheese and créme fraiche with added gelatin for the top. It worked beautifully with the bubble wrap and didnt stick. The “honey” is a lemon/orange jelly. So glad I found this recipe!
Oh my goodness! This looks absolutely gorgeous Hanna! I’m awe at its beauty. Really happy it turned out so well for you and that you loved it so much ?
I made this over the course of a week – baked and froze the layers and made the dulche de leche, and some Cajeta (goat milk version from our own goats milk), at the beginning of the week. Assembled and decorated the day before catching up with friends – OMG! A delicious and sophisticated cake! It had to travel 2 hours in the car and I was worried about it’s structural integrity but it held up beautifully.
Festive and absolutely D E V I N E!
YAY! I love hearing that you loved it so much and that it held up so well in such a long trip. I’m really glad that spacing out the work made it so much easier for you.
Pingback: Six-Layered Honey Cake - The Ovenist
Thank you for this amazing recipe Tasbih, especially the time, effort and resources you put into it.
Is it possible to cook the cake layers over a gas stove just like making pancakes or this may affect the overall texture?
I made this for a friend’s birthday, and it is mind blowing! Entirely worth the effort. I was also able to find fresh, unfiltered wildflower honey at the farmer’s market, and it was delicious in this cake!!!!
A friend made me this cake this past weekend and I cannot emphasize enough how unbelievably delicious this cake is. I cannot believe the time and labor she put into it but my goodness…..I have treasured every last morsel. Fantastic recipe.
Pingback: Modish Taste Redirecting
I’m currently baking this cake for my birthday tomorrow and I am SO excited to try it!! But I can tell it’s going to be huge, and there’s only two of us to eat it. Is it possible to freeze part of the assembled cake? I don’t know if we can make it through it in three days ?
Unbelievably delicious!
caramelized honey cakes that taste like the fine marriage of Lotus biscuits
Amazing. This is interesting. I like it. Will make again and again. Thank you so much!
This cake is delicious. Thank you for this recipe!
This cake is delicious. It is time consuming but well worth it. I used honey from local bee keepers which worked wonderfully well.
I completely agree, It is great. And I am always surprised when I read posts about the food. This great content. I have learned something powerful today.on demand delivery app development
Planning on making this soon, I’ve always wanted to try a honey cake and your description makes it sound like baking one is my best bet! I love to bake so here we go! My question is, after the initial 24 hours in the refrigerator, does the cake need to be kept in the fridge or can it be kept on the counter in a cake stand like most cakes? Need to know, so I can make it when I have room in the fridge! Thanks!
Wow, ten thin layers of air cake sounds amazing! I have never had a cake with so many layers before! I’ll look for some recipes like you did and see which of them I like most for Russian Honey Cake.
All your projects are very impressive. Looking forward to see what is next.
Pingback: honey means happiness – honeydofood
I made a wonderful cake recipe! Delicious right out of the oven, and the next day for breakfast! Will also be my new addition to my traditional Christmas breakfast. So glad I found your site! Thank you, and I look forward to trying your other recipes!
Shuhana Allen
http://myreviewcenter.com/
Started a new Thanksgiving traditionn to try traditional foods from other countries. This year was Russia and I have to tell you that this cake almost did me in. I cried then pushed through and SO glad I did. It isn’t beautiful like yours but it was amazing and a perfect ending to a fantastic meal and now relatives are begging for it for birthdays and all holidays. Thanks for sharing and maybe one day it will look just like yours. ?
Found your recipe after having Honey Cake for the first time in restaurant along the Gulf of Mexico. Thanks for sharing and I plan to try making for Christmas. But I don’t understand the part of the recipe with the parchment paper under the mat. Can someone explain that step. Thanks
Hello,
I plan on making this over the Christmas period. I have been in search of a detailed recipe for ages. I was wondering, I love the biscoff spread, could this be substituted for the dulce de leche?
I hope you all have a wonderful Christmas and a Happy and safe New Year!
🙂 Sylvia
Pingback: كيكة العسل الروسية المذهلة Medovik Torte والتي لن تتذوق مثلها أبدًا – جول العرب
I’m from Russia and lived there for 23 years before moving to US. Honey cake or Medovik is one of the most popular cakes in Russia, often baked for birthdays and I’ve eaten honey cake many times in different variations. However my Mom never was a fan of it and we never made it at home. So here I am making Russian honey cake for the first time in US and using your recipe for the cake part! I researched Russian recipes in order to find the one with more honey than sugar in it. And gave up, started to search in English and found your recipe. I was skeptical at first, because I knew that honey cake batter is always made thicker so you can roll it out with a rolling pin. I followed your recipe step by step and it is perfect! I was able to make 13 cake layers, so next time I’ll be spooning a little more batter for each layer. Frosting is where I decided to stick to the Russian roots. Creme fraiche (“smetana”) is a must in honey cake frosting. Some people just mix it with sugar, others will mix it with condensed milk and whipped butter, but I always loved dulche de leche combination more. So I whipped creme fraiche with dulche de leche and couple table spoons of honey and folded in whipped creme. Honey cake does have a lot of layers, but in Russia we make it much wider, sometimes square or rectangular or 23 cm rounds, so it’s easier to deal with hight. The cake is in the fridge and I hope my American family will enjoy it tomorrow.
Attachment
Tried this for my daughters 12th birthday and it was such a hit…thank you so much Tasbih for all these wonderful recipes you share with us. God bless you?