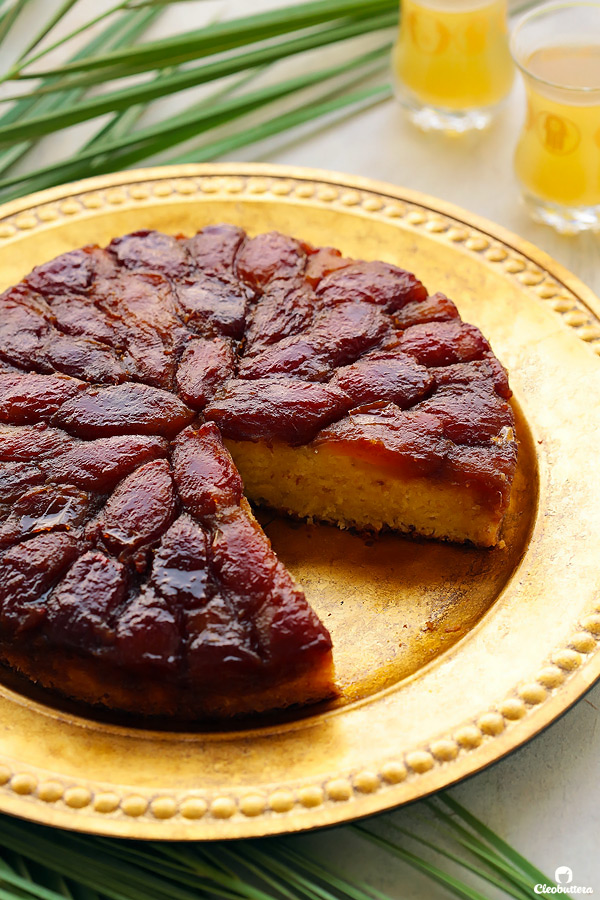
Upside Down Date Cake
A Middle Eastern classic cake, tweaked to perfection! Soft and moist vanilla cake topped with lightly candied black dates. Serve warm for the ultimate comfort!
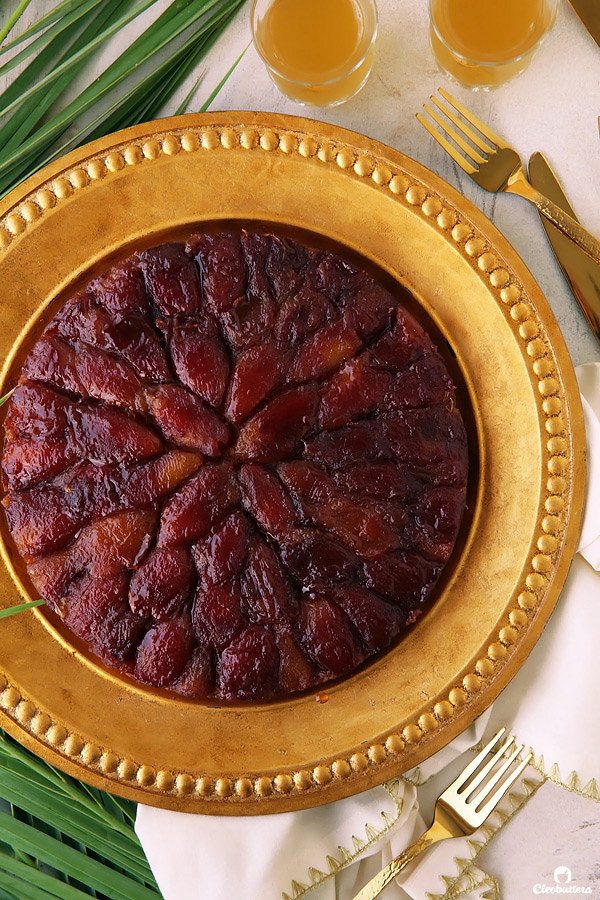
This cake is the Middle East’s answer to pineapple upside down cake!
With the area’s rich resources in palm trees and bountiful produce of dates, it only makes that much sense.
With a warm vanilla cake base and caramelized black date topping, this cake is a splendid treat with old fashioned roots!
Although I’ve only came to know about this cake, not that many years ago, from my mother-in-law, it has apparently been an Egyptian household favorite all along.
How have I not known about it earlier in life, is beyond me.
Only excuse I could think of, is that mom’s cooking was heavily influenced by her years in Canada, which shaped us into an apple pie and marble cake family all the way through.
This cake is my mother-in-law’s speciality. She’s so famous for it, that guests would specifically ask for it upon visiting her. She no longer bakes as much as she did back in the day, but when she did, she’d take it with her to every occasion and was her special print on every potluck table.
Not surprisingly, it was always the first thing to disappear.

Yes it was that delicious, and some would even say…addictive.
But if we’re being completely honest here, I’ve always been a much bigger fan of the date portion of the cake, more than the cake layer itself.
I’d shamelessly pick out the sticky, caramelized dates and leave out the yellow cake behind.
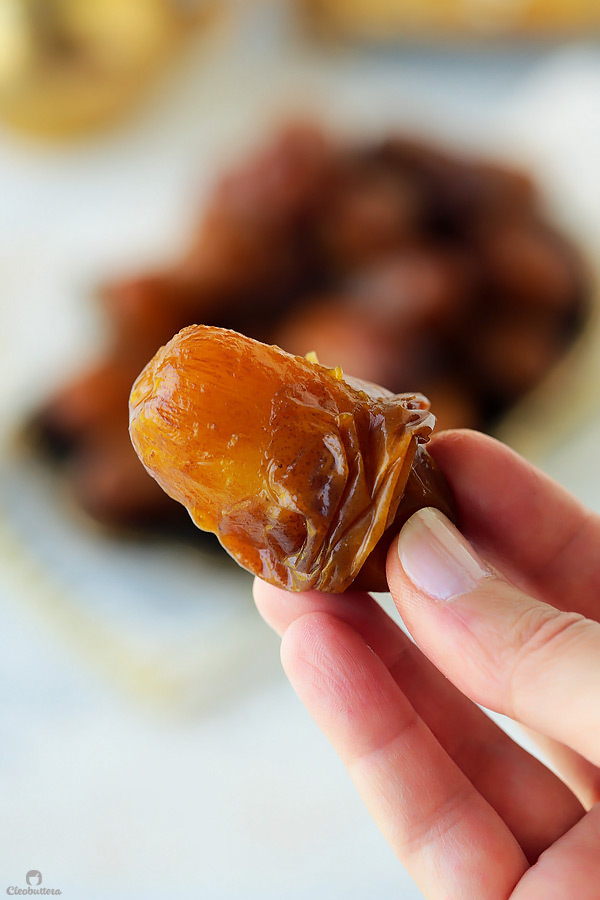
That lightly candied, wonderfully caramelized date topping, glistening with a sweet buttery varnish made it irresistible to stop stealing one after the other.
The cake part though, wasn’t equally amazing. A foam-based sponge type of cake, that relied on a large amount of whipped eggs for fat, instead of butter or oil. I found that unless the sponge is soaked with a syrup of sorts, this method made for a coarse crumbed cake with a dry texture and an eggy flavor.
The date topping, being that incredible, did a great job at distracting from the mediocre texture and masking the eggy flavor. That, combined with the fact that it was almost always served warm, helped give the illusion that it was softer than it really is. You know…because cakes are always more tender before cooling down.
Although no one ever complained, I just couldn’t settle with a weak sponge that depended on a topping to rescue it. I knew there was room for improvement.
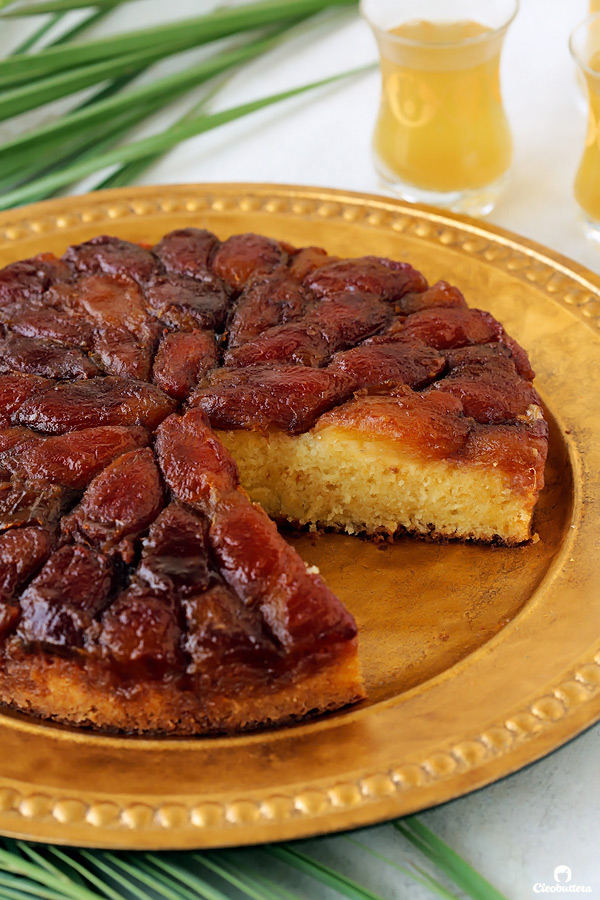
My mission with this cake was to create a yellow cake base that is as enjoyable to eat as that wonderful date topping.
It needed to be moist, soft, fluffy yet dense enough to be able to withstand the weight of the dates, with great flavor and be just as good at room temperature as it is warm.
And it needed to have butter! Because butter makes everything better. Who agrees?
I experimented way more than I’d like to admit with vanilla-butter cake batters, playing around with different ingredient ratios, as well as various liquid ingredients.
Between regular milk, buttermilk, sour cream and combinations of two, sour cream was the clear winner.
Not only did it create a thick batter that supported the dates beautifully, its tanginess cut through the sweetness, making for a cake with well balanced sweetness. Sour cream is also my weapon for making the softest, moistest cakes. It’s by far my favorite ingredient when it comes to cakes. So you could say I was a little bias to it from the beginning.
Now that the cake portion is out of the way…it’s time we discuss the elephant in the room.
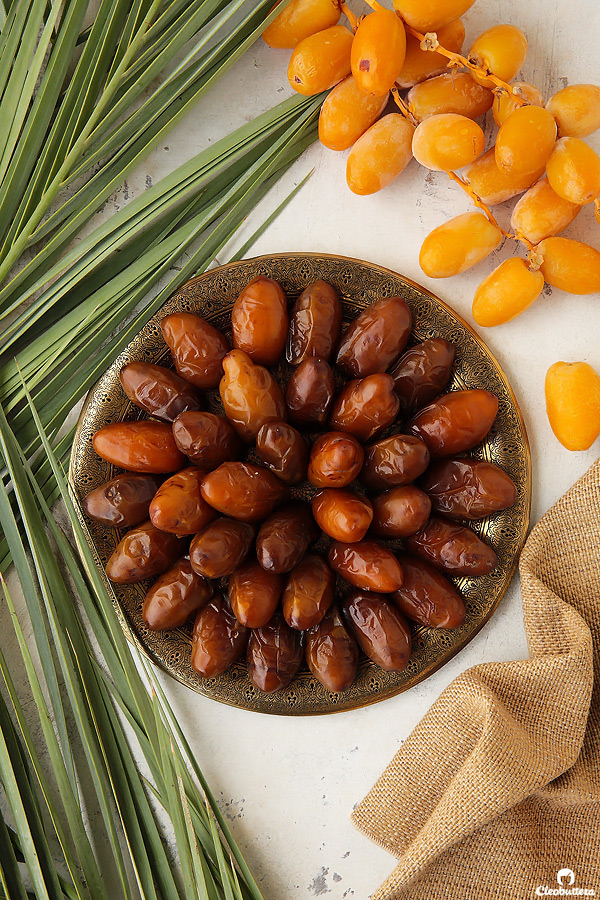
Black (or Rottab) Dates!
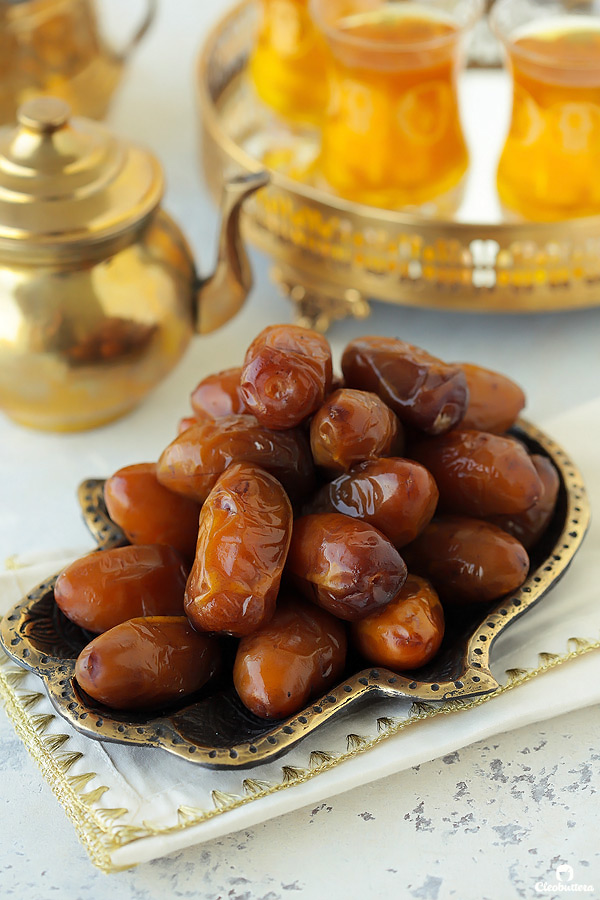
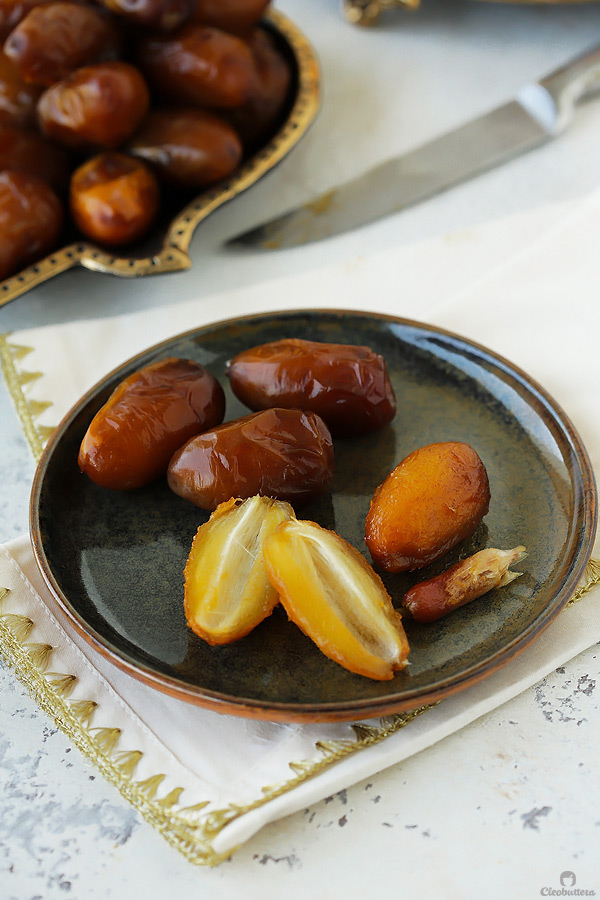
Unlike dried dates, say medjool, black, or similar ones like rottab dates, have a very soft, almost buttery flesh that melts in the mouth. They are not chewy like their dried counterparts, and can be compared to cooked apples in texture.
They have a thin outer layer, that slides off effortlessly just by slipping your fingers on them.
Black dates actually start off either red or yellow, and then ripen to a dark brown, almost black color, as they sit. The ripening process can take place while still on the palm trees, or can happen over the counter, just like bananas.
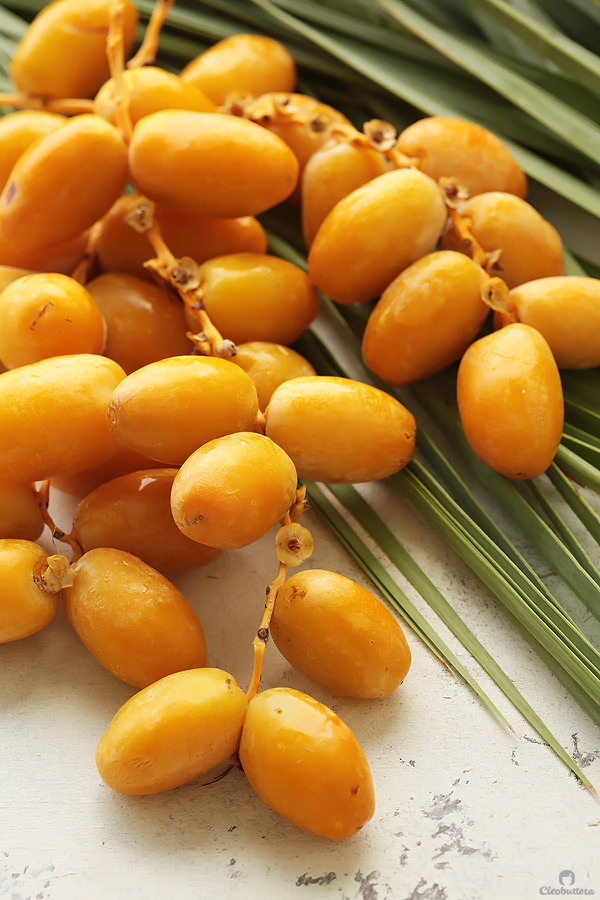
Their harvest season is very late summer/early fall, basically around end of September. So while their peak window is very slim, they freeze wonderfully, which can make them accessible year-round. I don’t know about other countries, but here in Egypt, they’re easily found at supermarket during Fall and Winter. This is when I stock up and freeze for future date cakes.
The ones you see in the pictures here were actually thawed from frozen.
To make the cake, you’ll first need to peel the dates, slice them in half, then remove the pits.
Then you can move on to make the topping. Cook butter and sugar together, whisking constantly until the sugar caramelizes and turns golden brown in color. The mixture will look separated, so don’t freak out; you didn’t screw up.
Update: Some readers have had issues with the hardened caramel sticking to the pan after baking. If that’s the case, alternatively, you can skip the caramelization step and just mix room temperature butter (the same amount) with the sugar and spread it on the bottom of the pan. You’ll still get great results, just a little less caramelized.
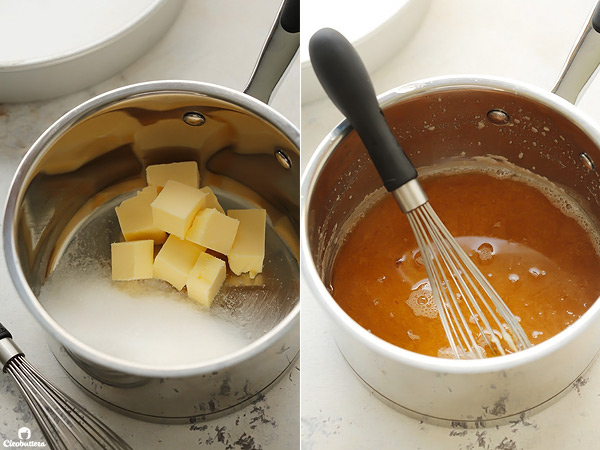
You’ll then spread the caramelized sugar/butter mixture (which looks like a big mistake) all over the bottom of a cake pan. You’ll want to do that quickly before the sugar starts to harden. I know it looks like a butter swamp right now, but I promise, it will all come together in the end and it won’t be greasy at all.
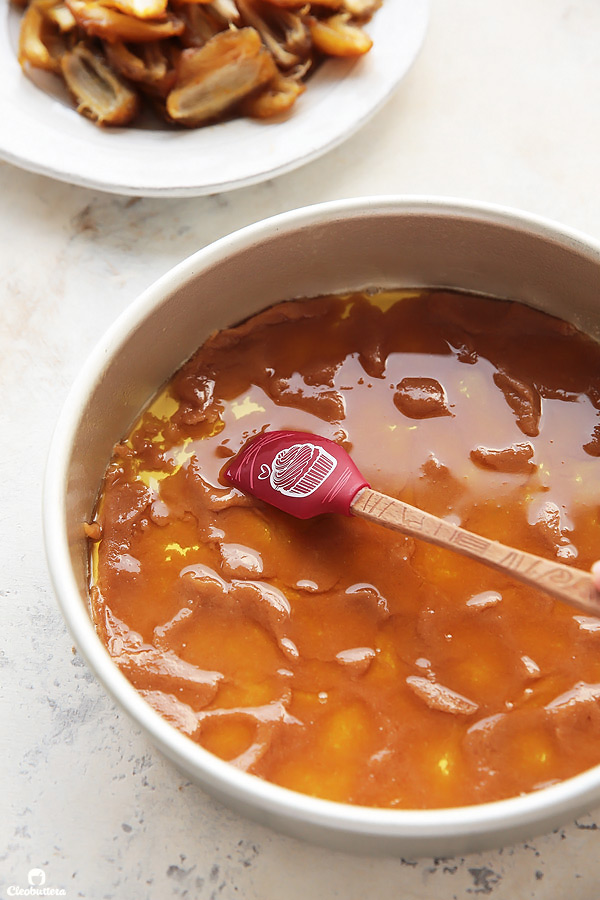
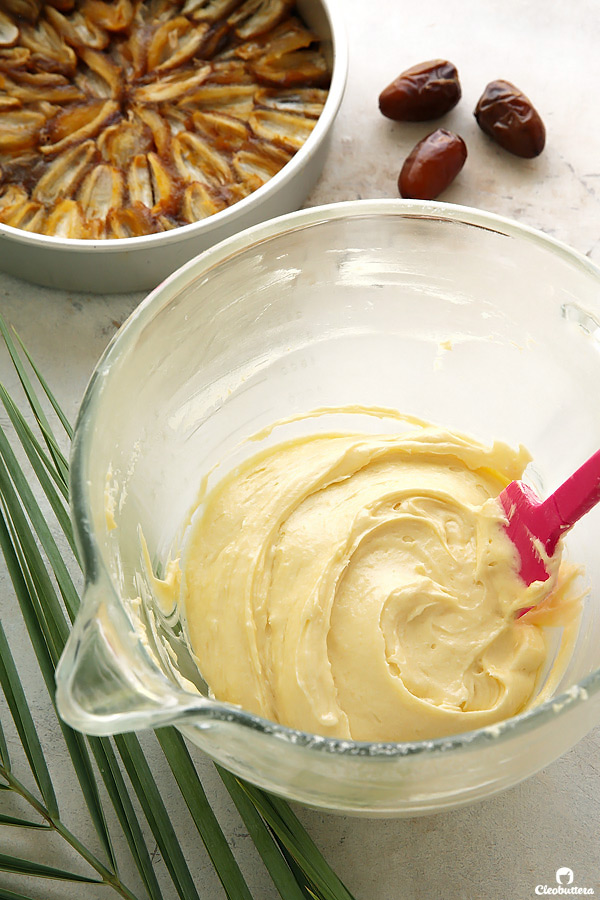
Now you can arrange the date halves, cut-side up, all over the caramelized sugar mixture.
Like so…
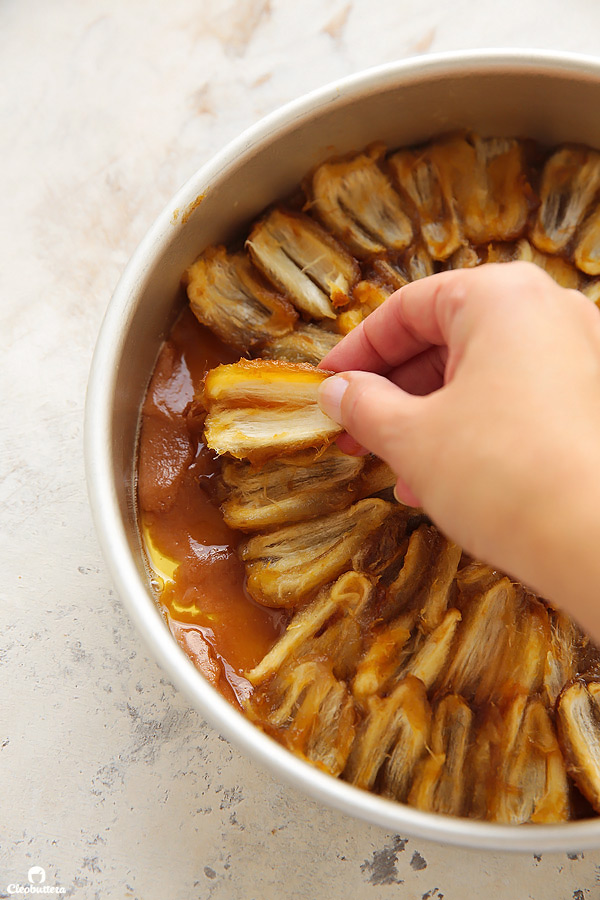
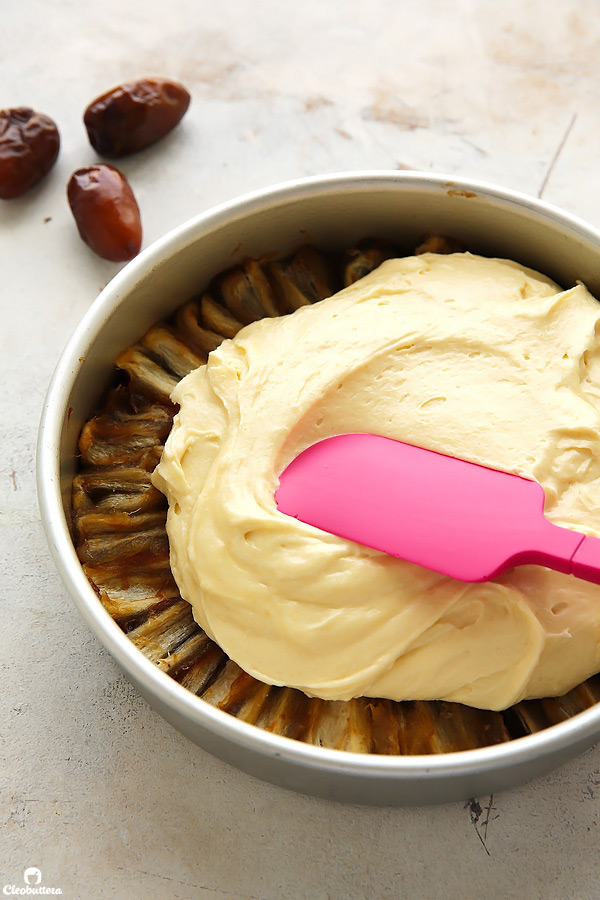
Meanwhile, whip up that glorious vanilla sour cream cake batter.
And gingerly spread over the dates.
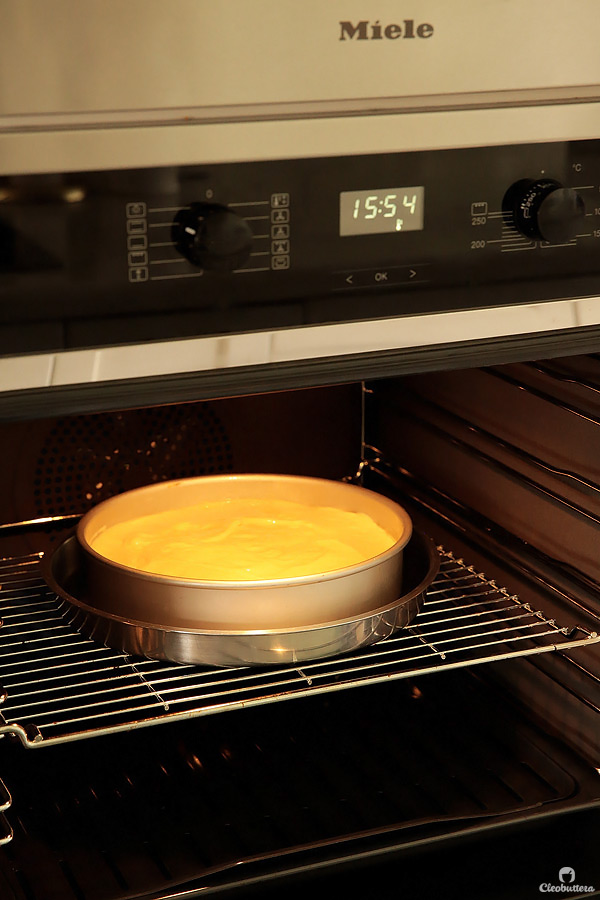
I’ve learned the hard way, that baking the cake over a super hot pan or baking sheet, that has been preheating in the oven, is a surefire trick that guarantees that the caramelized sugar will coat the dates, instead of stick to the pan.
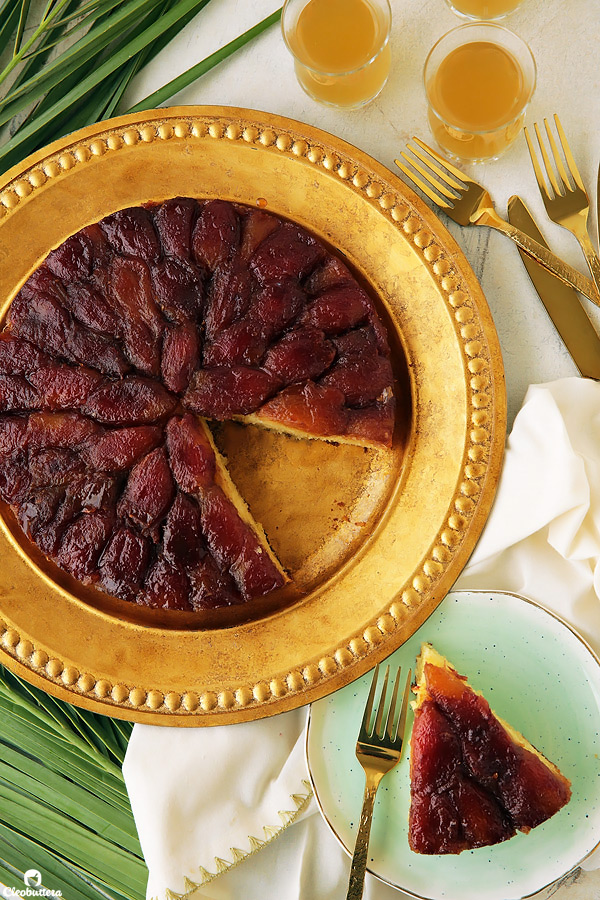
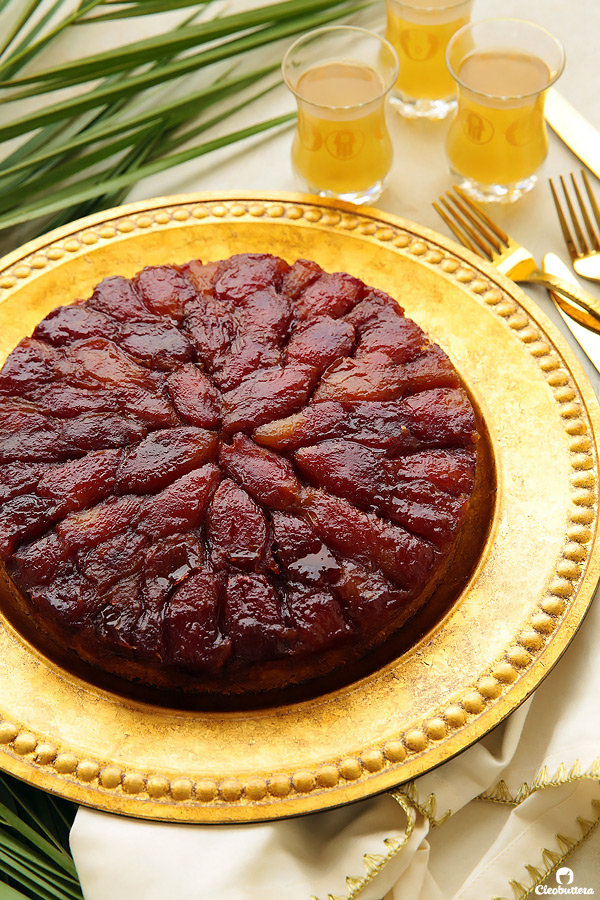
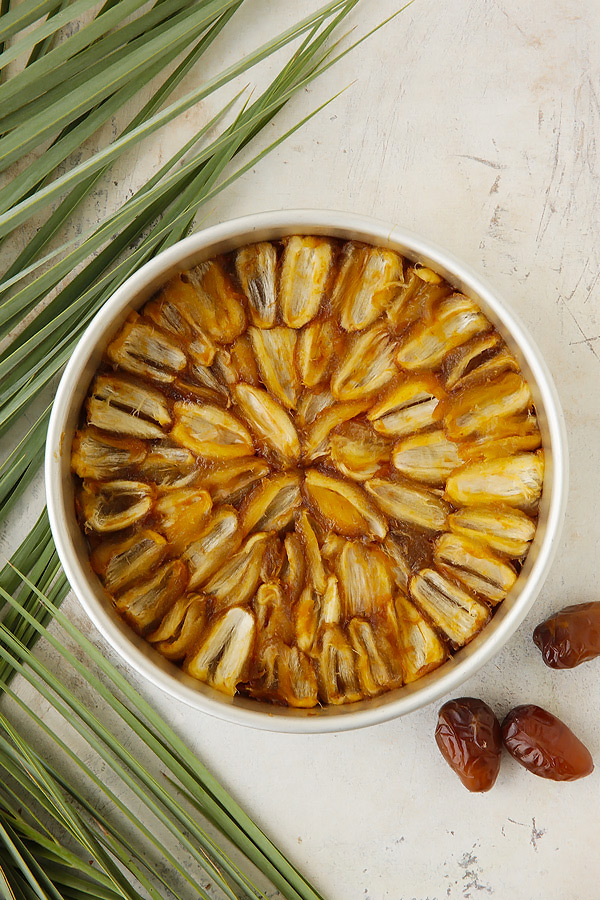
Once baked and beautiful, invert into a pretty platter…
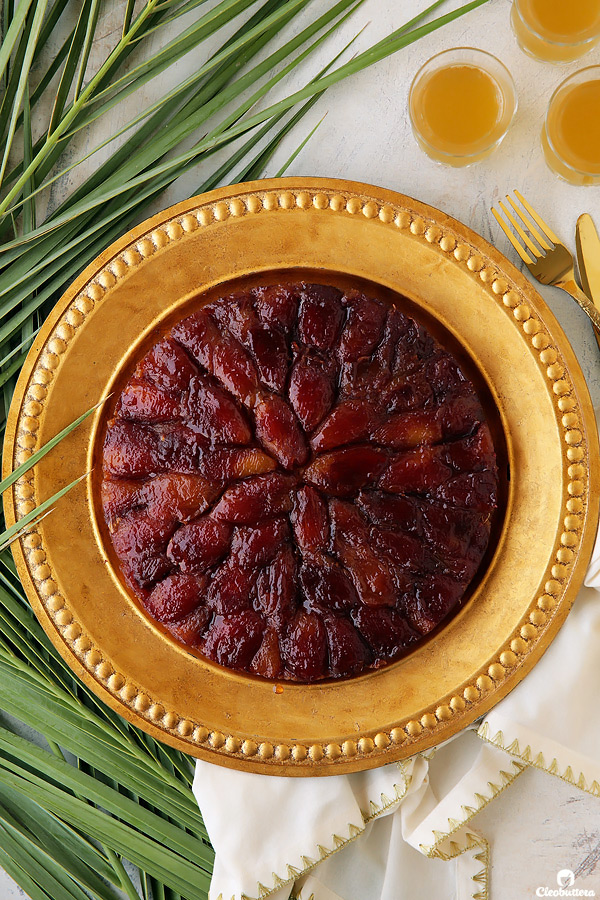
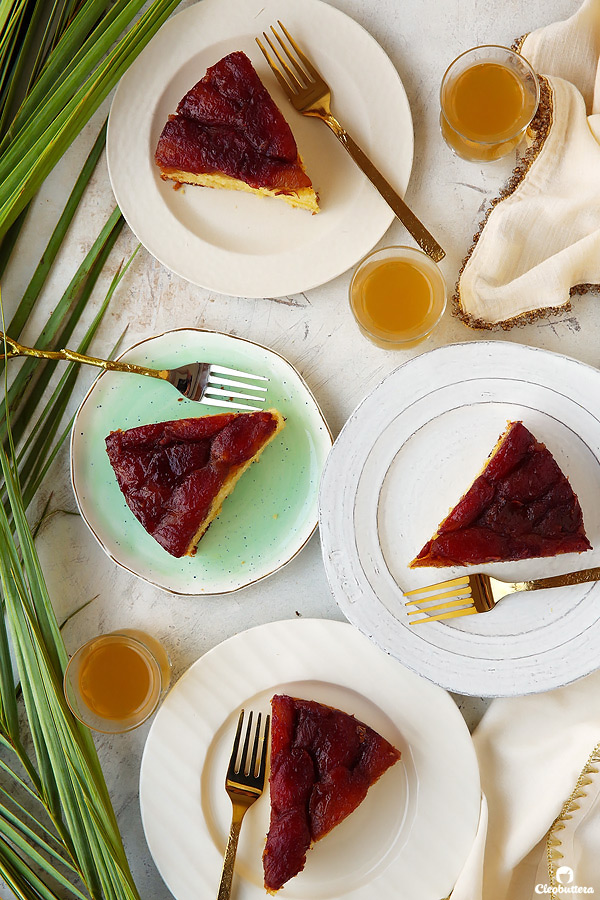
And serve while still warm. But I promise that this one, will remain just as delicious after it has cooled.
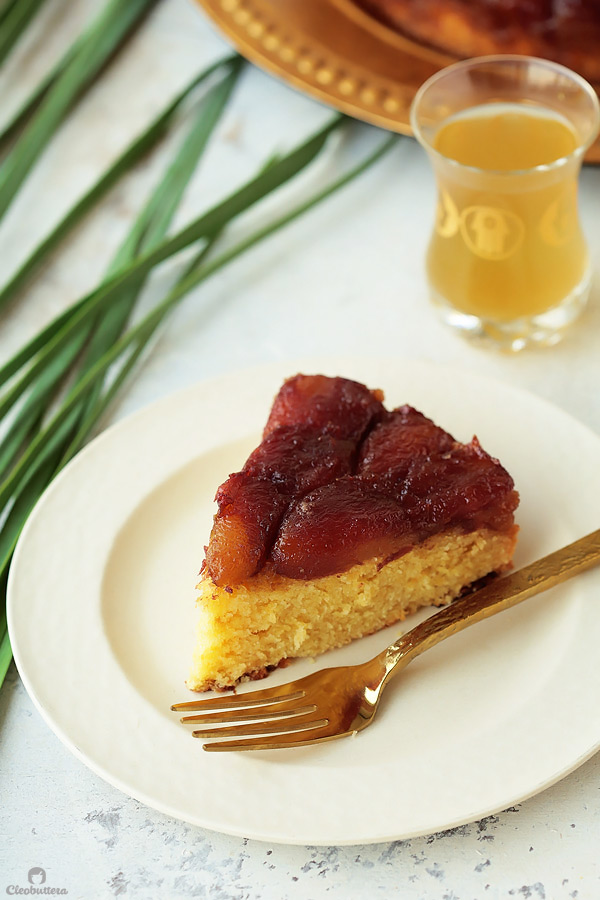
Finally…an upside date down cake that is amazing from top to bottom, to satisfy the picky palate in you.
I absolutely love classics, but I love them even more when they have been refined to meet our modern day spoiled tastebuds. This cake is a great example for that.
Enjoy!
Upside Down Date Cake
A Middle Eastern classic cake, tweaked to perfection! Soft and moist vanilla cake topped with lightly candied black dates. Serve warm for the ultimate comfort!
Ingredients
For the Date Topping:
- 24 to 28 black or rottab dates, NOT dried dates (about 600 grams with the pits & skin on)
- 1/3 cup (76g) unsalted butter
- 1/2 cup plus 1 tablespoon (113g) granulated sugar
For the Cake:
- 1 cup plus 5 tablespoons (160g) all purpose flour, preferably weighed*
- 3 tablespoons (21g) cornstarch (cornflour)
- 1 teaspoon baking powder
- 1/4 teaspoon baking soda
- 1/4 teaspoon fine salt
- 1/2 cup (114g) unsalted butter, softened to room temperature
- 1 cup (200g) granulated sugar
- 2 large eggs (at room temperature)
- 2 one gram packets vanilla sugar (or 3/4 teaspoon pure vanilla extract; 1 1/2 teaspoons if using imitation vanilla flavoring)
- 1/2 cup (114g) sour cream (at room temperature)
Instructions
To prepare Equipment:
- Adjust oven rack to lower middle position, set a rimmed baking sheet or round pan that is larger than 9-inches on the rack, and heat oven to 180C/350F. Allow the baking sheet/pan to become very hot while you prepare the cake.
- Spray (or butter and flour) the sides ONLY of a 9-inch round cake pan; leave the bottom ungreased.
To make the Date Topping:
- Peel the dates by sliding the skin off with your fingers. Use a sharp knife to cut the dates in half and remove and discard the pits. Set date halves aside.
- In a medium saucepan, heat the butter and sugar over medium-high heat, until the butter melts. Continue cooking, whisking constantly until the sugar caramelizes and turns golden brown in color; about 3 minutes. The mixture will look separated. *(check notes for an alternate method to this step)
- Transfer the caramelized sugar mixture and any floating butter into the bottom of the prepared pan. Working quickly before the sugar starts to harden, spread the caramelized sugar into an even layer. Don't fret, if the mixture looks like its separated and swimming in butter; it will all come together in the end.
- Arrange the date halves, cut-side up, in a circular fashion over the caramelized sugar mixture, to cover entire bottom.
To make the Cake:
- In a medium bowl, whisk together the flour, cornstarch, baking powder, baking soda, salt and vanilla sugar (if using), until well combined. Set aside.
- In the bowl of a stand mixer fitted with the paddle attachment (or a large bowl and an electric hand mixer) beat the butter on medium speed until creamy, about 1 minute.
- With the mixer running on medium-low speed, gradually add in the sugar. Raise the speed to medium-high and continue beating together until lightened up in both color and texture; 4 to 5 minutes. The color should turn very pale (almost white) and texture should look fluffy.
- Add the eggs, one at a time, beating well after each addition. If using vanilla in liquid form, add it in and mix until well incorporated.
- On lowest speed, add in one-third of the flour mixture and mix until mostly combined. Add in half of the sour cream and lightly stir until almost mixed in. Continue with adding another one-third of the flour mixture, followed by the remaining sour cream and ending with the last third of flour mixture. Mix until just combined and a smooth, thick batter forms. Do not overmix. With a rubber spatula, give the batter one good, final stir to make sure that everything is well incorporated. Transfer the batter to the pan with the dates and gently smooth over the arranged dates, being careful not to disturb them.
- Place the cake pan right on top of the hot baking sheet/pan in the oven. Bake for 45 to 50 minutes, or until the center of the cake springs back when lightly touched, and a wooden skewer inserted in the center comes out clean or with a few cooked crumbs attached. Lightly tent the cake with foil during baking, if the cake's surface is browning too quickly, to prevent over-browning.
- Allow the cake to cool in the pan for about 5 minutes, then invert onto a serving platter.
- Serve cake warm or at room temperature. Leftovers may be stored in an airtight container in a cool place. refrigeration is not advised as it can dry out the cake's crumb.
Recipe Notes
- Black (or rottab) dates are a special type of red or yellow dates, that turn soft and dark brown in color as they ripen. They are not interchangeable with dried dates in this recipe. I'm not sure about other countries, but they are easily accessible in the Middle East around Fall months, but can be stored in the freezer for later use. If using dates from frozen, be sure to thaw them first before peeling.
- Weighing ingredients, especially flour, is ideal in baking due to its consistency. If you don't have a kitchen scale to weigh the flour, use the Spoon & Sweep method: Use a spoon to lightly fill measuring cup with flour until required amount is obtained, then sweep access with the back of a knife.
- My mother-in-law, who introduced my family to this cake, uses vanilla sugar packets, such as Cook's brand, which are easier to find where we live in Egypt. I use whatever type of vanilla I have on hand; they all yield equally great results.
- Update: Some readers have had issues with the hardened caramel sticking to the pan after baking. If that's the case, alternatively, you can skip the caramelization step and just mix room temperature butter (the same amount) with the sugar and spread it on the bottom of the pan. You'll still get great results, just a little less caramelized.
Cake recipe inspired by my mother-in-law; actual recipe is a Cleobuttera original.
Measurements Note: All recipes of this site have been developed using weight measurements. Although US volume measurements have been included for your convenience, it is highly encouraged that you weigh your ingredients using a kitchen scale to get the best possible results. Due to the sensitive nature of baking, kitchen scales are proven to yield more accurate and consistent results than measuring cups. Enjoy!
Powered by ![]()
This post may contain affiliate links.
All images and content are owned by Cleobuttera® and are copyright protected. Please do not use my images without prior permission. If you would like to republish a recipe, please rewrite it in your own words and link back to the recipe page on my site. Original recipes and creations of this site are intended for personal and home use. Commercial replication or media consumption are only allowed with a written consent and agreement with Cleobuttera owners. Otherwise it is considered a violation of intellectual property. Thank you for respecting and appreciating the amount of time and effort that goes into creating free, unique recipes that make people happy.


This looks delicious. Thank you for sharing, and for working with the recipe to improve it. You mentioned living in Canada, which is where I am from. Had you made it when you were here? I’m just wondering if we can get those dates here. Thank you!
Hi Brian! Thank you so much for your kind words…it’s really my pleasure. I honestly don’t remember seeing them in Canada, but that could be because I never really searched for them. I have lots of friends and family still living in Canada, so I could ask them if they’ve seen anywhere and update you. I have a feeling you might be able to find them at Middle Eastern specialty supermarkets.
OK, thank you very much, Cleo. I will see what I can find here. We have Iqbal’s in the Thorncliffe Park area, and he might carry these dates. Thanks again!
Great recipe Tasbih, and looks yummy too.
I lived in Canada 45 years but I moved to Florida over 5 years ago. I love black dates ( balance rally my favorite
Which you can’t find here, and as you said el majdoul is not the same.
I have to say I read all your recipes and you are talented and and it shows you love what you do.
I always make your Konstantinos with the cream filling and it is delicious. I thank you and may God bless you. ??
Thank you Lily for those flattering words; I really appreciate your support. I’m also very happy to hear that you’re enjoying making recipes from the blog. Now that you’ve mentioned Canada…have you ever seen black dates there?
Salaam,
I’m sorry I couldnt comment on your honey cake. Its been so busy with taking kids to school and homework help and daily routine! I really wanted to thank you for posting that. I think my heart jumped out of my chest when you posted that recipe. I had tried it in Prague and I know it could have been better. So eventually when I try it I’ll let you know if it went well for me. And this date cake looks really good too. The tricky thing will find the right dates. Besides the mehjdool dates, we specifically get “baking” dates here, but that appears in more of a paste form?! I’ll try to find the right ones if you say its worth it. take care
Hello 🙂
I love black dates and I’ve been doing several desserts using them, but too bad they are seasonal! You mentioned that you freeze them, that would be ideal for me in order to be able to do my desserts all year around! I would really appreciate it if you could guide me how to freeze them. Do I wash and peal them then freeze them? And any idea how long I can keep them frozen?
Thank you in advance 🙂
Sandra
Hi Sandra! To freeze them, I arrange them in a single layer over a plastic wrap-lined plate, separating each date layer with a sheet of plastic. I then tightly wrap the plate with plastic wrap, place the plate in a zipperlock bag and freeze!
Hope that helps. Enjoy 🙂
Yes, this definitely helps! Thank you so much 🙂
Hello Tasbih
This cake looks delicious but can i replace dates with pineapple?
Thanks in advance .
Thank you Heba! While I still haven’t tried this recipe with pineapples, I’m pretty confident that it should work just as well. Please let us know how it turns out, if you do give to a try ?
Hello 🙂
I absolutely love your recipes, all the ones I’ve made Have turned out amazing!!
I was wondering if there’s any other type
Of dates I could use for this cake? I’m in Canada so I don’t have access to these amazing dates!
My dad loves my date bread, so I’d really like to surprise him with this cake 🙂 would medjool work?
Thank you so much! I’m so glad you’re enjoying the recipes you have been trying. Unfortunately, medjool would give you very different textural results and just won’t be the same. Medjool is very chewy and hearty while the ones used here are very soft, almost like cooked apples. I’ve heard that you can soften medjool dates in a mixture of water and baking soda, so maybe that could help you achieve a similar texture. Best of luck!
I have some medjool dates and even though they are brand new, they’re a little harder. The skin does not easily peel. How important is peeling the dates? Do you think it’s possible to skip that step?
Well, I soaked the dates and was able to peel them. But footnote #4 happened to my cake. The carmelized sugar and butter hardened and stuck to the pan. I was sure that wouldn’t happen to me…. buuuuuut I guess I should have followed the tip in footnote 4. 🙁
I made it and it tasted amazing, although the caramel got stuck to the pan. Can’t imagine how delicious it would have been if it hasn’t stuck.
My question: i would like to make it in a 28 cm pan, should i double the recipe or just make it 1 1/2 ? Thank you for your always amazing recipes
Nice new ideas on me, I know these same methods but replace dates with pineapple rings
After finishing the cake watered with pineapple water, this cake can be watered with molasses, which is a liquid extracted from dates similar to honey
Hi Tasbih – your cake was a hit at my tea party yesterday. It’s AMAZING! I was fortunate the caramelised dates didn’t stick but what did happen is I soaked and removed 28 dates for my 9” pan but they were black Persian dates, and I realised I needed more as I was packing them into my pan. Ahh it was too late, the sugar crystallised in the centre by the time I prepared a few more. Nonetheless – my family commented the sugar added to the aesthetic of the cake ?
You’re a star – and have the best cake recipes! God bless ??
Hello Tasbih,
I just made your delicious date cake & as I live in Egypt I made it with fresh black dates, I’ve peeled & pitted them & but put them whole as they were small.
I also used Greek yogurt instead of sour cream & I made the caramel directly in baking pan.
Thank you so much it was more than delicious ?
Hi Cherine! I’m really happy you loved this cake so much ? Thank you for your wonderful feedback!
Can I replace sour cream with something else??
Great Recipe! Thanks a lot. The sugar did stick at the bottom but it tasted great nevertheless. I will add the butter and sugar directly in the baking pan next time. I did replace the sour cream with whole milk yoghurt. Thanks again, you are always a saviour :))