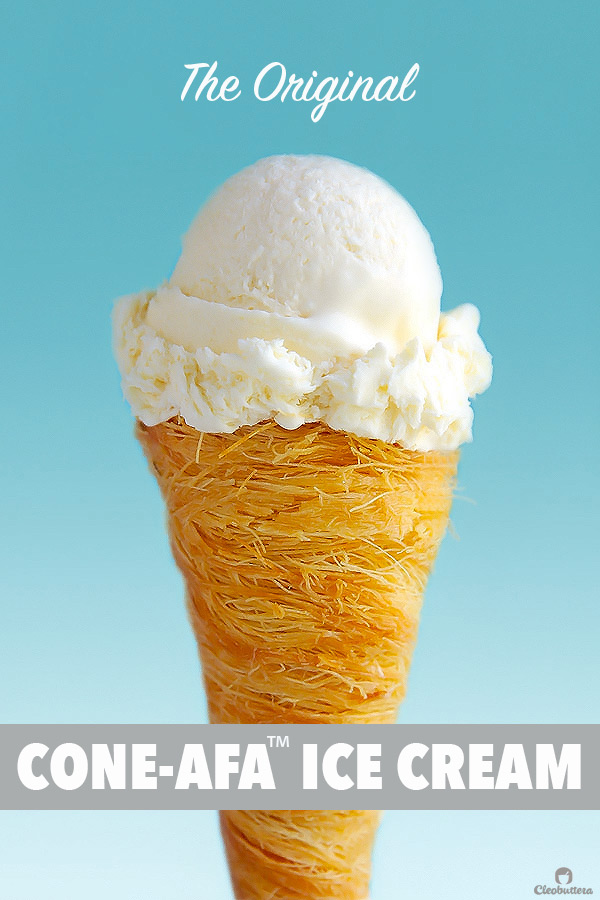
Cone-afa Ice Cream
The classic cream konafa just got ice cream-ized! Crunchy, sweetened konafa cones scooped with a no-churn rose and orange blossom water scented eshta ice cream!
Move over waffle cone there’s a new ice cream cone in town!
This…people, is an Egyptian’s answer to the latest crazy ice cream cone trend!
We’ve all seen them on social media! The doughnut cone, the churro cone and the red velvet cone.
But I bet you haven’t seen the Konafa Cone! No wait…CONE-AFA! Get it?! ?
You know how a lot of times, new food inventions can look so incredibily unique, with their out-of-the-box combinations and overly indulgent components, but in reality they taste like too much of a good thing, that the idea ends up sounding so much better than how it tastes?
Well…this is NOT one of them!
Because as far as Middle Eastern cuisine is concerned, few things are as dreamy as the combination of konafa and cream. And here…we’re just ice cream-izing the much loved classic dessert.
We’re taking an old favorite, giving it a few twists and turns and a 21st century facelift fit for a piping hot summer!
And I couldn’t be more excited to share it with you, because I’ve had this idea bottled up for a few weeks now that I was about to pop!
As I was making and shooting the Nutella Kunafa Cones from the previous post, I couldn’t help but envision the cones as the perfect vehicle for a scoop of ice cream. The cones were seriously begging for it! So I went with the idea, blew up the size of the cone a bit, created an Arabic inspired ice cream flavor to go with it and theeeeen…a heavenly creation was born.
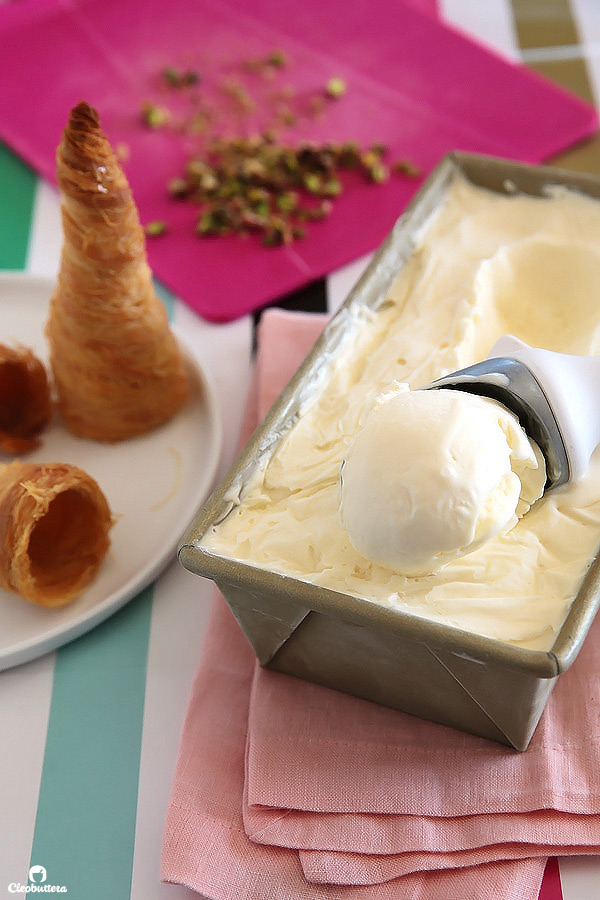
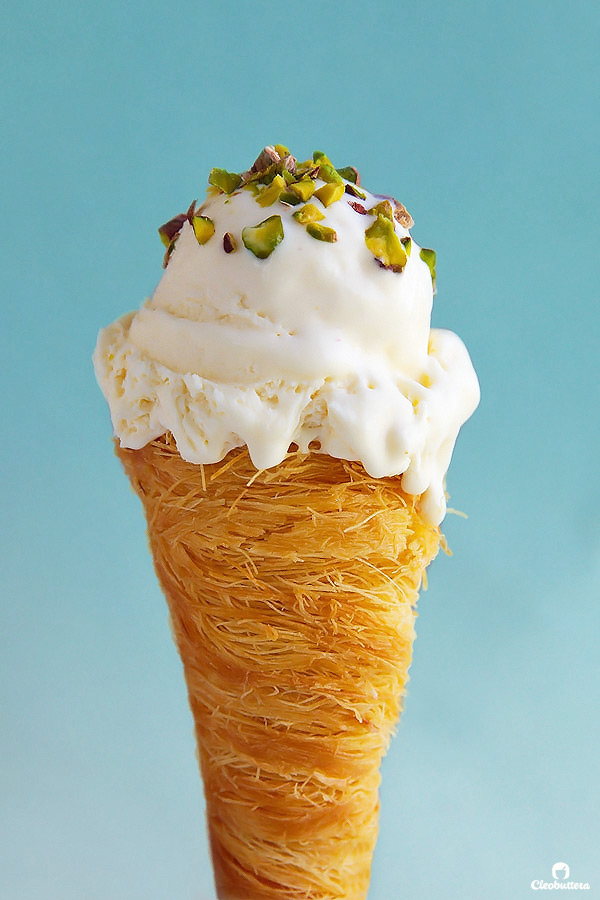
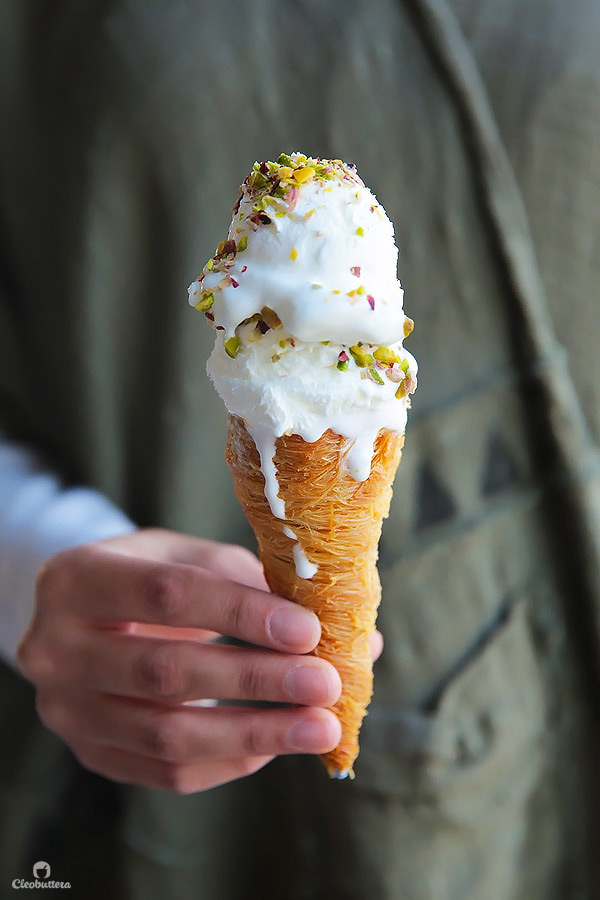
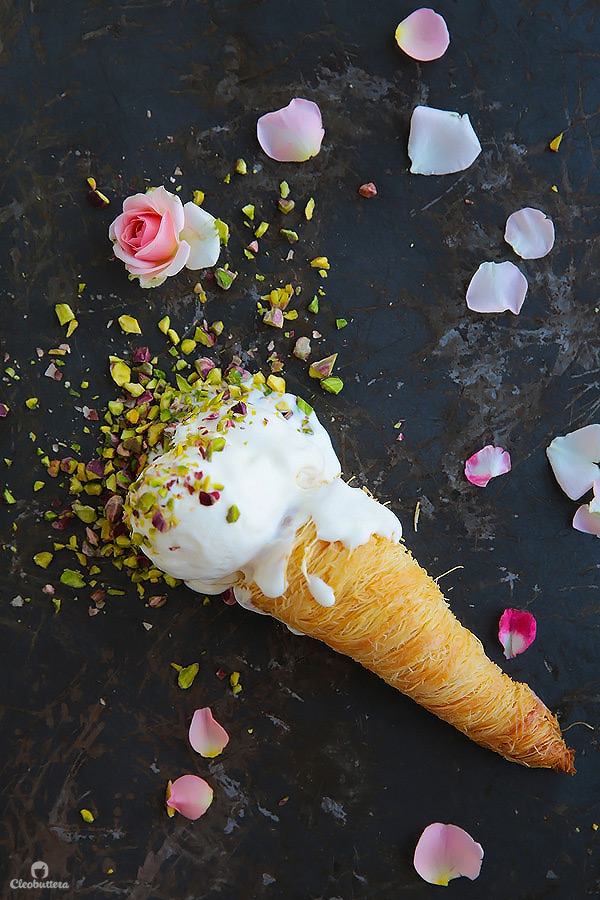
This awesomeness features a super crunchy, lightly sweetened Konafa cone topped with one of the best ice cream flavors I’ve ever tasted…Scented Eshta!
The ice cream itself is an entire story of its own and nothing I write here will ever do it justice.
Imagine the silkiest and richest of cream Konafa fillings that’s been perfumed with rose and orange blossom water. Now imagine this in ice cream form.
It’s creamy and velvety and tastes exactly like the scented eshta (Arabic clotted cream) we fill in classic Konafas! In fact, it’s actually made with real eshta…so no wonder here!
But best of all…its made WITHOUT an ice cream machine and no one will ever guess it. Guys! My dad said “it’s better than Haagen Dazs” ☺
 No-churn ice cream has been all the rage for the past few years, and for a good reason. The genius combination of sweetened condensed milk and whipped cream, prevents crystallization and creates a smooth ice cream texture that was previously only achievable through churning. So I decided to employ this easy technique instead of going the churn route, so that anyone could make it. SCENTED ESHTA ICE CREAM FOR ALL! And the result was nothing short of amazing! No sacrifices in texture whatsoever.
That addition of eshta (Arabic clotted cream) though, adds richness, even more creaminess and the classic flavor Konafa fillings are known for. Rose and orange blossom water is the perfect touch that makes this ice cream scream Konafa! So paleeeeeez don’t leave it out! Reduce it if you’re so inclined, but don’t skip it.
Before we get into the details of how to make it, check out this video for a quick preview!
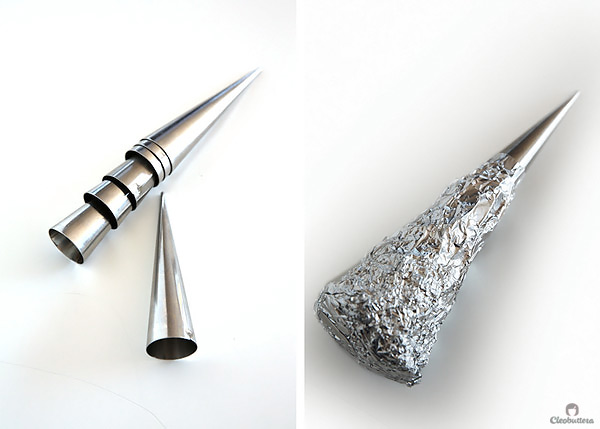
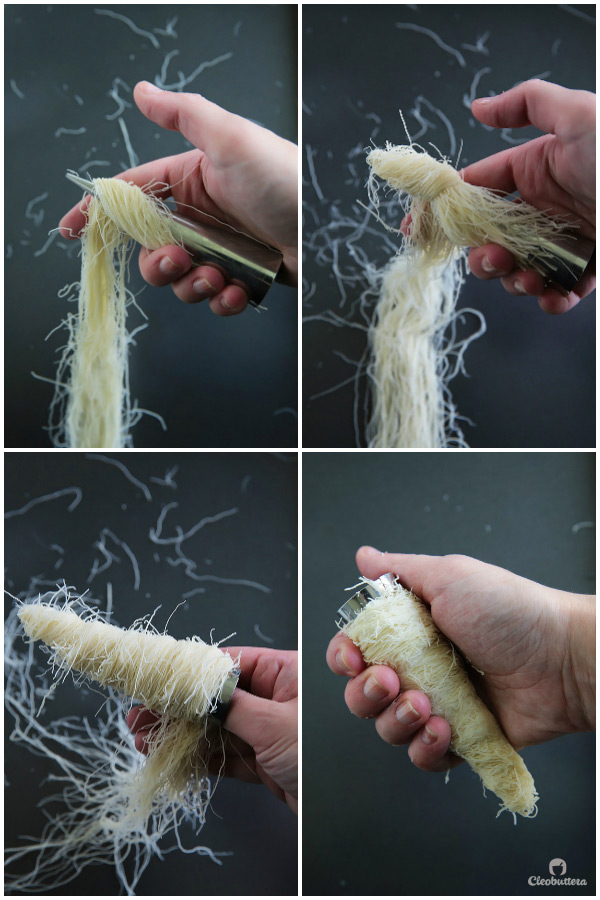
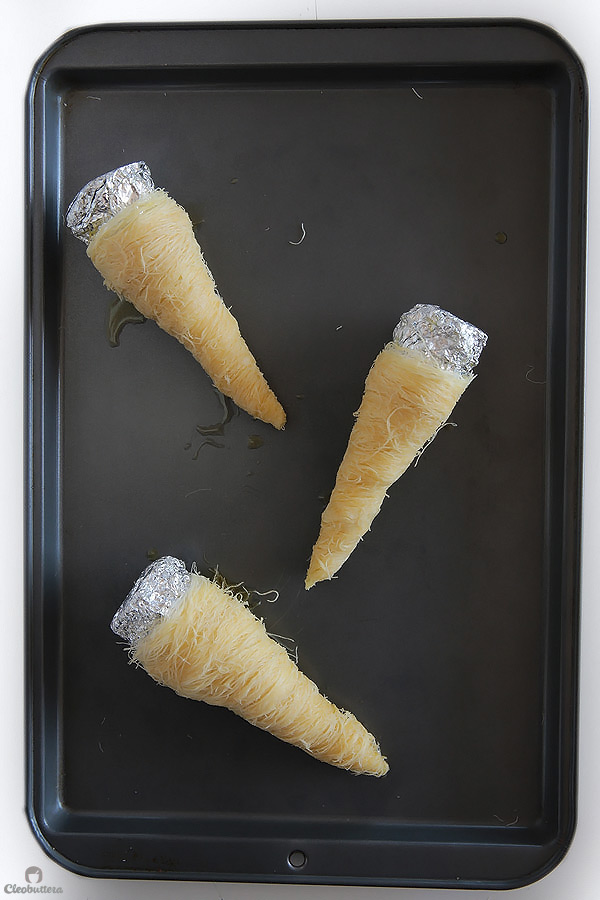
To make the cones, I used the same technique of wrapping strands of Konafa on cream horn forms as I did with the Nutella Kunafa Cones. But since I wanted the cones bigger (the size of sugar cones), I added an extension to the form using foil. Ofcourse if you could find oven-safe forms that are already big, that would even awesome, but I couldn’t, so DIYing it is.
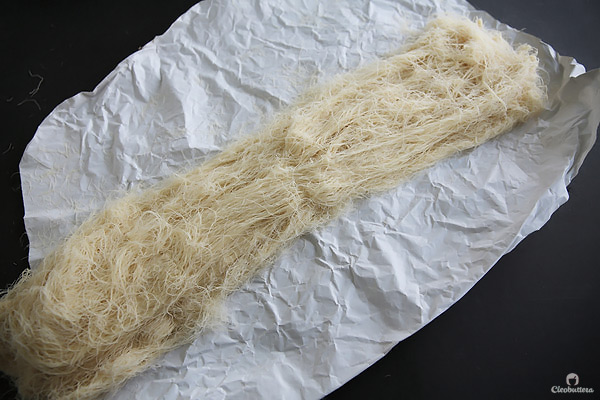
Its important that you use FRESH Konafa that comes in long, organized strands. It is known in Egypt as Konafa Torah/Tora7 and it is sold at the Kanafany (Konafa-maker). Tangled up konafa won’t do, because you need long, neat strands. Frozen konafa is not a really good idea either because it has the tendency to break as you roll it.
Not to be confused by the absence of the foil extensions in the following image, I borrowed the wrapping technique photos from the Nutella Kunafa Cones because I was too lazy to shoot similar pictures. But you know the drill……
You’re gonna start by placing one end of a konafa strand in the middle of the cone, then beginning from the tiny, closed end of the form, tightly wrap the remaining strand over the end and overlapping that middle piece and up until you almost reach the widest end of the form. Leave a small piece of the foil form showing; this will later make it easier to grab onto while removing the baked cones. Make sure that the konafa is wrapped as tightly as possible without tearing, and that there are no gaps showing. To make the konafa stick to itself and prevent unrolling, dampen your hands with a little bit of water, then use them to apply pressure on the wrapped kunafa, pressing tightly on it until its stable and all the stray strands are stuck. Don’t get it too wet; just damp enough to stick the konafa to itself.
You’re then gonna lay down the wrapped cones and forget about them for at least 3 hours. Better overnight. You need to let the konafa air dry until its kinda hard. This trick will ensure that they keep their shape as they bake.
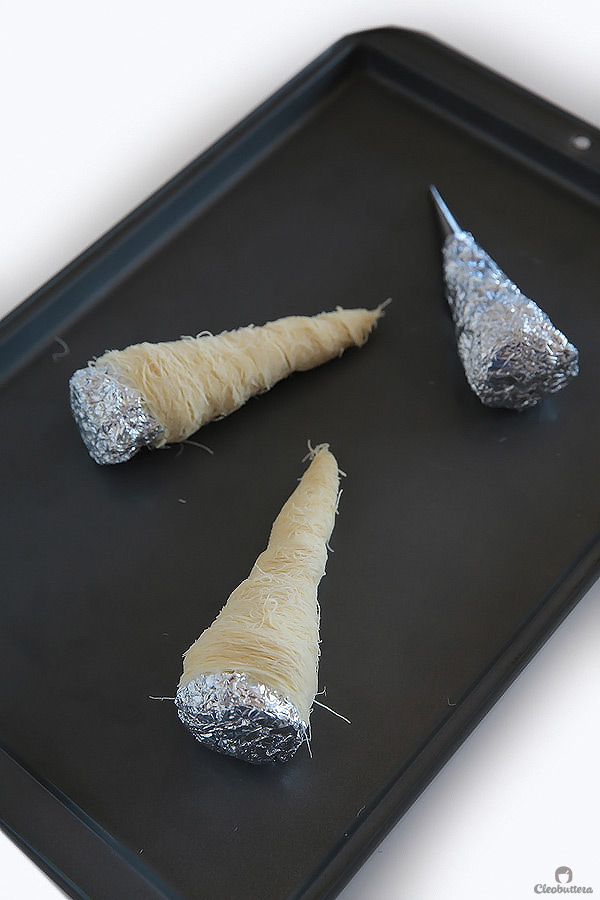
IMPORTANT: When ready to bake, loosen the hardened kunafa from the metal form quite a bit so its not stuck to it anymore This will make it easier to later remove the kunafa from the form without breaking. If you don’t do that, you’ll have a very hard time removing the baked kunafa from the form.
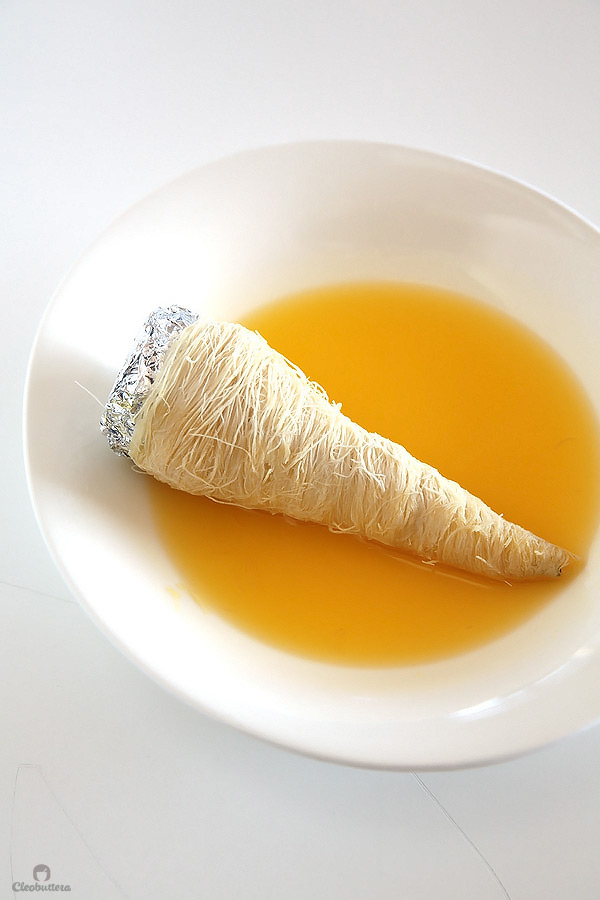
Now you’re gonna dip and roll the konafa cones into some melted ghee to saturate. Allow excess ghee to drip back into the bowl.
Now place these guys onto a baking sheet. Again, make sure they’re quite loose from the foil forms. Then bake!
As they bake, you’re gonna want to flip them on a different side every 5 minutes, to ensure even browning until the konafa turns golden brown in color, 15 to 20 minutes.
Then immediately drizzle that syrup on top of that piping hot Cone-afa.
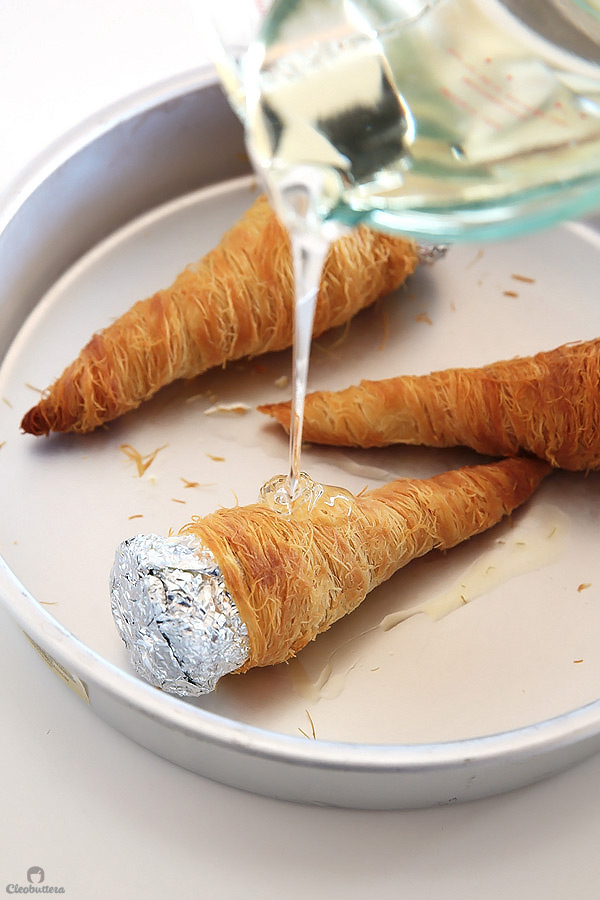
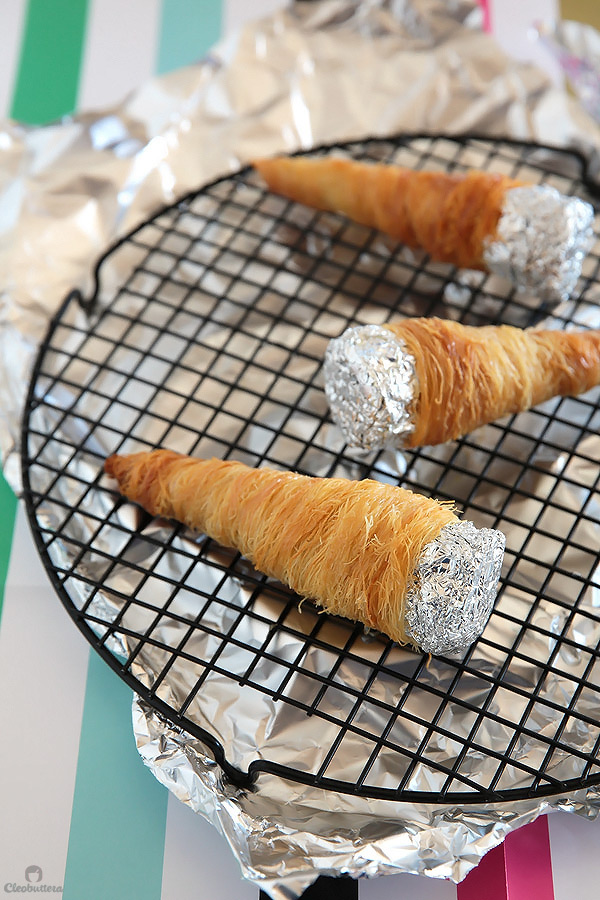
Then let them cool completely while allowing them to drip off any excess syrup and ghee.
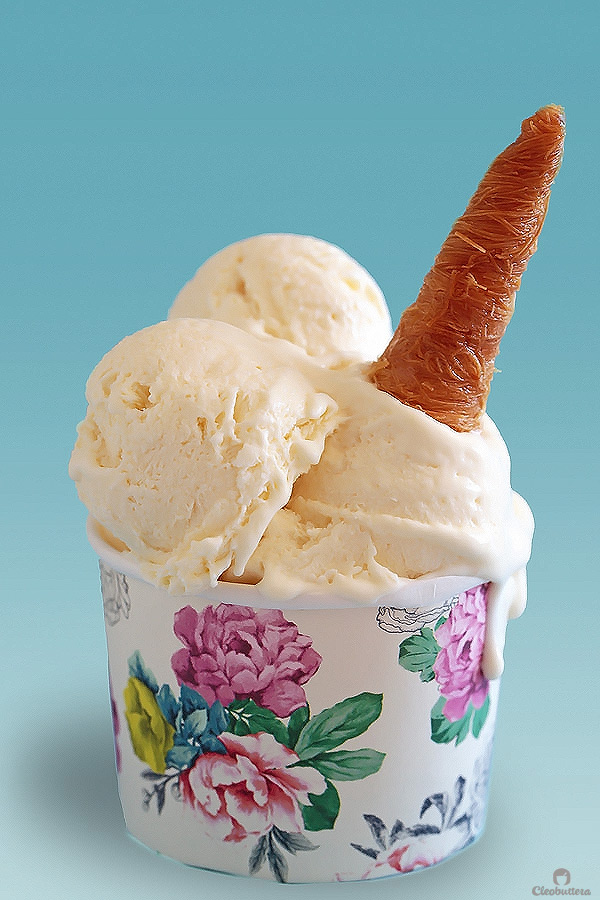
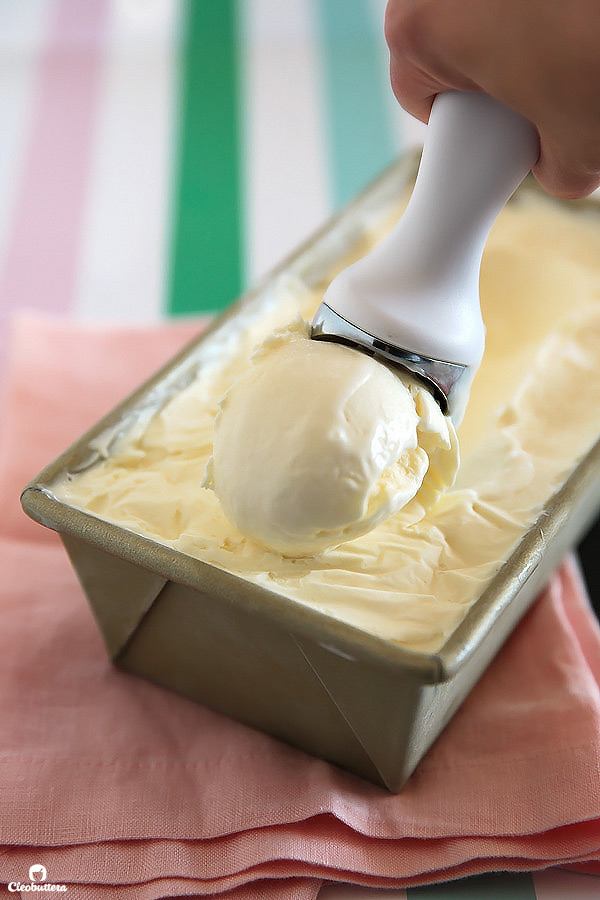
When they’re done with that, remove from the forms, pile on the scoops and go to town!
Ofcourse, you could use your favorite ice cream flavor! Mastic, chocolate, mango, pistachio and fro yo all sound amazing here. I actually used vanilla for this one right here!
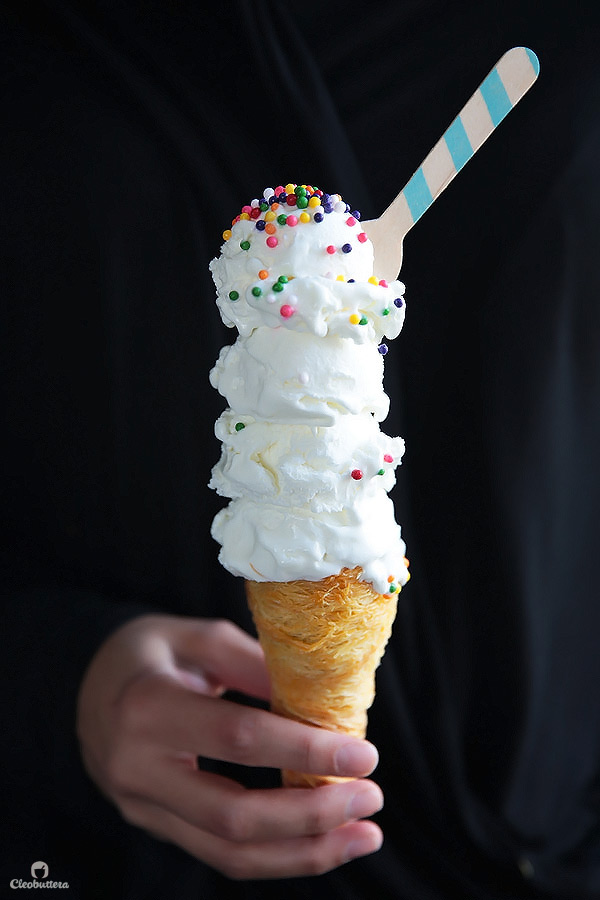
But to be honest, nothing beats the combination of Cone-afa and Scented Eshta. I’m madly in love with it!
I never say this, but I have to admit…I impressed myself with this one LOL! I just love it when I could come up with a new food creation that is as delicious as it is super cool and this one definitely fits the bill.
So in a decade, when you find Konafa ice cream cones (Cone-afa) sold at every Middle Eastern (or not) dessert shop…remember that you saw them here first.
A girl’s gotta dream big right?!
Cone-afa Ice Cream
The classic cream konafa just got ice cream-ized! Crunchy, sweetened konafa cones served with a no-churn rose and orange blossom water scented eshta ice cream! PLAN AHEAD! The scented eshta ice cream needs at least 8 hours in freezer to firm up. The rolled konafa cones need 3 hours to overnight to air dry before baking. So better make them the day before.
Ingredients
For the Scented Eshta Ice Cream:
- 1 cup (8oz/ 227g) fresh eshta/ kesha (Arabic clotted cream)*
- 1 (14oz/ 397g) can sweetened condensed milk
- 1 tablespoon orange blossom water (more or less according to taste)
- 1 teaspoon rose water (more or less according to taste)
- 2 cups (1 pint/ 473ml) heavy whipping cream, very cold
For the Syrup: (can be substituted with 2 cups of Big Batch Sugar Syrup)
- 2 cups (14 oz /400g) granulated sugar
- 1 cup (237 ml) water
- A squeeze of fresh lemon juice, about 1 teaspoon
For the Konafa Cones:
- 1lb/ 500g FRESH konafa (kadaifi/kataifi) sold in long organized strands (known as konafa torah)
- 3/4 cup (6oz/ 170g) ghee or clarified butter, melted and slightly cooled
Special Equipment:
- 10-12 Oven-safe metal cone forms (aka Cream Horn Molds) *See note below
Instructions
To make the Scented Eshta Ice Cream:
- In a large bowl, whisk together the eshta, sweetened condensed milk, rose and orange blossom water until smooth and well combined. Set aside
- In a chilled mixing bowl, and using an electric mixer fitted with the whisk attachment, beat the heavy whipping cream until stiff peaks form. Be careful not to overbeat.
- With a rubber spatula, gently fold the whipped cream into the sweetened condensed milk/eshta mixture, until the color is even and no streaks remain.
- Pour the ice cream mixture into a loaf pan or air-tight container. Cover with plastic wrap directly on top of the surface, then freeze until firm, at least 6 hours; better overnight. Meanwhile, prepare the konafa cones!
For the Syrup:
- In a medium saucepan, combine together the sugar, water and squeeze of lemon juice. Set on the stovetop over high heat. Try to avoid stirring it as it heats to prevent crystallization from happening, but if the sugar is not dissolving, then help it out with a few stirs. Once it comes to a boil, STOP stirring.
- Bring to a rolling boil, then immediately reduce the heat to low and let it simmer for 15 minutes. Set a timer! The syrup will thicken, and have a consistency similar to corn syrup. It should be slightly thicker than the average simple syrup used for the classic pan kunafa.
- Remove from heat. Transfer to a liquid measuring cup or gravy boat and allow to cool to room temperature before using.
To make the Konafa Cones (Cone-afa):
- Extend the size of the metal cone forms by attaching a piece of foil to each one of them, then scrunch and shape it to look like an ice cream cone. (Please refer to the photo in the post) Spray the forms with a non-stick cooking spray.
- Unwrap the konafa from its paper. Take about a (3/4"/ 2cm) thick strand of konafa and rewrap the rest to prevent from drying out.
- Roll the konafa strand around the cone form (as shown in the photos of the post). Start by placing one end of the strand in the middle of the cone, then beginning from the tiny, closed end of the form, tightly wrap the remaining strand over the end and overlapping that middle piece and up until you almost reach the widest end of the form. Leave a small piece of the foil form showing; this will later make it easier to grab onto while removing the baked cones. Make sure that the kunafa is wrapped as tightly as possible without tearing, and that there are no gaps showing. To make the konafa stick to itself and prevent unrolling, dampen your hands with a little bit of water, then use them to apply pressure on the wrapped konafa, pressing tightly on it until its stable and all the stray strands are stuck. Don't get it too wet; just damp enough to stick the kunafa to itself. Repeat with the remaining kunafa.
- Place the wrapped konafa cones on a baking sheet, cover loosely with a sheet pf foil or parchment paper and leave to air dry until the kunafa feel hard to the touch; 3 hours to overnight.
- When ready to bake, adjust oven rack to middle position and preheat the oven 200C/ 392F.
- IMPORTANT: Loosen the hardened konafa from the metal form quite bit so its not so stuck to it anymore, but do not remove completely. This will make it easier to later remove the konafa from the form without breaking. If you don't do that, you'll have a very hard time removing the baked konafa from the form.
- Pour the melted ghee (or clarified butter) into a shallow bowl. Dip and roll the konafa cones into the ghee to saturate. Allow excess ghee to drip back into the bowl. Make sure the konafa cones are fitting LOOSELY over the forms.
- Place the ghee dipped konafa cones on their sides onto a baking sheet. Bake the cones, flipping them every 5 minutes on a different side to ensure even browning until the kunafa turns golden brown in color, 15 to 20 minutes.
- Remove from the oven, then immediately transfer the cones to a clean pan. Drizzle the piping hot konafa with the cooled syrup. Move the konafa around to coat with the syrup.
- Transfer the cones to a wire rack that has been lined with a sheet of foil. Place the cones standing upside down over the wire rack to cool completely and allow to drip all the excess syrup and ghee.
- Once cooled, carefully twist the kunafa cones to remove from the form. If you're having a hard time removing it, place in the freezer to cool further then try again. It helps!
- Now just scoop up the ice cream over the cone-afa, serve and enjoy!
Recipe Notes
- Mascarpone cheese may be substituted for the eshta/keshta.
- I use the refrigerated type of eshta, like Pinar, NOT the balady kind. I have NOT tested this recipe with canned eshta like Nestle, so can't for certainty if it will work here..
- Please note that only FRESH konafa that comes in long strands will work for this recipe. This kind is known as Kunafa Torah (tora7) and is sold in Middle Eastern countries at the Kanafani (the konafa maker). Frozen konafa has the tendency to break as you roll them, so they are not recommended. Make sure to always keep the kunafa covered to prevent from drying out.
- You could find the oven-safe metal cone forms, aka Cream Horn Molds at baking supply stores or online. Mine are 11cm long and the opening is 3cm wide. Cairo shoppers! I got mine from El Kholafaa El Rashedeen in Heliopolis. Here's their number: 0100-6085280
Measurements Note: All recipes of this site have been developed using weight measurements. Although US volume measurements have been included for your convenience, it is highly encouraged that you weigh your ingredients using a kitchen scale to get the best possible results. Due to the sensitive nature of baking, kitchen scales are proven to yield more accurate and consistent results than measuring cups. Enjoy!
Powered by ![]()
This post may contain affiliate links.
All images and content are owned by Cleobuttera® and are copyright protected. Please do not use my images without prior permission. If you would like to republish a recipe, please rewrite it in your own words and link back to the recipe page on my site. Original recipes and creations of this site are intended for personal and home use. Commercial replication or media consumption are only allowed with a written consent and agreement with Cleobuttera owners. Otherwise it is considered a violation of intellectual property. Thank you for respecting and appreciating the amount of time and effort that goes into creating free, unique recipes that make people happy.