Nutella Donuts
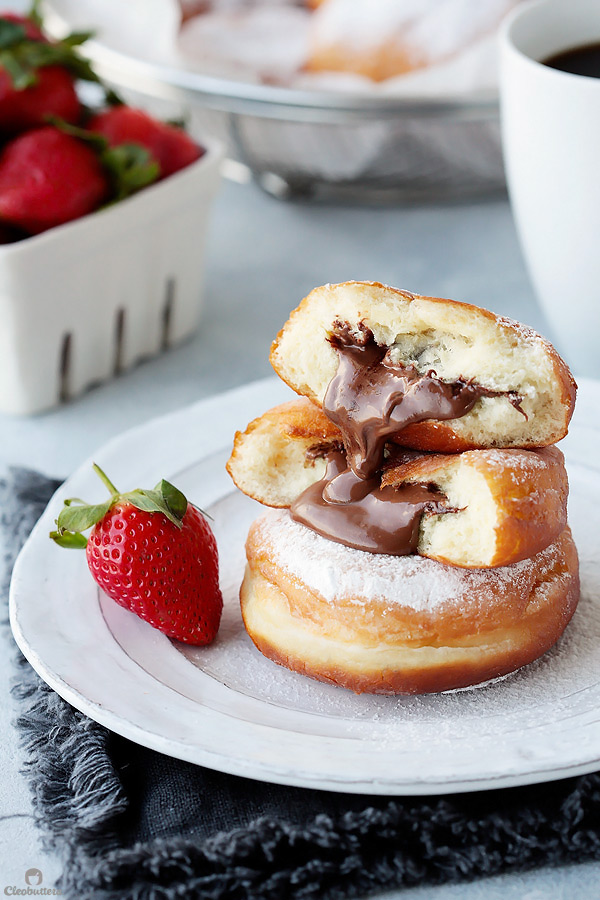
Inspired by the Eastern European-style ponchiks, these donuts are soft and pillowy, and exploding with a river of Nutella. One of the best donuts you could ever experience!
Ingredients
For the Donut Dough:
- 3/4 cup (177 grams) whole milk
- 1 tablespoon plus 1 teaspoon (19 grams) unsalted butter, melted
- 1 tablespoon plus 1 teaspoon (19 grams) vegetable oil (or any neutral tasting oil)
- 1 large egg (50 grams without the shell)
- 2 1/2 cups (313 grams) flour, preferably bread flour (*see note below)
- 1/4 cup plus 1 1/2 teaspoons (57 grams) granulated sugar
- 1/4 teaspoon (2 grams) salt
- 2 teaspoons (7 grams) instant yeast
For Filling the Donuts:
- 1 (350 grams) jar Nutella
- Vegetable oil (or any neutral tasting oil), for frying
For Finishing:
- Powdered sugar, for dusting over donuts
Instructions
- In a microwave-safe liquid measuring cup or small bowl, heat the milk in the microwave until very warm, but not hot (not higher than 110 °F / 43 °C); about 1 minute. Add the melted butter, oil and egg to the warm milk and whisk until well combined.
- Pour the milk mixture into the bowl of a stand-mixer fitted with the hook attachment (or a large mixing bowl, if kneading by hand).
- In another medium bowl, whisk together the flour, sugar, salt and yeast to combine. With the mixer running on medium-low, add the flour mixture to the milk mixture, one large spoonful at a time, until it’s completely incorporated.
- Set the mixer to medium-high and mix until the dough is satiny smooth, elastic and pulls away from the sides of the mixing bowl, but sticks to the bottom only; 10–20 minutes. Keep an eye on the mixer to make sure it doesn’t wobble its way off the side of the countertop over the course of the long mix.
- Form the dough into a ball, and place in a lightly greased bowl. Cover with plastic wrap, and set it in the fridge for one hour. (This cooling slows down the yeast action, a process known as retarding. It’s purpose here is to achieve a more consistent bubble structure in the donut and avoid getting huge blisters on the surface. It also makes working with the dough easier later). The dough will rise slightly in the fridge, but don’t expect it to double in size.
- Punch down the dough, then transfer it to a silicon mat or lightly floured working surface. Using a sharp knife or bench scraper, divide the dough into 8 equal portions. Then cut into portion in half. You should now have 16 pieces of dough. Cover with plastic wrap to prevent them from drying out.
- Take 1 piece of dough and place over a small square sheet of parchment paper as seen in the post photos (this will later aid in transferring the filled dough without damaging its shape). Try to avoid flouring the dough, but if its too sticky to work with, then flour your hands as needed. Using the palm of your hand, flatten it into a disk. Then using your fingers, push on the edges of the dough disk to stretch into a 9cm (3.5”) circle. The circle should be thicker in the center to withstand the weight of the Nutella, and thinner around the edges, which will get trimmed off anyway.
- Using a piping bag, pipe a generous amount (25-30 grams/ about 2 tablespoons) of Nutella into the center of the dough circle. I actually place the dough (using the parchment paper) on the kitchen scale and weigh the filling, to ensure that I don’t over or underfill.
- Flatten and stretch a second piece of dough the same way you flattened the first. Use this piece of dough to cover the Nutella sitting over the other piece of dough. Using your fingers, press firmly around the edges of the filled dough, to seal shut the top and bottom dough circles together. Using an 8cm (3 1/4”) round biscuit cutter, punch down on the dough, to cut out the excess dough off of the filled dough as shown in the post photos. Set aside the excess dough scraps and cover with plastic wrap; do not discard. Using the small piece of parchment paper underneath the filled dough, lift and transfer it to a lightly greased parchment paper-lined baking sheet. Loosely cover the baking sheet with plastic wrap.
- Repeat steps 7 to 9 to fill the remaining pieces of dough, and saving all the scraps. Transfer the filled donuts to the baking sheet, leaving at least 2” between them. You should now have 8 filled donuts. Gather up the scraps, knead lightly and divide into 3 equal portion. Cut each portion in half. You should now have 6 dough pieces. Use them to make 3 more filled donuts and place them on the covered baking sheet. If the dough snaps or shrinks back as you’re trying to stretch it, cover and let rest for 10 minutes, then try again. You should now have a total of 11 filled donuts altogether.
- Allow the donuts to proof on the countertop until they double in size, about 30–60 minutes depending on the temperature in your kitchen.
- In a large pot over medium heat, bring about 1 1/2 inches (3.8cm) of oil to 350 °F / 177 °C. It is important for the oil to reach and maintain this temperature, as any hotter can cause the donuts to over-brown on the outside, before the center has a chance to cook through. Any cooler and the donuts will cook too slowly, absorbing too much oil, resulting in a greasy donut. So its advised to clip on a kitchen thermometer, if you have one.
- Cut the parchment paper with the donuts on top, into squares around each doughnut, then slide your hand under the squares and use them to transfer the doughnuts to the fryer. Fry the first side for 15 seconds, then flip and cook until the bottom is deep amber in color, about 80 seconds. Flip again and cook for another 80 seconds. Transfer to a paper towel–lined plate to drain.
- Let the donuts cool off for about 10 minutes then dust with powdered sugar to cover the surface. Serve warm or at room temperature. Generally, donuts’ texture is at its best within a couple of hours after frying, however, leftovers can be stored in an airtight container. Warm in the microwave to retain its freshly-made texture.
Recipe Notes
- This recipe makes 11 donuts. Feel free to double or triple the recipe according to your needs.
- Please note that for this recipe (as for many others) I used a kitchen scale to weigh my ingredients as opposed to measuring cups, to achieve more consistent results. I highly recommend you do so too. It’s infinitely more accurate and will give you the best results possible.
- Bread flour is preferable here, because it will absorb less fry oil. However, I've only ever used all purpose flour, because it's what's available where I live, and still had spectacular results.
- To make in advance, I’ve successfully prepared the dough the night before, and let it sit in the fridge overnight. It more than doubled in size, but the final results weren’t affected. I then proceeded with filling and frying the dough as per the recipe. On other occasions, I’ve also been able to keep the filled doughs in the fridge for several hours before frying with great results. I’d just take them out of the fridge as I’m heating the oil, to allow them to continue rising. Though, I've never tried it in this particular recipe, I'd assume that the filled doughs can be kept in the fridge overnight, before frying.
Dough recipe adapted from Chef Steps with changes; streamlining the process by using instant yeast instead of active dry, omitting the diastatic malt powder, and cutting the recipe by 1/3 because I most definitely don’t need 33 donuts starring me in the face :)
Measurements Note: All recipes of this site have been developed using weight measurements. Although US volume measurements have been included for your convenience, it is highly encouraged that you weigh your ingredients using a kitchen scale to get the best possible results. Due to the sensitive nature of baking, kitchen scales are proven to yield more accurate and consistent results than measuring cups. Enjoy!